Topic Doc: Converting from Cash-based Accounting to Receivables-based or Receivables/Accrual-based Accounting
RecTrac 3.1

Written by Daniel Rotondi
Updated at October 28th, 2022
Table of Contents
Document Summary
The RecTrac application provides three (3) accounting solutions: Cash-based accounting, Receivables accounting, and Receivables/Accrual accounting. In very general terms, the difference between a Cash-based accounting system, a Receivables-based accounting system, and a Receivables/Accrual-based accounting system is in how revenues are earned reported on income statements. The following provides a simple example of each accounting system.
Cash-Based
In a Cash-based accounting system, revenues are earned and reported on income statements at the moment the cash is received.
For Example: You have a CPR Certification activity on 09 April. Registration Fees are $50.00. Clara Barton and Florence Nightingale sign up for the program on 26 March. Clara pays the Registration Fee when signing up. Florence does not. $50 of revenue for the CPR activity is earned on 26 March and your deposit for that day includes Clara's $50.00. Florence Nightingale does not pay the Registration Fee until 20 April, two weeks after the fact. $50 of revenue for the CPR activity is earned on 20 April and your deposit for that day includes Florence's $50.00.
Receivables-Based
In a Receivables-based accounting system, revenues are earned and reported on income statements at the moment of purchase regardless of whether a payment is made. At the moment of purchase, your Receivables account is debited the amount of the purchase and your Earned Income account is credited. When patrons remit for the purchase, the Receivables account is credited by the amount of the payment.
For Example: You have a CPR Certification activity on 09 April. Registration Fees are $50.00. Clara Barton and Florence Nightingale sign up for the program on 26 March. Clara pays the Registration Fee when signing up. Florence does not. $100 of revenue for the CPR activity is earned on 26 March because that is the purchase date. Receivables is debited $100.00 and Earned Income is credited $100.00. Receivables is credited $50.00 for Clara's payment (for a net $50.00- to Receivables for the two enrollments) and your deposit for that day includes Clara's $50.00. Florence Nightingale does not pay the Registration Fee until 20 April, two weeks after the fact. $0.00 of revenue for the CPR activity is earned on 20 April (Revenue for Florence's enrollment was realized on 26 March when she registered) but your Receivables account is credited $50.00 (for a net $0.00 to Receivables for the two enrollments) and your deposit for that day includes Florence's $50.00.
Receivables/Accrual-Based
In an Accrual-based accounting system, revenues are unearned from the time of purchase until the service is provided. Once the service is provided, you process Accrual and money moves from Unearned Revenue to Earned Revenue in increments equal to the time over which the service is provided. At the moment of purchase, your Receivables account is debited the amount of the purchase and your Unearned Income account is credited. When patrons remit for the purchase, the Receivables account is credited by the amount of the payment. When Accrual is processed, money moves from Unearned Income to Earned Income provided Accrual is run on or after the date of the service being purchased.
For Example: You have a CPR Certification activity on 09 April. Registration Fees are $50.00. Clara Barton and Florence Nightingale sign up for the program on 26 March. Clara pays the Registration Fee when signing up. Florence does not. $100 of revenue for the CPR activity goes to your Unearned Income account on 26 March because that is the purchase date. Receivables is debited $100.00 and Unearned Income is credited $100.00. Receivables is credited $50.00 for Clara's payment (for a net $50.00- to Receivables for both enrollments) and your deposit for that day includes Clara's $50.00. On 01 April you process Accrual for the period 01-31 March. $0.00 for the CPR program moves from Unearned to Earned because the service has not been provided. The class is held on 09 April. Florence Nightingale does not pay the Registration Fee until 20 April, two weeks after the fact. Your Receivables account is credited $50.00 (for a net $0.00 to Receivables for the two enrollments) and your deposit for 20 April includes Florence's $50.00. No other money moves. On 01 May you process Accrual for the period 01-30 April. $100 moves from Unearned Income to Earned Income and revenue for the CPR class that took place on 09 April, which is included in your Accrual Date Range, is realized.
Document Scope
The purpose of this document is to provide the steps required to change your accounting method from Cash-based to Receivables or Receivables/Accounting. RecTrac provides three (3) options. Select the option that best corresponds to the accounting method you wish to employ upon switching from Cash-based.
- Converting from Cash-based to Receivables-based only. Receivables-based accounting begins with the next sale.
- Converting from Cash-based to Receivables/Accrual-based "Going Forward." If going to Accrual, this is the recommended option, as it leaves your existing records alone and Receivables/Accrual-based accounting begins with the next sale.
- Converting from Cash-based to Receivables/Accrual-based Including History - This option converts your existing records from Cash-based to Receivables/Accrual-based accounting and involves post-conversion steps to delete duplicate GL entries for money already in revenue, updating existing detail records to include accrual retroactively, and creating miscellaneous postings for revenue and unearned offsets.
If you have additional questions about changing accounting methods from Cash-based to Receivables-based or Receivables/Accrual-based accounting in RecTrac after reading this document, please contact Vermont Systems Customer Service by phone at 887-883-8757 or generate a Support Case through the Customer portal of the Vermont Systems web site using your Customer ID and password.
License – Maintenance Agreement
The Cash to Receiveables Interface is free. Use of the interface requires a VSI license and annual maintenance agreement for RecTrac and the component modules discussed in this document. Prior to implementing any process outlined in this document, please contact the Vermont Systems Sales department at 1-877-883-8757 to verify that you are authorized to use the modules discussed in this document and if not, to obtain a quote and/or approval.
Before You Begin
This document is written with the following assumptions. If any of the items listed below is NOT true, contact Vermont Systems Support prior to continuing, as the steps in this document may prove difficult to complete and unexpected results may occur.
- Your organization is running RecTrac 3.1.05.10 or greater.
- Your organization has been running RecTrac in a Cash-based accounting environment and you now want to change your accounting system to a Receivables or Receivables/Accrual environment.
- The User ID with which you sign into RecTrac has the requisite permissions and ability to access all modules and functions pertaining to accounting, to include but not limited to: Profile Management, Fee Management, and the System Management menu.
- You understand how to create GL Accounts, Cost Centers (as applicable) and Fees in RecTrac and how to link them appropriately.
- You understand the new accounting principles that your Department will be using.
- Plan Ahead! The Cash to Receivables Conversion program is Access Code-protected. You will need to contact VSI Support to obtain an access code for entry to this program.
- Plan Ahead! VSI strongly recommends suspending all payments in RecTrac (i.e. stop all daily processing, do not run installment billing, etc…) and taking WebTrac offline during the Conversion process. The Cash to Receivables Conversion program takes a snapshot of your database, tallies all outstanding debits and credits and makes appropriate Receivables entries. You DO NOT want to be processing transactions during this time.
Receivables and Unearned Income Account Information
Regardless of the Conversion Option you choose, the information in this section will be required to complete the process.
RecTrac provides three (3) places for linking Receivables Accounts and two (2) places for linking Unearned Accounts. Before beginning the setup process, it is important to understand how the receivables accounts can be used and their hierarchy in the process.
Receivables Accounts
When processing in a Receivables or an Accrual/Receivables environment, purchases result in a Debit to the Receivables Account linked to the item equal to the amount of the purchase. Payments made toward purchases result in a Credit to the Receivables Account linked to the item equal to the amount of the payment. It is therefore necessary to have at least one (1) Receivables Account in your RecTrac system, though you can create multiple Accounts, if desired.
Receivables Accounts may be linked in three (3) separate places in RecTrac:
-
Fees - A Receivables Account can be linked directly to a Fee. Fields on the Additional GL Settings group in Fee Update allow you to link a Receivables GL Account and Receivables Cost Center (if applicable) to each Fee.
The Receivables GL Account and Cost Center linked to a Fee takes precedence and always will be used when that Fee is charged. If desired, you could create and link a separate Receivables GL Account and Cost Center for each Fee you charge, though such a set up would be unlikely. - Tax Table Update - Tax Table System Codes provide fields for Receivable GL Code and Receivable Cost Center for each tax percentage break out. If your organization charges sales tax AND you are using Receivables or Receivables/Accrual, you MUST link a Receivables Account to EVERY sales tax percentage in Tax Tables Update.
-
Static Parameters Profile • Financial Settings Group - When running in a Receivables environment, a Receivables Account must be linked to your Static Parameters profile; a Receivables Cost Center is optional.
The Receivables GL Account and Cost Center linked to your Static Parameters profile will be used as a "catch all" in the event you have not linked a Receivables GL Account to your Fees. The GL Account you link can be the same GL Account linked to your Fees (this would ensure redundancy) or it can be a different, more general Account, if desired.
Unearned Income Accounts
When processing in an Accrual/Receivables environment, purchases result a Credit to the Unearned Income Account linked to the item purchased equal to the amount of the purchase. The process of running Accrual results in a Debit from the Unearned Revenue Account and a corresponding Credit to the Revenue account equal to a percentage increment of the time over which the service is provided. It is therefore necessary to have at least one (1) Unearned Income Account in your RecTrac system, though you can create multiple Accounts, if desired.
Unearned Income Accounts may be linked in two (2) separate places in RecTrac:
-
Fees - An Unearned Income Account can be linked directly to a Fee. Fields on the Additional GL Settings group in Fee Update allow you to link an Unearned Income GL Account and Cost Center (if applicable) to each Fee.
The Unearned Income GL Account and Cost Center linked to a Fee takes precedence and always will be used when that Fee is charged. If desired, you could create and link a separate Unearned Income GL Account and Cost Center for each Fee you charge, though such a set up would be unlikely. -
Static Parameters Profile • Financial Settings Group - An Unearned Income Account can be linked directly to your Static Parameters profile; an Unearned Income Cost Center is optional.
The Unearned Income Account and Cost Center linked to your Static Parameters profile will be used as a "catch all" in the event you have not linked an Unearned Income Account to your Fees. The GL Account you link can be the same GL Account linked to your Fees (this would ensure redundancy) or it can be a different, more general Account, if desired.
Link Receivables and Unearned Accounts
Regardless of the Conversion Option you choose, the information in this section will be required to complete the process.
Using the information provided above, you will need to determine how and where you wish to link your Receivables and Unearned Income Accounts. This section provides the steps to link Receivables and Unearned Accounts to your Static Parameters profile, to Fees, and to Tax Tables. The number of accounts you create and where you choose to link them is up to your department policy.
Remember: A Receivables Account MUST linked to your Static Parameters profile and you MUST have at least one (1) Unearned Income Account in your RecTrac system.
Link Accounts to Your Static Parameters Profile
- In RecTrac, go to Management Ribbon • System Management • User/Menu/Profile Management • Profile Assignments.
- Click the Static Parameters button.
- Expand the Financial Settings group.
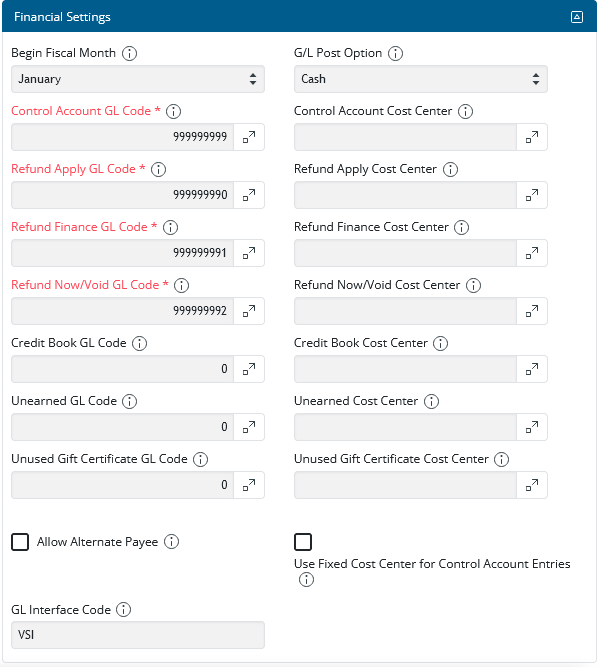
- Ensure your G/L Post Option is set to Receivables (Required for Accrual) as discussed above.
- Click the Picklist icon for Unearned GL Code and select the General Ledger Account Code you use to track Unearned Income at the System level.
- (Optional) Click the Picklist icon for Unearned Cost Center and select the General Ledger Cost Center Code you use to track Unearned Income at the System level.
Note: Purchases made in your system will post as Credits to this GL Account and Cost Center (if used) selected here in the event an Unearned Income Account (and Cost Center, if desired) is NOT specified on the Fees being charged.
- Click the Picklist icon for Receivables GL Code and select the General Ledger Account Code you use to track Receivables at the System level.
- (Optional) Click the Picklist icon for Receivables Cost Center and select the General Ledger Cost Center Code you use to track Receivables at the System level.
Note: Purchases made in your system will post as Debits to this GL Account and Cost Center (if used) selected here in the event a Receivables Account (and Cost Center, if desired) is NOT specified on the Fees being charged.
- Click Save and exit back to the main RecTrac menu. Changes take effect immediately.
Link Accounts to Fees
Use the following steps if opting to specify Receivables and/or Unearned Account information on Fees.
- In RecTrac, go to a Fee linked to an item for which you will run Accrual.
- Highlight/select the Fee and click Advanced Fee Change. You will continue to the Fee Update screen.
- Expand the Additional GL Settings group.
- Ensure the Use Accrual? option is selected, as discussed above.
- Click the Picklist icon for Unearned GL Code and select the General Ledger Account Code you use to track Unearned Income for this Fee.
- (Optional) Click the Picklist icon for Unearned Cost Center and select the General Ledger Cost Center Code you use to track Unearned Income For this Fee.
Note: Purchases made against this Fee will post as Credits to this GL Account and Cost Center (if used). If nothing is selected here, then purchases made against this feel will post as Credits to the Unearned accounts specified on your Static Parameters profile.
- Click the Picklist icon for Receivables GL Code and select the General Ledger Account Code you use to track Receivables for this Fee.
- (Optional) Click the Picklist icon for Receivables Cost Center and select the General Ledger Cost Center Code you use to track Receivables for this Fee.
Note: Purchases made against this Fee will post as Debits to this GL Account and Cost Center (if used). If nothing is selected here, then purchases made against this feel will post as Debits to the Receivables accounts specified on your Static Parameters profile.
- Repeat these steps for all applicable Fees that are linked to items for which Accrual will be processed.
Note: To set the Unearned and Receivables account field values for multiple Fees in bulk (as opposed to doing it by individual Fee as outlined above), use the Bulk Change program in Fee Maintenance (System Management • Fee/Rule/Question Management Group • Fee Management). Access the program and Add, as needed, ReceivableCostCenter, RecievableGLCode, UnearnedCostCenter and/or UnearnedGLCode to the Bulk Changes to Add box. Set the Field Value for each account as needed. Process your bulk changes as you normally would.
Use the "i" and "?" Help icons  on the upper-right hand corner of the screen for field definitions, if needed.
Link a Receivables Account to a Tax Table
Tax Table System Codes provide fields for Receivable GL Code and Receivable Cost Center for each tax percentage break out. If your organization charges sales tax AND you are using Receivables or Receivables/Accrual, you MUST link a Receivables Account to EVERY sales tax percentage in Tax Tables Update. The following provides the required steps.
- In RecTrac, go to Management Ribbon • System Management • Misc Management Group • System Code Management.
- Filter the DataGrid by Tax Table.
- Highlight/Select the Tax Table Code you use and click Change. You will continue to the System Code Update screen.
- Click the Tax Table tab.
- Highlight/select a Tax Table and click Change Tax Table.

Click Image to Enlarge
- Click the Picklist icon for Receivables GL Code and select the General Ledger Account Code you use as your Tax Liability Account.
- (Optional) Click the Picklist icon for Receivables Cost Center and select the General Ledger Cost Center Code you use as your Tax Liability Account.
- Click Save. You will return to the previous screen.
- Repeat this process for every Tax Table linked to this System Code
OR
Click Save to return to the main System Code Management DataGrid. - Repeat these steps as necessary for other Tax Table System Codes.
Note: If your organization charges sales tax AND you are using Receivables or Receivables/Accrual, you MUST link a Receivables Account to EVERY sales tax percentage in Tax Tables Update.
Conversion Options
Note: All file paths and screen/tab locations in this document refer to file paths and screen/tab locations as they appear in the standard, default VSI Design. Your setup and Design may vary.
RecTrac provides three (3) conversion options for going from Cash-based accounting to Receivables or Receivable/Accrual-based accounting. Select the option that best corresponds to the accounting method you wish to employ upon switching from Cash-based.
- Converting from Cash-based to Receivables-based only. Receivables-based accounting begins with the next sale.
- Converting from Cash-based to Receivables/Accrual-based "Going Forward." This option leaves your existing records alone and Receivables/Accrual-based accounting begins with the next sale.
- Converting from Cash-based to Receivables/Accrual-based Including History - This option converts your existing records from Cash-based to Receivables/Accrual-based accounting and involves post-conversion steps to delete duplicate GL entries for money already in revenue, updating existing detail records to include accrual retroactively, and creating miscellaneous postings for revenue and unearned offsets.
Converting from Cash-based to Receivables-based Accounting Only
Receivables is a system-wide accounting setting, so to go from Cash-based to Receivables-based, a conversion program is run to create the appropriate GL entries. To convert from Cash-based to Receivables-based accounting only, you need to:
- Set a Receivables GL Account and Cost Center (optional) on your Static Parameters profile
- Set Receivables GL Accounts and Cost Centers (optional) on specific Fees, if desired.
- Set Receivables GL Accounts on your Tax Tables.
- Run the Cash to Receivables Conversion program. This program updates all the fee records linked to actual purchases (registrations, reservations, bookings, etc…) based on how the fee record is setup and linked to your Management records. For Example: If you have separate Receivables GL Codes linked to Fees for Activity Registrations vs. Fees for Pass Memberships, then upon running this program, the system will update Activity Fees with their new Receivables GL Code and Pass Fees with their new Receivables GL Code respectively. All other Fees will be updated with the Receivables GL Code specified on your Static Parameters profile.
- Change the G/L Post Option on your Static Parameters profile • Financial Settings group to Receivables.
To Run the Conversion from Cash-based to Receivables Only-Based Accounting
Notes: Vermont Systems strongly recommends:
- Running this process in your Demo Database prior to running it in your Live Database.
- When running in your Live Database, suspending all payments in RecTrac (i.e. stop all daily processing, do not run installment billing, etc…) and taking WebTrac offline during the Conversion process. The Cash to Receivables Conversion program takes a snapshot of your database, tallies all outstanding debits and credits and makes appropriate Receivables entries. You DO NOT want to be processing transactions during this time.
- Run a Global Trial Balance report for balances equal to or greater than $0.01. Set this report aside; you will need it later in the process.
- Set a Receivables GL Account and Cost Center (optional) on your Static Parameters profile. This is a mandatory step for Receivables-based accounting.
- Set Receivables GL Accounts and Cost Centers (optional) on specific Fees, if desired. Receivables Accounts and Cost Centers specified on Fees take precedence over the Receivables GL Account and Cost Center linked on your Static Parameters profile.
- Set Receivables GL Accounts on your Tax Tables. If your organization charges sales tax and you are using Receivables, you MUST link a Receivables Account to EVERY sales tax percentage in Tax Tables Update.
- Run the Cash to Receivables Conversion program.
Note: The Cash to Receivables Conversion program is Access Code-protected. You will need to contact VSI Support to obtain an access code for entry to this program.
- In RecTrac, go to Management ribbon • System Management • Misc Management Group • Cash to Receivables Conversion.
- Input the Access Code given to you by VSI Support and click Validate. Access Codes are alpha-numeric and case-sensitive. If the Code was entered successfully, you will continue to the Cash to Receivables Conversion program.
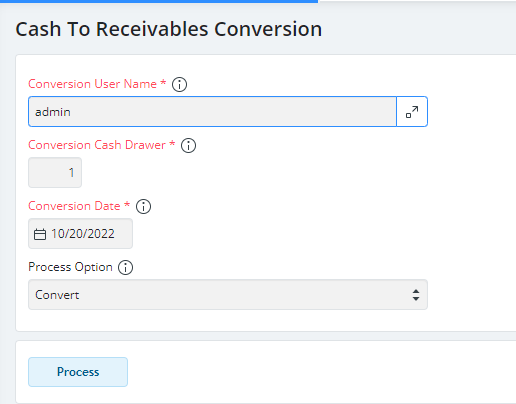
- Click the Picklist icon to select a User ID. The User ID you select will be linked to the posting records created by this program. This field serves no other purpose for this program.
- Accept the entry in the drawer field or overwrite as needed. The Drawer you select will be linked to the posting records created by this program. This field serves no other purpose for this program.
- Accept the default entry in the date field or overwrite as needed. The Date you select will be linked to the posting records created by this program. This field serves no other purpose for this program.
- Expand the Drop-down list for Process Option and select "Print Only"
THEN
Click Process and select the Run Conversion option. The system will prepare a Cash to Receivables Preview Journal that details the revenue currently due to your organization (by GL Code) and the offsetting posting to Receivables that will be made. The Receivables posting (or postings, if you have multiple Receivables accounts) and the Revenue due should equal.
Click Image to Enlarge
- Compare the Total on the Preview Journal to the Global Trial Balance report you ran in Step 1 above. The totals should be identical (or nearly identical).
- If Yes, continue to the next step.
- If the totals between the reports are extremely unequal, you will need to investigate, find the source of the discrepancies, and correct them. Once the problems are corrected, run this report again, verify the values, and then continue.
- When ready, set the Process Option to "Convert" and re-run the Cash to Receivables Conversion program. The program runs on the AppServer the Notification Center will tell you when it completes and a Cash to Receivables Report will be generated.
Important Note: When using the "Convert" option, this program can be run ONE TIME ONLY in your database. The program has a built-in check for this; attempting to re-run the program using the "Convert" option will be disallowed. You can run the program as often as you like using the "Preview" option.
- Exit the program when it completes.
- Change the G/L Post Option on your Static Parameters profile • Financial Settings group to Receivables.
- In RecTrac, go to Management Ribbon • System Management • Profile Assignments.
- Click Static Parameters at the bottom of the screen.
- Expand the Financial Settings group.

- Expand the Drop-down list for G/L Post Option and select "Receivables (Required for Accrual)."
- Save changes and exit back to the main menu. Changes take effect immediately.
- Run the G/L Report to insure postings were made to the proper General Ledger Accounts.
- If you use a GL Interface, run the program at this time.
- If you have not done so, schedule the Global Trial Balance report to run daily.
- Resume Daily Processing in RecTrac and bring WebTrac back online.

Converting from Cash-based to Receivables/Accrual-based Accounting "Going Forward"
Receivables is a system-wide accounting setting, so to go from Cash-based to Receivables/Accrual-based, a conversion program is run to create the appropriate GL entries. This is the recommended option for converting to Receivables/Accrual-based accounting, as it provides a clean break between the "old" accounting system and the "new" one.
This option leaves your existing transaction records alone and Accrual starts with the next sale processed after the conversion. When using this Cash-based to Receivables/Accrual-based conversion method, your existing records (i.e. your "old transaction records") will not be flagged for Accrual, meaning they will remain as cashed-based records, or as revenue recognized "now." The transaction records which get created after the conversion (i.e. any "new transaction records") are flagged for Accrual and therefore get picked up when Accrual is run. To convert from Cash-based to Receivables/Accrual-based accounting "going forward,", you need to:
- Set a Receivables GL Account and Cost Center (optional) on your Static Parameters profile
- Set Receivables GL Accounts and Cost Centers (optional) on specific Fees, if desired.
- Set Receivables GL Accounts on your Tax Tables.
- Run the Cash to Receivables Conversion program. This program updates all the fee records linked to actual purchases (registrations, reservations, bookings, etc…) based on how the fee record is setup and linked to your Management records. For Example: If you have separate Receivables GL Codes linked to Fees for Activity Registrations vs. Fees for Pass Memberships, then upon running this program, the system will update Activity Fees with their new Receivables GL Code and Pass Fees with their new Receivables GL Code respectively. All other Fees will be updated with the Receivables GL Code specified on your Static Parameters profile.
- Update your Fee records to Use Accrual.
- Change the G/L Post Option on your Static Parameters profile • Financial Settings group to Receivables.
- Set your Accrual Option by Module on your Static Parameters profile • Accrual Settings group.
- Implement your Accrual Processing plan.
To Run the Conversion from Cash-based to Receivables/Accrual-Based Accounting "Going Forward"
Notes: Vermont Systems strongly recommends:
- Running this process in your Demo Database prior to running it in your Live Database.
- When running in your Live Database, suspending all payments in RecTrac (i.e. stop all daily processing, do not run installment billing, etc…) and taking WebTrac offline during the Conversion process. The Cash to Receivables Conversion program takes a snapshot of your database, tallies all outstanding debits and credits and makes appropriate Receivables entries. You DO NOT want to be processing transactions during this time.
- Run a Global Trial Balance report for balances equal to or greater than $0.01. Set this report aside; you will need it later in the process.
- Set a Receivables GL Account and Cost Center (optional) on your Static Parameters profile. This is a mandatory step for Receivables/Accrual-based accounting.
- Set Receivables GL Accounts and Cost Centers (optional) on specific Fees, if desired. Receivables Accounts and Cost Centers specified on Fees take precedence over the Receivables GL Account and Cost Center linked on your Static Parameters profile.
- Set Receivables GL Accounts on your Tax Tables. If your organization charges sales tax and you are using Receivables, you MUST link a Receivables Account to EVERY sales tax percentage in Tax Tables Update.
- Run the Cash to Receivables Conversion program.
Note: The Cash to Receivables Conversion program is Access Code-protected. You will need to contact VSI Support to obtain an access code for entry to this program.
- In RecTrac, go to Management ribbon • System Management • Misc Management Group • Cash to Receivables Conversion.
- Input the Access Code given to you by VSI Support and click Validate. Access Codes are alpha-numeric and case-sensitive. If the Code was entered successfully, you will continue to the Cash to Receivables Conversion program.

- Click the Picklist icon to select a User ID. The User ID you select will be linked to the posting records created by this program. This field serves no other purpose for this program.
- Accept the entry in the drawer field or overwrite as needed. The Drawer you select will be linked to the posting records created by this program. This field serves no other purpose for this program.
- Accept the default entry in the date field or overwrite as needed. The Date you select will be linked to the posting records created by this program. This field serves no other purpose for this program.
- Expand the Drop-down list for Process Option and select "Print Only"
THEN
Click Process and select the Run Conversion option. The system will prepare a Cash to Receivables Preview Journal that details the revenue currently due to your organization (by GL Code) and the offsetting posting to Receivables that will be made. The Receivables posting (or postings, if you have multiple Receivables accounts) and the Revenue due should equal.
Click Image to Enlarge
- Compare the Total on the Preview Journal to the Global Trial Balance report you ran in Step 1 above. The totals should be identical (or nearly identical).
- If Yes, continue to the next step.
- If the totals between the reports are extremely unequal, you will need to investigate, find the source of the discrepancies, and correct them. Once the problems are corrected, run this report again, verify the values, and then continue.
- When ready, set the Process Option to "Convert" and re-run the Cash to Receivables Conversion program. The program runs on the AppServer the Notification Center will tell you when it completes and a Cash to Receivables Report will be generated.
Important Note: When using the "Convert" option, this program can be run ONE TIME ONLY in your database. The program has a built-in check for this; attempting to re-run the program using the "Convert" option will be disallowed. You can run the program as often as you like using the "Preview" option.
- Exit the program when it completes.
- Update your Fee records to Use Accrual
- Fees subject to Accrual must be specified in RecTrac. This can be done a per Fee basis or in can done in Bulk.
- In RecTrac, go to a Fee linked to an item for which you will run Accrual.
- Highlight/select the Fee and click Advanced Fee Change. You will continue to the Fee Update screen.
- Expand the Additional GL Settings group.
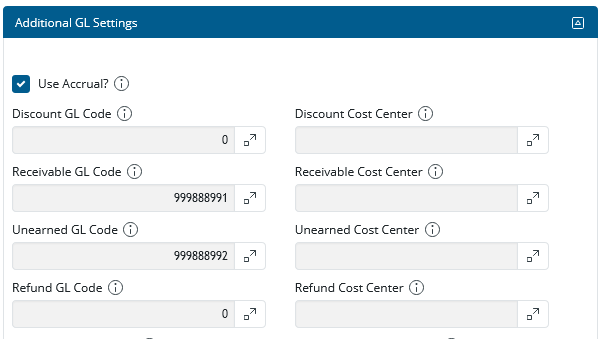
- Select the option to Use Accrual?.
- Click Save. Changes take effect immediately.
- Repeat these steps for all applicable Fees that are linked to items for which Accrual will be processed.
Note: To set the Use Accrual field value for multiple Fees in bulk (as opposed to doing it by individual Fee as outlined above), use the Bulk Change program in Fee Maintenance (System Management • Fee/Rule/Question Management Group • Fee Management). Access the program and Add UseAccrual to the Bulk Changes to Add box and set the Field Value to Yes. Process your bulk changes as you normally would.
Use the "i" and "?" Help icons  on the upper-right hand corner of the screen for field definitions, if needed.

Click Image to Enlarge
- Change the G/L Post Option on your Static Parameters profile • Financial Settings group to Receivables.
- In RecTrac, go to Management Ribbon • System Management • Profile Assignments.
- Click Static Parameters at the bottom of the screen.
- Expand the Financial Settings group.

- Expand the Drop-down list for G/L Post Option and select "Receivables (Required for Accrual)."
- Set your Accrual Optionby Module on your Static Parameters profile • Accrual Settings group.
- RecTrac offers you the option to run Accrual Through Item Dates, where funds for an Item are moved from Unearned Income to Revenue on percentage basis each time Accrual is processed over the life of an Item or by Item Begin Date, where 100% of the funds for an item are moved from Unearned Income to Revenue the first time Accrual is processed after the Item Begin Date passes. These settings are maintained, by Module, in the Accrual Settings group of the Static Parameters profile.
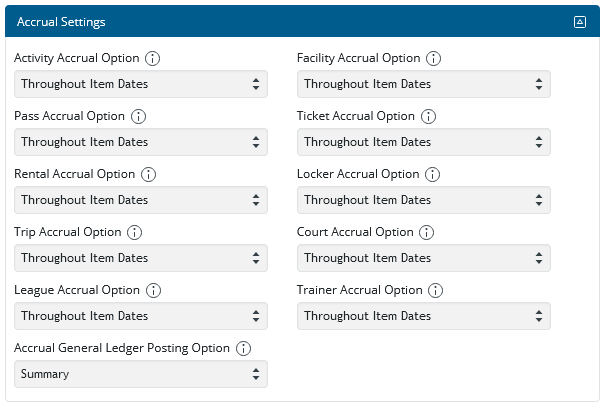
- For each Module, expand the Drop-down listand determine how you wish Accrual to be processed:
- Through Item Dates - When you process Accrual, funds for items in this Module will move from Unearned Income to Revenue in increments over the length of the item, where a percentage is accrued each time Accrual is run. For Example: Your Activity runs from 15 May through 15 July. When you process Accrual, funds for this Activity will move from Unearned Income to Revenue in an incremental process, where <x>% is Accrued in May, <x>% is Accrued in June, and <x>% is Accrued in July. This is the standard, default method for accruing items.
- Item Begin Date - When you process Accrual, 100% of the funds for items in this Module will move from Unearned Income to Revenue the first time Accrual is run after the beginning of the Item. For Example: Your Activity runs from 15 May through 15 July. When you process Accrual for May, 100% of the funds for this Activity will move from Unearned Income to Revenue because the Activity Start Date has passed. When you run Accrual in June and July, no further funds for this Activity will be accrued (unless full payment for the Activity was not made in May).
- This is a Module-by-Module choice, meaning you can mix and match how Accrual is processed over your different Modules, if desired.
- Click Save and exit back to the main RecTrac menu.
- RecTrac offers you the option to run Accrual Through Item Dates, where funds for an Item are moved from Unearned Income to Revenue on percentage basis each time Accrual is processed over the life of an Item or by Item Begin Date, where 100% of the funds for an item are moved from Unearned Income to Revenue the first time Accrual is processed after the Item Begin Date passes. These settings are maintained, by Module, in the Accrual Settings group of the Static Parameters profile.
- Run the G/L Report to insure postings were made to the proper General Ledger Accounts.
- If you use a GL Interface, run the program at this time.
- If you have not done so, schedule the Global Trial Balance report and the Unearned Income report to run daily.
- Resume Daily Processing in RecTrac and bring WebTrac back online.
- Implement your Accrual Processing plan.
- Refer to Topic Doc - Accrual Processing and Examples for the step-by-step instructions required to process Accrual in RecTrac.
- VSI does NOT provide the steps required to implement and run an Accrual Processing plan for your Department.
Converting from Cash-based to Receivables/Accrual-based Including History
Receivables is a system-wide accounting setting, so to go from Cash-based to Receivables/Accrual-based, a conversion program is run to create the appropriate GL entries. This option offers a more complete conversion, but it requires a number of extra steps, all of which leave room for error. The "History" option converts your existing records from Cash-based to Receivables/Accrual-based accounting and involves post-conversion steps to use DBEdit to delete duplicate GL entries for money already in revenue, updating existing detail records to include accrual retroactively, and creating miscellaneous postings for revenue and unearned offsets.
To convert from Cash-based to Receivables/Accrual-based accounting "going forward,", you need to:
- Complete Steps 1-11 under Converting from Cash-based to Receivables/Accrual-based Accounting "Going Forward" above.
- Ensure the Change Detail Records Linked to File Maintenance Records option is enabled when running the Bulk Fee Change outlined in the Note for Step 9.
- Process Accrual from the beginning of time (i.e. 01/01/1900) through to the last date you want Accrual to have posted.
- Use DBEdit to delete the GL entries made from running Accrual, since the money for those transactions is already in revenue.
Note: Completion of this step requires an Access Code from VSI.
- Run the Unearned Income report and make a Miscellaneous Posting to offset the revenue accounts and unearned account(s) with the amounts from the report.
- Complete Steps 12-16 under Converting from Cash-based to Receivables/Accrual-based Accounting "Going Forward" above.
To Run the Conversion from Cash-based to Receivables/Accrual-Based Accounting Only-Based Accounting Including History
Notes: VSI strongly recommends:
- Running this process in your Demo Database prior to running it in your Live Database.
- When running in your Live Database, suspending all payments in RecTrac (i.e. stop all daily processing, do not run installment billing, etc…) and taking WebTrac offline during the Conversion process. The Cash to Receivables Conversion program takes a snapshot of your database, tallies all outstanding debits and credits and makes appropriate Receivables entries. You DO NOT want to be processing transactions during this time.
- Complete Steps 1-11 under Converting from Cash-based to Receivables/Accrual-based Accounting "Going Forward" above, being sure to STOP at Step 9.
- At Step 9: When running the Bulk Fee Change outlined in the Note:, ensure the Change Detail Records Linked to File Maintenance Recordsoption is enabled.
- This option is used to update any existing SADetail records linked to the Fees being updated and have the change applied retroactively. So when you enable the option to Use Accrual, the system will go back and ensure that option in enabled for all Fee Records linked to a transaction. Upon processing the Bulk Change, it will be as if the Use Accrual option had always been enabled.
Note: This step is mandatory for the success of the "History" option.
- This option is used to update any existing SADetail records linked to the Fees being updated and have the change applied retroactively. So when you enable the option to Use Accrual, the system will go back and ensure that option in enabled for all Fee Records linked to a transaction. Upon processing the Bulk Change, it will be as if the Use Accrual option had always been enabled.
- STOP upon completing Step 11.
- Run Accrual with the following caveats.
- Set your Begin Accrual Date to "Actual Date" and select a date far in the past, such as 01/01/1900.
- Set your End Accrual Date to the date you want Accrual to have posted. VSI recommends selecting "Today / 0" as the End Date, since you will have to delete GL entries made from this posting. By running Accrual for the date range 01/01/1900 - "today," the system will pick up everything posted since the "beginning of time" through "today." Everything after "today" will picked up at your first scheduled running of Accrual.
- Refer to Topic Doc - Accrual Processing and Examples for the step-by-step instructions required to process Accrual in RecTrac.
- When Accrual finishes, refer to the Accrual Processing Post Journal, and write down the Transaction Receipt Number. This is listed in the Selection Criteria section.
- Resume Daily Processing in RecTrac and bring WebTrac back online.
- Go to DBEdit and delete ALL GL entries created from the Accrual posting. This step is necessary because the money from those transactions hit your Revenue Accounts under your old Cash-based Accounting system. Failure to complete this step will result in posting that money to revenue twice.
Note: Completion of this step requires an Access Code from VSI.
- In RecTrac, go to Management ribbon • System Management • Misc Management Group • DBEdit
- Input the Access Code given to you by VSI Support and click Validate. Access Codes are alpha-numeric and case-sensitive. If the Code was entered successfully, you will continue to the Raw DB Table Editor program.
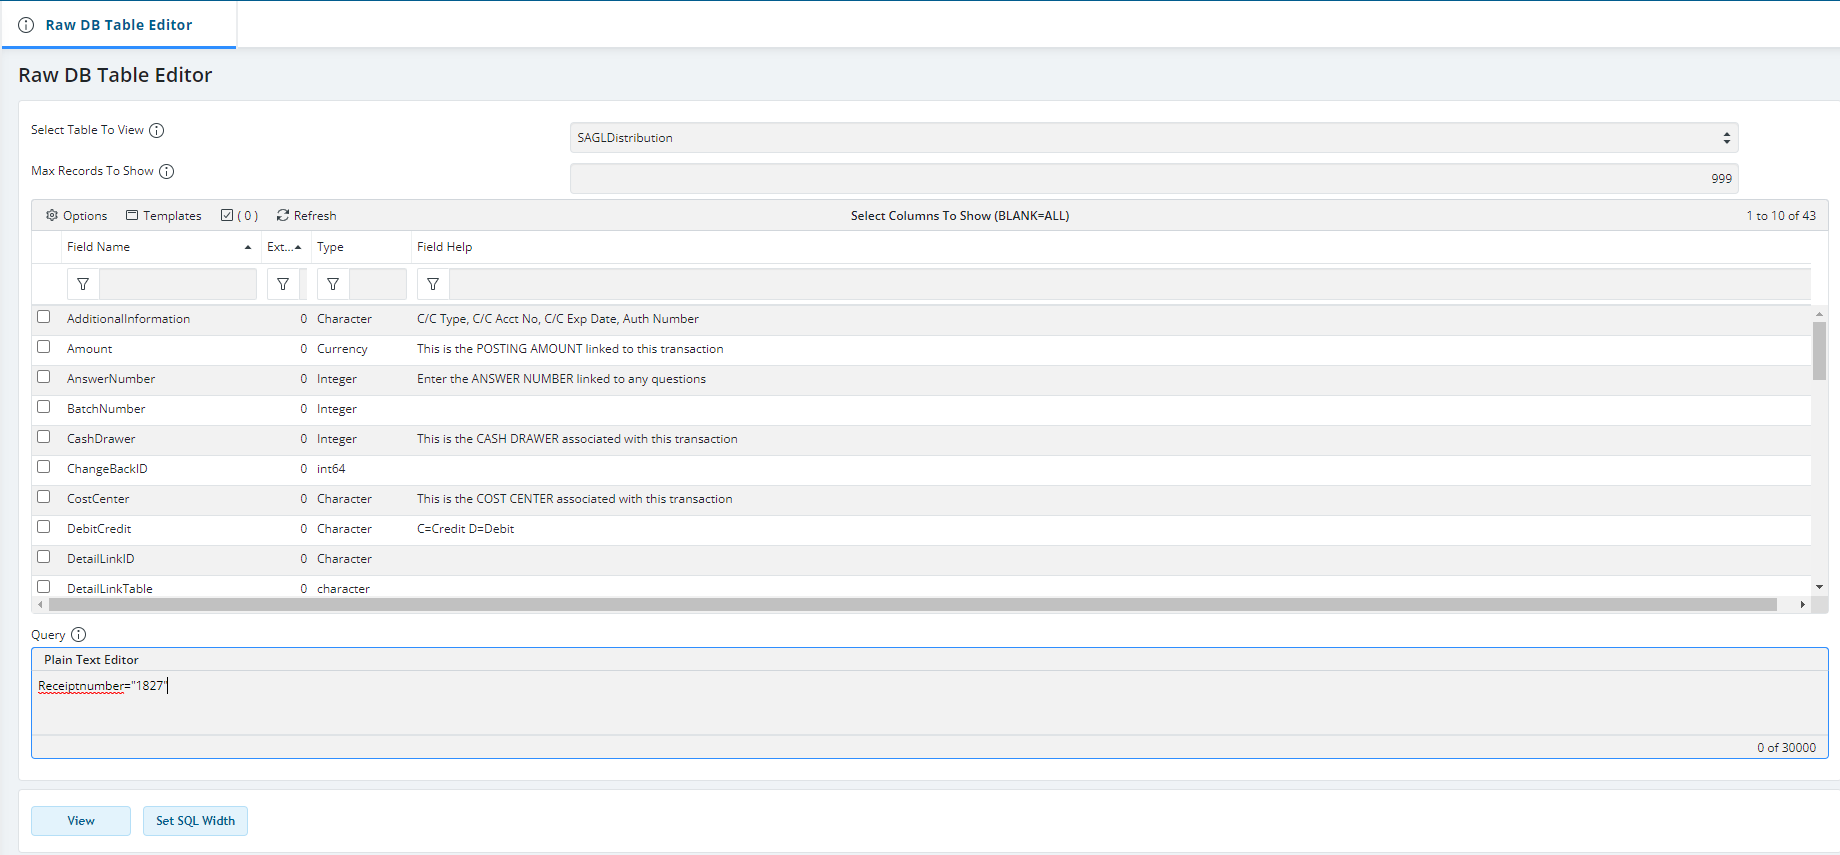
Click Image to Enlarge - Expand the Dropdown list for Select Table to View and select "SAGLDistribution."
- In the Query field, enter ReceiptNumber="<The Transaction Receipt Number from the Accrual Processing Post Journal>." For Example: ReceiptNumber="1827"
- Click View. You will continue to the Raw Table Editor DataGrid, where all GL records linked to your Accrual Posting will be listed.
- Select/Highlight each record in turn and click Delete. Depending on the number of records linked to your Transaction Receipt Number, this could take substantial time. There is NO "Bulk Delete" feature.
- When the DataGrid is blank, exit DBEdit and return to the main RecTrac menu.
- Run the Unearned Income report and print it. You will need this to complete the next step.
- Use "Today" through "Today" as your date range.
- Otherwise, run the report "wide open."
- Create the following Miscellaneous Postings:
- A Credit to your Unearned Income Account for the amount listed on the report.
- A Debit to each Revenue Account listed for the amount listed on the report.
- Use the "i" and "?" Help icons
 on the upper-right hand corner of the screen step-by-step instructions and/or for field definitions, if needed.
- Complete Steps 12-14 and 16 under Converting from Cash-based to Receivables/Accrual-based Accounting "Going Forward" above.
