
Table of Contents
Document Summary
The Template Design Studio program creates and maintains templates for the following objects printable to card-stock and PDF in RecTrac.
- Pass Membership ID Cards
- Gift Cards / Wristband Gift Cards
- Household ID Cards
- Access Control Tickets (Pass, Rental, Trip, etc…)
- POS Tickets (Serialized, Venue Seating, etc…)
- Labels (POS Service Item POS Inventory, Rental Items, etc…)
- POS IDs (Employee IDs)
- POS 'Sandwich' Tickets (Household Name and Address, Payment Info Tickets)
- Golf Bag Tags
- Golf Handicap Cards
- and more…
You quickly create a template of the right size and orientation by selecting a Type (i.e., a Pass ID) and Template Presets (single-sized, horizontal layout). RecTrac displays default sizing and margins based on your selections. Custom sizing can also be specified, when you have a unique-sized stock.
Use Template Design Studio to add database fields (i.e, patron's name, access code, dates, and times), static text (i.e., your organization's name, instructions, etc…), and graphics (i.e., your organization's logo, the patron's picture, a background image).

Click the Image to enlarge.
Once they are created, templates are generally linked to items within the Management Program for their respective modules (For Example: Pass Templates are linked to individual passes in Pass Management, Inventory Labels are linked to individual inventory items in Inventory Management, etc…). Regular Tickets and Access Control Ticket templates are linked on the Access Ticket Settings group, which is found in each module.

Click the Image to enlarge.
Print templates to the appropriate output medium PVC card printer, label stock, wristband printer, or as a .pdf.
This Topic Document will walk you through the process of creating a simple Pass ID. After you are familiar with the tools and process to make a simple ID, you can create additional and more complex templates. The process of creating templates for other purposes is very similar. Refer to the Appendix for other common fields you might use within other Types of templates.
License – Maintenance Agreement
The use of this interface requires a VSI license and annual maintenance agreement for RecTrac and the component modules discussed in this document. Prior to implementing any process outlined in this document, please contact the Vermont Systems Sales department at 1-877-883-8757 to verify that you are authorized to use this interface and if not, to obtain a quote and/or approval.
Setup Steps
This document will walk you through the basic steps required to use Template Design Studio. If you have additional questions about Template Design Studio after reading this document, please contact Vermont Systems Customer Service by phone at 887-883-8757 or generate a Support Case through the Customer portal of the Vermont Systems web site using your Customer ID and password.
Before You Begin
This document is written with the following assumptions. If any of the items listed is NOT true, contact Vermont Systems Support prior to continuing.
- Your organization is running RecTrac 3.1.04.00 or greater.
- The User ID with which you sign into RecTrac has the requisite permissions and ability to access Template Design Studio.
- You understand RecTrac DataGrids and how to maneuver through them.
File Maintenance Setup
This document will guide you through the basic steps required to use Template Design Studio.
- Creating a New Template
- Understanding the Template Design Details Screen
- Adding/Editing Template Fields
- To Add a Background Image Layer
- To Add a Text Layer
- To Add a Barcode
- To Add a Rectangle Layer
- To Add Member Photo Image Layer
- Appendix: Common Fields Used in Template Design Studio
Note: All file paths and screen/tab locations in this document refer to file paths and screen/tab locations as they appear in the standard, default VSI Design. Your setup and Design may vary.
Creating a New Template
In this section, you will create a new record in Design Template Studio. For the purpose of example, you will create a new template record for use as a pass. The process of creating tickets, rentals, and others is very similar.
Begin by selecting the Record Type and Template Presets, which together enable you to quickly size a new template for passes. You can choose from various types of passes and can further define its orientation (horizontal or vertical).
- In RecTrac, go to the Management Ribbon • System Management • Misc Management group • Template Design Studio. The Template Management screen opens with a DataGrid listing your organization's templates (if any).

Click the Image to enlarge.
- To create new template, click the Add button. The SATEMPLATE Update screen opens. Continue with step #4.
- If you were editing an existing template, you would instead click the Change button. The SATEMPLATE Update screen opens. Continue with step #6.
Click the Image to enlarge.
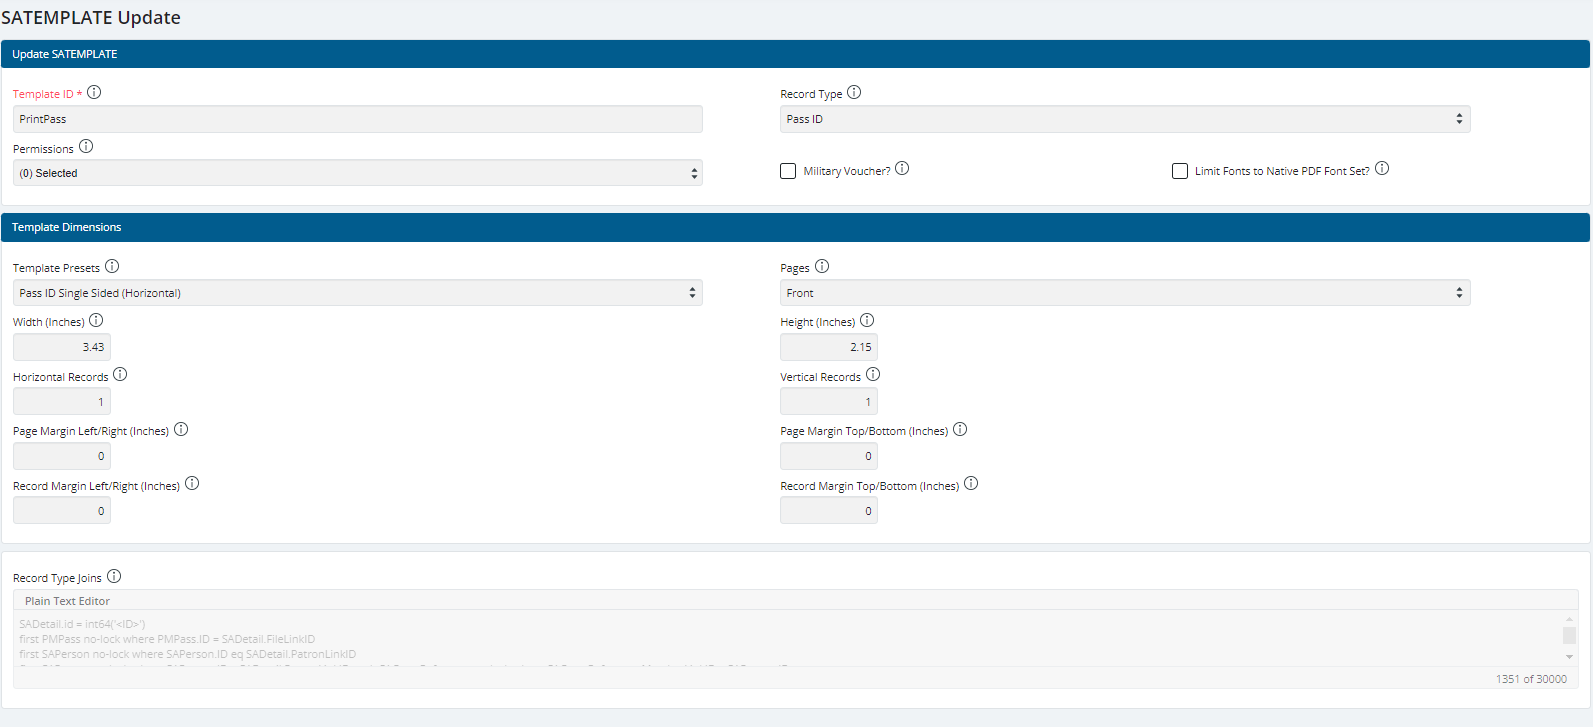
- Enter a value in the Template ID field to name your template (i.e., Park Pass). This is the system name selected when printing out labels/tickets/passes based on this template.
- Expand the Drop-down list to select the Record Type, which is the kind of Template you wish to create. For the purpose of example, choose Pass ID.
An explanation of all other options follows:- Access Ticket <Module Abbreviation> - These are Access Ticket Templates that can be linked to individual records in each module. For Example: Entry to your Campground is controlled via Access Ticket. You would link this template to each of your Campsites so the ticket prints upon Check-in.
- <Module> Sale - These are "Regular" Ticket Templates that can be linked to individual records in selected modules. For Example: You sell tickets for your Theater productions. You would link the Template to the POS Ticket Code for your show, so they print upon purchase.
- <Module< Reservation - These are "Regular" Ticket Templates that can be linked to individual records in selected modules. For Example: You offer train trips on a regular basis throughout the day. Rather than having patrons present their receipt to the Conductor at the platform, you could print Trip Tickets instead. You would link the Template to your Trips so they print upon purchase.
- Bag Tag - Bag Tag Templates are linked to Golf Courses • Additional Settings group. These are proof of sale tickets that golfer affix to their golf club bag.
- Gift Card - Gif Card Templates are linked to Service Items ̶ Gift Certificate Settings group and provide the design for your PVC Gift Cards.
- Golf Handicap -Handicap processing has not been completed for RecTrac 3.1
- Household ID - Household ID Templates provide the design for your Household ID cards.
- Label <Module> - These are barcode-type templates that can be linked to individual records in selected modules. Barcodes can be scanned in Global Sales lieu of manual data entry.
- Pass ID - Pass ID Templates are linked to Pass Update ̶ Pass Print Settings group and provide the design for your PVC Pass Membership Cards.
- POS ID - POS ID Templates provide the design for your Employee ID cards.
- Ticket Payment - Ticket Payment Templates provide the design for the "sandwich tickets" that print when patrons purchase "regular" tickets. Typically "sandwich tickets" contain Name, Address, and Payment information for the "regular" tickets that were sold.
- Unsold Ticket - This is a legacy option that is required to convert RecTrac Databases from 10.3 to 3.1. The template type, itself, is not needed for RecTrac 3.1.
- Wristband - Wristband Templates provide the design for any Pass Codes or Gift Cards that you want printed as a wristband instead of a PVC Card. For Example: You have a snack bar area at your pool. Rather than requiring kids to bring money to the pool, you could sell gift cards printed as waterproof wristbands.
- AR = Activity
- CR = Court
- FR = Facility
- GR = Golf
- LK = Locker
- LS = League Scheduling
- PM = Pass Management
- PSI = Point of Sale, Inventory Items
- PSS = Point of Sale, Service Items
- PST = Point of Sale, Tickets
- RN = Rental
- TP = Trips
- Within the Template Dimensions area of the screen:
- Expand the Drop-down list and select "Pass ID Single Sided (Horizontal)." for the Template Presets to use. Selecting a Template Preset will fill-in the Template Dimensions area based on commonly used options.
- Accept the default entry (Front) for Pages. Determines whether you have a single or double-sided design.
- Accept the default Width (3.43-inches) and Height (2.15-inches) of the template. If you have a different stock for your passes, then adjust the dimensions accordingly.
- Accept the default Horizontal (1) and Vertical (1) Records or adjust them to match your pass stock. If you are printing one pass at-a-time then you would have one (1) entered for Horizontal and Vertical Records. If you are printing sheets of labels then you MUST make sure the correct number of labels across (horizontal), and down (vertical) are correct. For Example: Avery 5160 Label Stock consists of 30 labels per sheet, 10 rows at three (3) columns. If using Avery Labels, you would enter "3" in the Horizontal Records field and "10" in the Vertical Records field.
- Accept the default Page Margins (0-inches) or adjust as needed. This is the margin of empty space outside of the pass. Start at zero (0), and adjust when necessary.
- Accept the default Record Margins (0-inches) or adjust as needed. This is the margin within the inside of the pass. Start at zero (0), and adjust when necessary.
- Use the "i" and "?" Help icons Help Icons on the upper-right hand corner of the screen for additional field definitions, if needed.
- Click the Save button. You return to the Template Management screen and your new Park Pass Template now appears within the DataGrid.
- Continue with the next section.
Understanding the Template Design Details Screen
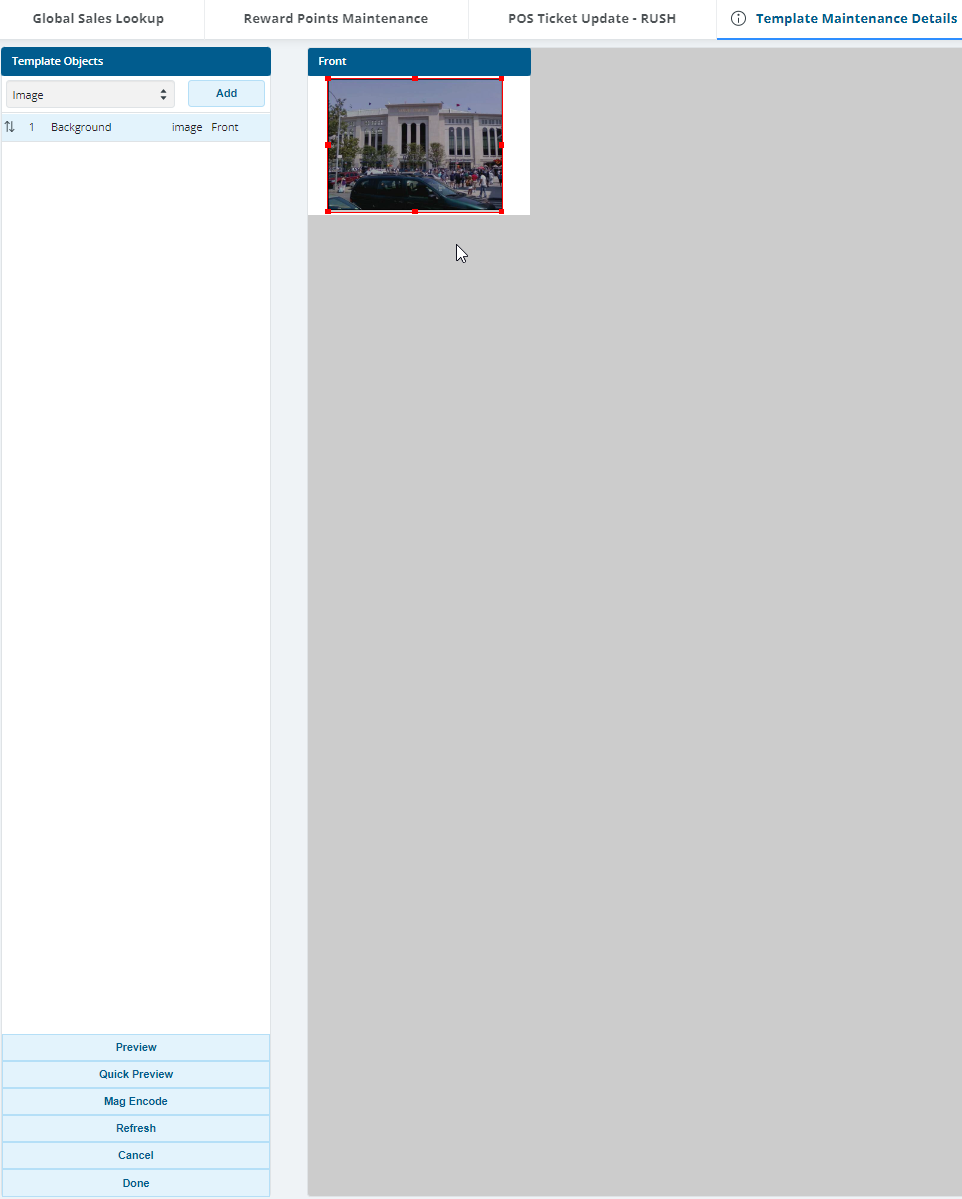
The Template Design Studio • Template Maintenance Details screen is where you build your Templates. It is comprised of three (3) main parts:
- Preview - The right-hand portion of the screen previews the template as you create it.
- Template Objects - The top, left-hand panel of the screen enables you to add new Template Objects, and lists existing objects within their print order. The first object to print displays at the top of the list, and is identified with the number 1. The second object to print is number 2, and so on down the list. The order of objects is important to get the desired results. For Example: You would NOT want a background image object to print last, as it would cover up any other objects (names, barcodes, etc…). Typically, a background layer prints first, before everything else.
- Buttons - The green buttons on the lower left-hand panel of the screen enable you to quick preview the last selected record, preview multiple records you specify, refresh the preview, and add Magnetic Strip Encoding to your labels. You can also exit from this screen with or without saving.

Click the Image to enlarge.
Template Preview
The Template Preview displays the layout of your template and all the fields currently on it. The field uses What You See is What You Get (WYSIWYG) format. Plain text, rectangles and images display "as they are." Calculated fields (fields drawn from a Database record, such as Member Photos, Ticket Codes, Reservation Names, etc…) and mag encode fields will display their Label name. The Template Preview displays one (1) template only regardless of the number of rows and/or columns you chose in your layout. So if you have a label template with thee (3) columns of 10 labels, your preview window still will show one (1) template only.
You can select an object from the preview, and right-click to open a menu described further in the "Right-Clicking on a Template Object Layer" section.
You can position and resize any object layer on the Template Preview by selecting it and using either "click and drag" to position or "grabbing and dragging" a dot (click a dot and hold) to resize.
- Click on the layer within the Preview area, it is surrounded by a red box.
- Hover over the icon and a Move icon displays
 . Drag and drop it to the desired location on the pass.
 - Click an edge, a Resize icon displays
 . Stretch the layer boundaries to an appropriate size.

Click the Image to enlarge.
Right-Clicking on a Template Object Layer
Note: To use the right-click menu, you can select an Object (or objects) from the Preview OR you can selecting an Object Layer (or Object Layers) in the Template Object Editor.
Click to select an Object Layer and right-click with your mouse. The following menu items appear:
- Change this Object - Enables you to edit the object's properties (i.e., change color, font, etc…).
- Delete this Object - Deletes the Object from your template.
- Clone this Object - Makes an exact copy of the Object, which can then be repositioned on the screen.
- Select All Objects - Selects all Objects on the Template.
- Deselect All Objects - De-select all Objects on the Template.
- Object Print Order - Allows you to move the Layer up or down on the print order. When printing Templates, the system prints the bottom layer first and then each successive layer on top of the previous.
- Match Object Properties - Allows you to match Color, Size and Font properties across multiple Objects. Press and hold the <Ctrl> key and click on Objects in the template. Right-click and select an Object Property to match. The system will match the property element selected (Color, Font, or Size) of the first Object selected to all subsequently selected Objects.
- Align Object - Allows you to align multiple Objects on the Template. Press and hold the <Ctrl> key and click on Objects in the template. Right-click and select an Object Alignment (Top, Bottom, Left, or Right). The system will match the alignment property of the first Object selected to all subsequently selected Objects.
-
Move Object - Allows you to move the selected Object(s) on the Template in one (1) pixel increments. You can click on a single Object or you can press and hold the <Ctrl> key and click on multiple Objects in the template
THEN
Select the direction you wish to move the Object(s) (Up, Down, Left, or Right).
OR
Use the Up/Down/Left/Right arrows on your keyboard. -
Text Alignment - This option is applicable to Text Fields only. Allows you to align the Text in then selected Object(s). You can click on a single Object or you can press and hold the <Ctrl> key and click on multiple Objects in the template
THEN
Select the text alignment for the Object(s) (Left, Right, or Center). -
Rotate this Object - This option is applicable to Text Fields only. Allows you to rotate the text in a field by 45-degree increments. Text fields rotate counter clockwise. A watermark preview displays how your text will align with the rotation selected. You can click on a single Object or you can press and hold the <Ctrl> key and click on multiple Objects in the template
THEN
Select the rotation degree for the Object(s) (0, 45, 90, 135, 180, 225, 270, or 315). - Match Aspect Ratio by Height or Width - This option is applicable to Image Fields only. Allows the system to size an image field automatically based on one set aspect (height or width). The system uses the aspect ratio as defined on your Photo profile. For Example: you place a Member Photo image on your Template. You set the Height at 40px. When you select Match Aspect by Height, the system will set the Width aspect automatically based on the ratio for height to width as defined on your Photo profile to ensure the width is proportional to your set 40px height.
Template Objects
In the Standard VSI default design, the Object Editor runs along the top half of the left-hand panel of your screen and is used to add fields to your template. It presents a number of options for building a template for whatever purposes you choose.
To use the Object Editor
- To add an Object Layer, expand the Drop-down list and select the type of Layer you wish to add.
THEN
Click Add You will continue to the Template Object Update screen. The types of Layers you can add are:- Text - Text for Calculated Fields and/or plain text and/or both.
- Image - A picture from a calculated field, such as a Member Photo or a .jpg that can serve as a background image or supplement image, if needed.
- Rectangle - A box with borders, used to accentuate/emphasize areas with expiration dates, times, and venue within your template.
- Whenever you Add a new Object Layer, it is listed in the left-hand panel. The first layer added is given the number "1." Successive layers get successive numbers. When printed, the lowest numbered layer (i.e. Layer 1) is printed first; it is the "bottom layer." Successive layers print in successive order, so a four-layer template would have Layer 1 on the bottom, then Layers 2, 3, and 4, where Layer 4 would be the last/top-most Object printed.
- You can re-order print Layers on the fly, if desired by clicking and holding on the "pipe" (|) symbol with your mouse (the "pipe" symbol is the left-most column on the Object Editor Layer grid) and then "dragging and dropping." The Layer Number will update automatically.
- To select a Layer, simply click on it with your mouse. The Object will select in the Preview. To select multiple layers, press and hold the <Ctrl> key and click with your mouse.
- Once you've selected a Layer(s), you can right-click to bring up the Options menu. This is the same Options menu as discussed above.
Other Buttons
The remaining buttons on the lower left-hand panel of the screen perform the function of their label.
Note Regarding the Preview and Quick Preview Options: The system needs a valid record in order to generate a preview image for your Template.
In order to preview a template, a valid sale for the item to which you wish to link the Template must have occurred. For Example: The Template you wish to preview is your Annual Family Pass. In order to use the Preview or Quick Preview feature, a sale for the Annual Family Pass must have taken place in your database. In other words, the system needs to have record to print..
This is a requirement for each Template type you create, whether it is a Pass, an Inventory Bar Code, an Activity Access Control Ticket, a POS Ticket, etc…
- Preview - Clicking this button takes you to the Template Preview DataGrid, where you can select the record(s) you wish to use as your preview. Multiple selection is allowed. Using the example from the Note above, you would advance to a Pass Membership DataGrid where you would pick the member whose pass you wish to preview. When multiple records are selected for previewing, multiple, consecutive previews will display.
- Quick Preview - The system will generate a preview of your Template based on the first valid record of the item found. Using the example from the Note above, the system would generate a preview from the first Annual Family Pass sold in your database.
- Mag Encode - Takes you to the Template Object Update screen where you can insert Mag Stripe encoding for either an Eltron Zebra or Fargo printer.
- Refresh - The system refreshes the Template Maintenance Details Screen. This is a good option in the event you cannot remember where you left off when working on a template.
- Cancel - Discards your changes and returns you to the Template Management DataGrid. Any changes you made WILL NOT be saved.
- Done Saves your changes and returns you to the Template Management DataGrid>. Any changes you made ARE SAVED.
Adding/Editing Template Fields
For the purpose of example, this document will walk you through designing a pass. However, the process of creating a template is very similar for tickets, rentals, golf, gift cards, and other similar things you might create.
You will create the basic information needed for a park pass, which includes static text, dynamic text based on the patron's information (i.e., name), add a barcode, and your organization's logo to the template.
- In RecTrac, go to the Management Ribbon • System Management • Misc Management group • Template Design Studio. The Template Management screen opens with a DataGrid listing your organization's templates.
- Select the template you created in the last section (i.e., Park pass) within the DataGrid.
- Click the Template Design button. The Template Maintenance Details screen opens.

Click the Image to enlarge.
- Refer to the sections that follow to add a background image, text for the patron's name, barcode, rectangle, and patron photo to your layer.
To Add a Background Image Layer
Complete the steps in this section if you would like to have a static image print on your template. Background images are typically the first thing added to a template and the first field printed so that subsequent fields print over it. Use the Object Print Order right-click menu option to edit the order in which field print, if needed.
When using images on your templates it is good to consult someone who is familar with resizing imagery. For best results, background images should be pre-sized to the approximate height and width of the template you are creating and of sufficient resolution/quality for your printer (but not excessive). For Example: If creating a Pass Template, your background image should be approximately 2.2” height x 3.4” width. If your printer is the equivalent of 72 dots-per-inch, then the image should be approximately 245 x 159 pixels in resolution. The images should be of a sufficient resolution/quality to get good results from your printer. However, printing and processing speed is greatly reduced when you have an image of MUCH higher resolution then your printer needs. For Example: A digital camera produces images that are thousands of pixels in height and width, which is much larger than what is needed for a background image of a pass card. Using those images without first resizing them, can take multiple times longer to process and print then a lower quality image.
Note: If you intend to print a barcode with your template, VSI recommends leaving (or inserting) white space on the template where the barcode will be printed. Placing a barcode over non-white space typically results in difficulty with the barcode read.
- To add an Image Layer, expand the Drop-down list and select Image.
THEN
Click Add.

Click the Image to enlarge.
- The Template Maintenance Object Update screen opens.
- Enter Background as the name for this new layer in the Object Label field. This label displays only within this editor to help you work with your various object layers.
- You have two (2) methods to add a static image to your template.
Click the File Folder icon and select an Image File to Upload.
Choose an existing image stored in your database. For Example: Your organization's logo might already be in the system, and you can select it from the Existing Uploaded Image Drop-Down list.
- Expand the Drop-down list and select your Image Option. If you would like to use the member's photo then select Member Photo. Otherwise, select Fixed Image (Blob).
- Although you can manually enter the Object Position and Object Size in pixels on this screen, it is much easier to use the preview area of the Template Maintenance Details screen to drag to move and/or resize the object.
- Click Done. You return to the Template Maintenance Details screen where you can move and size your new object.
- Your new Background layer displays in the preview.
- Click on the layer within the Preview area, it is surrounded by a red box.
- Hover over the icon and a Move icon displays
 . Drag and drop it to the desired location on the pass.
 - Click an edge, a Resize icon displays
 . Stretch the layer boundaries to an appropriate size.
Click the Image to enlarge.
Add a text layer to your template in order to enter static text (i.e., your organization's name) and/or select data from your database (i.e., the patron's name, total cost, etc…). One text layer can include static text, data from the database, and a combination of those two things. For Example: Within one text layer, you might add the static text "Name:" and also select the data field for the patron's first and last name to display "Name: Nancy Wheeler" on your Pass.
- To add a Text Layer, expand the Drop-down list and select Text.
THEN
Click Add.

Click the Image to enlarge.
- The Template Maintenance Object Update screen opens. You will add the patron's name to this pass.
- Enter Name for this new layer in the Object Label field. This label displays only within this editor to help you work with your various object layers.
- In the Text area, enter "Name:" and then a space without the quotes. This label prints before the patron's name.
- Under Combo Presets, expand the Drop-down list and select First Name Last Name. This displays the patron's first name followed by last name. Additional options are available for the name, such as last name, comma first name.
- Click Add Preset.
- Although you can manually enter the Object Position and Object Size in pixels on this screen, it is much easier to use the preview area of the Template Maintenance Details screen to drag to move and/or resize the object.
- Accept the default Font Face (Helvetica) or expand the Drop-down list and select an alternative.
- Accept the default Color (black) or click to select an alternate color for the font. The Pick a Color screen opens, specify the color with the options provided, and then use the close "X" in the corner to close that screen. There are multiple methods of specifying a color like red, click on the color within the picker, enter the HTML Hexadecimal Color Code (i.e., #ff0000), or enter the RGB value (i.e., R=255, G=0, and B=0) and you will get the same results.
- Accept the default Font Style (Normal) or expand the Drop-down list to select an alternative. Oblique means italic.
- Accept the default Text Justify (Left) or expand the Drop-down list to select an alternative.
- Accept the default Text Font Size (8-point) or expand the Drop-down list to select an alternative. In many cases, you would want a larger 12-point size.
- Accept the default Object Rotation (0) or click in the Drop-down list to select an alternate Text Rotation. Text Rotation allows you to rotate the text in a field by 45-degree increments. Text fields rotate counter clockwise. A watermark preview displays on the WYSIWYG shows how your text will align with the rotation selected.
- Click Done. You return to the Template Maintenance Details screen where you can move and size your new object.
- Your new Name layer displays in the preview.
- Click on the new layer within the Preview area, it is surrounded by a red box.
- Hover over the icon and a Move icon displays
 . Drag and drop it to the desired location on the pass.
 - Click an edge, a Resize icon displays
 . Stretch the layer boundaries to an appropriate size.

Click the Image to enlarge.
Barcodes are based on typically based on an ID field: a serialized ticket's ID, patron's ID, a household's ID, a rental item's ID, and etc…. Add barcodes using the same process as used for text fields, with one exception: you MUST use IDAutomationC128 for the font.
- Expand the Drop-down list and select Text.
THEN
Click Add.

Click the Image to enlarge.
- The Template Maintenance Object Update screen opens. You will create the barcode for this pass.
- Enter Barcode for this new layer in the Object Label field. This label displays only within this editor to help you work with your various object layers.
- Under Combo Presets, expand the Drop-down list and select Member ID With Lost Card.
- Click Add Preset.
- Under Additional Object Properties, expand the Drop-down list and select IDAutomationC128M for the default Font Family. The IDAutomationC128 font is available in XXS, XS, S, M, L, XL, and XXL sizing.
- Expand the Drop-down list to select an 12 point for the Text Font Size. This determines the size of the barcode on the pass. You can further adjust the Text Font Size to be larger or smaller depending on your desired look for this pass.
- Click Done. You return to the Template Maintenance Details screen where you can move and size your new object.
- Your new Barcode layer displays in the preview.
- Click on the layer within the Preview area, it is surrounded by a red box.
- Hover over the icon and a Move icon displays
 . Drag and drop it to the desired location on the pass.
 - Click an edge, a Resize icon displays
 . Stretch the layer boundaries to an appropriate size.
Notes:
1.) You MUST stretch the Barcode Object to the maximum area you want it to occupy in your template. Important to define the maximum boundaries as barcodes can be variable in size, depending on the data used.
2.) You MUST use the font IDAutomationC128.
3.) To get the desired barcode results, you might have to adjust the font size and/or switch between different barcode sizes (XXS, XS, S, M, L, XL, and XXL).
4.) When printing a barcode on ANY template type, you must leave white space on each side of the barcode. This allows the barcode easy reading by most barcode readers and serial input devices.
5.) Place the barcode so that there are no colors underneath the barcode. Placing the barcode over a color typically results in bad or inconstant reads.
6.) Vermont Systems STRONGLY recommends printing one or two test cards/tickets/labels and ensuring they are readable by the barcodes scanners you use at all applicable sites.

Click the Image to enlarge.
Rectangles allow you to put a "frame" around the entire pass or just specific objects in your template to emphasize them. For Example: You might "frame" expiration dates or show dates. In this example, you will insert a member photo in the corner of the Pass Template that should have a black border. You will add a custom-colored rectangle, which will act as a "frame" when we set the Calculated Image on top of it.
- To add a Rectangle Layer, expand the Drop-down list and select Rectangle.
THEN
Click Add.

Click the Image to enlarge.
- The Template Maintenance Object Update screen opens.
- Enter a name for this new layer in the Object Label field. This label displays only within this editor to help you work with your various object layers.
- Although you can manually enter the Object Position and Object Size in pixels on this screen, it is much easier to use the preview area of the Template Maintenance Details screen to drag to move and/or resize the object.
- Accept the default Border Size (1-pixel) or enter a different size in pixels.
- Accept the default Color (black) or click to select an alternate color for the rectangle's border. The Pick a Color screen opens, specify the color with the options provided, and then use the close "X" in the corner to close that screen. There are multiple methods of specifying a color like red, click on the color within the picker, enter the HTML Hexadecimal Color Code (i.e., #ff0000), or enter the RGB value (i.e., R=255, G=0, and B=0) and you will get the same results.
- Click Done. You return to the Template Maintenance Details screen where you can move and size your new object.
- Your new Rectangle layer displays in the preview.
- Click on the layer within the Preview area, it is surrounded by a red box.
- Hover over the icon and a Move icon displays
 . Drag and drop it to the desired location on the pass.
 - Click an edge, a Resize icon displays
 . Stretch the layer boundaries to an appropriate size.

Click the Image to enlarge.
To Add Member Photo Image Layer
For IDs and passes, you can add the patron's picture as a new image layer to your template.
- To add an Image Layer, expand the Drop-down list and select Image.
THEN
Click Add.

Click the Image to enlarge.
- The Template Maintenance Object Updatescreen opens.
- Enter Photo as the name for this new layer in the Object Label field. This label displays only within this editor to help you work with your various object layers.
- Expand the Drop-down list and select Member Photo for your Image Option.
- Although you can manually enter the Object Position and Object Size in pixels on this screen, it is much easier to use the preview area of the Template Maintenance Details screen to drag to move and/or resize the object.
- Click Done. You return to the Template Maintenance Details screen where you can move and size your new object.
- Your new Photo layer displays in the preview.
- Click on the layer within the Preview area, it is surrounded by a red box.
- Hover over the icon and a Move icon displays
 . Drag and drop it to the desired location on the pass.
 - Click an edge, a Resize icon displays
 . Stretch the layer boundaries to an appropriate size.

Click the Image to enlarge.
- Click the Preview button. The Records to Print screen opens.
- Use the DataGrid to select one or more records to preview.
- Click the Continue button. RecTrac will notify you that the process was sent to the server for processing.

Click the Image to enlarge.
- Mag Stip encoding is beyond the scope of this Topic Doc, refer to the online help for additional information.
- You might have to adjust the position, size, and contents of your layers after previewing. Refer to the Understanding the Template Design Details screen.
- Vermont Systems STRONGLY recommends printing one or two test cards/tickets/labels to ensure the barcodes are easily scannable by your barcodes scanner hardware at all applicable sites.
Formatting Multiple Objects at Once
You can multiple-select Objects within Template Design Studio and apply formatting to them as a group. For Example: You print a sample card, and upon review, the font is a bit smaller and harder to read than you had expected. Rather than clicking Change for each of your individual text objects on the template, you can edit one text field and then use Match Object Properties • Font to apply that to all other selected text objects.
You can apply the following formatting to groups of objects at-a-time:
- Customize the font and color of your text and/or rectangle fields, as discussed above.
- Line up/justify multiple fields (i.e., even up rows, column spacing, etc…)
- Match text Font, Size, and Color between multiple fields.
To select multiple fields, press and hold the ‹Ctrl› key and click with your mouse. When a function affects multiple fields, the first field you select will be the 'Lead' field to which the other fields will comply. The 'Lead' field has a red border and additional fields display within black border. So if "Aligning Left," all subordinate fields (those NOT selected first) will align to the left edge of the Lead field as it exists on the template, or if "Matching Color," all fields will match the color of the first field selected, etc….
The following sub-sections provide basic information for aligning, moving, and matching multiple field on your template to help make it look neater, cleaner and more professional.
Align Multiple Fields
You can easily align multiple fields to the top, bottom, left, or right of a Lead field on your template. The first field you select will be the Lead field, and subsequently selected fields will match its alignment.
You can move a group of fields together using drag and drop.
- From the Template Maintenance Details screen, press and hold your ‹Ctrl› key and click on the first field in the Template Preview screen that you wish to align. This will be the Lead field.
- Continue holding the ‹Ctrl› key and select the other fields you wish to align with the Lead field. As you select a second (or third, fourth, fifth, etc…) field, black borders display.

Click the Image to enlarge.
- To align fields do the following: Right-click over the fields, open the Align Object menu, and then choose your desired direction. For the purpose of this example, Left is used. The fields align as specified, and then are deselected.

Click the Image to enlarge.
- To move fields do the following: With the fields selected as described in step #2, hover over them and a move icon displays, drag and then drop them into the desired location. he fields align as specified, and then are deselected.

Click the Image to enlarge.
To Match Object Font, Color, and Size
You can make a change to one field and apply that change to other Object fields on your template.
- Choosing Match Color will set the color of all subordinate fields to that of the Lead field. This option is valid for text fields and rectangle fields.
- Choosing Match Font will set the font of all subordinate fields to that of the Lead field. This option is valid for text fields. This includes the font size (i.e. 8pt, 10pt, etc…) and the font style (i.e. Regular, Bold, Italic, etc…), and Font Color.
- Choosing Match Size will set the field dimensions of all subordinate fields to that of the Lead field. The field size is the area of the field when surrounded by the eight (8) sizing dots. This option is valid will all field types.
For the purpose of this example:
- From the Template Maintenance Details screen, press and hold your ‹Ctrl› key and click on the first field in the Template Preview screen that you wish to align. This will be the Lead field.
- Continue holding the ‹Ctrl› key and select the other fields you wish to match with the Lead field. As you select a second (or third, fourth, fifth, etc…) field, they display with a black border.

Click the Image to enlarge.
- Right-click over the fields, open the Match Object Properties menu, and then choose your desired match. For the purpose of this example, Font is used. The fields update as specified, and then are deselected.
Appendix: Common Fields Used in Template Design Studio
Below are the common fields (i.e., name, rental name, fee total paid, and etc….) used for each Record Type (i.e., Access Ticket FR, Pass, Gift Card, and etc…). Only the most commonly selected fields are referenced for ease of use.
Note: If you want to use a field not described in this appendix, then you can view the table and field name through the "i" icon on a screen in which that field displays. Write down the table and field name, and then select it within the Table/Field Presets Drop-down list within Template Design Studio. For Example: For the purpose of example, you want to include the Phone #2 field within Template Design Studio. Open the Household Update screen. Hover over the "i" icon beside the Phone #2 field, and the bottom of the note lists the table and field in which that is stored within the system: SAHousehold_SAPhoneNumber2. (Field-level help is enabled by clicking the "i" icon in the upper-right of the screen.) Go back to Template Design Studio, and then select SAHousehold_SAPhoneNumber2 within the Table/Field Presets Drop-down list. Click Add Preset. You now have the Phone #2 field on your template.

Click the Image to enlarge.
For each row in the table, you will know which of the three (3) Drop-down lists (Combo, Function, or Table/Field Presets) you will use, and what value within that Drop-down list to select.

Click the Image to enlarge.
| Record Type | Use Combo, Function, or Table Presets? | Pick this entry | Desc/Notes | |
| Access Ticket FR | Combo Presets | Access Ticket Access Code | Can be a barcode with the ticket's access code | |
| Access Ticket FR | Table/Field Presets | ADetail_VSIFunction-ReservationPurpose | Reservation purpose can be a question asked at reservation and displayed on access tickets (i.e., meeting, party, family reunion, or wedding) | |
| Access Ticket FR | Table/Field Presets | FRFacility_ShortDescription | Reservation location for this ticket (i.e., Lakeside Pavillion, Room 302, or Daenerys Center) | |
| Access Ticket FR | Table/Field Presets | SADetail_BeginDate-Weekday | Begin date of the reservation | |
| Access Ticket FR | Table/Field Presets | SADetail_BeginTime | Begin time of the reservation | |
| Access Ticket PM | Combo Presets | First Name Last Name | First and last name (other name formats are also available) | |
| Access Ticket PM | Function Presets | Format Date | This pastes as <?formatdate(<VALUE>,<DATEFORMAT>,<DAYOFWEEKOPTION>)?>.To make it useful, you would edit it as follows: <?formatdate(today,MM/DD/YY,Short)?> and it will print in the format: Fri, 11/6/20 (if that was today's date) | |
| Access Ticket PM | Function Presets | Format Time | Visit time. This pastes as <?formatTime(<VALUE>,HH:MMam)?> . To make it useful, you would edit it as follows: <?formatTime(<?SADetail_TransactionTime?>,HH:MMam)?> and it will print as 5:43pm. | |
| Access Ticket PM | Table/Field Presets | SAPerson_ID | Can be a barcode with the Family Member ID | |
| Access Ticket PSS | Table/Field Presets | PSServiceItem_ShortDescription | Service Item's Description | |
| Access Ticket PSS | Table/Field Presets | SADetail_CurrentReceipt | Receipt Number | |
| Access Ticket PSS | Table/Field Presets | SADetail_FeeAmount | Fee Total | |
| Access Ticket PSS | Table/Field Presets | SADetail_Quantity | Quantity | |
| Access Ticket PSS | Table/Field Presets | SADetail_TotalPaid | Total Paid | |
| Access Ticket PSS | Table/Field Presets | SADetail_TransactionTime | Transaction time | |
| Access Ticket PSS | Table/Field Presets | SADetail_UserName | User processing this transaction | |
| Access Ticket PST | Table/Field Presets | PSTicketMain_BeginEventDate | Begin date of event | |
| Access Ticket PST | Table/Field Presets | PSTicketMain_BeginEventTime | Begin time of event | |
| Access Ticket RN | Combo Presets | Access Ticket Access Code | Can be a barcode with the ticket's access code | |
| Access Ticket RN | Table/Field Presets | RNRentalItem_ShortDescription | Rental Item Description (i.e., campsite 12) | |
| Access Ticket RN | Table/Field Presets | SAAccessTicket_EndDate | Expiration Date of this rental | |
| Access Ticket RN | Function Presets | Transaction Answer | Result of a transaction question. This pastes as <?Answer(<QUESTION ID>)?>. To make it useful, you would edit it as follows: <?Answer(27608)?> where 27608 is the question's ID. | |
| Access Ticket TP | Combo Presets | Access Ticket Access Code + PIN | Use as a barcode with ticket code and the pin | |
| Access Ticket TP | Function Presets | Format Date | The date of this trip. This pastes as <?formatdate(<VALUE>,<DATEFORMAT>,<DAYOFWEEKOPTION>)?>. To make it useful, you would edit it as follows: <?FormatDate(<?SAAccessTicket_BeginDate?>,January 01 yyyy,Long)?> and it will print Friday, November 6, 2020 | |
| Access Ticket TP | Table/Field Presets | SAAccessTicket_BeginTime | Time of this trip | |
| Access Ticket TP | Table/Field Presets | SAAccessTicket_ReceiptNumber | Receipt # associated with this ticket | |
| Access Ticket TP | Table/Field Presets | SADETAIL_FeePaid | Fee paid for this ticket | |
| Gift Card | Table/Field Presets | SAGiftCertificateDetail_ID | Gift Card Number | |
| Gift Card | Table/Field Presets | SAGiftCertificateDetail_Number | Useful as a barcode with the gift certificate's number | |
| Inventory Label | Table/Field Presets | PSInventory_InventoryCode | Useful as a barcode for this item's inventory code | |
| Inventory Label | Table/Field Presets | PSInventory_ItemPrice | Item's price | |
| Inventory Label | Table/Field Presets | PSInventory_ShortDescription | Description of Inventory Item (i.e., 8 OZ Cape Code Potato Chips) | |
| Name and Address | Table/Field Presets | SAHousehold_AdditionalAddress1 | Household's address | |
| Name and Address | Table/Field Presets | SAHousehold_CityStateZip | Household's city, state, zipcode | |
| Name and Address | Table/Field Presets | SAHousehold_NameFirstLast | Household's first and last name | |
| Pass ID | Combo Presets | First Name Last Name | Name in first and last format (other formats are also available). | |
| Pass ID | Combo Presets | Member ID With Lost Card | Useful as a barcode containing the SAPerson ID plus the lost card count | |
| Pass ID | Table/Field Presets | PMPass_LongDescription | Pass Description (i.e., family park pass) | |
| Pass ID | Table/Field Presets | PMPass_TypeCode | Pass Type | |
| Pass ID | Function Presets | Print Date - today | Today's date | |
| Pass ID | Table/Field Presets | SAFee_ReceiptNumber | Receipt Number | |
| Pass ID | Table/Field Presets | SAHousehold_CityStateZip | Household's city, state, zipcode | |
| Pass ID | Table/Field Presets | SAHousehold_HouseholdNumber | Household's number | |
| Pass ID | Table/Field Presets | SAHousehold_NameFirstLast | Household's first and last name | |
| Pass ID | Table/Field Presets | SAHousehold_PrimaryAddress1 | Household's address | |
| Pass ID | Combo Presets | Standard ID | SAPerson ID | |
| POS Ticket Sale | Function Presets | Format Decimal | Price. This pastes as <?formatDec(<VALUE>,9.99)?>. To make it useful, you would edit it as follows: <?formatDec(<?PSSerialTicket_FeeAmountLessDiscount?>,$zz9.99)?> and it will print as $25.00. | |
| POS Ticket Sale | Function Presets | Format Time | Event time. This pastes as <?formatTime(<VALUE>,HH:MMam)?>. To make it useful, you would edit it as follows: <?formatTime(<?PSTicketMain_BeginEventTime?>,HH:MMam)?> and it will print as 5:43pm | |
| POS Ticket Sale | Table/Field Presets | PSSerialTicket_Area | Area | |
| POS Ticket Sale | Table/Field Presets | PSSerialTicket_Seat | Seat | |
| POS Ticket Sale | Table/Field Presets | PSSerialTicket_SeatRow | Row | |
| POS Ticket Sale | Table/Field Presets | PSSerialTicket_Section | Section | |
| POS Ticket Sale | Table/Field Presets | PSTicketMain_BeginEventDate | Event Date | |
| POS Ticket Sale | Table/Field Presets | PSTicketMain_ShortDescription | Event Info | |
| POS Ticket Sale | Table/Field Presets | SADetail_AccessControlCode | Barcode | |
Date Formatting Options
Template Design Studio offers a wide variety of ways to format the display of Dates on your templates. The following presents a basic example for adding a Date Format field. The table below provides the list of formatting options.
To Add a Date Format Field to a Template
The following example describes how you might add a Member Since Date field to a Pass Template. When adding a Date Field to a Template, the basic steps outlined here remain the same regardless of the Template Record Type with which you are working.
- On the Template Maintenance Details for <Your Template> screen, Add a Text field. You will continue tot the Template Maintenance Object Update screen.
- Enter a name for your text field in the Object Label field.
- In the Text field, add miscellaneous text as needed. For purposes of this example, "Member Since: "
- Expand the Drop-down list for Function Presets and select "Format Date (Blank for current Date - formatdate(Value,Format,Weekday Option)"
You make this selection because you want to add a Date field. - Expand the Drop-down list for Table/Field Presets and select "SADETAIL_OriginalMemberDate"
You make this selection because you want to display the "Member Since" Date, which is the Original Member Date of the membership.

Click Image to Enlarge
Notes:
- When adding Dates to Templates, you need to know the field and/or table that corresponds to the Date you want to display. Your selection in this field, therefore, is dependent upon the type of Template with which you're working. If adding an event date to a POS Ticket, for example, your selection would be PSTicketMain_BeginEventDate.
- To display a Date that is not linked to a field or table, use the Function Presets only and skip the Table/Field Presets field. For Example: If you want to display a static date only, such as July 4, 2020, then you would add the "Format Date" field and you would skip the "Table/Field Presets" field.
- Click Add Preset. Your entries will be placed in the Text field.

Click Image to Enlarge
- The <DATEFORMAT> field determines how the Date will display.
- Remove the < > brackets. Regardless of the date format you use, the brackets must be deleted.
- Use "DATEFORMAT" to have the date display in your RecTrac default date format, as determined on your Static Parameters profile • Formatting Options group.
- To use a static date, enter it in front of "DATEFORMAT." For Example: Enter "07/04/2020,DATEFORMAT" to have the July 4 static date appear on your template in your RecTrac default date format.
- To use a date display format other than your RecTrac default, overwrite "DATEFORMAT" with the format you wish to use. The table below provides the list of formatting options. For Example: Overwrite "DATEFORMAT" with "January 01 yyyy" to have the date display as July 04, 2020..

Click Image to Enlarge
- The <DAYOFWEEKOPTION> field determines how the Day of the Week will display.
- Remove the < > brackets. Regardless of the day format you use, the brackets must be deleted.
- Use "NONE" to skip the day of the week display.
- Use "SHORT" to have the day of the week display in three-letter format. For Example: Sat.
- Use "LONG" to have the day of the week display in full format. For Example: Saturday.
- Click Done when finished. You will return to the Template Maintenance Details for <Your Template> screen. Use the Preview or Quick Preview option to test your results.

Click Image to Enlarge
Valid Date Formats
The following table provides the list of formatting options for dates in Template Design Studio using July 4, 2020 as the example with the lone exception to that example being "today." In all instances, the DAYOFWEEKOPTION is either "Short" or "None." Valid DAYOFWEEKOPTIONs are:
- NONE - Skips the day of the week display.
- SHORT - Displays the day of the week in three-letter format. For Example: Sat.
- LONG - Displays the day of the week display in full format. For Example: Saturday.
| Valid Date Format | <?formatdate(<VALUE>,<DATEFORMAT>,<DAYOFWEEKOPTION>)?> | Template Display |
|---|---|---|
| today | <?formatdate(today,<date format>,<weekday format>)?> | Prints "today's date" in your selected Date/Weekday Format |
| DATEFORMAT | <?formatdate(07/04/2020,DATEFORMAT,NONE)?> | Prints the date in your RecTrac default date format. |
| Jan 01 yyyy - Note: Enter as displayed. Do not insert commas. | <?formatdate(07/04/2020,Jan 01 yyyy,SHORT)?> | Sat, Jul 04, 2020 |
| Jan 1 yyyy | <?formatdate(07/04/2020,Jan 1 yyyy,SHORT)?> | Sat, Jul 4, 2020 |
| Jan 01 yy | <?formatdate(07/04/2020,Jan 01 yy,SHORT)?> | Sat, Jul 04, 20 |
| Jan 1 yyyy | <?formatdate(07/04/2020,Jan 1 yy,SHORT)?> | Sat, Jul 4, 20 |
| Jan 1st yyyy | <?formatdate(07/04/2020,Jan 1st yyyy,SHORT)?> | Sat, Jul 4th, 2020 |
| Jan 1st yy | <?formatdate(07/04/2020,Jan 1st yy,SHORT)?> | Sat, Jul 4th, 20 |
| January 01 yyyy | <?formatdate(07/04/2020,January 01 yyyy,SHORT)?> | Sat, July 04, 2020 |
| January 1 yyyy | <?formatdate(07/04/2020,January 1 yyyy,SHORT)?> | Sat, July 4, 2020 |
| January 01 yy | <?formatdate(07/04/2020,January 01 yy,SHORT)?> | Sat, July 04, 20 |
| January 1 yy | <?formatdate(07/04/2020,January 1 yy,SHORT)?> | Sat, July 4, 20 |
| January 1st yyyy | <?formatdate(07/04/2020,January 1st yyyy,SHORT)?> | Sat, July 4th, 2020 |
| January 1st yy | <?formatdate(07/04/2020,January 1st yy,SHORT)?> | Sat, July 4th, 20 |
| 01 Jan yyyy | <?formatdate(07/04/2020,01 Jan yyyy,SHORT)?> | Sat, 04 Jul 2020 |
| 01 Jan yy | <?formatdate(07/04/2020,01 Jan yy,SHORT)?> | Sat, 04 Jul 20 |
| 01 January yyyy | <?formatdate(07/04/2020,01 January yyyy,SHORT)?> | Sat, 04 July 2020 |
| 01 January yy | <?formatdate(07/04/2020,01 January yy,SHORT)?> | Sat, 04 July 20 |
| 1 Jan yyyy | <?formatdate(07/04/2020,1 Jan yyyy,SHORT)?> | Sat, 4 Jul 2020 |
| 1 Jan yy | <?formatdate(07/04/2020, 1 Jan yy,SHORT)?> | Sat, 4 Jul 20 |
| 1 January yyyy | <?formatdate(07/04/2020,1 January yyyy,SHORT)?> | Sat, 4 July 2020 |
| 1 January yy | <?formatdate(07/04/2020, 1 January yy,SHORT)?> | Sat, 4 July 20 |
| Jan 1 | <?formatdate(07/04/2020, Jan 1,SHORT)?> | Sat, Jul 4 |
| Jan 01 | <?formatdate(07/04/2020, Jan 01,SHORT)?> | Sat, Jul 04 |
| Jan 1st | <?formatdate(07/04/2020, Jan 1st,SHORT)?> | Sat, Jul 4th |
| 1 Jan | <?formatdate(07/04/2020,1 Jan,SHORT)?> | Sat, 4 Jul |
| 01 Jan | <?formatdate(07/04/2020,01 Jan,SHORT)?> | Sat, 04 Jul |
| 1 January | <?formatdate(07/04/2020,1 January,SHORT)?> | Sat, 4 July |
| 01 January | <?formatdate(07/04/2020,01 January,SHORT)?> | Sat, 04 July |
| January 1 | <?formatdate(07/04/2020,January 1,SHORT)?> | Sat, July 4 |
| January 01 | <?formatdate(07/04/2020,January 01,SHORT)?> | Sat, July 04 |
| January 1st | <?formatdate(07/04/2020,January 1st,SHORT)?> | Sat, July 4th |
| Jan yyyy | <?formatdate(07/04/2020,Jan yyyy,NONE)?> | Jul 2020 |
| Jan yy | <?formatdate(07/04/2020,Jan yy,NONE)?> | Jul 20 |
| January yyyy | <?formatdate(07/04/2020,January yyyy,NONE)?> | July 2020 |
| January yy | <?formatdate(07/04/2020,January yy,NONE)?> | July 20 |
| mm/dd/yyyy | <?formatdate(07/04/2020, mm/dd/yyyy,SHORT)?> | Sat, 7/4/2020 |
| mm/dd/yy | <?formatdate(07/04/2020, mm/dd/yy,SHORT)?> | Sat, 7/4/20 |
| dd/mm/yyyy | <?formatdate(07/04/2020, dd/mm/yyyy,SHORT)?> | Sat, 4/7/2020 |
| dd/mm/yy | <?formatdate(07/04/2020, dd/mm/yy,SHORT)?> | Sat, 4/7/20 |
| mm/yyyy | <?formatdate(07/04/2020, mm/yyyy,NONE)?> | 7/2020 |
| mm/yy | <?formatdate(07/04/2020, mm/yy,NONE)?> | 7/20 |
| mm/dd | <?formatdate(07/04/2020, mm/dd,SHORT)?> | Sat, 7/4 |