
Table of Contents
Document Summary
RecTrac offers you the ability to setup your own Reward Points program. Using the RecTrac Reward Points program, your patrons will earn Points though purchases and then use those Points as payment for additional services and products you provide.
The RecTrac Reward Points program allows you to:
- Determine the modules and items for which RecTrac Reward Points can be earned.
- Determine how Reward Points can be earned:
- By dollars spent per transaction.
- By dollars charged per transaction.
- Determine how many Reward Points equate to one dollar when Reward Points are redeemed.
Once established, you can run reports and inquiries about reward point balances on your households.
Notes for fitRewards Programs:
RecTrac Rewards and fitRewards both use RecTrac Rewards logic. If you utilize fitRewards at your Department, follow the steps in this document to establish your Reward Point Program in RecTrac and then use the fitRewards Topic Document for additional fitRewards setup instruction and guidance for running the fitRewards Interface program.
Because RecTrac Rewards and fitRewards use the same RecTrac Reward Points logic, VSI strongly recommendsthat you DO NOT attempt to use both fitRewards and RecTrac Rewards in the same database, as the system has no way of knowing what reward points are earmarked for which program.
License – Maintenance Agreement
The Rewards Interface is free. Use of the interface requires a VSI license and annual maintenance agreement for RecTrac and the component modules discussed in this document. Prior to implementing any process outlined in this document, please contact the Vermont Systems Sales department at 1-877-883-8757 to verify that you are authorized to use the modules discussed in this document and if not, to obtain a quote and/or approval.
Setup Steps
This document will walk you through the basic steps required to:
- Create and link a Reward Points profile in your profile hierarchy to establish default Reward Points earned per dollar spent values for your RecTrac modules.
- Ensure that all applicable Fees are set to record Reward Points when used, and, if desired, determine the Reward Points earned per dollar charged for the individual Fee.
- Determine how Reward Points can be earned:
- By dollars spent per transaction.
- By dollars charged per transaction.
- Create a Reward Points Payment Code that will be used when patrons redeem Points and include the Payment Code in the list of allowed Payment Codes on your Payment profile(s). You also determine your Reward Points to Dollar ratio on the Payment Code.
- Ensure your Households are allowed to earn Reward Points.
- Use Reward Points in Daily Processing.
- Earn Reward Points via purchases.
- Redeem Reward Points as Payment.
- Refund Reward Points.
- Run basic Reward Points reports and inquiries.
If you have additional questions about RecTrac Rewards setup and operation after reading this document, please contact Vermont Systems Customer Service by phone at 887-883-8757 or generate a Support Case through the Customer portal of the Vermont Systems web site using your Customer ID and password.
Before You Begin
This document is written with the following assumptions. If any of the items listed below is NOT true, contact Vermont Systems Support prior to continuing, as the steps in this document may prove difficult to complete and unexpected results may occur.
- Your organization is running RecTrac 3.1.04.00 or greater.
- The User ID with which you sign into RecTrac has the requisite permissions and ability to access all modules and functions pertaining to RecTrac Rewards, to include but not limited to: the Profile Assignments, Payment Code Management, Module Management (i.e. Activity Management, Facility Management, etc…), Fee Management, Household Management, and RecTrac Daily Processing functions.
- You understand RecTrac DataGrids and how to maneuver through them.
- You understand RecTrac Profile Hierarchy.
- You understand the Reward Points program at your Department.
- You have created the items in RecTrac (along with their applicable Fees, Rules, and Questions) for which patrons can earn Rewards Points. Items for which patrons can earn Reward Points may include (but are not limited to) pass visits, activity registrations, POS purchases, equipment and/or facility rentals, etc….
File Maintenance Setup
Note: All file paths and screen/tab locations in this document refer to file paths and screen/tab locations as they appear in the standard, default Vermont Systems Design. Your setup and Design may vary.
Create and Link a Rewards Profile
The Rewards profile allows you to establish parameters for your RecTrac Rewards Points program OR for your fitRewards program. Reward Points values entered in the fields below are Reward Points per dollar spent and will be earned/accrued provided the Rewards Option on the Fee you're charging is be set to Earn When Fee Paid. This is discussed in greater detail below.
Note: RecTrac Rewards and fitRewards both use RecTrac Rewards logic. Therefore VSI strongly recommends that you DO NOT attempt to use both RecTrac Rewards and fitRewards in the same database, as the system has no way of knowing what reward points are earmarked for which program.
- In RecTrac, go to Management Ribbon • System Management • User/Menu/Profile Management Group • Profile Assignments.
- Click Add. You will continue to the Profile Add/Update screen.
- Enter a Profile Code for your Rewards profile. For Example: Rewards Profile.
- Expand the Drop-down list for Profile Type and select Rewards.
- Accept the default entry in the Profile Subtype field.
- Enter a Profile Description, if desired, and click Create.
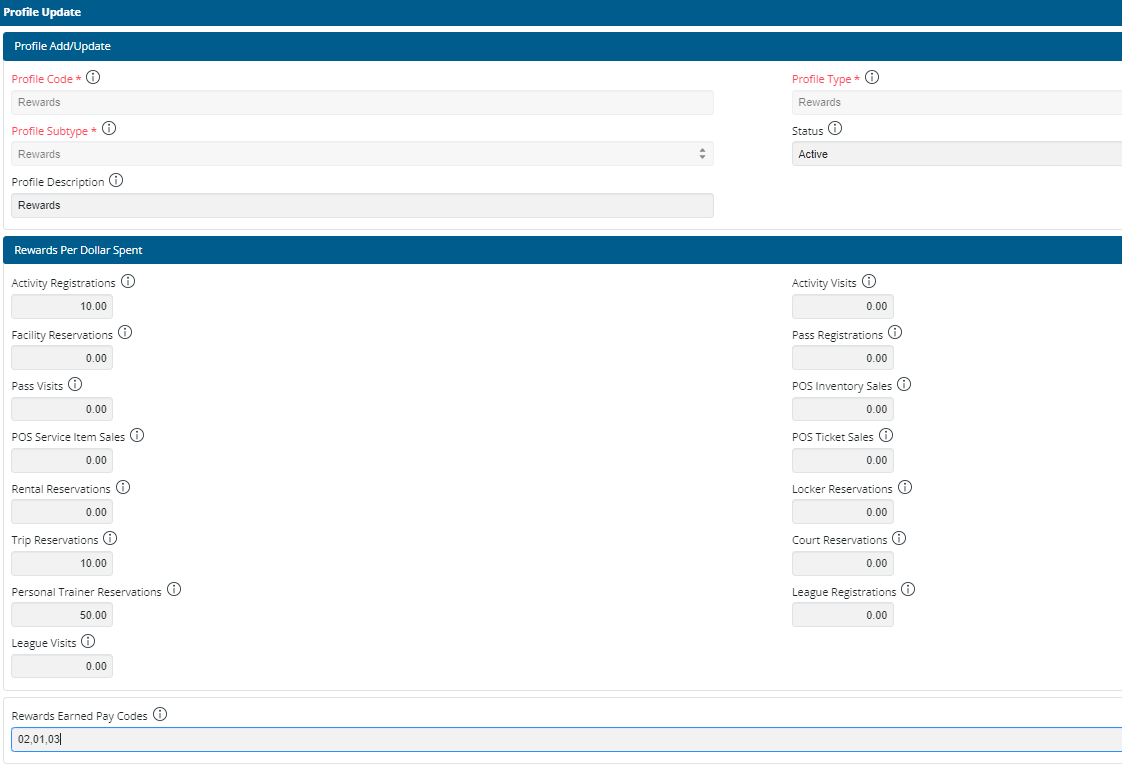
- Click the Picklist icon for Rewards Earned Pay Codes and select the Payment Code Types that can be used for a transaction where patrons earn Reward Points. When remitting for services using the Payment Codes in this field, patrons will earn Reward Points. Generally speaking, the codes in this list will be your legal tender Payment Codes, such as Cash, Check, AMEX, VISA, MasterCard, Foreign Currency, etc…. VSI also recommends including your VSI-System Payment Code in this list in order for patrons to earn Reward Points when using a Credit Balance as payment for an eligible service. For Example: Agatha Christie has a $50.00 credit balance and enrolls in your Writer's Workshop class for which Reward Points are earned. Agatha uses her credit balance to pay for the class. The GL transaction will show a debit from the Unearned Income account (VSI-System Payment Code) and a credit to the Revenue account (VSI-System Payment Code) for that transaction. Without the VSI-System Payment Code in this field, no Reward Points will be earned for Agatha's registration into Writers Workshop.
- Enter values in the remaining fields as needed. The values you enter are the number of Reward Points that will be earned per dollar spent (when the Fee is paid) for items in the modules. In the example above, Reward Points will be earned in the following modules only: Activity Registrations, Pass Registrations, POS Service Item Sales, and Trip Reservations.
Note: Entering values in these fields alone will NOT result in Reward Points being earned. Purchases will earn/accrue Reward Points only if the Rewards Option on the Fee you're charging is set to Earn When Fee Paid. This provides flexibility in your Reward Points Program in that you can award points for certain items in a Module but not others. For Example: You award Reward Points for Senior Citizen Activity Registrations but not for Youth Registration. Fees linked to your Senior programs would have a Rewards Option; fees linked to your Youth programs would not.
- Click Save when ready to save your changes. You will return to Profile Assignments.
- Determine where you want to link your Rewards profile. Linking your profile at the Default Level of Hierarchy is a good option.
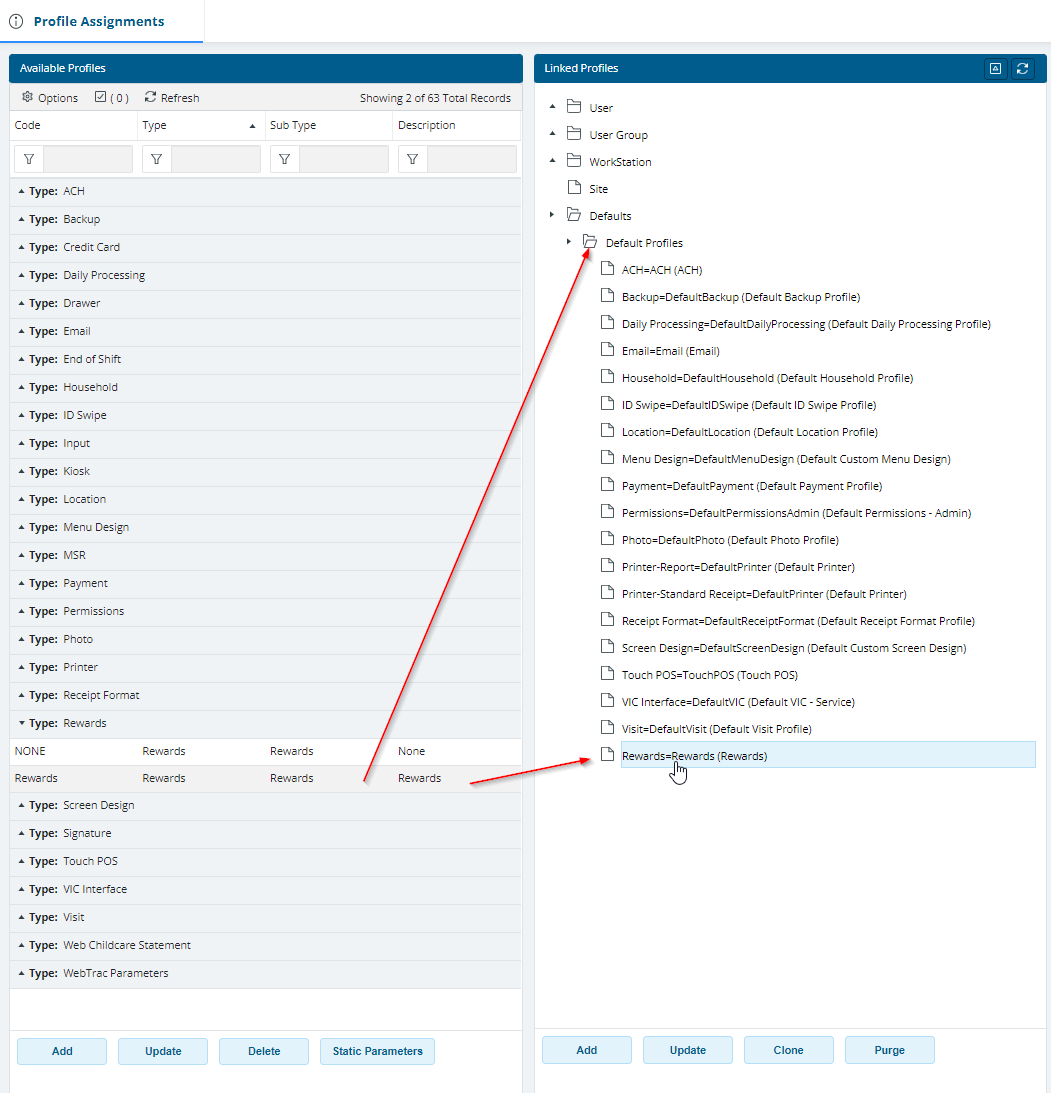
- In the Linked Profiles middle column, click to expand the Default folder.
- In the Available Profiles left-hand column, click to highlight the Reward profile you just created.
- Click again and hold the mouse button down. When you have "grabbed" the profile, a red box will appear that displays the profile name.
- Drag and drop. Drag to the Default Profiles folder in the middle column. When the box turns green, release the mouse. This will place the profile at the Default level of hierarchy. Profile Assignments are saved automatically and take effect immediately.
The level of hierarchy can be changed later, if needed. - Click the 'X' in the upper-right hand corner of the Profile Assignments panel to Exit.
Ensure Fees are Set to Record Reward Points
The Reward Options field in Advanced Fee Management determines which fees will be used to accrue Reward Points and how those points will be earned. Your options are as follows:
- None - No Reward Points are earned.
-
Earn When Fee Paid - Reward points will be earned when the Fee is paid. When you select this option, the patron will earn Reward Points equal to the value entered for the appropriate module on your Rewards profile.
For Example: You have a $50.00 registration fee linked to an Activity. Your Rewards Profile offers 10.00 Reward Points per Dollar Spent. When a patron registers for this activity and pays the fee, the patron will earn 500 Reward Points (50 x 10.00 per dollar spent = 500). -
Earn When Fee is Charged - Reward points will be earned when this Fee is charged. When you select this option, enter a value in the Reward Points Earned field. The value you enter there is the total number of points a patron will earn per time this Fee is charged. This is a good option for scenarios where you allow patrons to earn Reward Points for "No charge" transactions, such as pass visits.
For Example: Your Fitness Pass members earn 2.00 points per visit, but the visit itself is free (because they're pass holders). You would create a $0.00 Standard Visit Fee, select Earn When Fee is Charged and enter "2.00" in the Reward Points Earned field. When a Fitness Pass members swipe into your Fitness Center, the system will charge the $0.00 fee and award the member 2.00 Reward Points.
Note: RecTrac 3.1 currently does not offer a method to "stack" Reward Points without creating separate Fees. (i.e. You cannot combine points earned from a Fee being Charged and a Fee being Paid on one Fee. To do that, you have to create separate Fees.)
To Set the Reward Point Option on a Fee
- In RecTrac, go to a Fee linked to an item for which Reward Points can be earned.
- Highlight/select the Fee and click Advanced Fee Change. You will continue to the Fee Update screen.
- Expand the Miscellaneous Settings Group.
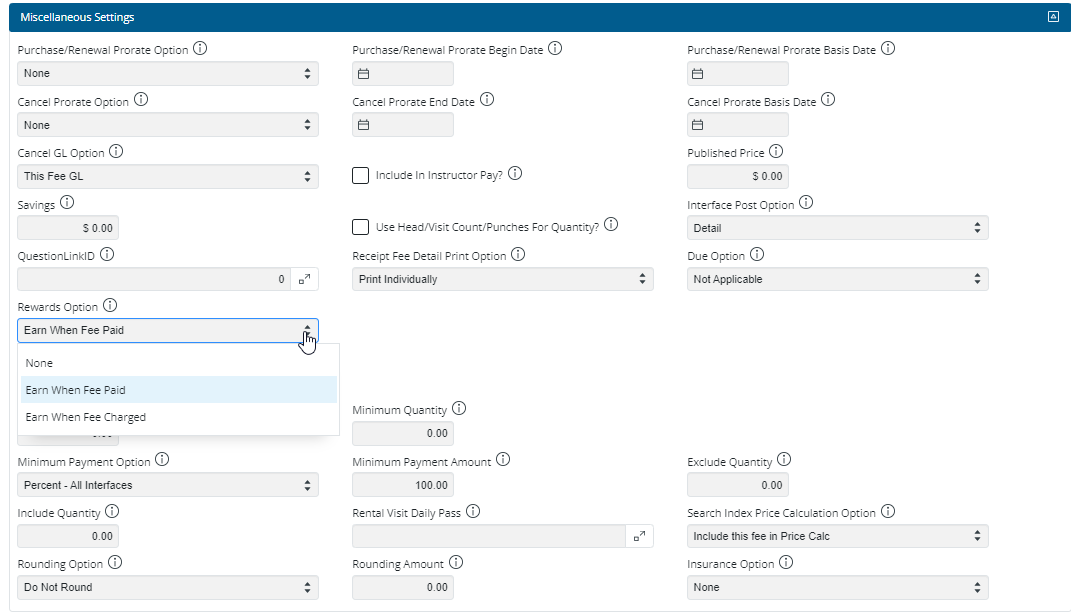
- Expand the Drop-down list for Reward Point Option and make your selection.
- None - No Reward Points are earned.
- Earn When Fee Paid - Reward points will be earned when the Fee is paid. When you select this option, the patron will earn Reward Points equal to the value entered for the appropriate module on your Rewards profile.
-
Earn When Fee is Charged - Reward points will be earned when this Fee is charged. When you select this option, enter a value in the Reward Points Earned field. The value you enter there is the total number of points a patron will earn per time this Fee is charged.
Refer to the descriptions above for examples
- IF opting to Earn When Fee is Charged, enter the Reward Point value in the Rewards Points Earned field. The value you enter is the total number of Reward Points that a patron will earn when this fee is charged; it is NOT a "per dollar charged" value.
For Example: This is a $5.00 Visit Fee for which 2.00 Reward Points will be earned. When the Fee is charged, the patron will earn two (2) Reward Points and NOT 10.
Note: RecTrac 3.1 currently does not offer a method to "stack" Reward Points without creating separate Fees. (i.e. You cannot combine points earned from a Fee being Charged and a Fee being Paid on one Fee. To do that, you have to create separate Fees.)
- Fill out any remaining fields as necessary.
- Click Save when done to save your record. Changes take effect immediately.
- Repeat these steps for all applicable Fees for which Reward Points can be earned.
Note: To set the Rewards Option field value for multiple Fees in bulk (as opposed to doing it by individual Fee as outlined above), use the Bulk Change program in Fee Maintenance (System Management • Fee/Rule/Question Management Group • Fee Management). Access the program and Add Rewards Option to the Bulk Changes to Add box. Process your bulk changes as you normally would.

Create and Link a Rewards Payment Code
The purpose of Reward Points program is to allow your patrons to use the Points they've earned as payment for specific services and products you offer. In order to use Reward Points as payment, you need to establish a Reward Points payment code and determine the number of Points that equal a Dollar.
When patrons opt to redeem their Reward Points, the Payment Code you create here is what you will enter in the Pay Code field to complete the transaction.
To Create a Rewards Payment Code
- In RecTrac, go to Management Ribbon • System Management • Financial Management Group • Payment Code Management.
- Click Add. You will continue to the Payment Code Update Core Settings screen.
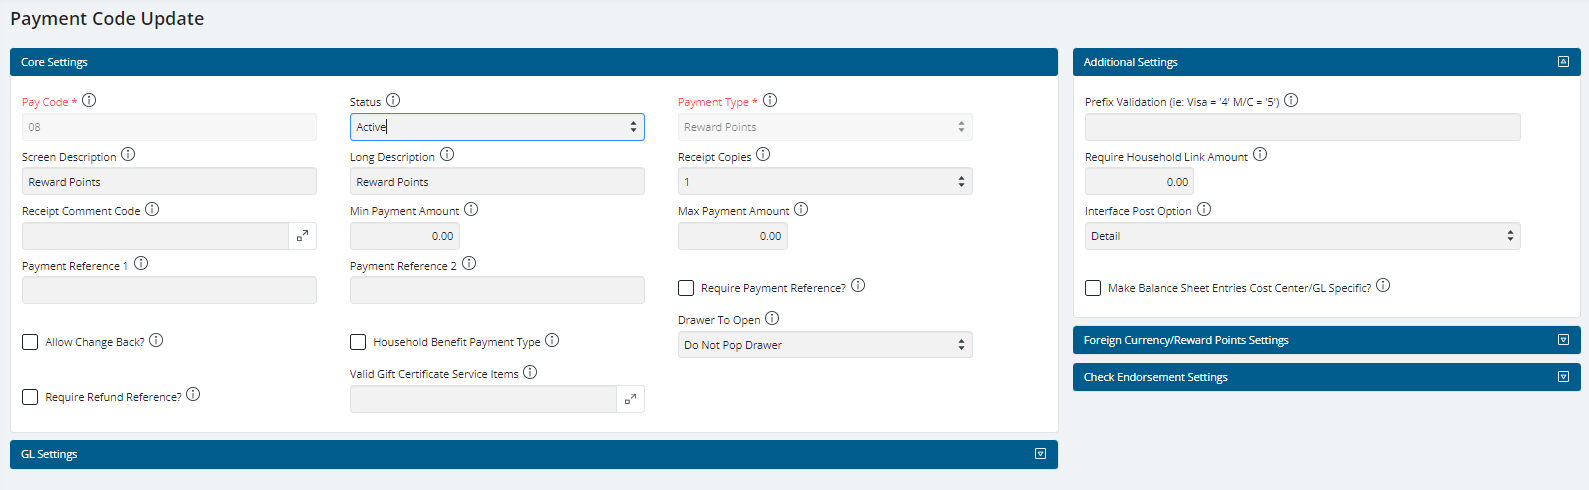
- Enter your Pay Code. For Example: Rewards or 25 or 25 - Rewards.
- Expand the Drop-down list for Payment Type and select Reward Points.
- Enter a Description and Long Description for this pay code. For Example: Reward Points.
- Expand the Foreign Currency/Reward Points Settings group.
- In the Exchange Rate field, enter the number of Reward Points which equal $1 US Dollar.
For Example: If 100 Rewards Points = $1.00 US Dollar, enter 100.00000 in this field. - Expand the GL Settings group and select your Offset General Ledger Codes as needed.
- Fill out the remaining fields in all groups on this screen as necessary.
- Click Save. You will be returned to the Payment Code Management DataGrid.
- Exit the DataGrid.
To Link a Payment Code to Your Payment Profile
To use Payment Codes in RecTrac, they must be linked in the Allowed Pay Codes field of your Payment profile.
- In RecTrac, go to Management Ribbon • System Management • User/Menu/Profile Management Group • Profile Management.
- Highlight/select your Payment profile and click Change.
- Scroll down to the Pay Code Restrictions Group.

- Click the Picklist icon for the Allowed Pay Codes field and highlight/select the Rewards Payment Code you created above. Any Pay Codes already in the field will remain selected.
- Click Select. You will return to the Payment profile.
- Ensure your Rewards Payment Code appears in the Allowed Pay Codes along with all other valid Pay Codes for this profile.
- Click Save. You will be returned to the Profiles DataGrid. Changes take effect immediately.
- Repeat these steps for any additional Payment profiles as needed.
- Exit the DataGrid when done.
Note: If you allow/will allow Reward Point Refunds, be sure to include your Rewards Point Payment Code in the Allowed Refund Pay Codes (Refund Now) field as well. Use the steps provided above as a guide.
Ensure Households are Eligible to Earn Reward Points
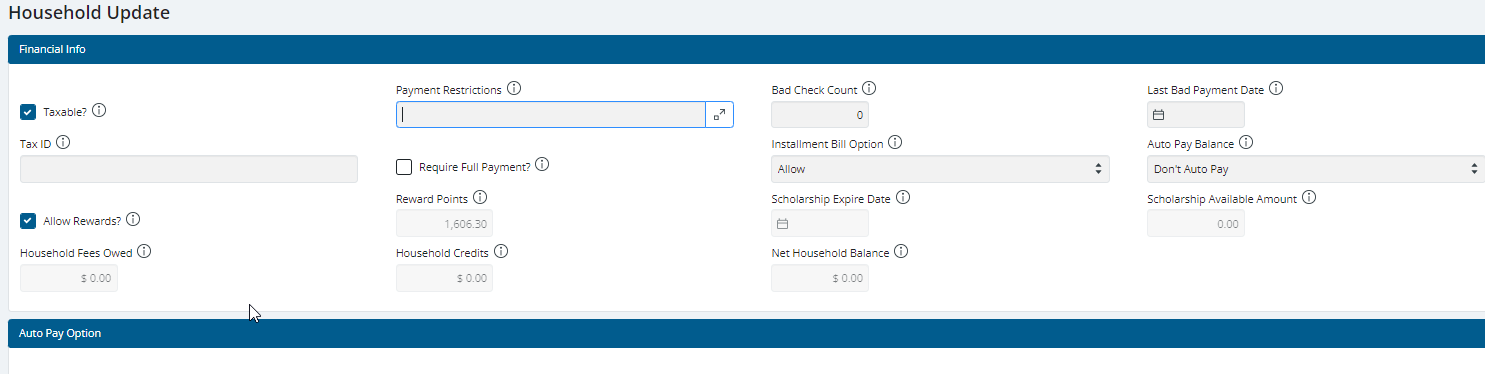
RecTrac offers you the option to allow or deny Households the ability to use Reward Points. This is managed by the Allow Rewards? option on the Financial Info tab of the household. The default setting for all new households is "enabled."
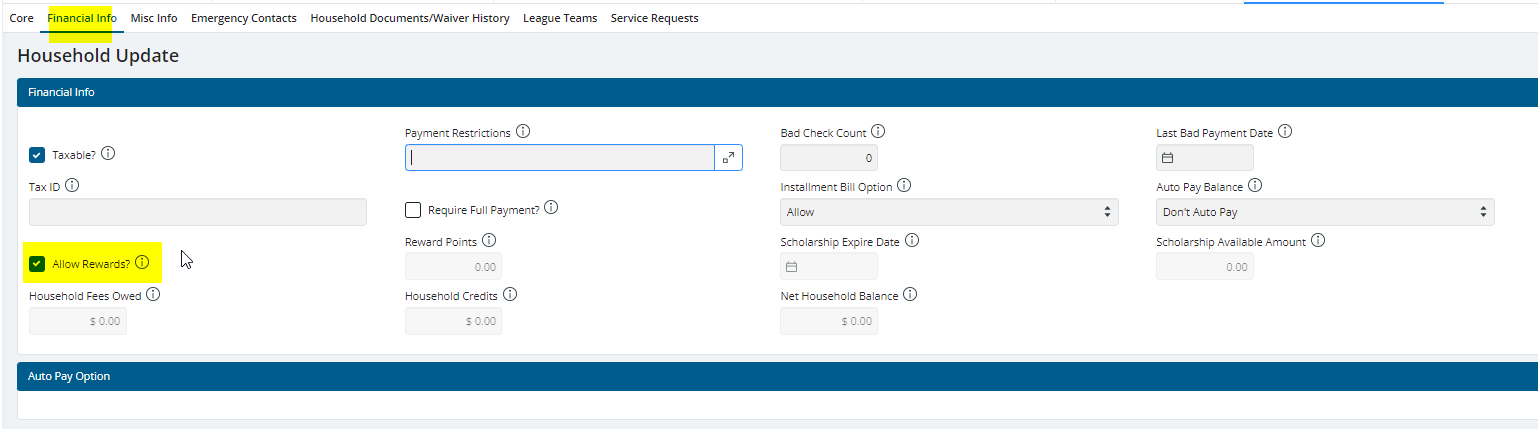
To Verify the Allow Rewards? Field Setting
- In RecTrac, go to Household Management.
- Select a random Household from the Lookup field and proceed to the Financial Info tab.
- Note whether the Allow Rewards? option is enabled. Make changes as necessary and click Save.
- Repeat steps 2-3 as needed to spot check other households, if desired.
This completes the File Maintenance Setup for RecTrac Rewards Points.
Using Reward Points
Earning Rewards Points
The following assumes that you have established your Reward Points program using the instructions above, though with the realization that your Reward Points earned per dollars spent may be different.
To Earn Rewards Points
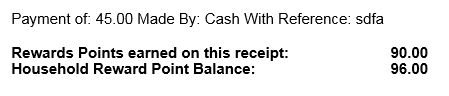
- The patron purchases (or is charged for) an Item to which Rewards Points are linked, such a the sale of a Service Item or a Pass Visit.
- Process the sale/visit in RecTrac as you normally would.
- The receipt generated from the transaction will list Reward Points earned on this receipt and Household Reward Point Balance.
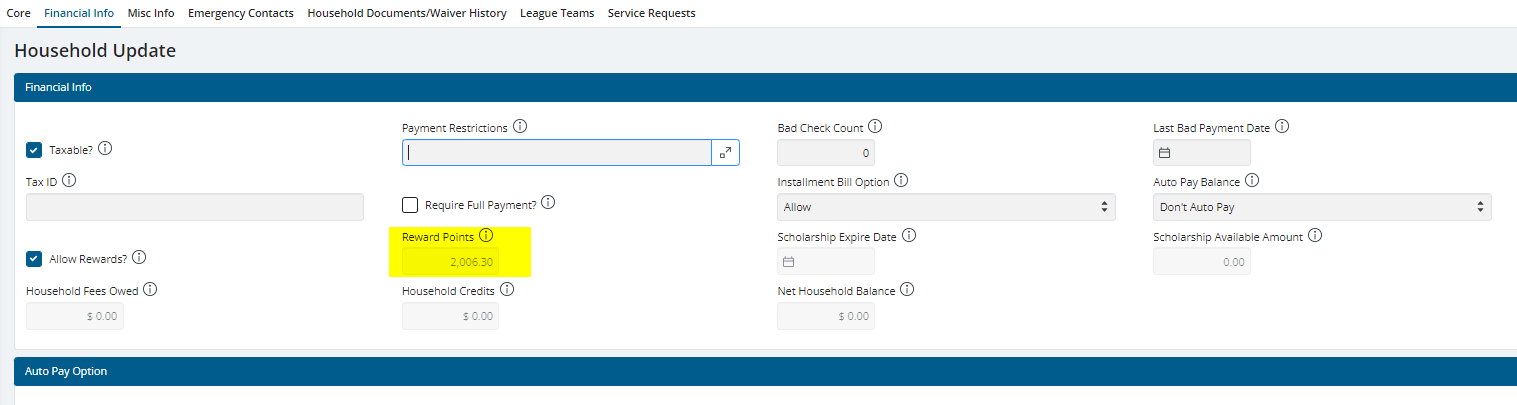
- You can check a household's Rewards Points balance from the Financial Info tab using either Household Management or Household Inquiry.
Redeeming Rewards Points
The following assumes that you have established your Reward Points program using the instructions above, though with the realization that the Reward Rate on your Reward Points Pay Code (the number of Reward Points which equal $1 US Dollar) may be different.
To Redeem Reward Points
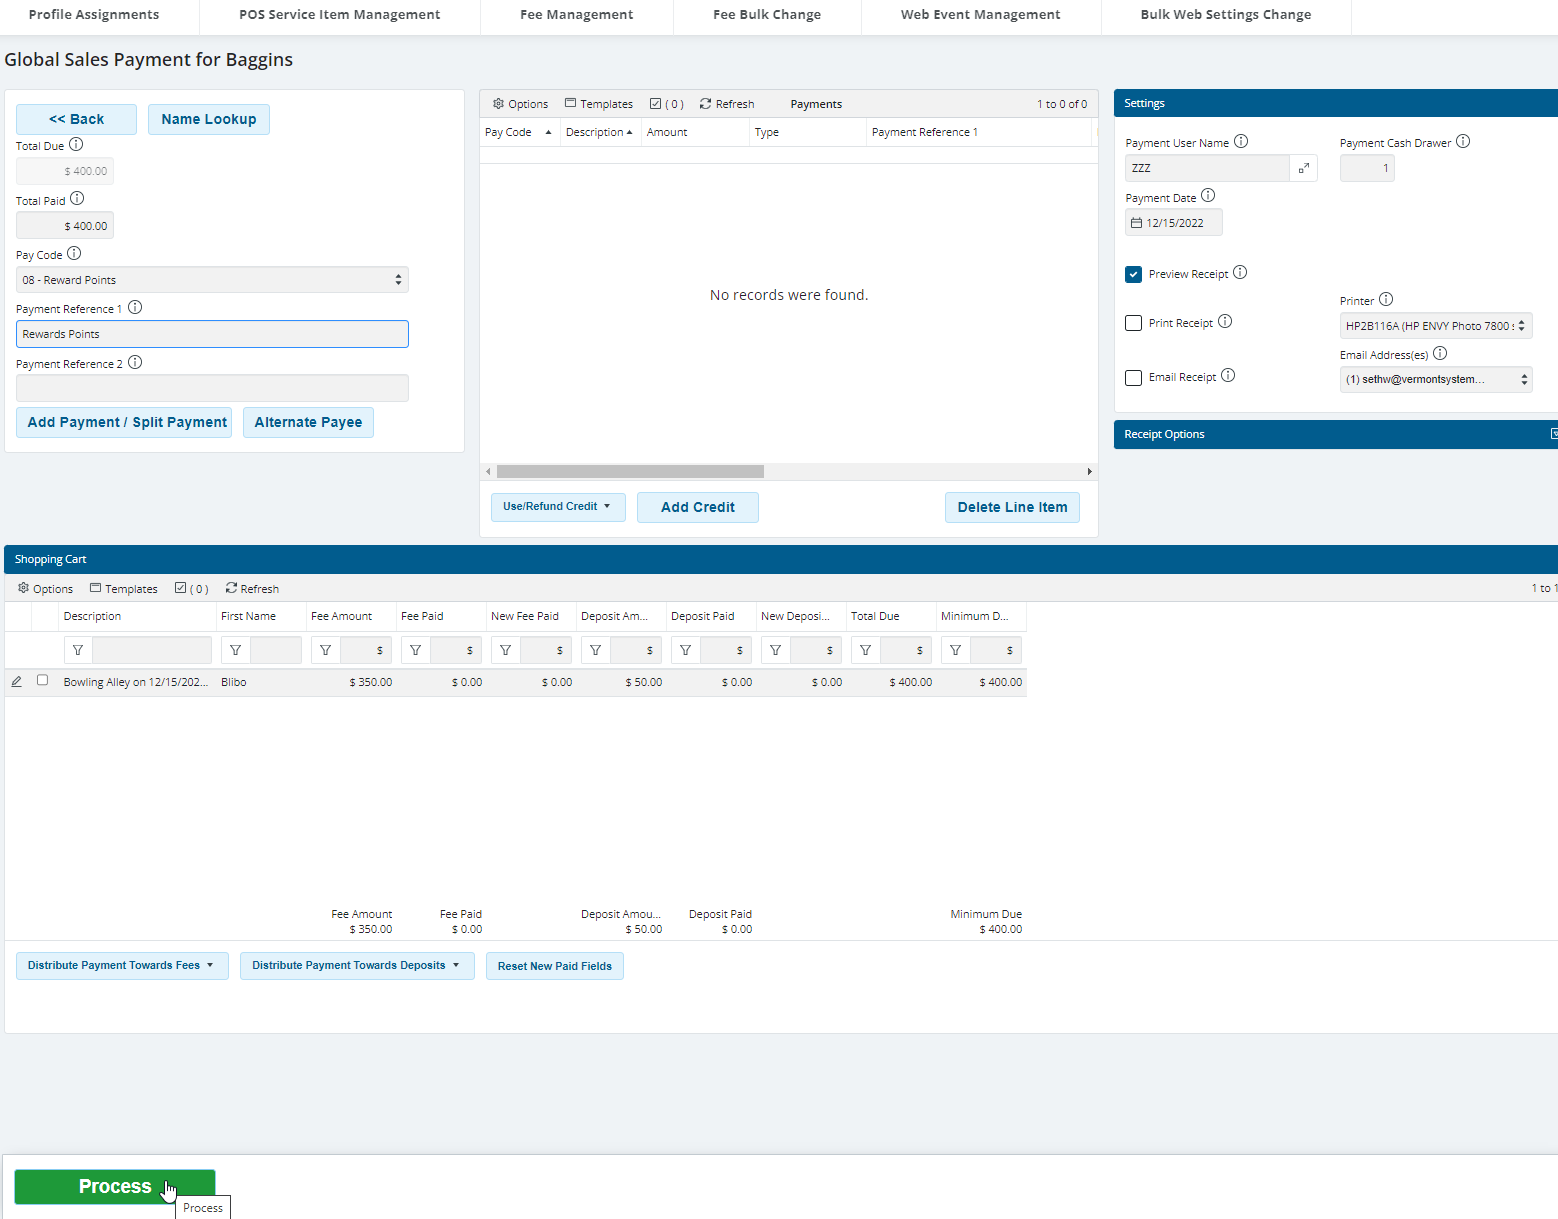
- Process the transaction for this patron as you normally would and click Payment to proceed to the Global Sales Payment screen.
- Expand the Drop-down list for Pay Code and select your Rewards Payment Code.
- Upon selecting the Rewards Points Pay Code, the Amount field will default to the Reward Point total needed for the sale.
Note: This occurs ONLY if your Default Payment Amount Settings for the requisite module is set to Total Due on your Payment profile.
- Complete the sale as you normally would. The resulting receipt will display Reward Points Used and Reward Points Remaining for the Household.

- You can check a household's Rewards Points balance from the Financial Info tab using either Household Management or Household Inquiry.
Refunding Rewards Points
The following assumes that you have established your Reward Points program using the instructions above, though with the realization that the Reward Rate on your Reward Points Pay Code (the number of Reward Points which equal $1 US Dollar) may be different.
To Refund Rewards Points
Note: To complete the steps below, your Payment profile must be set to allow Refund Now as an Allowed Refund Option and your Rewards Payment Code must be listed in the Allowed Refund Pay Codes (Refund Now) field.
- Process the return for this patron as you normally would and click Refund to proceed to the Refund Update screen.
- Expand the Drop-down list for Refund Option and select Refund Now.
- Select your Reward Points Payment Code. The Refund Amount will calculate out the number of points to be refunded.
- Enter any applicable Pay References, if needed.
- Click Process and complete the transaction. The Receipt will display the Rewards Points return.

Updating a Household's Rewards Point Balance
The Reward Points Maintenance program allows you manually increase or decrease a Household's Reward Points balance.
To increase a household's Reward Points balance, enter a positive number and click Process To reduce a household's Reward Points balance, enter a negative number and click Process. No receipt is generated; the balance is simply updated. The User ID of the person logged in will be added to the Rewards Maintenance record whenever a Household's Reward Points balance is updated.
To Adjust Reward Point Totals:
- In RecTrac, go to Management Ribbon • System Management • Household Management • Household Reward Points Management.
- Look up and Select the Household whose points you wish to adjust from the Household look up screen. You will continue to the Reward Points Maintenance program for the household selected.
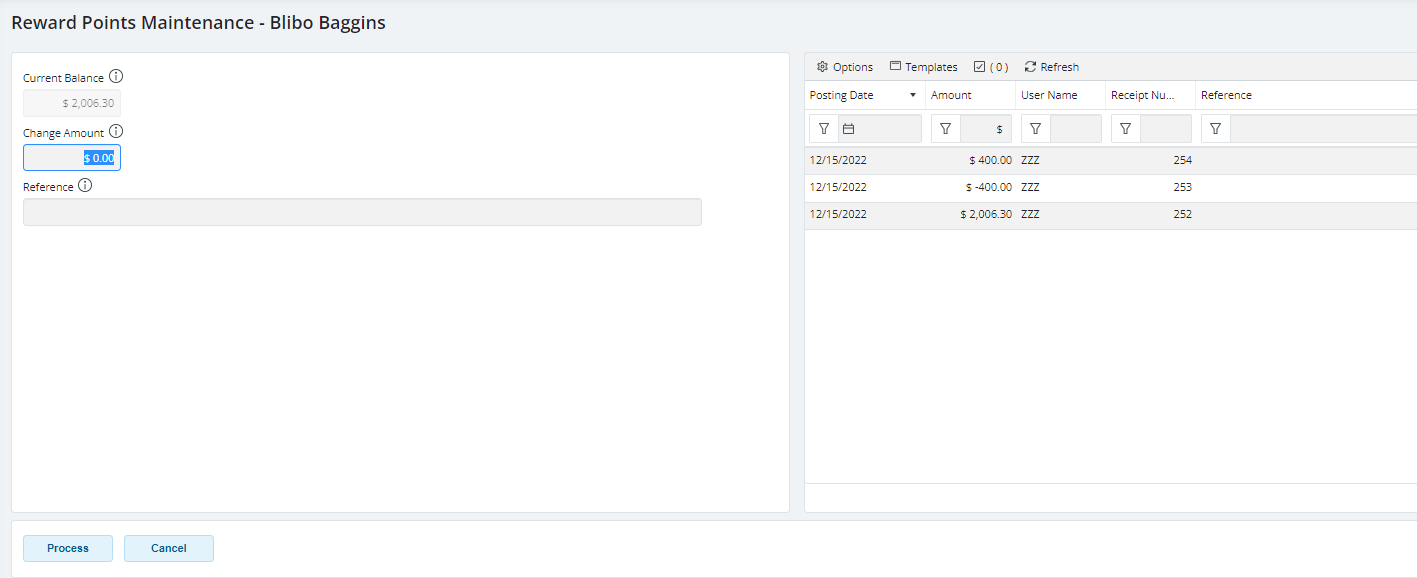
- The Household's Current Balance will appear in the corresponding field.
- Enter a Reward Balance Change Amount. This can be an increase (+) or decrease (-).
- Enter a note in the Reference field to explain the adjustment, if desired. This note will appear in the household's Reward Points history.
- Click Process to complete the action. The household's reward points will be adjusted accordingly. You will be returned to the Household Lookup screen where you can repeat this process or Exit back to the main menu.
Purging Reward Point Balances
The Reward Purge program removes any Rewards Point balance for households in the range selected. This program does not take permissions into account nor does it print a purge journal. It simply initializes household Reward Point balances to $0.00 and creates an Audit Log entry.
To Run the Reward Points Purge
- In RecTrac, go to Management Ribbon • System Management • Household Management • Household Reward Points Management.
- Click Reward Purge. You will continue to the Reward Purge program.
Note: Access to this button is controlled via the Permissions profile: Buttons/Misc Permissions tab • RewardPointsLookup_ButtonRewardPurge.
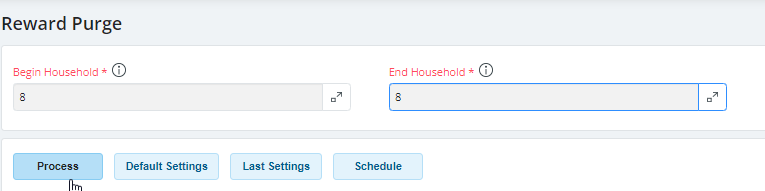
- Click the Picklist icons for Begin and End Household to select your range of Households. These fields use Household Number and not Household Last Name.
- Click Process when ready. The process runs on the AppServer. You will be notified when it completes. This program does not take permissions into account nor does it print a purge journal.
Rewards Points Reports and Inquiries
At present, no specific Reports or Inquiries for Rewards Points have been coded for RecTrac 3.1.
Reports
You can include a Household's Reward Point total on any custom report where the SAHousehold Table is available. Opt to include SAHousehold_RewardPoints.
Inquiries
You can check a household's Rewards Points balance from the Financial Info tab using either Household Management or Household Inquiry.

You can check a household's Rewards Point balance from Household Inquiry • Rewards.
- Go to Household Inquiry.
- Look up the Household.
- Click the Rewards button at the bottom of the DataGrid.
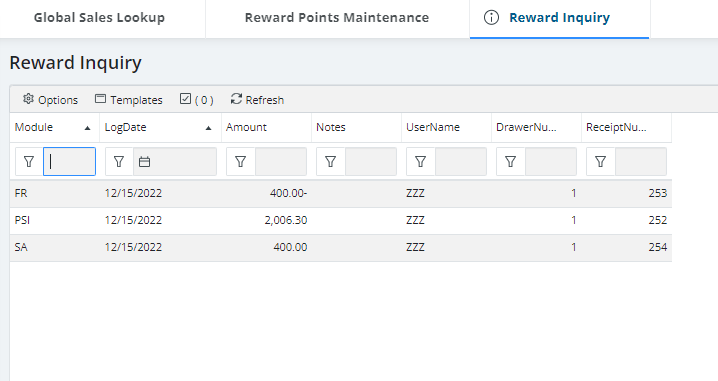
Optionally, you can check a household's Rewards Points balance and view its Rewards Points History using the Rewards Points Maintenance program.