
Table of Contents
Document Summary
This Topic Doc discusses how to configure the Payment Profile for refunds, and how to process common types of refunds through the Global Sales screen. Before you begin, it's essential to understand that a given user's Payment Profile assignment determines what refund options are available (if any), so your screens might look and behave differently than those pictured in this Topic Doc depending on the restrictions established by your organization.
Overview: Payment Profile
A RecTrac user's assigned Payment Profile determines whether refunds are allowed, which refund types are available, defaults, maximum amounts, and other key permissions. It's common to have multiple Payment Profiles, each assigned appropriately to limited-access-users and manager-users with greater privileges.
Overview: Common Refund Scenarios
- Deposit - Processing a simple refund of a security/damage deposit as you might hold when renting a facility or other rental items (i.e., a jet ski).
- Facility/Activity/Rental - Cancelling a facility reservation, activity registration, or rental item.
- POS Service/Inventory Item - Refunding a Point of Sale purchase for an Inventory Item (a baseball cap) or a Service Item (a lane rental in the bowling alley).
Overview: Refund Options
These are the basic types of refund options through RecTrac (might be restricted in your Payment Profile):
- Refund Apply - The refund applies back to the household as a credit in RecTrac. The household balance will be updated accordingly.
- Refund Now - The refund processes "now" as a cash back situation, either as literal cash back or a credit to the patron's credit card. This is determined by local policy. The household balance in RecTrac will be updated accordingly.
- Refund Void - The refund processes "now" as a cash back situation but identifies a mistake was made, allowing you to determine whether the refund was processed to correct an error. The Refund Void never debits the Refund GL code associated with the bill code only the original Revenue GL code will be debited. Refund reports can also report on Refund Void refund types.
- Refund Finance - Your Finance department will ensure the household gets refunded (usually a check or an ACH deposit that's processed outside of RecTrac). The household balance in RecTrac will be updated accordingly.
The Refund Options that appear in this list are set in the Allowed Refund Pay Codes field of the Payment profile • Pay Code Restrictions group to which your User ID is linked.
Bulk Refund Options
You might have an activity, trip, or ticketed event that MUST be cancelled. Your local policy might require a minimum attendance and when that threshold is not met, you cancel that activity/trip/event. Cancelling in bulk saves you from having to open each individual patron's household in Global Sales and processing each refund. This bulk cancel program automatically purges the roster, resets the registered counts, handles the general ledger adjustments, and generates receipts/statements for households.
To bulk cancel:
- Activity Cancellations - In RecTrac, go to Management Ribbon • Activity Management • Section Management. Highlight the section within the DataGrid and then click the Cancel Section button.
- Ticket Cancellations - In RecTrac, go to Management Ribbon • Ticket Management • Ticket Management. Highlight the ticket within the DataGrid and then click the Cancel Ticket button.
- Trip Cancellations - In RecTrac, go to Management Ribbon • Trip Management • Trip Management. Highlight the trip within the DataGrid and then click the Cancel Trip button.
- Use the "i" and "?" Help icons Help Icons on the upper-right hand corner of the screen for field definitions, if needed.
Overview: Alternate Payee Refunds
You process an alternate payee refund much as you do any other refund. When using Alternate Payee logic:
- The Payment Record does NOT show under the Alternate Payee's Purchase History. The Payment Record is found in Purchase History on the original household for whom the item was purchased.
- Refunds go back to the Alternate Payee. They do not go to household for whom the item was purchased.
- You can Refund only to an Alternate Payee who is linked to the initial sale. In other words, you cannot use Alternate Payee to refund to a third party. For Example: Marian Paroo cancels her son's enrollment in Boys Band. She wants the refund to go to Harold Hill. The system will disallow this unless Harold was the original Alternate Payee for the Boys Band program. If Harold Hill was not the Alternate Payee, then the refund cannot go to him.
- Payments made toward Childcare-eligible programs and services using an Alternate Payee are recorded under the Alternate Payee's household and will appear on Childcare Statements printed from RecTrac/WebTrac for the Alternate Payee.
- Alternate Payee logic is available only for payments toward balances made through RecTrac Global Sales at this time. There is no Alternate Payee option for Auto-Debit through Installment Billing.
- This is a System-wide setting, so once the Allow Alternate Payee option is enabled, the Alternate Payee button will appear on all RecTrac Payment screens that use the standard Vermont Systems design. Alternate Payee buttons may have to be added to Payment Screens that use a Custom design.
License – Maintenance Agreement
The Refund Options discussed in this document are free. Use of them requires a Vermont Systems license and annual maintenance agreement for RecTrac and the component modules discussed in this document. Prior to implementing any process outlined in this document, please contact the Vermont Systems Sales department at 1-877-883-8757 to verify that you are authorized to use the modules discussed in this document and if not, to obtain a quote and/or approval.
Setup Steps
This document provides instruction for applying refunds.
If you have additional questions about the refunds through Global Sales after reading this document, please contact Vermont Systems Customer Service by phone at 887-883-8757 or generate a Support Case through the Customer portal of the Vermont Systems web site using your Customer ID and password.
Before You Begin
This document is written with the following assumptions. If any of the items listed below is NOT true, contact Vermont Systems Support prior to continuing, as the steps in this document may prove difficult to complete and unexpected results may occur.
- Your organization is running RecTrac 3.1.05.00 or greater.
File Maintenance Setup
This document will guide you through the basic steps required to refund through Global Sales.
Note: All file paths and screen/tab locations in this document refer to file paths and screen/tab locations as they appear in the standard, default Vermont Systems Design. Your setup and Design may vary.
Defining the Payment Profile
In this section, you will review key Payment Profile settings that are applicable to how the refund process works within RecTrac. Typically, multiple Payment Profiles exists and are assigned as is appropriate to your users. For Example: You might have a restricted-access Payment Profile that is appropriate for your clerks when processing daily transactions. Additionally, you might have a managers-only Payment Profile that has elevated permissions to handle other situations as they might arise (i.e., refunds).
- In RecTrac, go to Management Ribbon • System Management • User/Menu/Profile Management group • Profile Assignments. The Profile Assignments screen opens.
- Within the Available Profiles area, expand Payment and then highlight the desired Payment Profile. Click Update. You will continue to the Profile Update screen.
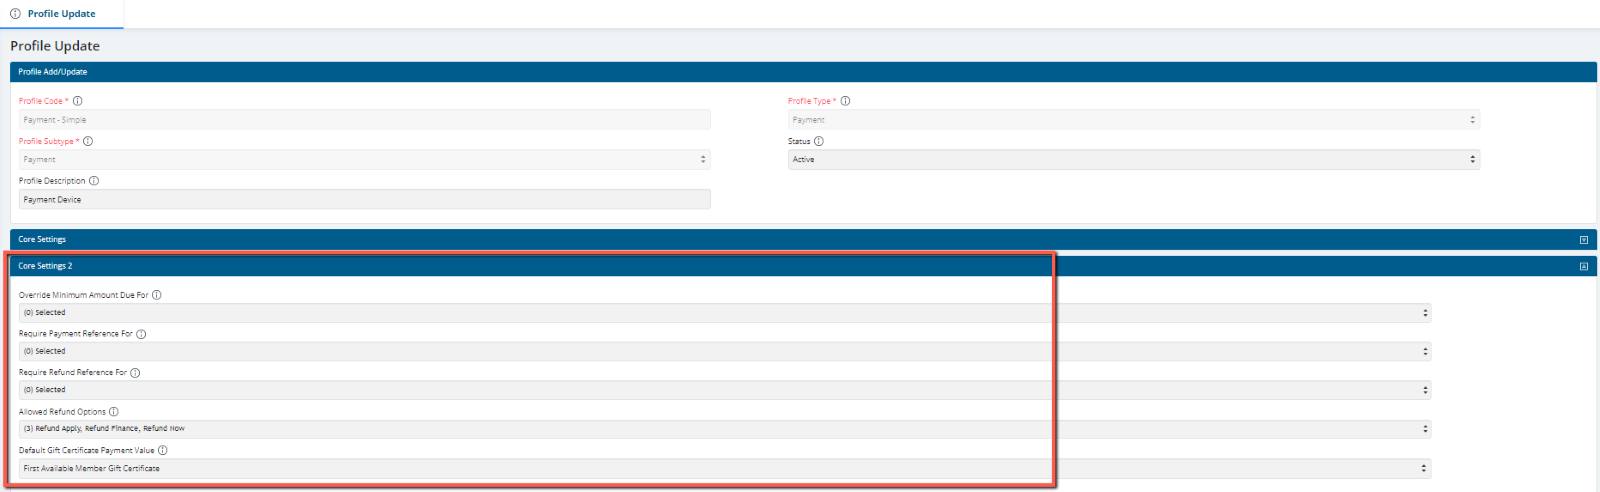
- Expand the Core Settings 2 group.
- Expand the Drop-down list for the Default Credit Availability From Cancel\Change field. Select how "new" credits should be made available elsewhere in the system during refund situations. For Example: Amy cancels her activity enrollment for Yoga. Should Amy's household credit only apply to other activity enrollments or anywhere else within the system (i.e., Amy can use her credits for a Facility Reservation or Pass)? Select Original Module Only or All Modules based on your local policy.
- Click the Combo Box icon to select the Modules for which you wish to require a Refund Reference, if any. If a refund transaction involves any of the modules selected, then you will be required to enter a reference at the Refund Screen. For Example: The refund Reference field might enable your POS staff to record the reason the patron is cancelling his/her purchase which administrators can later produce reports based off of.
- Click the Combo Box icon to select the Refund Types you wish to allow for refund transactions processed by users linked to this Payment profile. When a transaction results in a refund situation and the user continues to the Refund screen, the refund options selected here will be available. Depending on local policy, you might enable all, some, or none of these options for the POS clerks.
These are the basic types of refund scenarios:Refund Apply - The refund will be applied back to the household as a credit in RecTrac. The household balance will be updated accordingly.Refund Now - The refund processes "now" as a cash back situation, either as literal cash back or a credit to the patron's credit card. This is determined by local policy. The household balance in RecTrac will be updated accordingly.
- Refund Void - The refund processes "now" as a cash back situation but identifies a mistake was made, allowing you to determine whether the refund was processed to correct an error. The Refund Void never debits the Refund GL code associated with the bill code only the original Revenue GL code will be debited. Refund reports can also report on Refund Void refund types.
- Refund Finance - Your Finance department will ensure the household gets refunded (usually a check or an ACH deposit that's processed outside of RecTrac). The household balance in RecTrac will be updated accordingly.
Note: When none of these Refund Types are enabled, a Lock icon displays on the Global Sales Refund screen. Clicking the icon "pops" a user override window where a manager's (or other similar user with sufficient permissions) User ID and password is entered. The system will allow you to use the Refund Options and Refund Pay Codes from that User's Payment profile for the current Refund Transaction.
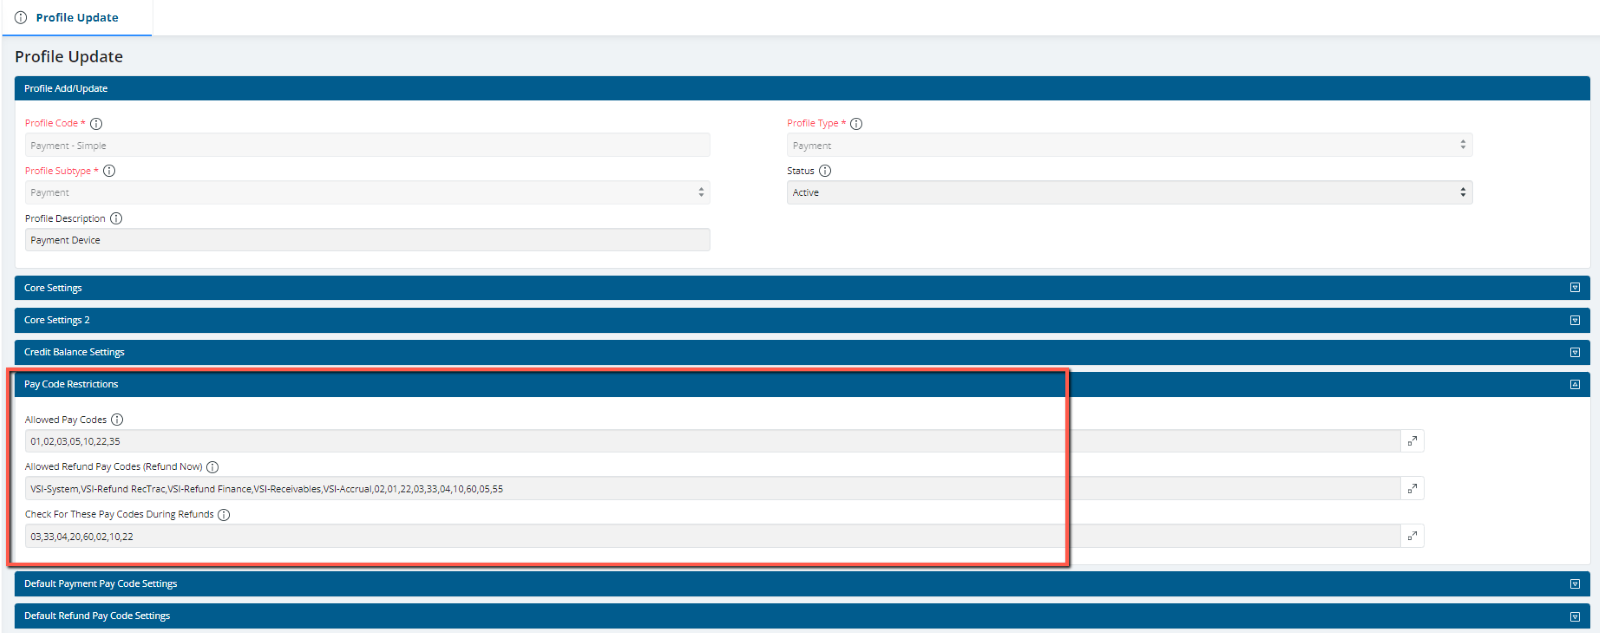
- Expand the Pay Code Restrictions group.
- Click the Combo Box icon and select the Payment Codes you want for Allowed Refund Pay Codes (Refund Now). Users linked to this profile will be able to use these Refund Codes on the Payment screen in Global Sales, Touch POS, etc….
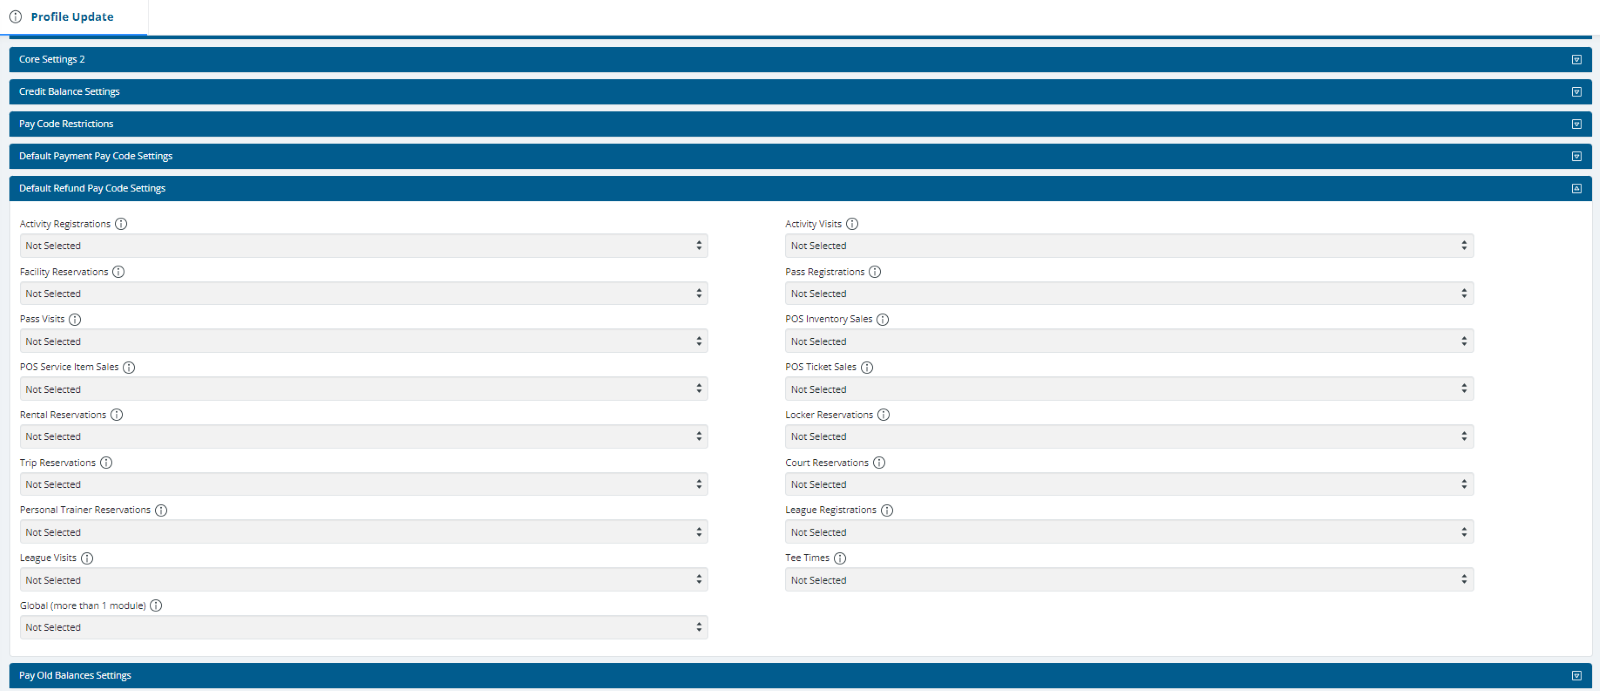
- Expand the Default Refund Pay Code Settingsgroup.
- For each module, you can choose the default Refund selected for Users linked to this profile on the Payment screen in Global Sales, Touch POS, etc…. Expand the Drop-down lists and select Payment Codes as is appropriate.
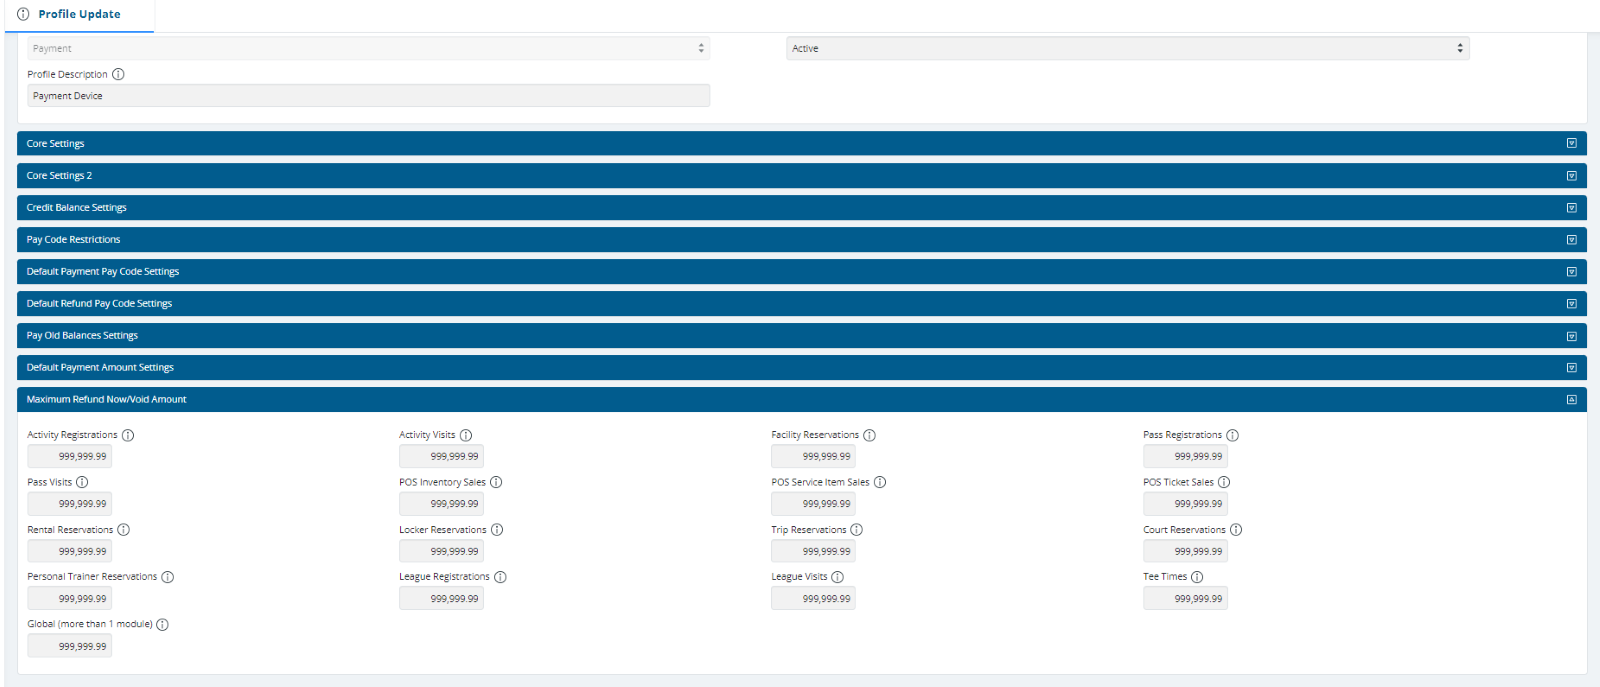
- Expand the Maximum Refund Now/Void Amount group.
- For each module, you can enter the maximum amount that can be refunded for Users linked to this profile on the Payment screen in Global Sales, Touch POS, etc…. Enter amounts as is appropriate.
- Click the Save button.
Refunding a Deposit
This section goes through a simple refund of a security deposit. It's common to hold a damage deposit when renting a facility and other rental items (i.e., a jet ski).
- In RecTrac, go to the Home Ribbon • Global Sales. The Global Sales screen opens.
- Select the desired Household. For the purpose of example, the household of Brunhilda Austrasia was selected. The Global Sales screen for [Name] screen opens.
- Click the Purchase History tab.

- The DataGrid lists this household's purchases. Click to highlight the desired rental(s). Multi-selection is allowed. For the purpose of example, this was a jet ski rental.
- Click the Update Fees button and then select Deposit Refund from the menu. A screen opens with details about the deposit held for the selected purchase.

- The total Amount held in deposit is listed and editable.
- To refund the complete deposit held, enter zero ($0.00) within the Amount field. For Example: Brunhilda returned her jet ski in good condition and therefore received the full deposit back according to your local policy.
- To refund part of the deposit held, edit the Amount field as is applicable. For Example: Brunhilda returned the jet ski with damage and half of the deposit will be given back according to your local policy.
Note: Alternatively, you might configure an additional Fee that is a Deposit Refund Transaction Type (i.e., labeled Deposit Forfeiture) with an appropriate Revenue GL linked to define where the forfeited deposit money is sent. In the step above, you would have two lines one for the Amount you're refunding, and another line for the Deposit Forfeiture you're keeping ($100.00 each in the example given).
- Click the Continue button. You return to the Global Sales screen with the refund(s) in the cart.

- Click the Refund button. The Global Sales Refund screen opens.

- Begin with the panel in the upper-right corner of the screen. You have the Total Refund (i.e, in this case $200.00) amount available to use for reference, the Total Paid field, and an Add Refund button. The Total Refund field value drops as you use the Total Paid and Add Refund button together to refund the patron.
- Determine whether you are refunding through one or multiple payment methods.
- To refund all through one payment method, then accept the default Total Paid value (matching the Total Refund).
- To refund with multiple payment methods, edit the Total Paid value for the amount you desire to refund through the first payment method. Repeat steps 9-14 for each additional payment method. You get multiple Lines in the Payments area of the screen for each of the respective values and methods until you reach the full refund amount allowed. For Example: Patron wants half the refund to go toward their outstanding household balance and the other half refunded to their credit card. You create two lines in the Payments area, one for 50% toward the household credit, and one for 50% toward the credit card.
- Accept the default value for Refund Option or expand the Drop-down list to select the Payment Code being used for this transaction. Depending on the Payment Code you select, other fields may appear and disappear from the screen.
- Applicable if you chose Refund Now or Refund Void. Accept the default value for Pay Code or expand the Drop-down list to select the Refund Type you wish to use for this transaction.
- Enter Payment References as needed. For Example: You might be required to enter the patron's refund reason into the reference field.
- IF this transaction will result in a Credit being applied to the household, then expand the Add Credit/Refund Apply - Restrictions group, if needed, to set parameters on how that credit can be used in a future transaction. Otherwise, skip to the next step.
- The fields in this group allow you to place restrictions on how household credits generated from this transaction can be used for future transactions. When a credit is created as a result of a transaction due to a Refund Apply situation, you can use these fields to select a specific Module, a Category and/or Type/SubType within that Module or a single Item within that Module for which the Credit can be used.
- Expand the Drop-down lists to select the Credit Module, Credit Category, Credit Type/Subtype as is appropriate. For Example: Your local policy is that a refund from the water sports area is only good for other purchases or rentals there. Brunhilda's refund for the jet ski can be used for a rentals of paddle boards, kayaks, or Hobie Cat.
- Use the "i" and "?" Help icons Help Icons on the upper-right hand corner of the screen for field definitions, if needed.
- If adding multiple lines, click the Add Refund button and a line item matching your amount paid and payment code will appear in the Payments DataGrid. Otherwise, skip to the next step.
- Accept the default entries for Refund Information (User Name, Drawer, and Date) and Receipt Information (Preview, Print, and/or Email). Use the "i" and "?" Help icons Help Icons on the upper-right hand corner of the screen for field definitions, if needed.
- Expand the Receipt Options group, if needed, to make additional selections.
- Click Process when ready to complete the refund. Receipt(s) will be generated and you will be returned to the Global Sales Lookup screen.
Refunding a Facility/Activity/Rental Purchase
This section goes through a simple cancel of a facility rental, activity registration, or rental item. The cancellation of the purchase enables a refund in-full or partial of the purchase amount. For Example: Saeda is cancelling her reservation for a Pavilion in June and is far enough in advance to receive back the full amount of $300.00 (including a $200.00 damage deposit, and a $100.00 pavilion rental fee).
- In RecTrac, go to the Home Ribbon • Global Sales. The Global Sales screen opens.
- Select the desired Household. For the purpose of example, the household of Brunhilda Austrasia was selected. The Global Sales screen opens.
- Click the Purchase History tab.
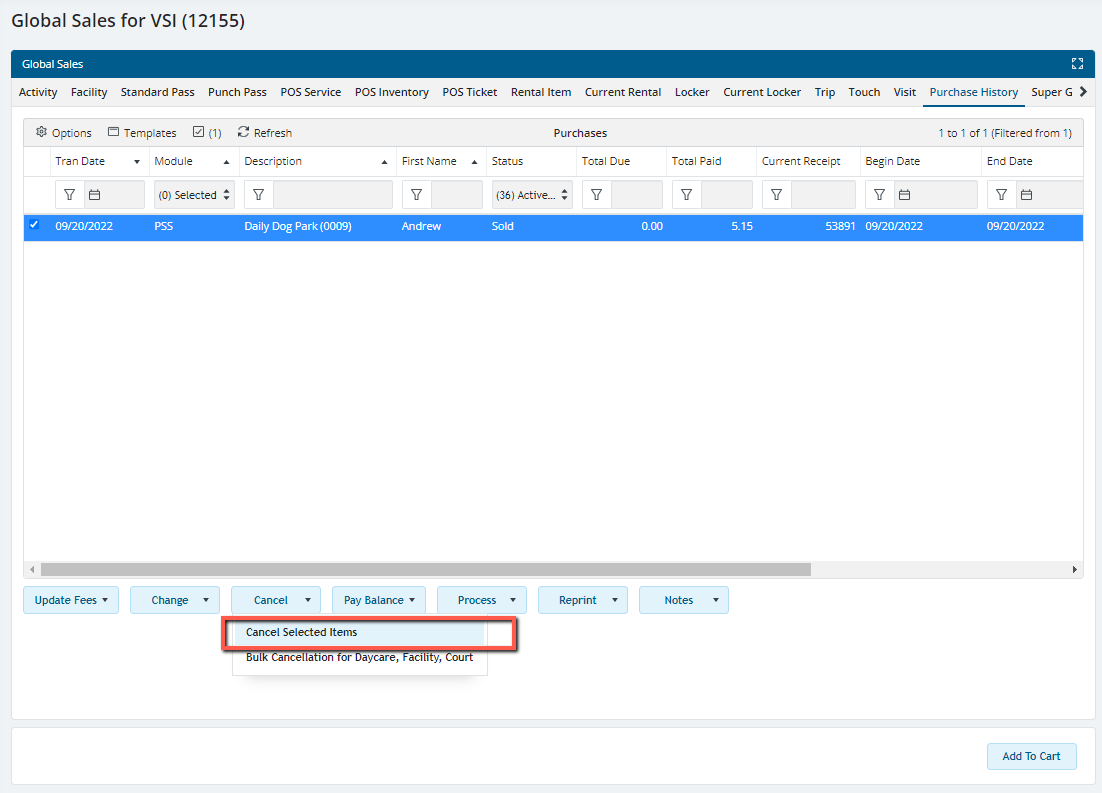
- The DataGrid lists this household's purchases. Click to highlight the desired purchase(s). Multi-selection is allowed. For the purpose of example, this was a facility rental.
- Click the Cancel button and then select Cancel Selected Items from the menu.
- The Shopping Cart now includes the purchase(s) you selected to cancel, along with the Total Due. For the purpose of this example, that is a $300.00 refund.
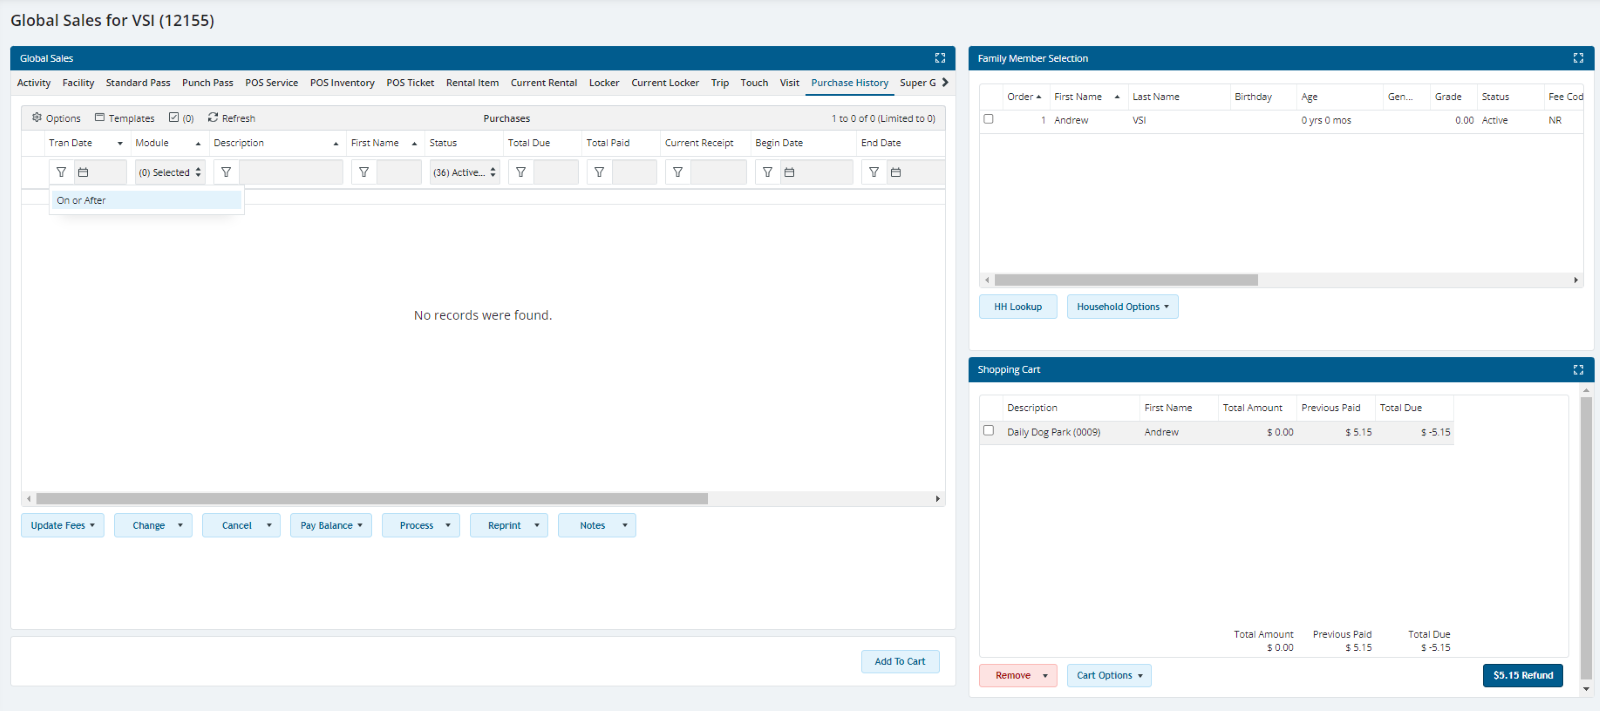
- Click the Refund button within the shopping cart. The Global Sales Refund screen opens.
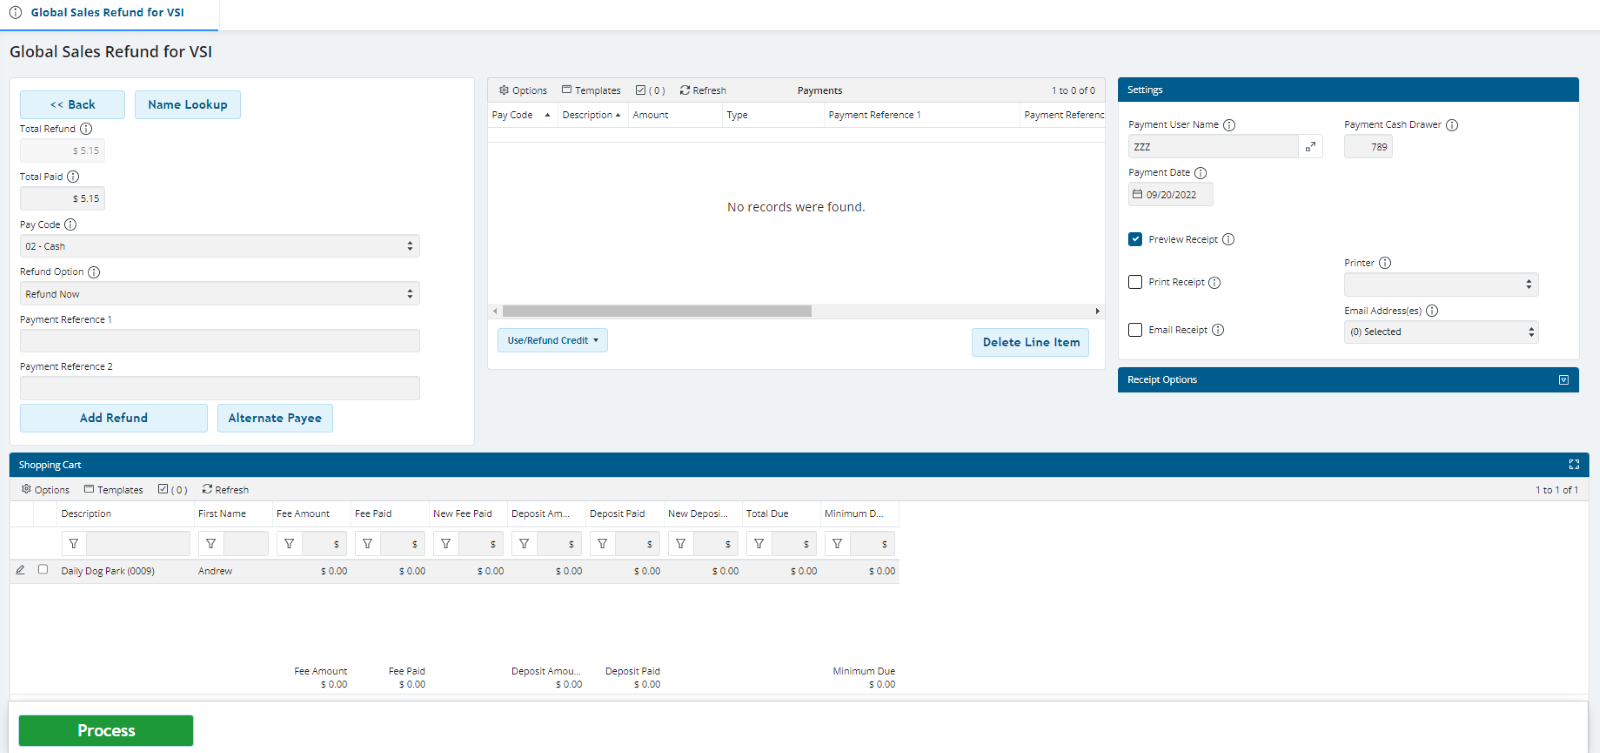
Click Image to Enlarge
- Begin with the panel in the upper-right corner of the screen. You have the Total Refund (i.e, in this case $300.00) amount available to use for reference, the Total Paid field, and an Add Refund button. The Total Refund field value drops as you use the Total Paid and Add Refund button together to refund the patron.
- Determine whether you are refunding through one or multiple payment methods.
- To refund all through one payment method, then accept the default Total Paid value (matching the Total Refund).
- To refund with multiple payment methods, edit the Total Paid value for the amount you desire to refund through the first payment method. Repeat steps 9-14 for each additional payment method. You get multiple Lines in the Payments area of the screen for each of the respective values and methods until you reach the full refund amount allowed. For Example: Patron wants half the refund to go toward their outstanding household balance and the other half refunded to their credit card. You create two lines in the Payments area, one for 50% toward the household credit, and one for 50% toward the credit card.
Note: Alternatively, you might configure an additional Fee that is a Deposit Refund Transaction Type (i.e., labeled Deposit Forfeiture) with an appropriate Revenue GL linked to define where the forfeited deposit money is sent. In the step above, you would have two lines one for the Amount you're refunding, and another line for the Deposit Forfeiture you're keeping ($100.00 each in the example given).
- Accept the default value for Refund Option or expand the Drop-down list to select the Payment Code being used for this transaction. Depending on the Payment Code you select, other fields may appear and disappear from the screen.
- Applicable if you chose Refund Now or Refund Void. Accept the default value for Pay Code or expand the Drop-down list to select the Refund Type you wish to use for this transaction.
- Enter Payment References as needed. For Example: You might be required to enter the patron's refund reason into the reference field.
- IF this transaction will result in a Credit being applied to the household, then expand the Add Credit/Refund Apply - Restrictions group, if needed, to set parameters on how that credit can be used in a future transaction. Otherwise, skip to the next step.
- The fields in this group allow you to place restrictions on how household credits generated from this transaction can be used for future transactions. When a credit is created as a result of a transaction due to a Refund Apply situation, you can use these fields to select a specific Module, a Category and/or Type/SubType within that Module or a single Item within that Module for which the Credit can be used.
- Expand the Drop-down lists to select the Credit Module, Credit Category, Credit Type/Subtype as is appropriate. For Example: Your local policy is that a refund from the water sports area is only good for other purchases or rentals there. Brunhilda's refund for the jet ski can be used for a rentals of paddle boards, kayaks, or Hobie Cat.
- Use the "i" and "?" Help icons Help Icons on the upper-right hand corner of the screen for field definitions, if needed.
- If adding multiple lines, click the Add Refund button and a line item matching your amount paid and payment code will appear in the Payments DataGrid. Otherwise, skip to the next step.
- Accept the default entries for Refund Information (User Name, Drawer, and Date) and Receipt Information (Preview, Print, and/or Email). Use the "i" and "?" Help icons Help Icons on the upper-right hand corner of the screen for field definitions, if needed.
- Expand the Receipt Options group, if needed, to make additional selections.
- Click Process when ready to complete the refund. Receipt(s) will be generated and you will be returned to the Global Sales Lookup screen.
Refunding a POS Service/Inventory Item Purchase
This section walks you through the process of refunding a patron for a POS Service, Inventory Item, or Ticket Purchases.
Option 1: You can process a second transaction for a negative quantity (-1) to refund that purchase and restock your inventory with one process. For Example: Vincent Vega purchased a baseball cap for $20.00 and now wants to return it. To refund Vincent, you would process a sale for a negative one (-1) quantity of a baseball cap. This new sale will refund the complete $20.00 of the original purchase. Your inventory quantity increases by one hat. This section walks you through this scenario.
Option 2: You can Cancel the transaction through Purchase History, which will refund the amount (as described in the prior section: Refunding a Facility/Activity/Rental Purchase). You highlight the item in the DataGrid, click Cancel, and then Cancel Selected Item. The process remains the same from the Cart forward.
- In RecTrac, go to the Home Ribbon • Global Sales. The Global Sales screen opens.
- Select the desired Household. For the purpose of example, the household of Vincent Vega was selected. The Global Sales screen opens.
- Click the POS Inventory tab.

- The DataGrid lists the POS Inventory Items you sell. Click to highlight the desired item(s). Multi-selection is allowed. For the purpose of example, this is a baseball cap.
- In the Inventory Quantity field, enter a value of negative one (-1).
- Click the Add To Cart button.
- The Shopping Cart now includes the item(s) you selected for refund, along with the Total Due. For the purpose of this example, that is a $20.00 refund.
- Click the Refund button within the shopping cart. The Global Sales Refund screen opens.

- Begin with the panel in the upper-right corner of the screen. You have the Total Refund (i.e, in this case $20.00) amount available to use for reference, the Total Paid field, and an Add Refund button. The Total Refund field value drops as you use the Total Paid and Add Refund button together to refund the patron.
- Determine whether you are refunding through one or multiple payment methods.
- To refund all through one payment method, then accept the default Total Paid value (matching the Total Refund). For a POS of a baseball cap, one payment method is typically used.
- To refund with multiple payment methods, edit the Total Paid value for the amount you desire to refund through the first payment method. Repeat steps 9-14 for each additional payment method. You get multiple Lines in the Payments area of the screen for each of the respective values and methods until you reach the full refund amount allowed. For Example: Patron wants half the refund to go toward their outstanding household balance and the other half refunded to their credit card. You create two lines in the Payments area, one for 50% toward the household credit, and one for 50% toward the credit card.
- Accept the default value for Refund Option or expand the Drop-down list to select the Payment Code being used for this transaction. For a baseball cap, Cash from the drawer or a refund to their credit card might be used. Depending on the Payment Code you select, other fields may appear and disappear from the screen.
- Applicable if you chose Refund Now or Refund Void. Accept the default value for Pay Code or expand the Drop-down list to select the Refund Type you wish to use for this transaction. For a baseball cap, Refund Now is typically used.
- Enter Payment References as needed. For Example: You might be required to enter the patron's refund reason into the reference field.
- IF this transaction will result in a Credit being applied to the household, then expand the Add Credit/Refund Apply - Restrictions group, if needed, to set parameters on how that credit can be used in a future transaction. Otherwise, skip to the next step.
- The fields in this group allow you to place restrictions on how household credits generated from this transaction can be used for future transactions. When a credit is created as a result of a transaction due to a Refund Apply situation, you can use these fields to select a specific Module, a Category and/or Type/SubType within that Module or a single Item within that Module for which the Credit can be used.
- Expand the Drop-down lists to select the Credit Module, Credit Category, Credit Type/Subtype as is appropriate. For Example: Your local policy is that a refund from the golf pro shop area is only good for other purchases or rentals there. Vincent's refund for the baseball cap can be used for other golf merchandise, lessons, or other services the shop offers.
- Use the "i" and "?" Help icons Help Icons on the upper-right hand corner of the screen for field definitions, if needed.
- Accept the default entries for Refund Information (User Name, Drawer, and Date) and Receipt Information (Preview, Print, and/or Email). Use the "i" and "?" Help icons Help Icons on the upper-right hand corner of the screen for field definitions, if needed.
- Expand the Receipt Options group, if needed, to make additional selections.
- Click Process when ready to complete the refund. Receipt(s) will be generated and you will be returned to the Global Sales Lookup screen.