
Table of Contents
Document Summary
The following is a step-by-step walk-through of how to configure and then generate an AR Brochure. The AR Brochure is a customized interface that exports Activity Registration information (i.e. meeting dates, times, location, fees, etc...) in the format requested for your organization's Brochure. At the time you process the Brochure, you can limit the activities included through criteria. For Example: You might generate a Brochure focusing on just your fall activities. When you process, an export file is created. You will import that file into the publishing software of your choice to apply any finishing touches necessary for completing your Brochure.
License – Maintenance Agreement
The use of an AR Brochure interface requires a Vermont Systems license and an annual maintenance agreement. Prior to implementing any process outlined in this document, please contact the Vermont Systems Sales department at 1-877-883-8757 to verify that you are authorized to use this interface and if not, to obtain a quote and/or approval.
Setup Steps
This document will walk you through the basic steps required to configure and generate an AR Brochure export from RecTrac. If you have additional questions about AR Brochures after reading this document, please contact Vermont Systems Customer Service by phone at 877-883-8757 or generate a Support Case through the Customer portal of the Vermont Systems website using your Customer ID and password.
Before You Begin
This document is written with the following assumptions. If any of the items listed is NOT true, contact Vermont Systems Support prior to continuing.
- Your organization is running RecTrac 3.1.04.00 or greater.
- Your organization purchased the AR Brochure Interface.
- Vermont Systems has delivered your custom AR Brochure Rich Text Format (RTF) file, and you know where it is stored. This RTF determines which fields, order, and format that your organization exports information for AR Brochures.
- The User ID with which you sign into RecTrac has the requisite permissions and ability to access the AR Brochure procedure, Static Parameters, and Activity and Section Management.
- Activities and Sections have been created in your RecTrac database and all information for them is ready for publication in your Brochure.
- You understand RecTrac DataGrids and how to maneuver through them.
File Maintenance Setup
This document will guide you through the process of setting up and then generating an AR Brochure.
Linking Your Brochure Interface Code
You must enter the Activity Brochure Code Vermont Systems provided you (i.e., a three-character alphanumeric code unique to your organization) into Static Parameters. Additionally, you will select the model household for Activity Brochure Resident, Non-Resident, and Misc.
The system will use your Activity Resident Household and its linked Category and Fee Codes to display "Resident" information, such as Fees, Registration Dates and etc….
The Activity Non-Resident Household yields the "Non-Resident" information, such as fees, Registration Dates and etc….
For organizations that have a third category of residents, specifying the Misc Household will produce those Fees, Registration Dates and etc….
- In RecTrac, go to the Management Ribbon • System Management • User/Menu/Profile Management group• Profile Assignments.
- Click the Static Parameters button.

Click Image to Enlarge
- Expand Activity Settings.
- Enter the Activity Brochure Code that Vermont Systems provided you (i.e., commonly a 3-digit alphanumeric code).
- Click the Picklist Icon to select the Activity Brochure Resident Household. The household you select can be an actual household in your database or a "dummy" household created specifically for this purpose. No actual Household data will appear on the brochure (i.e. no names, addresses, phone numbers, etc…). The system simply uses the Category and Fee Codes linked to the household for purposes of building the brochure.
- Click the Picklist Icon to select the Activity Brochure Non Resident Household.
- Uncommon, click the Picklist Icon to select the Activity Brochure Misc Household. Used for organizations who have a third category of residents, specifying the Misc Household will enable that information to display within the AR Brochure.
- Click Save.
- Exit from the Profile Assignments screen.
Activity and Section Maintenance
Prior to creating an AR Brochure, all of the necessary Activities and Sections MUST be in RecTrac. This section will review the Activity and Section screens and the information commonly included within Brochures. Prior to producing your AR Brochure, verify everything needed is up-to-date and ready for publication.
Much of the information that you enter for your Activities and Sections can be displayed in a brochure, such as the activity and section codes, description, dates and times, location, fees and course synopsis, registration dates, instructors, age/gender limitations, and other information depending on your needs.
To include a course synopsis in your brochure, you must link a Brochure Comment Code to the Activity Section and/or enter free-form Brochure Text.
- In RecTrac, go to the Management Ribbon • Activity Management group • Activity Management.
- Double-click an Activity within the DataGrid. The Activity Update screen opens.
- Click on the Core tab. Many of the fields displayed on this screen can be included in your Brochure Interface design, such as Activity Code, Short Description, Type, SubType and Category.
- Click on the Fees tab and review the fees assigned to the activity.
- Click the Sections button. The Activity Section Management screen opens with the DataGrid filtered to Sections of that Activity.
- Double-click a Section within the DataGrid. The Activity Section Update screen opens.
- Click on the Core tab. Again, many of the fields displayed here and in following three (3) tabs (Fees tab, Comments tab, and Instructors tab) can be included in your Brochure Interface design. These Core fields include, but are not limited to, Section Code, Short Description, Begin and End Dates/Times, and the Facility location and Days that it meets.
- Click on the Fees tab and review the fees assigned to the section are correct.
- Click the Comments tab. To include a course synopsis for this section in your brochure, you must select a canned-Brochure Code comment and/or enter free-form text Brochure Text. A standard synopsis for a beginner level swimming program might read as follows: This is a beginner level class where children work on their endurance and improve their breathing, kicking, floating and paddling skills. To complete Level I, children must be able to swim 25 yards on their stomachs without floatation and 15 yards on their backs without floatation.
You can enter free-form text in the Brochure Text field.You can click the Picklist Icon to select a canned-comment to use for the Brochure Code.
Note: If you choose a Brochure Code and Brochure Text then they both are included within your AR Brochure. The comment displays above the text.
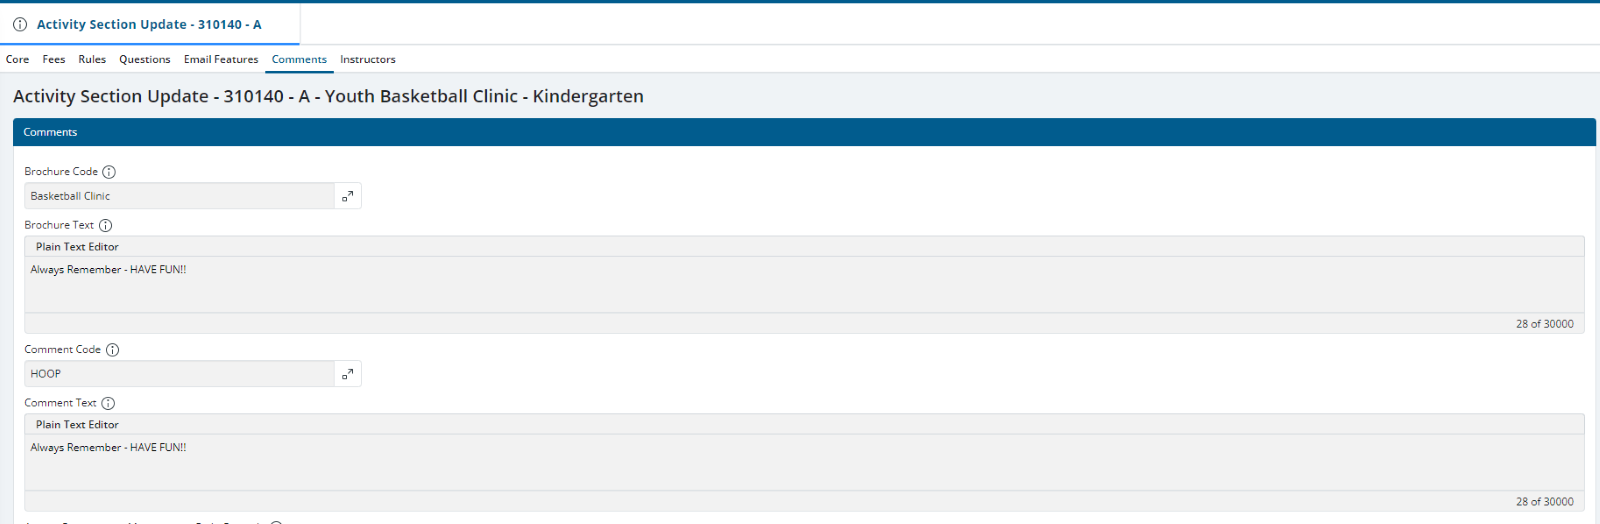
Click Image to Enlarge
- Click the Instructors tab and review the instructors assigned.
- Click the Save button.
- Repeat this process for each Activity and Section to verify that everything is ready to be published for your AR Brochure.
Running the Activity Brochure Interface Program
The AR Brochure is a custom interface that you will use to generate an export of the activity sections for your Brochure.
Use the Core Settings tab to include sections using one or multiple options. For Example: When producing your fall program Brochure, you might start by selecting an Activity Section Range for your fall-specific activities. Additionally, you might use the Activity Section DataGrid to select any year-round programs that are always part of each brochure.
Use the Additional Settings tab to select any additional options that are unique to your organization.
- In RecTrac, go to the Management Ribbon • Activity Management • AR Brochure.
- The AR Brochure screen opens to the Core Settings tab.
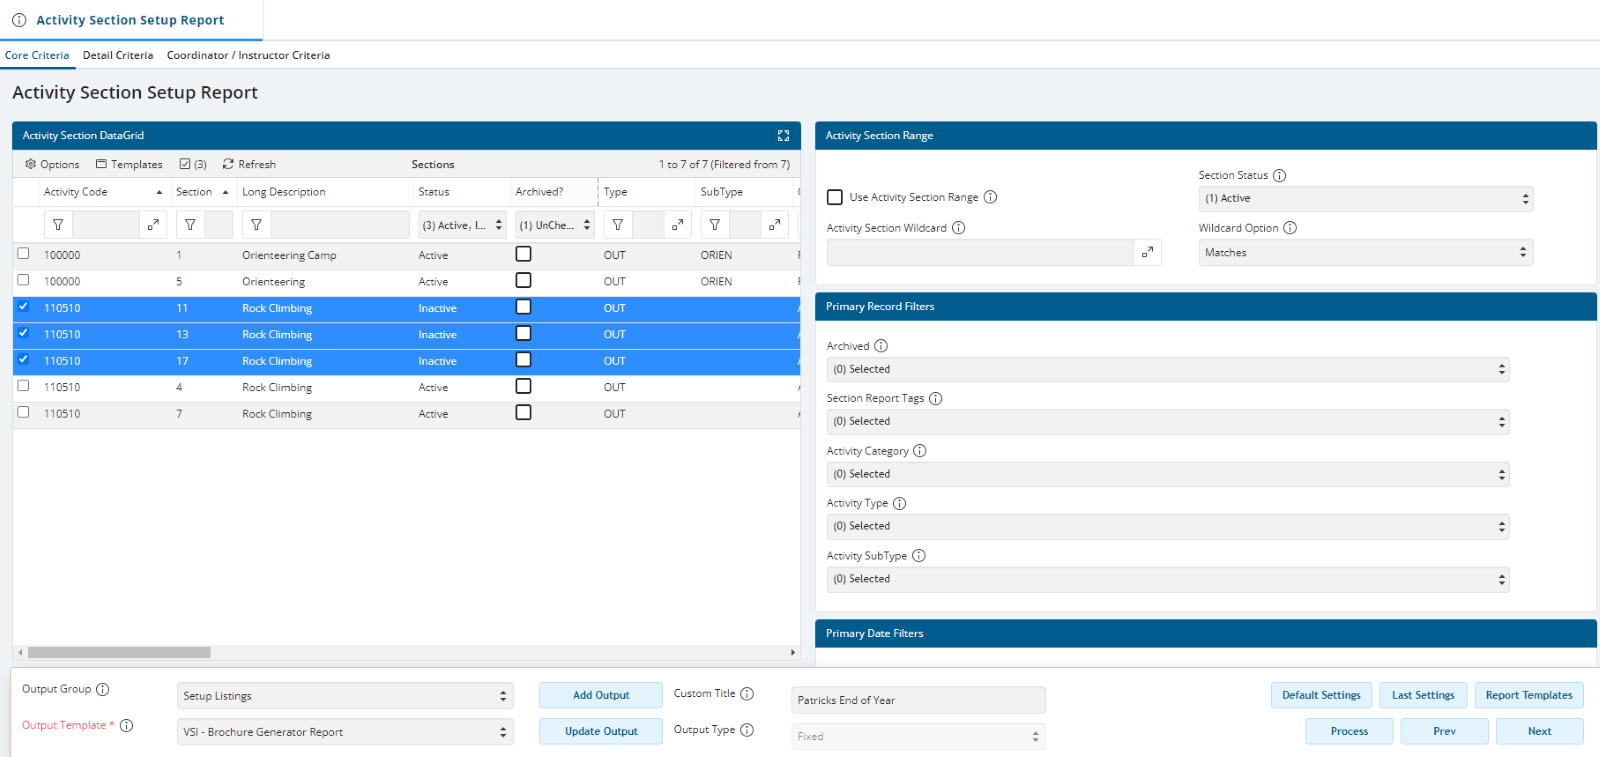
Click Image to Enlarge
- The Activity Section DataGrid displays all Sections in your database based on the DataGrid filters being used and your Permissions.
Highlight/select individual Sections, as needed, from the DataGrid. Multiple selection is allowed. You can use both the Activity Section DataGrid and an Activity Section Range simultaneously to specify the sections to include. For Example: When producing your fall program Brochure, you might select an Activity Section Range for your fall-specific activities. You might use the Activity Section DataGrid to choose any sections offered year-round that are also included in every brochure.
- Enable Use Activity Section Range to specify the range of sections to include within your AR Brochure if desired. You can use both the Activity Section DataGrid and an Activity Section Range simultaneously to specify the sections to include.
Click the Picklist Icon to select the Beginning Activity Section in the range.
Click the Picklist Icon to select the Ending Activity Section in the range.
- Enter an Activity Section Wildcard, if desired. Expand the Drop-down list to select a Wildcard Option. Depending on your selection, wildcard asterisks/periods may be required.
- If desired, only Activity Sections with the selected Categories, Types or SubTypes will be included in your AR Brochure. For Example: You might limit the export to include only Activity Sections from certain Types of programs, like Fitness, Arts & Crafts, and Swim. Alternatively, leave these options blank to include all Categories, Types, and SubTypes within your AR brochure.
Click the Combo Box to select Activity Category(s). Multiple selection is allowed.
Click the Combo Box to select Activity Type Category(s). Multiple selection is allowed.
Click the Combo Box to select Activity SubType Category(s). Multiple selection is allowed.
- Enable Use Section Date Range to filter records by the dates during which the Section was meeting. Any Section with meeting dates anywhere within your Date Range will be included. For Example: Your Date Range is 01 May 20xx - 30 June 20xx.
- A Section beginning on 29 June would be included because the section meets within your Date Range.
- A Section ending on 02 May would be included because the section meets within the Date Range.
- A Section ending before/on 30 April would NOT be included because there are no meeting dates within your Date Range.
- A Section beginning on/after 01 July would NOT be included because there are no meeting dates within your Date Range.
- Click the File Icon to select the path and file name of the Rich Text Format (.RTF) file Vermont Systems customized for your organization. This RTF determines which fields, order, and format that your organization exports information for AR Brochures. The filename corresponds to the three character, alphanumeric code you entered into Static Parameters. For Example: In Static Parameters, you specified a three-character code of VSI. For AR Brochure, you select the corresponding VSI.rtf file.
- Enter only the Brochure File Name that you want to export the specified Activity Section information.
- Click the Additional Settings tab.
If your custom AR Brochure interface includes fields then fill them out as is appropriate.
- Click Process and the file will be sent to the server for processing.
In Notifications, click Preview Document to download the AR Brochure export to your web browser's default download location.