Topic Doc: CardConnect with BOLT V2 (Ethernet) Integration
RecTrac 3.1

Written by Daniel Rotondi
Updated at October 28th, 2022
Table of Contents
Document Summary
The CardConnect External Redirect Interface (ERI) is a certified and secure gateway credit card processing system that allows patrons to remit for your services with credit cards while ensuring that no credit card data is entered, transmitted, or stored within a Vermont Systems application.
License - Maintenance Agreement
Use of the interface requires a Vermont Systems license and annual maintenance agreement for RecTrac and the component modules discussed in this document. Prior to implementing any process outlined in this document, please contact the Vermont Systems Sales department at 1-877-883-8757 to verify that you are authorized to use the modules discussed in this document and if not, to obtain a quote and/or approval.
Setup Steps
This document provides the basic File Maintenance steps required to prepare your RecTrac database for credit card processing using the CardConnect gateway solution. If you have additional questions about CardConnect Credit Card Processing setup and operation after reading this document, please contact Vermont Systems Customer Service by phone at 887-883-8757 or generate a Support Case through the Customer portal of the Vermont Systems web site using your Customer ID and password.
Before You Proceed
This document is written with the following assumptions. If any of the items listed below is NOT true, contact Vermont Systems Support prior to continuing, as the steps in this document may prove difficult to complete and unexpected results may occur.
- Your organization is running RecTrac 3.1.07.03 or greater, unless otherwise noted. Vermont Systems recommends you always update to the most current version.
- You have a valid CardConnect user account. If you do not have a CardConnect account, you cannot proceed. To establish a CardConnect account, contact Lauren Neal at CardConnect. Email: lneal@cardconnect.com.
- You understand that you will purchase your credit card pin pad(s) directly from CardConnect and that CardConnect Tech Support will assist you with the setup and installation of that physical hardware at your facilities. CardConnect certified hardware:
- Ingenico isc250, ISMP4 - for use with RecTrac on a mobile device (though it can also be used on a workstation), or ipp320 Ethernet - CardConnect will supply the Ethernet cable.
Notes: When setting up your pin pad(s), have CardConnect Tech Support enable clearNEC on all terminals. This setting returns the card holder name to RecTrac and allows the system to update the credit card record with that name.
Pin pads are pre-configured for DHCP IP Addressing. Specific firmware updates are required for Static IP Addresses. If you need Static IP Addresses for your pin pads then you must inform CardConnect and work with them to apply the firmware update after receiving the hardware.
- You understand your Credit Card solution; which credit card brands you accept; and processes for which you allow them, such as Purchases, Installment Billing, Tip Processing, Gift Cards, etc.
- The User ID with which you sign into RecTrac has the requisite permissions and ability to access all modules and functions pertaining to Credit Card Processing, to include but not limited to: Profile Management, Payment Code Management, Sales screens, Credit Card Terminal, and Tip Processing.
- You understand RecTrac Profile Management and hierarchy.
- You understand RecTrac DataGrids and how to maneuver through them.
- You have Ethernet drops.
CardConnect Overview
The CardConnect External Redirect Interface (ERI) is a certified and secure gateway credit card processing system that allows patrons to remit for your services with credit cards while ensuring that no credit card data is entered, transmitted, or stored within a Vermont Systems application.
The CardConnect ERI option allows credit cards to be swiped on a magnetic stripe reader, manually entered by your staff, or "dipped" (if EMV) into RecTrac, or manually keyed on a web portal by your customers in WebTrac. The CardConnect option:
- Stores NO card data in the Vermont Systems database other than the card mask returned by the processor (For Example: the first digit and last four (4) digits of a credit card)
- Ensures NO card entry is performed on the screen of a Vermont Systems application.
- Server, Workstation and Network Minimum Requirements
Server Minimum Requirements
In order to process credit card transactions using CardConnect, the servers through which transactions will be processed (Database Server, Transaction Server, and WebSpeed Brokers, if applicable) must meet the following requirements.
- Have access to the World Wide Web.
- Have a Firewall Rule that is open bi-directionally between the server and the CardConnectEndPoint URL, which is https://vsi.cardconnect.com:8443/cardconnect/rest/ .
- Allow traffic on ports 443, 6443, and 8443.
- Workstation Minimum Requirements
In order to process credit card transactions using CardConnect, the workstations on which you process transactions must meet the following requirements:
- Have a valid URL to your RecTrac Server.
- Have access to the World Wide Web.
- Credit Card Pinpads have been set up and properly configured with the assistance of CardConnect Tech Support.
- Network Minimum Requirements
Prior to implementing the CardConnect solution, you should discuss firewall rules with CardConnect Tech Support.
White List CardConnect IP addresses
The link below contains the IP Addresses that will need to be white listed on your network to communicate with the Card Pointe Gateway and Bolt Servers. RecTrac utilizes the IP Addresses specified for the CardPointe Gateway IP Addresses (used by Bolt). https://support.cardconnect.com/bolt/network-whitelisting.
Limitations
The following limitations exist, which will be addressed by CardConnect:
- No EMV with Pin; EMV with Signature only at this time.
- No Cash Back transactions at this time.
- No dupe transaction checking at this time.
RecTrac File Maintenance Setup
Note: The following steps assume you have a valid CardConnect user account. If you do not have a CardConnect account, you cannot proceed. To establish a CardConnect account, contact Lauren Neal at CardConnect. Email: lneal@cardconnect.com.
To use CardConnect credit card processing, you will need to complete the following setup steps within the RecTrac application:
- Create and link a CardConnect Pinpad profile.
- Create and link a CardConnect Credit Card profile.
- Create and Link a CardConnect Pinpad Profile
Note: Complete this step only after the physical pin pad hardware has been installed. Pin pads must be purchased directly from CardConnect. CardConnect Tech Support will assist you with the setup and installation of the physical hardware at your facilities. CardConnect certified hardware:
- Ingenico isc250, ISMP4 - for use with RecTrac on a mobile device (though it can also be used on a workstation), or ipp320 Ethernet - CardConnect will supply the Ethernet cable.
The following steps will walk you through the process of creating and linking a Pinpad profile for use with CardConnect credit card processing. These steps assume that you will link a separate Pinpad profile to each workstation from which you will process credit cards.
- In RecTrac, search for and go to Profile Assignments. Click Add.
- Enter a Profile Code for your Pinpad. For Example: CardConnect Pinpad POS 1
- Select "Pinpad" as your Profile Type.
- Select "CardConnectDevice" as your Profile Subtype.
- Enter a Profile Description. For Example: CardConnect Pinpad POS 1.
-
Click Create. You will continue to the Profile Update screen.
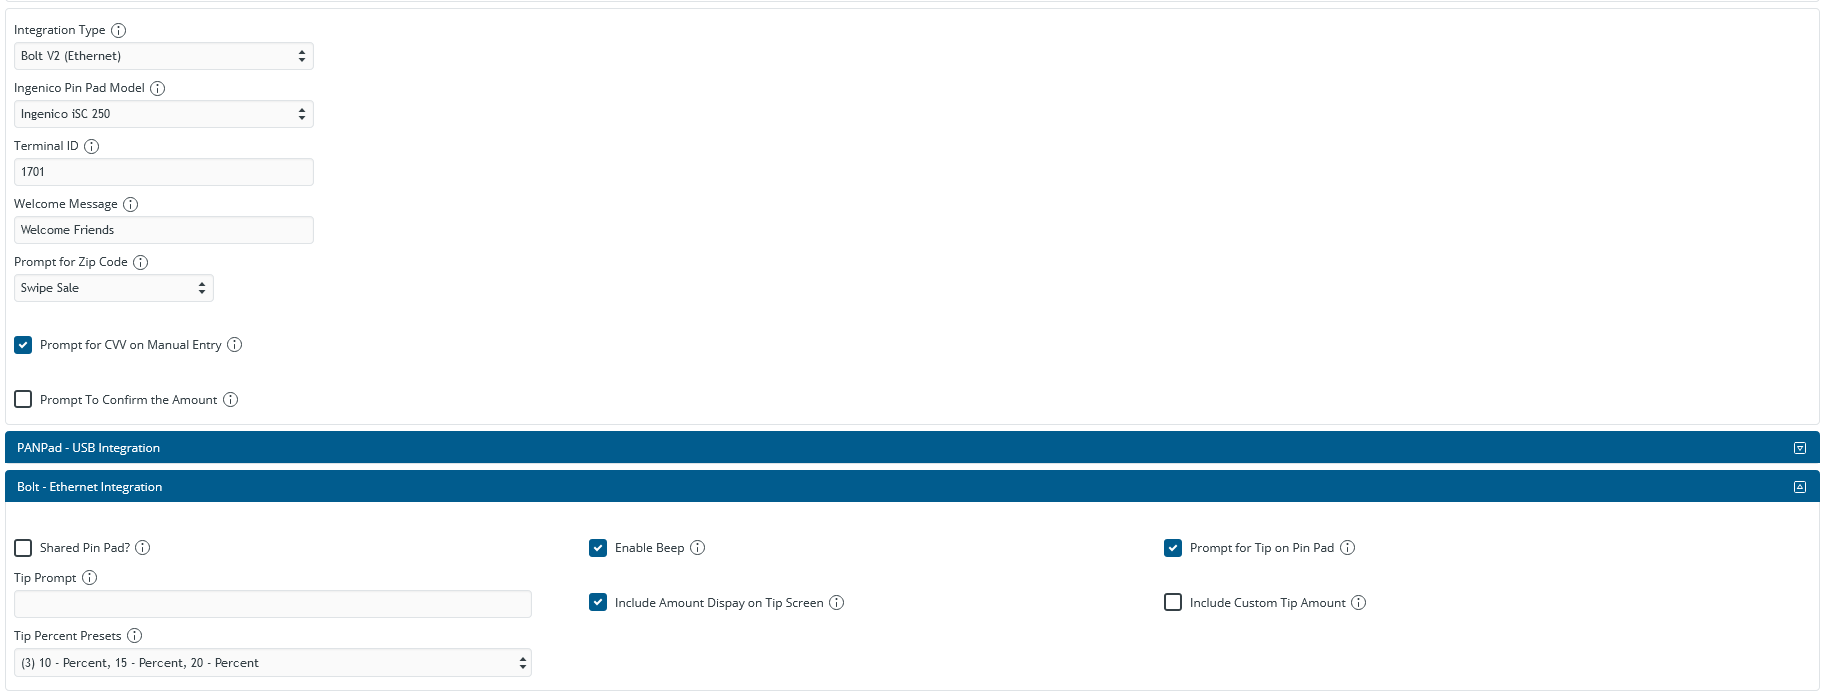

- Select "Bolt V2 (Ethernet)" as your Integration Type.
- Select your Ingenico Pin Pad Model:
- Ingenico iSC 250
- Ingenico iPP 320
- Ingenico ISMP4
Note: Ingenico ISMP4 is for use with RecTrac on a mobile device, such as a tablet. It can also be used on a workstation. Click Here to configure the wireless settings on the ISMP4.
- Enter the pin pads' serial number, which is located on the sticker on the back of the unit, in the Terminal ID field. This field is case-sensitive. The information entered here is used to identify where the transaction originated.
- Enter the Welcome Message that you want the PinPad to display, if any. This field will accept up to 18 alpha-numeric characters only. Do Not use any special characters in this field, such as exclamation points, ampersands, apostrophes, dashes, etc.
- Enter the pin pads' serial number, which is located on the sticker on the back of the unit, in the Terminal ID field. This field is used to identify where the transaction originated.
- Fill out the remaining fields in this Group as needed.
- Expand the Bolt - Ethernet Integration group.
- Select the Shared Pin Pad? option if this Pinpad will be servicing more than one (1) workstation. In other words, if two (2) or more computers are using this Pinpad, then enable this option. Otherwise, leave it de-selected.
- Determine whether you want to Enable Beep adn Prompt for Tip Amount.. Fill out any remaining fields.
- Click Save to save your changes. You will return to Profile Assignments.

Click to Enlarge
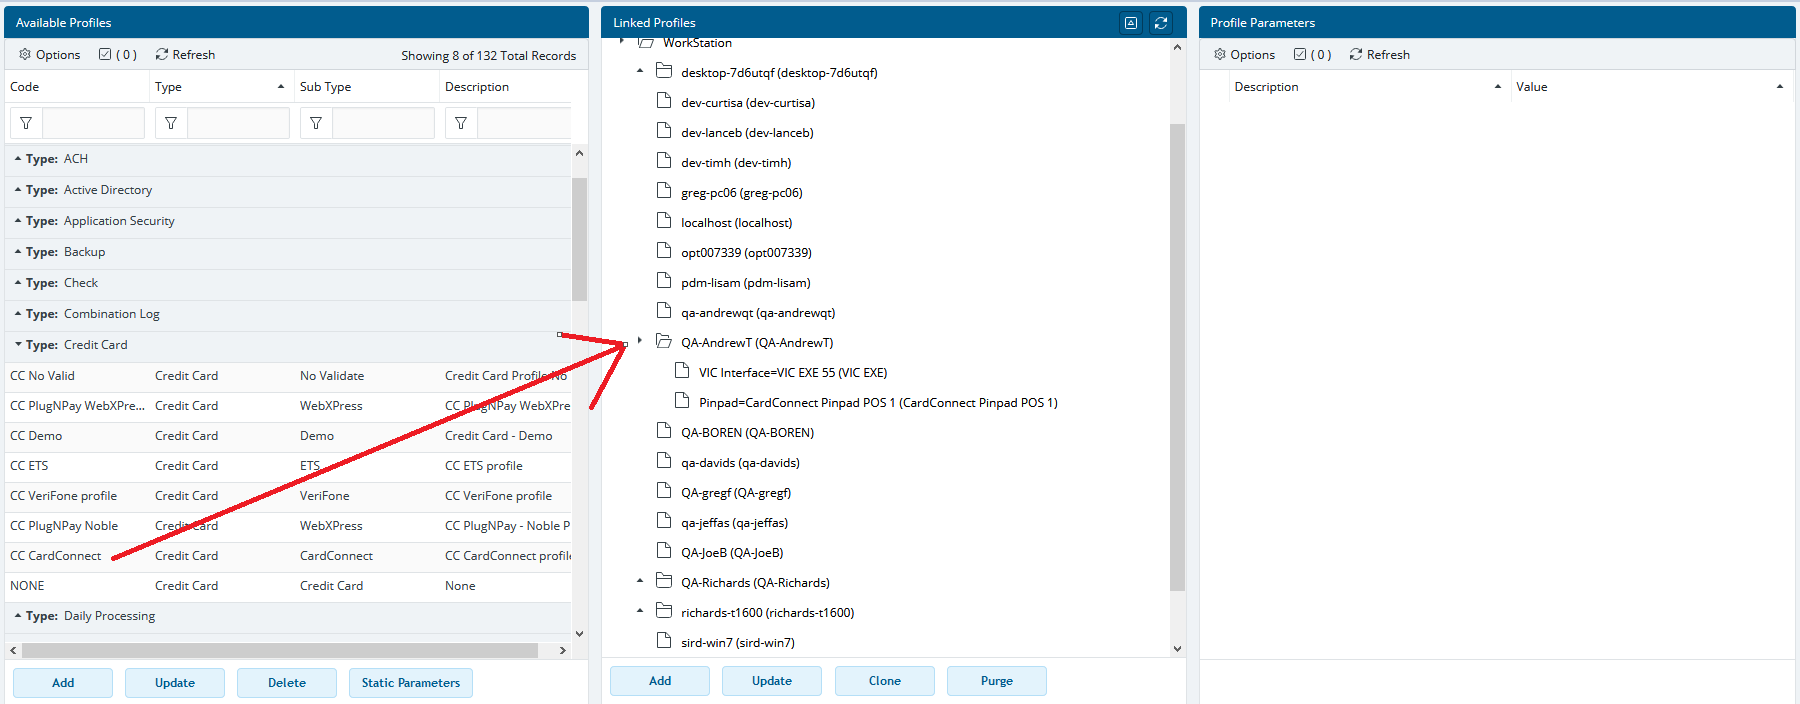
- In the Linked Profiles middle column, click to expand the Workstation folder.
- In the Available Profiles left-hand column, click to highlight the PinPad profile you just created.
- Click again and hold the mouse button down. When you have "grabbed" the profile, a red box will appear that displays the profile name.
- Drag and drop. Drag to the appropriate Workstation Name in the middle column. When the box turns green, release the mouse. This will place the profile at the Workstation level of the hierarchy. Profile Assignments are saved automatically and take effect immediately.
The level of the hierarchy can be changed later if needed. - Click the 'X' in the upper-right-hand corner of the Profile Assignments panel to Exit.
This completes the setup steps for your CardConnect Pinpad profile. Repeat these steps as necessary for other workstations on which you will process credit cards using CardConnect.
Create and Link a CardConnect Credit Card Profile
Note: If you have separate merchant accounts, then you need to set up at least one (1) Credit Card profile for each separate Merchant Account. By default, Merchant Accounts are linked at CardConnect. In the event you DO NOT want Merchant Accounts linked, then you must advise CardConnect. Discuss your Merchant Account options with CardConnect to determine how many accounts you need and whether you want them linked.
- In RecTrac, search for and go to Profile Assignments. Click Add.
- Enter a Profile Code for your profile. For Example: CardConnect Normal Retail.
- Select "Credit Card" as your Profile Type.
- Select "CardConnect" as your Profile Subtype.
- Enter a Profile Description. For Example: CardConnect Normal Retail Credit Card Processing.
- Click Create. You will continue to the Profile Update screen.

Click to Enlarge
- Enter the Merchant ID, User Name, and Password information for this account that was given to you by CardConnect. The password field will appear as a series of dots (• • • •).
Note: Username and Password are case-sensitive.
- Enter the EndPoint URL as given to you by CardConnect. Typically this value is as follows, though you should verify with CardConnect.
https://vsi.cardconnect.com:8443/cardconnect/rest/ - Select an Account Type:
- Normal Retail - Generally used for normal everyday transactions performed in RecTrac.
- e-Commerce - Generally used for normal everyday web-based transactions, such as those performed by patrons in WebTrac.
- Restaurant - Generally used where credit card transactions will include tip processing, such as in a restaurant or bar.
- MOTO - Generally used for Installment Billing processed through RecTrac.
- Applicable for Restaurant Account Types only. Expand the Picklist for Tip GL Code and Tip Cost Center and make the appropriate selections.
- Select the Credit Card Brand(s) you accept.
- Enter the number of credit card authorization receipts you wish to print upon completion of a transaction in the Auth Copiesfield.
Note: An Authorization Receipt printer and an Auth Receipt profile are needed.
-
Require Signature Amount- The value in this field is involved in determining whether the Ingenico Pin Pad prompts for signature or not. It is also used to determine whether a signature line is printed on the Auth Receipt.
- If the Pin Pad prompts for signature, and the customer signs, then the signature is captured and no signature line will print on the Auth Receipt.
- If the value of the sale is less than the value entered here, the Auth Receipt will print with "Signature Not Required."
For Example: The Pin Pad is set to require signature at $25.00. The value in this field is $25.00. A sale of $25.00 or more will prompt for a signature on the Pin Pad and no signature line will print on the receipt. A sale of $24.99 or less will result in no signature capture on the Pin Pad and "Signature Not Required" being printed on the Auth Receipt.
Note: If using the iPP320 or ismp4 pin pad, then the value here simply determines whether or not a signature line prints on the Auth Receipt, as neither the iPP 320 nor ismp4 have signature capture functionality.
- Select the additional Credit Card profiles that any user linked to this profile will have the authority to manage.
- This field is applicable if you are using this profile for WebTrac payments. IF CardConnect provides you with e-Commerce information for this Account, then fill out the fields in the CardConnect - eCommerce Settings group. All fillable field values will be given to you by CardConnect.
- Mandatory - Enter "vsi in the CardConnect Site Name field. Use all lower case letters.
- Fill out the remaining fields in this group as needed.
- In the CardConnect - BOLT Settings group, ensure the Bolt Endpoint URL and API Keyfields are filled in. These values are the same for all Vermont Systems customers and should be:
- https://bolt.cardpointe.com:443/api/v2/.
- 6oXxkPFROi8BQqtxi73lfVIm3YEYbDZffpv6GZ6qbOw=
- Click List Terminals for this MID
- When you click List Terminal for this MID, RecTrac will pass the Merchant ID to Bolt Endpoint using a curl request. The response will display all of the Terminal ID (TID) numbers (Pin Pads) that can be used to process sales against this Merchant ID (MID).
- Click Save to save your changes. You will return to Profile Assignments.
- Determine where you wish to link the profile. For purposes of example, this document will link the profile at the Workstation level.

- In the Linked Profiles middle column, click to expand the Workstation folder.
- In the Available Profiles left-hand column, click to highlight the Credit Card profile you just created.
- Click again and hold the mouse button down. When you have "grabbed" the profile, a red box will appear that displays the profile name.
- Drag and drop. Drag to the appropriate Workstation Name in the middle column. When the box turns green, release the mouse. The Profile Assignment Add dialog box will appear.

- Select the transaction type(s) for which this CardConnect Credit Card profile will be used. Multiple selections are allowed.
- Click Continue. This will place the profile at the Workstation level of the hierarchy. Profile Assignments are saved automatically and take effect immediately.
The level of the hierarchy can be changed later, if needed.Note: A separate profile record will appear for each option you select.
- Click the 'X' in the upper-right hand corner of the Profile Assignments panel to Exit.
This completes the setup steps for your CardConnect Credit Card profile. Repeat these steps as necessary for other CardConnect Credit Card profiles.
Create and Link an Auth Receipt Profile
Perform the steps outlined in this section for each workstation from which you will print credit card authorization receipts. Vermont Integration Client (VIC) MUST be installed on those workstations in order for RecTrac to communicate with the printer.
Note: This section details how to create and link an Auth Receipt profile only. It does not cover the setup of the physical hardware, as many makes and models exist. If you require assistance with or documentation for physical printer set up and operation, contact Vermont Systems Support via the Customer Portal of our Vermont Systems website.
- In RecTrac, search for and go to Profile Assignments. Click Add.
- Enter a Profile Code for your auth receipt printer. For Example: "Star TSP143IIIU CC Auth 1"
- Select "Printer" as you Profile Type.
- Accept the default Profile Subtype.
- Enter a Profile Description. For Example: "EPSON TM-T88V Auth Receipt Printer 1"
- Click Create. You will continue to the Profile Update screen.

Click to Enlarge
- In the Windows Printer Path/Name field, enter the name of the Printer as it appears in Windows on the workstation to which it is linked, regardless of whether it is a network printer or one dedicated to the single workstation only.
- Leave the Dupe Printer Code field blank.
- Click Save to save your changes. You will return to Profile Assignments.
- Determine where you wish to link the profile. For purposes of example, this document will link the profile at the Workstation level.
- In the Linked Profiles middle column, click to expand the Workstation folder.
- In the Available Profiles left-hand column, click to highlight the Printer profile you just created.
- Click again and hold the mouse button down. When you have "grabbed" the profile, a red box will appear that displays the profile name.
- Drag and drop. Drag to the appropriate Workstation Name in the middle column. When the box turns green, release the mouse. The Profile Assignment Add dialog box will appear.

Click to Enlarge
- Select the purpose(s) for which this printer will be used. Multiple selections are allowed, but in most cases, you will select Printer-Auth Receipt only.
- Click Continue. This will place the profile at the Workstation level of the hierarchy. Profile Assignments are saved automatically and take effect immediately.
The level of the hierarchy can be changed later if needed.Note: A separate profile record will appear for each option you select.
- Click the 'X' in the upper-right hand corner of the Profile Assignments panel to Exit.
This completes the setup steps for your Auth Receipt Printer profile. Repeat these steps as necessary for other Auth Receipt profiles.
Create a Manual Entry Credit Card Payment Code
Ingenico pin pads do not offer an onscreen option for Manual Card Entry. This prompt has to come from RecTrac, in the event it is needed. For this purpose, Vermont Systems highly recommends creating a Payment Code that will force the Ingenico to prompt for manual entry. To do this, create a new Credit Card Payment Code and enter "Manual" in the Prefix Validation field.
- In RecTrac, search for and go to Payment Code Management.
- Click Add.
- Enter a Pay Code and Screen Description. For both instances, Vermont Systems recommends using something that clearly indicates that the purpose of this Pay Code is for "manual card entry."
- Select "Credit Card" as your Payment Type.
- Enter the word "MANUAL" (no quotes) in the Prefix Validation field. When this Payment Code is used, the Ingenico Pin Pad will prompt for manual entry of a Credit Card Number and Expiration Date.
- Fill out the remaining fields as you normally would.
- Save your changes when done and exit back to the main RecTrac menu.
- Link the new Payment Code to your Payment profile(s) • Pay Code Restrictions group • Allowed Pay Codes field.
- This completes the setup steps for your Manual Payment Code creation.
Using CardConnect
Processing Transactions in RecTrac
The following provides brief examples of common credit card transactions in RecTrac. From a processing standpoint, credit card transactions in RecTrac look like transactions for any other tender type. There is no third-party portal. All connection with the CardConnect gateway is handled through the pin pad.
Processing a Sale in RecTrac
- Process the sale as you normally would and proceed to the payment screen.
- Enter the appropriate Credit Card Payment Code.
- If the household has a credit card linked to their account, expand the Linked Credit CardsDrop-down list and select it, if desired by the patron.
- Click Add Payment when ready and Process when ready. RecTrac will initialize the CardConnect pin pad. Follow the prompts to insert card, swipe card, remove card, sign (isc250 only), etc.….
- The transaction will complete as normal, and the Auth Receipt(s) will print. Depending on your Signature Amount and hardware (ipp320 vs. isc250), a signature line may or may not print. Refer to CardConnect Credit Card Profile for further specifics, if needed.
Processing a Refund in RecTrac
In order to process a Refund Now transaction in RecTrac to a credit card using CardConnect, you will need a receipt number for a transaction for which the credit card was used. Optimally, the receipt number you use will be the receipt for which the original transaction was processed, but this is NOT a requirement.
Generally speaking, the fastest way to find a receipt number to look at the Purchase History tab (in Global Sales) for the household to whom you are processing the Refund, or for your Internal Household in the event of a Daily Sale. Household Transaction History inquiries/reports and Cash Journal reports also list receipt numbers.
- Once you have determined the Receipt number, process the refund like you normally would and proceed to the refund screen.
- Select "Refund Now" as your Refund Option.
- Enter the appropriate Credit Card Payment Code.
- Enter the Receipt Number. Optimally this will be the same receipt that was used for the original transaction, but any receipt number linked to a transaction linked to credit card to which you are applying the refund will work.
- Expand the Linked Credit Cards field and select the appropriate record.
- Click Add Refund when ready and then click Process.

Click to Enlarge
- Wait while the system completes the transaction. You will be returned to the Global Sales Lookup screen when done.
Processing Tips in RecTrac
Note: To process Tips via CardConnect, ensure your CardConnect Credit Card profile is set as follows:
- Account Type = Restaurant
- Tip GL Code - This field must be populated.
- Tip Cost Center - (Optional)
- In RecTrac, search for and go to Tip Processing
- Process Tips as you normally would.
- When you click Submit Tip Amount, the amount entered will be added to the original amount of the sale on your CardConnect portal as the "Settle" amount.

Click to Enlarge
Note: To update or revise a Tip Amount that you have submitted, return to the Tip Processing program, set the Status to show and find the transaction. Process the Tip again as you normally would (i.e. re-enter the exact amount of the tip). The CardConnect site will update the Gratuity with the new amount as if you were entering it for the first time.
Processing Transactions on the CardConnect Website
You may not process blind credits/refunds in RecTrac These types of transactions can be processed only via the CardConnect website. Some of the more common scenarios are:
- Blind Sales
- Blind Refunds
- Processing Voids
CardConnect will provide you with your department's Production Port URL as well as instructions for processing these and other transactions, as needed, on their site.
Settlement and Reporting Options
Settlement
The CardConnect settlement process is automatic and exclusively host-based. There is no need to use the RecTrac Credit Card Terminal, nor is there a need to settle transactions via the CardConnect website.
Reporting on Credit Card Transactions in RecTrac
- In RecTrac, search for and go to Credit Card Report.
- Choose "VSI - CreditCard Report" as your Output Template.
- Highlight/select the Profiles (i.e. Merchants) in the Credit Card Profiles DataGrid on which you wish to report.
- Accept the default entries in the Date/Time Filters group or make alternate date selections, if desired.
- On the Transaction Filters group, expand the Combo Box icons for Record Status, Transaction Type, and Pay Codes and make your selections.
- Fill in all remaining report selection criteria based on the data that you want to view on the report.
- Click Process. You will continue to the Report Options screen. Make your selections and click Continue.
Click here to see a sample of the Credit Card Report
AIG/RegSaver Insurance
A supplemental option with the CardConnect credit card solution is an interface that allows a patron to purchase insurance underwritten by AIG through RegSaver to cover refunds, should the enrollee not be able to participate. This could be a full refund or a prorated refund, but that is decided by your Department and AIG.
For Example: You offer a Non-Refundable Rock Climbing program that includes the AIG/RegSaver enrollment insurance option. At the time of registration, your patrons will be asked whether they wish to purchase insurance.
- When patrons opt-in, then their credit card is charged the enrollment fee and tax plus the insurance amount. In the event patrons must cancel, then they pursue their enrollment insurance claim through AIG/RegSaver.
- When patrons opt-out of insurance, then their credit card is charged the enrollment fee and tax only. In the event patrons have to cancel, then they receive no refund.
- The AIG/RegSaver/CardConnect Insurance interface falls outside the scope of the RecTrac application. Some set up is required within the RecTrac, but neither Vermont Systems nor the RecTrac application are involved in the daily processing or insurance claim functions. The cost of the insurance to the patrons is not recorded in RecTrac, and the means by which patrons receive a refund from AIG/RegSaver is processed outside of RecTrac.
How It Works
- You contact CardConnect and inform them that you wish to offer the AIG/RegSaver Insurance option to your patrons.
- CardConnect supplies you with a CardConnect Insurance Merchant ID, User Name, Password, and other information.
- You work with CardConnect and AIG to determine which items will be covered by Insurance.
- In RecTrac, you:
- Create and link an Insurance profile that contains your CardConnect and RegSaver account information.
- Update all Fees that will be subject to Insurance to ensure the Insurance Option is set to "Percent." The Insurance option is Fee-based.
- Update all Fees that will be subject to Insurance to disallow refunds. In the event patrons cancel a Fee, you do NOT want to refund them through RecTrac.
- Process Sales as you normally would and allow patrons to opt-in or opt-out of Insurance.
- Process Cancellations as you normally would and inform your patrons to pursue Insurance claims through AIG. The Refund Receipt will contain a URL and phone number.
AIG/RegSaver Insurance Implementation
Prior to implementing AIG/RegSaver Insurance, ensure the following statements are true.
- You have obtained a valid CardConnect insurance Merchant ID. If you do not have one, then contact Lauren Neal at CardConnect. Email: lneal@cardconnect.com.
- Your organization is running RecTrac 3.1.08.01 or greater.
- You have created and linked an Insurance profile. Instructions appear below.
- You have updated all applicable Fees in RecTrac to ensure the Insurance Option is set to "Percent" and to ensure that refunds for these fees will not be allowed through RecTrac.
Create and Link an Insurance Profile
The following steps will walk you through the process of creating and linking an Insurance profile for use with AIG/RegSaver insurance underwriting through CardConnect. These steps assume that you will link one (1) Insurance profile only.
- In RecTrac, search for and go to Profile Assignments. Click Add.
- Enter a Profile Code for your Insurance profile. For Example: CardConnect RegSaver Insurance
- Select "Insurance" as your Profile Type and Subtype.
- Enter a Profile Description. For Example: CardConnect RegSaver Insurance.
- Click Create. You will continue to the Profile Update screen.

Click to Enlarge
- Click the Combo Box icon for Modules Allowedto select the Module(s) you wish to include in the Insurance option. Multiple selection is allowed. Only items within the Module(s) you select here will be subject to the Insurance Option at purchase.
Note: Insurance is set up and maintained by Fee. In addition to selecting Modules in this field, you also must go to Fee Update and set the Insurance Option to "Percent" on all applicable Fees. This can be done quickly using Bulk Change. This is detailed in the next section.
- Enter the Insurance Merchant ID number for this profile in its field. CardConnect will supply this information.
Note: Insurance Merchant IDs and regular CardConnect Merchant IDs are different. So do NOT enter your regular/standard CardConnect Merchant ID in this field.
- Enter the CardConnect Insurance Payment URL as given to you by CardConnect. By default, this value should be as follows, but you should verify with CardConnect:
https://vsi.cardconnect.com:8443/cardconnect/rest/ - Enter your CardConnect Insurance Merchant Username and Password in their respective fields. CardConnect will supply you with this information. The password field will appear as a series of dots (• • • •).
Note: Username and password fields are case-sensitive.
- Enter your RegSaver Authorization Key as given to you by CardConnect. This will be a long alpha-numeric string.
- Enter the RegSaver URL as given to you by CardConnect. By default, this value should be as follows, but you should verify with CardConnect:
https://tech.nextwaveins.com/PolicyService/PolicyMerchantService.svc/RegistrationSaverInsurance/Purchase/Staging - Enter your Insurance Header in its field. The text you enter here appears on the Opt-in Information screen under the Protect Your Investment group during a Transaction when the patron is purchasing an item for which insurance is offered. You should work with CardConnect to determine the appropriate phrasing, but a good example of an Insurance Header is as follows:
"Registration fees are typically non-refundable. The new AIG insurance policy, "Registration Saver," now provides you the opportunity to cover the fees you pay for your child to participate in their sports activities.<br>
The policy covers your investment in case of injury(on or off the field), illness, and other unforeseen circumstances that may cause your child to miss an entire season, or portion of their season." - Enter your Insurance Footer in its field. The text you enter here appears on the Opt-in Information screen under the Terms and Conditions group during a Transaction when the patron is purchasing an item for which insurance is offered. You should work with CardConnect to determine the appropriate phrasing, but a good example of an Insurance Footer is as follows:
"NOTE: if you do not purchase the AIG-Registration Saver policy, then your fee may be non-refundable. <br>
You need to agree to the Terms and Conditions before placing your order. <br>
"RegSaver is offered by Next Wave Insurance Services, LLC - CA License #OF00755, in partnership with AIG." - Click Save when ready. You will return to the Profile Assignments screen.
- Link the Insurance profile at the Defaults level of Hierarchy. Refer to Create and Link a CardConnect Pinpad Profile above for guidance in linking profiles, if needed.
Update Fees
Set the Insurance Option to "Percent"
Insurance is set up and maintained by Fee. In addition to selecting Modules on the Insurance profile, you also go to Fee Update and set the Insurance Option to "Percent" on all applicable Fees. This can be done quickly using Bulk Change.
- In RecTrac, search for and go to Fee Management.
- Click More • Bulk Change. You will continue to the Fee Bulk Change program.
- In the Fee DataGrid, highlight/select the Fees on which you will be offering Insurance. Multiple selection is allowed.
- Do NOT select Change Detail Records Linked to File Maintenance Records.
- In the Bulk Changes Available Fields list on the lower-left of the screen, scroll down and select "InsuranceOption."
- Click Add.
- On the Individual Field Change screen, expand the Drop-down list for Insurance Option and select "Percent."
- Click Continue. You should see "SAFee_InsuranceOption=Percent" in the Bulk Changes to Complete list on the lower middle portion of the screen.

Click to Enlarge
- Click Process Bulk Change.
- Review the Information message for accuracy and click Yes when ready. Bulk Change runs on the AppServer. The Notification Center will alert you when the process completes.
- Repeat these steps to change other Fees as needed or continue to the next section.
Set Fees to NonRefundable
Insurance underwriting from AIG/RegSaver allows patrons to recover all or some of the Fees for an item in the event they must cancel. In light of this, you should update all Fees in RecTrac that are subject to Insurance to disallow refunds. In the event patrons cancel a Fee, you do NOT want to refund them through RecTrac.
To accomplish this, Vermont Systems recommends setting the Cancel Prorate Option on all applicable Fees to "NonRefundable." Once set, RecTrac will disallow refunds for the Fee in the event of a cancellation. Use Fee Bulk Change. Follow the directions above. In the Bulk Changes Available Fields list on the lower-left of the screen, scroll down and select "CancelProrateOption." Upon Adding the field, expand the Drop-down list for Cancel Prorate Option and select "NonRefundable."
Daily Processing Example
- In RecTrac, process a sale as you normally would.
- When you click Process, you will be prompted with the following screen:

Click to Enlarge
- At this point, patrons can opt-in or opt-out.
- If patrons opt-in, they will be charged $7.00 or 7% of the Fee (tax included), whichever is greater.
- If patrons opt-out, they will be charged the Fee (tax included) only.
- The Sale will complete.
Important Processing Notes
- Insurance charges are not listed or recorded in RecTrac. Upon opting-in for Insurance, the patron's credit card will be charged the $7.00 or 7%, but the charges will not show up in RecTrac. Separate line items for the Fee and the Insurance will appear on the customer's credit card statement.
- There is no indication in RecTrac that insurance has been purchased, nor will there be.-The one exception is a note on the receipt which includes a URL to the AIG RegSaver page.
- Patrons can go to their-credit card-portal to-view the transaction fees.-Two (2) will be listed: one for the Fee in RecTrac and the other for the insurance.
- Vermont Systems customers can see insurance fees on the CardConnect portal. Be sure to look at the account which is specific to the Insurance Merchant ID given to you by CardConnect.
- Split payments are allowed, but at least $1.00 of the Fee being charged must be paid by credit card in order for Insurance to apply.
- WebTrac functionality is available as of RecTrac 3.1.08.02 and later.
- Insurance cannot be applied to recurring Installment Bills.
Refunding Insurance
In the event a patron cancels from an item which is insured through AIG/RegSaver, the patron must seek through AIG. Receipts from RecTrac that are linked to Insurance contain a URL as well as policy information. Patrons must file a claim using the information specific to their policy. An example is provided here:

Click to Enlarge
WebTrac Payment Pages
CardConnect offers two (2) payment page options for WebTrac.
Hosted iFrame Tokenizer
CardConnect's Hosted iFrame Tokenizer solution captures code (HTML, JavaScript, and Java) associated with a CardSecure token value within an iFrame. Per the Payment Card Industry (PCI) Data Security Standards, a merchant's PCI compliance requirements are reduced when encasing token functionality in an iFrame hosted by CardSecure.
Why integrate with the Hosted IFrame Tokenizer? Setup and use is simple. This integration does not require a page redirect to the Hosted Payment Page (HPP) and then a redirect back to WebTrac, like the other options do.
RecTrac Setup
Modify the Credit Card profile used for WebTrac transactions. This includes your purchase profile as well as your billing profile. In the group CardConnect - eCommerce Settings, set the Hosted Payment Page Version to "Hosted iFrame Tokenizer." Then Save your changes.
WebTrac
There are five (5) areas in WebTrac where the CardConnect iFrame Tokenizer has been integrated:
- Sales
- Adding a card on account for billing purposes.
- Updating cards associated with existing installment bills.
- Updating additional cards that the household has on account.
- Adding card on account for Tee Time No-Show.
Hosted Payment Page v2
CardConnect's Hosted Payment Page allows your patrons to complete credit card transactions in WebTrac.
Refer to Topic Document - CardConnect Hosted Payment Page for WebTrac.
Hosted Payment Page v1
CardConnect's Hosted Payment Page allows your patrons to complete credit card transactions in WebTrac. This is CardConnect's original payment page processing option
Additional Information
Required Third Party Files
- The standard RecTrac 3.1 installation includes a \thirdpartyfiles directory. From within that directory, CardConnect uses the following sub-directories.
- \thirdparty\7-zip - The directory and its contents are required for Signature Capture on the Pin Pad
- \thirdparty\Curl - The directory and its contents are required to send auth requests to CardConnect
- \thirdparty\imageMagick - The directory and its contents are required for Signature Capture on the Pin Pad
Credit Card Pin Pad Terminals
- You will purchase your credit card pin pad(s) directly from CardConnect, and CardConnect Tech Support will assist you with the set up and installation of that physical hardware at your facilities. CardConnect certified hardware.
- Approved pin pad terminals for Bolt V2 (Ethernet) integrations, at this time, are the Ingenico isc250, ISMP4, and ipp320. (The ISMP4 is for use with RecTrac on a mobile device, such as a tablet, though it can also be used on a workstation.)
- When setting up your pin pad(s), have CardConnect Tech Support enable clearNEC on all terminals. This setting returns the card holder name to RecTrac and allows the system to update the credit card record with that name.
- Pin pads are pre-configured for DHCP IP Addressing. Specific firmware updates are required for Static IP Addresses. If you need Static IP Addresses for your pin pads then you must inform CardConnect and work with them to apply the firmware update after receiving the hardware.
- Remember: RecTrac does NOT communicate directly with the pin pad. All communication with the pin pad is handled via WebSpeed requests and responses to and from CardConnect.
- For more information, refer to https://support.cardconnect.com/bolt/network-whitelisting
CardConnect Bolt Integration Processing Diagram

Charging Service Fees, Convenience Fees and/or Surcharges
CardConnect provides functionality to append transaction fees to your credit card transactions. This allows you to pass some of the operating costs for credit cards to your customers.
CardConnect provides three (3) options: Service Fees, Convenience Fees, and Surcharges. These fees are set up and maintained directly between you and CardConnect. There is no additional set up within Vermont Systems products, and these fees are NEVER reflected anywhere in RecTrac or WebTrac. If you establish Service Fees and/or Convenience Fees and/or Surcharges, then the only way you will be able to view them is via the CardConnect portal.
If opting to charge these fees, CardConnect will contact VISA/MasterCard. VISA/MasterCard will perform an audit of your department's finances to ensure the fees you wish to pass along to your customers are within industry standards. This process will take up to 60 days.
Adding a Logo to Your Igenico Unit
Some users choose to "brand" their Ingenico units for marketing purposes. CardConnect supports this process. Refer to the following URL for further information. Image requirements are "as stated" and need to be adhered to.
https://support.cardconnect.com/device-integration/bolt-p2pe#custom-image-theme
Contactless Payments

Click to Enlarge
Contactless payments are available with the CardConnect BOLT solution. Contactless payments include credit cards that bear the Near Field Communication (NFC) symbol as well as any wallet app, such as Google Pay, Apple Pay, etc.
- NFC credit cards and wallet apps cannot be used for putting credit card numbers on file for installment billing or auto pay programs in RecTrac.
- If using a wallet app, the card mask returned by CardConnect to RecTrac represents the virtual card number stored on the mobile payment application (i.e Google Pay, Apple Pay, etc.) and not the actual card number that was uploaded to the mobile payment application.
- Refunds: If sale processed is with a NFC card and a refund is attempted, the refund will
- Succeed when processed through the same Merchant ID (MID).
- Fail when processed through a different MID, as the tokens from the sale are considered single-use tokens.
If you wish to use Contactless Payments, contact CardConnect to:
Troubleshooting
This section provides information regarding common problems and their resolution.
Problem
We are receiving the following error at login: "errorCode:3,errorMessage: 'hsn' property expected."
Solution
This error is the result of an invalid or <blank> Terminal ID on the Pinpad profile. The pin pads' serial number is located on the "Serial No" sticker on the back of the Ingenico i250. Enter this number in the Terminal ID field of the Pinpad profile.
Problem
We are receiving the following error when processing a transaction from a shared Pinpad: "errorCode:1,errorMessage: Session exists for hsn <alpha-numeric character string>."
Solution
This error is the result of two clerks attempting to process transactions at the same time on a shared pin pad. When sharing pin pads only one (1) transaction can connect to the Pinpad at a time, so if two (or more) users are trying to process sales at the same time, then only one transaction can connect. Wait until the first transaction ends and then process the second one.
Problem
We are receiving the following error when processing a transaction from a shared Pinpad: "errorCode:7,errorMessage: Terminal <alpha-numeric character string> is already in use"
Solution
This error is the result of a shared pin pad not being set up as a shared pin pad on the Pinpad profile. In this situation, the second workstation's request will cancel the first workstation's request without checking to see if a transaction is in progress. The pin pad will display -Command Cancelled.- The second workstation will get the message. Go to the Pinpad profile in question and enable the Shared Pin Pad? toggle option in the Bolt Ethernet Integration group.