Topic Doc: Distributing RecTrac User IDs and Passwords via Email
RecTrac 3.1

Written by Seth Warren
Updated at May 12th, 2023
Table of Contents
Document Summary
The Email Login URL (Single or All Users) dialog allows you to send RecTrac User ID and new password (optional) information to an individual User ID or All User IDs in your User Management DataGrid.
Email Login URL is a good option for distributing new passwords to existing users. It is also a good option for distributing User IDs and passwords to users upon a new installation of RecTrac.
When you click Process, a system-generated email will be sent to All User IDs (or a single selected User ID) that contains the User ID, a login URL to your RecTrac database and, if selected, a newly generated random password.
Upon receipt of the email, users can click the embedded link and enter their User ID and password to access RecTrac.
To utilize this feature:
- The User ID you are using to perform this operation must be linked to an Email profile.
- Queued Email must be set up as a Scheduled Event.
- User IDs must be created in User Management and each User ID must have a valid email address entered in the Password field.
License – Maintenance Agreement
The use of the interface requires a Vermont Systems license and annual maintenance agreement for RecTrac and the component modules discussed in this document. Prior to implementing any process outlined in this document, please contact the Vermont Systems Sales department at 1-877-883-8757 to verify that you are authorized to use the modules discussed in this document and if not, to obtain a quote and/or approval.
Setup Steps
This document provides the basic File Maintenance steps required to email User IDs and Login information to users in your database. If you have additional questions about distributing RecTrac User IDs and Passwords via email after reading this document, please contact Vermont Systems Customer Service by phone at 887-883-8757 or generate a Support Case through the Customer portal of the Vermont Systems web site using your Customer ID and password.
Create and Link an Email Profile
Note: If your RecTrac User ID is linked to an Email Profile, skip this section.
The Email profile allows you to process emails and text messages from RecTrac to staff members (employees, instructors, referees, etc…) and patrons alike. Generally speaking, one (1) Email profile only per database is required, but your needs may vary. The following presents the minimum information required to create and link an Email profile for purposes of distributing User ID and Password information to users from RecTrac.
- In RecTrac, go to Profile Assignments. In the default Vermont Systems Design, go to Management Ribbon • System Management icon • User/Menu/Profile Management • Profile Assignments. Your setup may vary.
- The left-hand panel displays all profiles currently in your database. The middle panel displays the profile hierarchy tree. The right-hand panel will be blank.
- Click Add. You will continue to the Profile Update screen.
- Expand the Profile Type Drop-down list and select Email.
- Enter a name for the profile in the Profile Code field. This will become the Email profile code. For Example: Email Profile.
- Enter a description in the Profile Description field. For Example: Default Email Profile.
- Click Create.

Click the Image to enlarge.
- Enable the Use HTML Email Body option.
- Enter the name of your Email Server in the Server IP/Name field. Optionally, you can enter the IP Address of your email server, if desired.
- Enter the Port number for your Email Server in the Server Port field. Simple Mail Transfer Protocol (SMTP standard uses TCP port 25 by default, but your setup may vary.
- Accept the Base 64 default entry in the SMTP Authorization Type field.
- Enter email addresses in the three (3) "From" Email Address fields. When emails are sent from RecTrac, the addresses entered here will be listed as Sender.
- Fill in other fields as desired or come back to them at a later date, if necessary.
- Click Save when done. You will return to Profile Assignments.

Click the Image to enlarge.
- In the Linked Profiles middle column, click to expand the Default folder.
- In the Available Profiles left-hand column, click to highlight the Email profile you just created.
- Click again and hold the mouse button down. When you have "grabbed" the profile, a red box will appear that displays the profile name.
- Drag and drop. Drag to the Default Profiles folder in the middle column. When the box turns green, release the mouse. This will place the profile at the Default level of hierarchy. Profile Assignments are saved automatically.
The level of hierarchy can be changed later, if needed. - Click the 'X' in the upper-right hand corner of the Profile Assignments panel to Save and Exit.
Create a Queued Email Scheduled Event
Note: If your RecTrac has a Scheduled Event for Queued Email, skip this section.
Scheduled Events are processes in RecTrac that can be set up to run at regular periodic intervals. Sending emails from RecTrac is one such process. The following presents the minimum information required to establish a Schedule Event for purposes of distributing User ID and Password information to users via email from RecTrac.
- In RecTrac, go to Scheduled Events Maintenance. In the default Vermont Systems Design, go to Management Ribbon • System Management icon • Misc Management group • Scheduled Events Management. Your set up may vary.
- The DataGrid displays all Scheduled Events that currently exist in the database.
- Click Add. You will continue to the Scheduled Program Update screen.
- Enter a name for your event in the Schedule Name field. For Example: Email Queue.
- Expand the Scheduled Program Drop-down list and select Email Queue.
- Click the Picklist List icon in the Run As field and select the ZZS User ID. This is mandatory field in the Vermont Systems Design. Your design and setup may vary.
Note: If User ID ZZS does not exist, use ZZZ. Once the ZZS User ID is created, you can come back and change the Run User for this event, if desired.
- Fill in other fields as desired or come back to them at a later date, if necessary.
- Click Save. You will be returned to the Scheduled Events DataGrid.
- Click the 'X' in the upper right-hand corner of the panel to Exit.
Create RecTrac User IDs
Note: If your User Management DataGrid is populated with current User IDs and if those User IDs have a valid email address on the record, skip this section.
RecTrac User IDs are maintained in User Management. The following presents the minimum information required to establish a User ID for purposes of distributing User ID and Password information to users via email from RecTrac.
- In RecTrac, go to User Management. In the default Vermont Systems Design, go to Management Ribbon System Management icon • User/Menu/Profile Management group • User Management. Your setup may vary.
- The DataGrid displays all User IDs that currently exist in the database.
- Click Add. You will continue to the User Update screen.

Click the Image to enlarge.
- Enter a User Name in the User Name field. This will become the RecTrac User ID for this person.
- Enter the person's name in the Name field.
- Leave the Password and Confirm Password fields blank.
- Click the Picklist icon in the User Group(s) field to select the User Group to which this User belongs. This is mandatory field in the Vermont Systems Design. Your design and setup may vary.
User IDs can be linked and re-linked to User Groups at a later date, if needed, in the event you have not established all of your User Groups prior to running the process being outlined here. - Enter the person's email address in the Email Address field. The system will alert you if the address you enter seems invalid due to lack of selected criteria, such as an '@' symbol, a valid extension (i.e. .com, .org, .edu, etc...), invalid characters, etc….
Note: The system cannot check the validity of the address, itself; it can check only that the email address contains valid criteria.
- Fill in other fields as desired or come back to them at a later date, if necessary.
- Click Save when done. You will return to the User Management DataGrid.
- Repeat these steps as needed to add additional User IDs
OR
Select/Highlight an existing User ID and click Clone to create multiple User IDs in bulk, if desired. Use the mouse-over help or full page help for field definitions and examples, if needed. - Remain in User Management when done.
Run the Email Login URL for All Users
Selecting this option prompts the system to send an email to all User Ids in the User Management DataGrid, provided the User ID record contains a valid email address. There is no option for selected users; your options are ALL users or a SINGLE user.
- If you are not on the User Management DataGrid, in RecTrac, go to User Management. In the default Vermont Systems Design, go to Management Ribbon • System Management icon • User/Menu/Profile Management group • User Management. Your setup may vary.
- The DataGrid displays all User IDs that currently exist in the database.
- Click Email Login URL - All Users. You will continue to the Email Login URL - Bulk dialog.

- Enable the Change to Random Password option. When you click Process, the system will assign a random 6-digit alpha-numeric password to each User ID. That password will be included in the email.
OR
Leave the option de-selected. IF de-selected, no changes to a user's password will be made. The ensuing email will NOT contain a password. When you leave this option de-selected, the system assumes users know their password. - Click Process. A system-generated email will be sent to All User IDs. The email contains the User ID, a login URL to your RecTrac database and a newly generated random password, depending on whether you enabled the option discussed above.
Upon receipt of the email, users can click the embedded link and enter their User ID and password to access RecTrac. - Exit User Management.
- (Optional) Once users click the embedded link, they will be brought to your RecTrac login screen using the default web browser on the client workstation they are using. Click here for the listing of minimum web browser requirements.
You or a member of your staff should consider:- Creating a desktop shortcut from the icon using the default web browser you wish your staff to use for access to RecTrac.
- Making the RecTrac login a "favorite" ( + D) in the default web browser you wish your staff to use for access to RecTrac.
Run the Email Login URL for a Single User
Selecting this option prompts the system to send an email the selected User Ids in the User Management DataGrid, provided that User ID record contains a valid email address. There is no option for selected users; your options are ALL users or a SINGLE user.
- If you are not on the User Management DataGrid, in RecTrac, go to User Management. In the default Vermont Systems Design, go to Management Ribbon • System Management icon • User/Menu/Profile Management group • User Management. Your setup may vary.
- The DataGrid displays all User IDs that currently exist in the database.
- Highlight/select a User record and click Email Login URL - Single. You will continue to the Email Login URL - Single dialog.
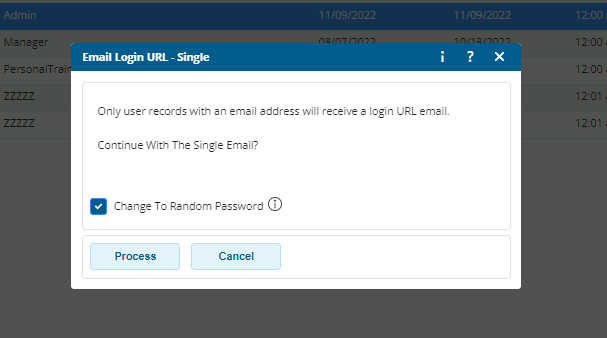
- Enable the Change to Random Password option. When you click Process, the system will assign a random 6-digit alpha-numeric password to the selected User ID. That password will be included in the email.
OR
Leave the option de-selected. IF de-selected, no changes to the user's password will be made. The ensuing email will NOT contain a password. When you leave this option de-selected, the system assumes users know their password. - Click Process. A system-generated email will be sent to the selected User ID. The email contains the User ID, a login URL to your RecTrac database and a newly generated random password, depending on whether you enabled the option discussed above.
Upon receipt of the email, the user can click the embedded link and enter his/her User ID and password to access RecTrac. - Exit User Management.
- (Optional) Once users click the embedded link, they will be brought to your RecTrac login screen using the default web browser on the client workstation they are using. Click here for the listing of minimum web browser requirements.
You or a member of your staff should consider:- Creating a desktop shortcut from the icon using the default web browser you wish your staff to use for access to RecTrac.
- Making the RecTrac login a "favorite" ( + D) in the default web browser you wish your staff to use for access to RecTrac.
Customization Options for the RecTrac URL Email
The stock email that gets created contains basic User ID, Password (optional), and Login Link information only. You can create custom text for the URL Login email that gets sent to Users, if desired. To do so:
- Go to the RecTrac Email URL Settings group of your Static Parameters profile and create two (2) Vermont Systems Reserved Comment Codes: One for the email that does not include a random password, and one for the email that does include a new, randomly generated password. Comment Codes are maintained in Comment Code Maintenance.
- Ensure the following tags are included in the Comment Codes you create:
- <USERNAME> - This tag inserts the User's RecTrac User ID.
- <PASSWORD> -This tag inserts the new, randomly generated password. This tag is applicable ONLY if you opt to Change to Random Password. This tag should be included ONLY on the Vermont Systems Reserved Comment Code for the Email WITH Password.
- <LINK> -This tag inserts the login URL to your RecTrac database.
- Link the Comment Codes to the applicable fields (Email Login URL - No Password Change and Email Login URL - With Password Change) in the RecTrac Email URL Settings group of your Static Parameters profile.
- Save changes and utilize the Email URL Login feature. Your custom text will be used for the email.
Create and Link Email URL Custom Comment Codes
- In RecTrac, go to User Management. In the default Vermont Systems Design, go to Management Ribbon • System Management icon • User/Menu/Profile Management group • Profile Assignments. Your setup may vary.
- The left-hand panel displays all profiles currently in your database. The middle panel displays the profile hierarchy tree. The right-hand panel will be blank.
- Click Static Parameters. You will continue to the Profile Update screen for Static Parameters.
- Expand the RecTrac Email URL Settings group, on the right-hand side of the screen.
- Click the Picklist icon in the Email Login URL - With Password Change field. You will continue to the Comment Code Management - VSI Reserved screen.
- Click Add.
- Enter a Code for your Comment Code in the Comment Code field. For Example: VSI Reserved - Email URL with Password.
- Enter a Description. For Example: Email URL with Password.
- In the Comment Text field, enter your custom text. This is the text that will appear in your email. Your text MUST include the following tags:
- <USERNAME> - This tag inserts the User's RecTrac User ID.
- <PASSWORD> -This tag inserts the new, randomly generated password. This tag is applicable ONLY if you opt to Change to Random Password. This tag should be included ONLY on the Vermont Systems Reserved Comment Code for the Email WITH Password.
- <LINK> -This tag inserts the login URL to your RecTrac database.
An Example Comment Code might look like this:

Click the Image to enlarge.
- Click Save. You will be returned to the Comment Code Management DataGrid.
- Highlight the code you just created and click Select. You will be returned to the Static Parameters Profile Update screen, and the Comment Code you created will be in the field.
- Repeat these steps for the Email Login URL - No Password Change field, if desired, or come back to this later.
When creating a Comment Code for the No Password option, DO NOT include the <PASSWORD> tag. No password is being transmitted in that email and the tag, if present, will be skipped. - Click Save and exit Profile Assignments.
- Run the RecTrac URL Email dialog for All Users or the RecTrac URL Email dialog for One User as desired.