
Table of Contents
Document Summary
This Topic Document walks you through setting up facility permitting, submitting a permit from WebTrac, and processing an example permit into an actual facility reservation within RecTrac. In WebTrac, patrons to send a request for their desired facility, dates, and times, without making a reservation within RecTac. This enables your staff to retain control over the facility reservations: staff reviews Permits, staff determines which to accept or reject, and staff can work through all of the needed details before creating the facility reservation.
Most organizations do not charge a fee for permits (as a permit is a request not a guarantee of getting that reservation), and only charge when a Permit is converted to an actual Facility Reservation. However, RecTrac does offer a Permit Fee Type you can assign to the Facility and WebTrac will charge patrons it.
Facility permitting is a good solution for those who want to control the facility reservation process in RecTrac:
- While still allowing their patrons to browse Facilities and request a reservation online.
- For selected facilities only while allowing their patrons to reserve other facilities online.
For each individual facility, you can choose whether it is visible online, is available for permit or reservation. You can mix and match. For Example: Patrons might use WebTrac to directly purchase reservations for your popular children's birthday room, as it saves your staff considerable time for similar, easy to setup events. However, your pavilions are permit-only, because setup and requirements vary quite a lot for different event types (weddings, corporate events, and etc…) and you expect your staff to be actively working with the patron to get the details right.
You can set rules that determine who can reserve the facilities and when that is allowed through WebTrac. For Example: You might only allow WebTrac permits 30-days or more in advance of their selected event date. Another common example, residents might be allowed to directly purchase a facility reservation, whereas nonresidents can only permit facilities.
You can create questions specifically for patron's facility permits, and your patrons will answer them as part of their permit application process within WebTrac. Questions help your staff when deciding to accept, reject, or follow up on patron permit requests.
Document Scope and Assumptions
This document will walk you through the basic steps required to:
- Determine which Facilities are available in WebTrac for permit processing.
- Add a Permit Processing Question Group to a location.
- Submit a facility permit application online via WebTrac.
- Process facility permit applications in RecTrac as they are received.
Before You Begin
This document is written with the following assumptions. If any of the items listed below is NOT true, contact Vermont Systems Support prior to continuing, as the steps in this document may prove difficult to complete and unexpected results may occur.
- Your organization is running RecTrac 3.1.05.00 or greater.
- Your organization is using WebTrac.
- The User ID with which you sign into RecTrac has the requisite permissions and ability to access the programs discussed within this Topic Document: Question Management, Facility Management, and Global Sales.
- Your Facilities have been set up in the database and can be reserved via Global Sales.
- You (or the individual(s) using the Facility Reservations SuperGrid) understand the current facility reservation process at your organization.
- You understand how to create Questions, Rules, and Fees.
Setup Steps
This document provides instructions for facility permitting processes. If you have additional questions about the facility permitting processes after reading this document, please contact Vermont Systems Customer Service by phone at 887-883-8757 or generate a Support Case through the Customer portal of the Vermont Systems website using your Customer ID and password.
License – Maintenance Agreement
The Facility Permit Interface is free. Use of the interface requires a VSI license and annual maintenance agreement for RecTrac and the component modules discussed in this document. Prior to implementing any process outlined in this document, please contact the Vermont Systems Sales department at 1-877-883-8757 to verify that you are authorized to use the modules discussed in this document and if not, to obtain a quote and/or approval.
File Maintenance Setup
This document will guide you through the basic steps required to configure and use facility Permitting and is divided into the following sections.
- Creating Questions
- Setting Facilities to Display as Permit Within WebTrac
- Submitting Permits Through WebTrac
- Managing Permits Through Global Sales
Note: All file paths and screen/tab locations in this document refer to file paths and screen/tab locations as they appear in the standard, default VSI Design. Your setup and Design may vary.
Creating Questions
To help with the permit approval process, you might ask your patrons a series of questions about their event. Answers ensure reservations are a good fit for the facility. For Example: How many people are attending? Is their event a wedding, family reunion, corporate event, and etc…?
Note: Even if your organization already has questions, they MUST be set for use with Permits. See the Question Type field described within this section.
- In RecTrac, go to the Management Ribbon • System Management • Fee/Rule/Question Management group • Question Management. The Question Management screen opens.
- Click the Add button. The Question Text Update screen opens.

Click Image to Enlarge
- Enter the Question Text (i.e., Reserv Purpose).
- Click in the Combo Box icon to select the Question Type. For this question to display within WebTrac for Permit-facilities, you MUST have Permit selected here. Multiple selection is allowed.
- Use the "i" and "?" Help icons on the upper-right hand corner of the screen for additional field definitions, as needed.
- Click the Save button.
- Repeat steps #2 through #6 for each of the questions applicable for Permit facilities.
- Remember to link your Questions to facilities. See the Questions tab within Facility Management.
Setting the Display Facility on Web field
In this section, you set the Display Facility On Web field to Permit for the desired facilities. Other facilities might remain as No, and be unavailable through WebTrac. If desired, set Purchase for facilities that patrons are allowed reserve online (i.e., you children's birthday party room).
- In RecTrac, go to the Management Ribbon • Facility Management • Facility Management. The Facility Management screen opens.
- Highlight the desired facility within the DataGrid and then click the Change button. The Facility Update screen opens to the Core tab.
- Expand the WebTrac Settings area of the screen.

Click Image to Enlarge
- Expand the Drop-down listfor Display Facility on Web and determine how you would like this Facility displayed in WebTrac.
- Permit Only - This Facility will display on WebTrac for reservation requests (Permit) only. Availability checks will be run against Rules set for Transaction Type Permit only.
- Purchase and Permit (Subject to Rules) - This Facility will display on WebTrac for both reservations (Purchase) and reservation requests (Permits). Availability checks will be run against Rules set for Transaction Type Purchase and Transaction Type Permit
- No - This Facility will not be displayed in WebTrac. No Rule checks will take place.
- Inquiry Only - This Facility will display on WebTrac but upon mouse-over, a message will display reading, "Inquiry Only - Reservations cannot be made online." No rule checking is used for this option.
- Purchase Only - This Facility will display on WebTrac for reservations (Purchase) only. Availability checks will be run against Rules set for Transaction Type Purchase only.
- This Topic Doc assumes your Facilities are already set up with all required fields completed on this screen. Use the "i" and "?" Help Icons on the upper-right hand corner of the screen for additional field definitions, as needed.
- Click on the Fees tab.
- Click Add and then Add Fee.
- Enter a Fee Description (i.e., Permit Fee).
- Click on the Combo Box option and notice that Permit is an allowed Transaction Type. If desired, you can establish a fee for when patrons submit a Permit through WebTrac and associate it with this facility. In this example, only the Purchase Transaction Type will be used.
- Use the "i" and "?" Help icons on the upper-right hand corner of the screen for additional field definitions, as needed.
- Click Save button.
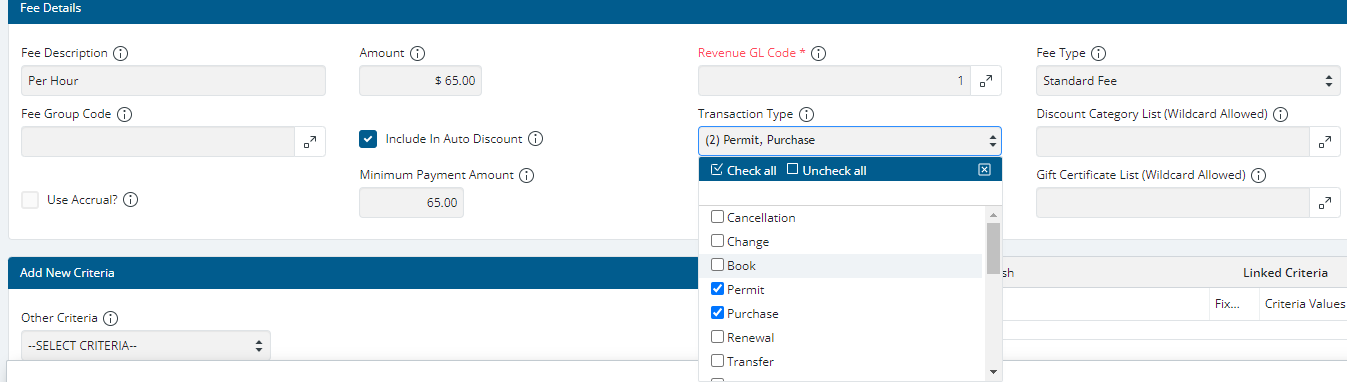
Click Image to Enlarge
Note: Use hierarchy to your advantage when establishing a fee. Can your fee be applied only once at the Facility Module (all facilities within RecTrac), Facility Class (i.e., all pavilions), or Facility Location-levels (i.e., all Allen-Park facilities)? Does creating your fees as a Set make sense? Sets enable you to reuse a group of fees wherever they are needed. You can save a lot of work, by linking fees once high within your hierarchy, rather than linking them many times at lower levels. In certain situations, a fee might be unique to just this facility and therefore MUST be applied at the facility-level.
- Click on the Rules tab.
- Click Add and then Add Rule.
- Enter a Fee Description (i.e., Facility Capacity Rule).
- Under the Transaction Type field, you MUST choose Permit for rules that apply to permits. This Permit selection enables you to establish unique Rules for your permits.
- Use the "i" and "?" Help icons on the upper-right hand corner of the screen for additional field definitions, as needed.
- Click Save button.

Click Image to Enlarge
Note: Use hierarchy to your advantage when establishing rules. Can your rules be applied only once at the Facility Module (all facilites within RecTrac), Facility Class (i.e., all pavilions), or Facility Location-levels (i.e., all Allen-Park facilities)? Does creating your rules as a Set make sense? Sets enable you to reuse a group of rules wherever they are needed. You can save a lot of work, by linking rules once high within your hierarchy, rather than linking them many times at lower levels. In certain situations, a rule might be unique to just this facility and therefore MUST be applied at the facility-level.
-
Click on the Questions tab.
- Highlight a question record within the DataGrid and then click the Change button.
- Click the Combo Box icon for Question Type to select Permits. Multiple Selection is allowed.
- Click Save button.

Click Image to Enlarge
Note: Use hierarchy to your advantage when establishing questions. Can your questions be applied only once at the Facility Module (all facilites within RecTrac), Facility Class (i.e., all pavilions), or Facility Location-levels (i.e., all Allen-Park facilities)? Does creating your questions as a Set make sense? Sets enable you to reuse a group of questions wherever they are needed. You can save a lot of work, by linking questions once high within your hierarchy, rather than linking them many times at lower levels. In certain situations, a question might be unique to just this facility and therefore MUST be applied at the facility-level.
- Optional. Click the Email Features tab button. Here, you can specify who is emailed when a Transaction Type of Permit is activated.
- Click the Add button. Click the Combo Box icon for Transaction Types to select Permits. Multiple Selection is allowed.
- Click the Combo Box icon to select the users whom you want to email when the selected Transaction Types occur (i.e., a permit is processed within RecTrac, etc…). Alternatively, enter email addresses within the Free Form Contact List as needed.
- Use the "i" and "?" Help icons for additional field definitions, as needed.

Click Image to Enlarge
Note: Use hierarchy to your advantage when establishing Email Options. Can your Email Options be applied only once at the Facility Module (all facilities within RecTrac), Facility Class (i.e., all pavilions), or Facility Location-levels (i.e., all Allen-Park facilities)? You can save a lot of work, by linking Email Options once high within your hierarchy, rather than linking them many times at lower levels.
- Click the Save button to return to the Facility Management screen and DataGrid.
- Repeat this process for additional facilities, as needed.
Note: Use the Bulk Change button when you have many facilities that you'd like to set as Permit Only all at once as a group. In the example below:
- The Display On Web field was added to the Bulk Changes To Complete area.
- The Permit Only Combo box selection was set.
- The DataGrid was filtered to display only pavilions, based on the Facility Class.

Click Image to Enlarge
Processing Permits
This section describes how:
- Patrons will submit a permit through WebTrac.
- Your staff will use RecTrac to review and manage permit requests.
- Your staff converts a permit request into a facility reservation and generates a receipt.
Submitting Permits Through WebTrac
This section discusses the general steps your patrons will follow within WebTrac to submit a permit for a facility. For the purposes of example, the VSI sales department's WebTrac is shown. Your organization's own WebTrac and menu pathing will vary from those shown but the process should be similar.
- In WebTrac, go to the Search menu • Facility Search. The Global Sales Lookup screen opens.
- Patrons will search for their desired facility type (i.e., a pavilion), date, and time. Click Add to Cart.

Click Image to Enlarge
- A screen opens with your organization's Questions, Ticklers, Waivers, and Permit Information. For Example: Patrons might enter their reservation purpose (i.e., a party, family event, wedding, etc.) and read and acknowledge a standard facilities waiver. Below is the top portion of that screen.

Click Image to Enlarge
- Further down the same screen, the Permit Information section defaults are the specific facility, date, and time chosen. However, that can be changed here to provide flexibility within dates, times, locations, and/or facilities. For Example: The patron might have a very specific request of only the selected facility, date, and time. Other patrons might be flexible enough to accept any pavilion at this location, within a two week time span which will make booking easier.

Click Image to Enlarge
- Click Continue. This example assumes that there is no fee associated with permits (if your organization charges permit fees then the patron must pay that fee as part of this process). Your shopping cart includes the permit with a $0.00 fee, which is normal. Comomnly, fees are only incurred when the permit is approved by your organization and the actual facility is reserved for the household.
- Click Proceed to Checkout.

Click Image to Enlarge
- A summary of charges and billing contact information is shown. Click Continue to complete the transaction.
- The receipt is emailed to the patron and WebTrac links immediately to a PDF receipt for this permit.
Note: Permits are not guarantees of use of that facility on a patron's selected date and time. Rather permits are first reviewed and can be accepted or rejected.

Click Image to Enlarge

Click Image to Enlarge
Managing Permits Through Global Sales
Once a permit has been submitted, you can use the Permits tab in Global Sales in order to view them. If you know the household, then you can look it up. Alternatively, skip the household lookup and view all permits on the Permits tab. Skipping the Household Lookup enables you to see all Permits awaiting action, where you can filter the DataGrid to just those In Review, or any of the various statuses. Helpful if you have a staff member or members whose job it is to vet and approve permit requests as they come in from WebTrac.
- In RecTrac, go to the Home Ribbon • Global Sales. The Global Sales Lookup screen opens.
- If you know the household, then look it up. Otherwise, click the Skip Household Lookup button.
- Click the Permits tab.

Click Image to Enlarge
- Highlight the desired permit within the DataGrid. You have several options which are discussed in detail below:
- Click the Change Permit Settings button. This enables you to change the Status, Permit Option, and various question answers associated with the Permit. You can set the Status of this Permit to In Review, Incomplete, Approved, Complete, or Rejected for your own tracking purposes. If desired, you can advance the status of the permit as you work through them, to track which are in the various stages of the permit review process. RecTrac does NOT force you to advance through those statuses. You can go immediately from a new Permit to selling and reserving that space without touching the Permit Status at all. The Statuses can be used within DataGrid filtering, to show only Rejected status Permits, as an example. Setting the various statuses does NOT automatically notify patrons of your udpates.
- Click the Reserve button only for Permits you want to convert to sales. This enables you to first edit any necessary details and then add this to the cart. Once the purchase is complete, the facility is reserved, patron charged, and receipt is generated. The patron is NOT automatically notified.
- Click the Add to Cart button only for Permits you want to convert to sales. This adds this immediately to the cart as is. Once the purchase is complete, the facility is reserved, patron charged, and receipt is generated. The patron is NOT automatically notified.
- Note: It is assumed your staff will be in contact with the patron as part of the permitting process, as RecTrac and WebTrac does NOT automatically notify him/her about changes to his/her permit (i.e., completion, rejection, etc…). Often a facility is set to Permit when it is not a simple sell. You are likely working with a complex event (i.e., a wedding) that will require a staff followup who is essentially an event coordinator and further vet and get additional information. Receipts can be mailed to patrons, and/or emailed as PDF attachments.
- To edit or change the status of this permit, click the Change Permit Settings button. The permit opens within a new window and enables you to edit this permit's information.
- Edit the permit Status and Questions as is needed. To continue with this example, you might click the Drop-down list for Status and change it from "Permit - In Review" to "Permit - Approved." For Example: Your organization might have an individual(s) who review permit requests and work them through the various stages: In Review, Approved, Rejected, Incomplete, or Complete. Alternatively, leave the permit in its default state from WebTrac "Permit - In Review" and process it as a sale. This decision depends on local policy, your desire to track those individual statuses, and to generate reports based on those statuses.
- Click the Continue button to save your changes and return to the Permits tab.
- Repeat steps #4 and #5 to edit the status of additional permits within your queue.

Click Image to Enlarge
- To convert this permit to a sale, you have the choice of editing before selling or just selling as is. The steps that follow explain those processes.
- To convert this permit into a sale AND edit its details, click the Reserve button. The permit opens within a new window and enables you to edit this permit's information.
- You can edit the Begin/End Dates and Times, Status, Headcount, Set/Clean Up Minutes, and etc.
- Click the Continue button to save your changes, add this facility reservation to the cart, and return to the permits tab.
- Follow through your standard POS processes to complete that sale and generate a receipt.

Click Image to Enlarge
- To convert this permit into a sale without changes, click the Add to Cart button.
Note: When added to the cart, two records are shown. First, the reservation is added to the cart for your organization's normal fee (i.e., $60.00 in the example that follows). Second, the original permit is added to the cart for a $0.00 fee when no permit fee is set. If a Permit Fee is established, then it will be shown here.

Click Image to Enlarge
- Follow through your standard POS processes to complete the sale.

Click Image to Enlarge