
Table of Contents
Document Summary
The PlugNPay WebXPress External Redirect Interface (ERI) is a certified and secure gateway credit card processing system that allows patrons to remit for your services with credit cards while ensuring that no credit card data is entered, transmitted, or stored within a Vermont Systems application.
License – Maintenance Agreement
The use of this interface requires a Vermont Systems license and annual maintenance agreement for RecTrac and the component modules discussed in this document. Prior to implementing any process outlined in this document, please contact the Vermont Systems Sales department at 1-877-883-8757 to verify that you are authorized to use the modules discussed in this document and if not, to obtain a quote and/or approval.
Setup Steps
This document provides the basic File Maintenance steps required to prepare your RecTrac database for credit card processing using the PlugNPay WebXPress gateway solution. If you have additional questions about PlugNPay WebXPress Credit Card Processing setup and operation after reading this document, please contact Vermont Systems Customer Service by phone at 887-883-8757 or generate a Support Case through the Customer portal of the Vermont Systems website using your Customer ID and password.
Before You Begin
This document is written with the following assumptions. If any of the items listed below is NOT true, contact Vermont Systems Support prior to continuing, as the steps in this document may prove difficult to complete and unexpected results may occur.
- Your organization is running RecTrac 3.1.03.01 or greater.
- You have a valid PlugNPay user account. If you do not have a PlugNPay account, you cannot proceed. To establish a PlugNPay account, contact Barbara Volpe at PlugNPay: (800) 945-2538 x7738 or barbara@plugnpay.com.
- You understand your Credit Card solution; which credit card brands you accept; and the processes for which you allow them, such as Purchases, Installment Billing, Tip Processing, Gift Cards, etc….
- The User ID with which you sign into RecTrac has the requisite permissions and ability to access all modules and functions pertaining to Credit Card Processing, including but not limited to: Profile Management, Payment Code Management, Sales screens, Credit Card Terminal, and Tip Processing.
- You understand RecTrac Profile Management and hierarchy.
- You understand RecTrac DataGrids and how to maneuver through them.
PlugNPay WebXpress Overview
The PlugNPay WebXPress External Redirect Interface (ERI) is a certified and secure gateway credit card processing system that allows patrons to remit for your services with credit cards while ensuring that no credit card data is entered, transmitted, or stored within a Vermont Systems application.
The PlugNPay WebXPress ERI option allows credit cards to be swiped on a magnetic stripe reader or manually entered by your staff into RecTrac, or manually keyed on a web portal by your customers in WebTrac. This option:
This option:
- Stores NO card data in the Vermont Systems database other than the card mask returned by the processor (For Example: the first four (4) and last two (2) digits of a credit card)
- Ensures NO card entry is performed on the screen of a Vermont Systems application.
Important Notes: If you use RecTrac and WebTrac, as well as utilize the Installment Billing/Auto-Debit feature within the software, Vermont Systems strongly advises you to setup at least one separate account for each function with PlugNPay.
For example, if your organization uses all of these functions – RecTrac, WebTrac and Installment Billing/Auto-Debit – it would be recommended that you setup a minimum of three (3) accounts with PlugNPay: an account for Retail transactions (RecTrac), an account for e-Commerce transactions (WebTrac), and an account for MOTO transactions (Installment Billing/Auto-Debit).
While it is not required, Vermont Systems considers it "best practice" to setup your accounts in this fashion. PlugNPay has the ability to process MOTO type transactions (Installment Billing/Auto-Debit) regardless of the account type; however, not every merchant will allow it. By setting up separate accounts for each function, this will ensure that transactions are processed consistently. Please note that choosing to combine your merchant accounts may result in processing issues later, should your merchant’s regulations change.
Workstation Minimum Requirements
In order to process credit card transactions using PlugNPay WebXPress, the workstations on which you process transactions (including your WebTrac Transaction server, if applicable) must meet the following requirements.
- Have a valid URL to your RecTrac Server.
- Have access to the World Wide Web
- Have Microsoft Internet Explorer, version 10 or greater installed.
- Have the Vermont Integration Client (VIC) installed, either as a Service (recommended) or as an .EXE.
Limitations
- You may NOT process debit cards UNLESS the card can also be used as a major credit card.
- You may not process blind credits in RecTrac Blind transactions can be processed only via the PlugNPay website. Processing blind transactions is discussed here.
- Having installment billing periods of six months or more (billing semi-annually, annually, etc…) is not recommended. PlugNPay stores unique identifiers for approximately six months. If you bill semi-annually or annually, you run the risk of not having unique identifiers for your households and billing for those households will fail. Vermont Systems recommends no more than quarterly installment billing (quarterly, monthly, semi-monthly, bi-weekly, weekly).
- Customers who do Installment Billing with Credit Card Auto-Debit and/or WebTrac E-commerce accounts cannot use Duplicate Checking. DO NOT enable Duplicate Check on your PlugNPay Installment Billing Account or on your WebTrac E-Commerce Account.
PlugNPay per Transaction Fee Structure
PlugNPay transaction cost is based on monthly transaction volume within your organization. The following table provides PlugNPay’s per transaction cost as of February, 2012.
Note: The data in the table below is subject to change by PlugNPay. Be sure to confirm this information when contracting with them
| Monthly Transaction | Cost/Transaction in US cents |
|---|---|
| Fewer than 1,000 | $0.075 |
| 1,000 - 5,000 | $0.05 |
| Monthly Minimum per Gateway | $15.00 |
Your monthly transaction total is the sum of all credit card transactions from every point of sale within your organization; transactions from your individual point of sale workstations are not billed separately.
For Example: You have two (2) facilities each with two (2) points of sale. During May, Facility 1 processes 6,500 transactions through PlugNPay and Facility 2 processes 4,000 transactions through PlugNPay. Beginning in June, your per transaction cost will be 0.05 because your organization processed 10,500 total transactions in May. It will remain at 5 cents/transaction for at least the next three (3) months. See below for further details.
Raising or Lowering your per Transaction Fee
Lowering Your per Transaction Fee
PlugNPay does not monitor your transaction volumes on a regular basis. It is therefore up to you as a customer to notify PlugNPay when you attain a higher transaction threshold and thus qualify for a better per transaction rate.
As a customer, you will always start at the 7.5 cents per transaction ($0.075/transaction) rate. Once you reach the 1,000 transaction/month threshold level YOU must inform PlugNPay, so that your per transaction fee can be reduced to match the proper rate beginning the next month.
PlugNPay will provide the instructional steps required to monitor your transaction volume.
Raising Your per Transaction Fee
To help offset seasonal dips in sales, PlugNPay provides a three (3) month buffer at your current per transaction rate before changing it, should your transaction volume drop to a lower threshold number (and thus affect a higher per transaction rate).
For Example: You hit the 1,000/month transaction threshold in June and qualify for the $.05 /transaction rate starting in July. Sales remain constant through the summer months, but in September your sales drop below the 1,000 transaction threshold. You will still be charged the 5 cent per transaction fee for September. This will be true for October and November as well if your volume remains below the 1,000 transaction threshold. If the volume stays below 1,000 in December, you will revert to the 7.5 cents per transaction rate.
RecTrac File Maintenance Setup
Note: The following steps assume you have a valid PlugNPay user account. If you do not have a PlugNPay account, you cannot proceed. To establish a PlugNPay account, contact Barbara Volpe at PlugNPay: (800) 945-2538 x7738 or barbara@plugnpay.com.
To use PlugNPay credit card processing, you will need to complete the following setup steps:
- Install the MagTek IPAD pinpad hardware, if applicable
- Setup and link your MagTek IPAD Pinpad device, if applicable.
- Set up your PlugNPay WebXPress profile(s).
- Link the PlugNPay profile(s) appropriately in Profile Hierarchy.
- Set up and link your MSR profile, if applicable.
Note: All file paths and screen/tab locations in this document refer to file paths and screen/tab locations as they appear in the standard, default Vermont Systems design. Your setup and design may vary.
MagTek IPAD Setup
Complete the following steps only if you are using the MagTek IPAD pinpad hardware. If you do not use the MagTek IPAD, proceed to Setup Your PlugNPay WebXpress Profile.
Perform the steps outlined in this section on each workstation from which you will process transactions using a MagTek IPAD pinpad. Vermont Integration Client (VIC) MUST be installed on those workstations.
Product Description
The IPAD is a secure PIN entry device. The IPAD provides end-to-end security solution to prevent personal cardholder data breaches while bringing convenience and speed to Retail and Financial transactions.
The IPAD immediately encrypts data at the point of swipe to safeguard personal information encoded on the magnetic stripe. The encryption takes place within an encapsulated magnetic read head as the card is swiped, eliminating the chance of intercepting clear text data. The data is not in the clear for even a few milliseconds. The IPAD’s data encryption scheme uses the industry standard 3DES algorithm, which offers merchants, processors, issuers, and acquirers the flexibility to manage decryption services themselves or to outsource, thereby avoiding the risk imposed by unproven, proprietary encryption algorithms.
In addition to meeting the requirements established by PCI PED v2.0, the IPAD has MagnePrint®, a proven embedded security feature that authenticates the debit, credit, or gift card and its encoded track data, rendering counterfeit or cloned cards useless. This feature provides a valuable defense to protect the merchant, the acquirer, the processor, the card issuer, and ultimately the consumer.
Unpacking and Handling the MagTek IPAD
Whenever handling the MagTek IPAD, do so with extreme care and caution, being careful not to drop the device. These units are configured with a tamper proof setting that, when tripped, will deactivate the encryption keys and render the unit useless until it is re-injected by the seller (i.e. if the encryption keys are deactivated, you will have to return the unit to the vendor and have it re-injected.).
Install the MagTek IPAD
Note: DO NOT plug the MagTek IPAD unit into the workstation until you are instructed to do so
Perform the steps outlined in this section on each workstation from which you will process transactions using a MagTek IPAD pinpad. Vermont Integration Client (VIC) MUST be installed on those workstations.
- Log into the workstations using a Windows Administrator account. Open a file transfer client program. Use "sftp.vermontsystems.com" as the Host and "22" as the Port. Vermont Systems Knowledge Base entry 1516 contains the current login credentials.
- Once on the sFTP site, browse to \File Updates and Drivers\MagTek IPAD.
- Copy the contents of \MagTek IPAD to a temporary directory on your workstation and exit the sFTP site.
- In Windows, browse to the temporary directory to which you copied the contents of \MagTek IPAD. Highlight/select 99510093.exe.Right-click and choose Run As Administrator.
- At the Open File - Security Warning, click Run. At the MagTek IPAD Windows Library - InstallShield Wizard screen, click Next.
- At the Ready to Install the Program screen, click Install. Be patient, as this may take some time to begin and complete.
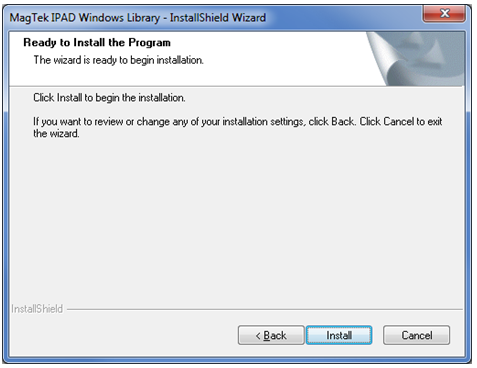
- Click Finish when prompted. You will return to Windows Explorer.
- Exit Windows Explorer and return to your computer desktop.
- Plug the MagTek IPAD pinpad hardware into an available USB port on the workstation. The unit will install automatically. The LCD will read Welcome when the install is complete.
Create and Link a MagTek IPAD Profile
Note: If you have an MSR profile linked to this workstation in RecTrac, it must be removed
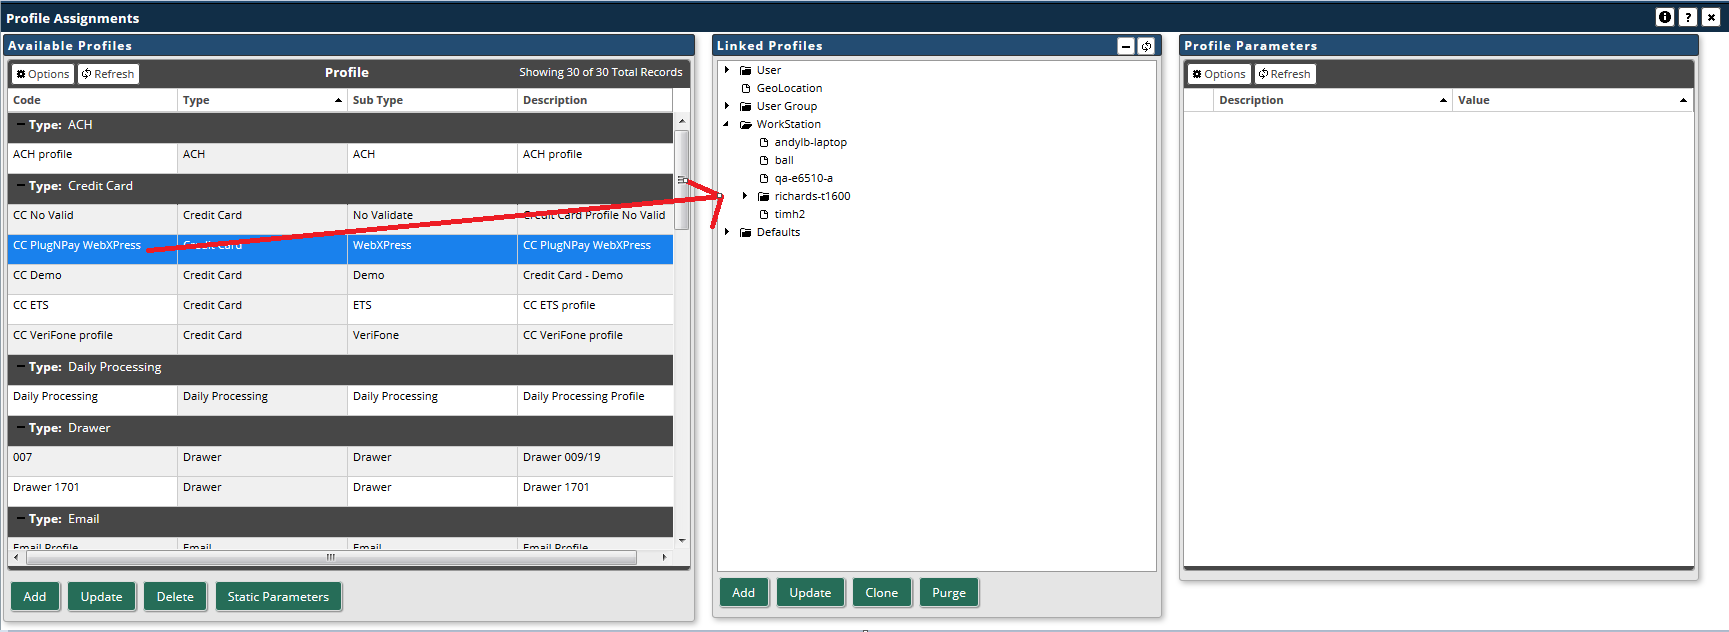
- In RecTrac, go to Management Ribbon • System Management • User/Menu/Profile Management Group • Profile Assignments. Click Add.
- Enter a Profile Code for your Pinpad. For Example: "IPAD."
- Expand the Drop-down list for Profile Type and select Pinpad.
- Expand the Drop-down list for Profile Subtype and select MagTekIPAD.
- Enter a Profile Description. For Example: "MagTek IPAD Cash Register 1."
- Click Create. You will continue to the Profile Update screen.
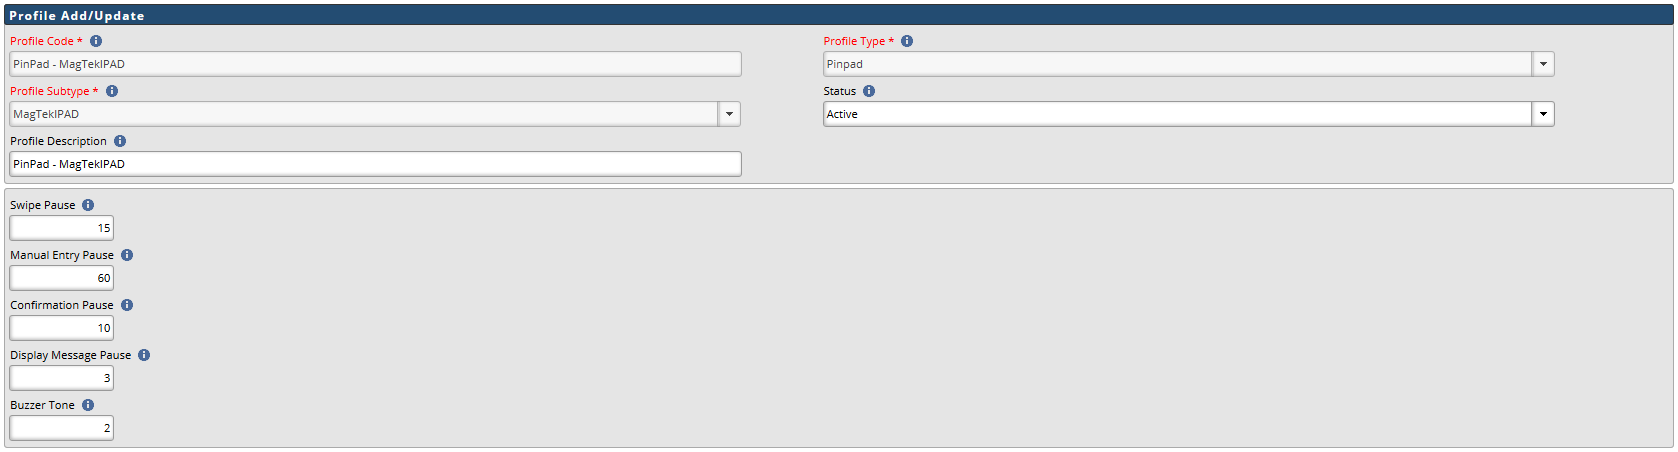
- Set your Swipe Pause value. The Swipe Pause is the number of seconds the PinPad will wait (i.e. "pause") for a swipe before timing out. Vermont Systems recommends a value at/around '15.'
- Set your Manual Entry Pause value. The Manual Entry Pause is the number seconds the Pinpad will wait (i.e. "pause) for manual input of a credit card number before timing out. Vermont Systems recommends a value at/around '60.'
- Set your Confirmation Pause value. The Confirmation Pause is the number seconds the PinPad will wait (i.e. "pause") for confirmation that the amount being displayed is accurate. Vermont Systems recommends a value at/around '10.'
- Set your Display Message Pause value. The Display Message Pause is the number of seconds the PinPad will wait (i.e. "pause") while displaying messages, such as 'Approved,' 'Declined,' etc… on the LCD. Vermont Systems recommends a value at/around '2.'
- Set your Buzzer Tone. The value here determines the buzzer tone for this IPAD. Buzzer Tone value can be numbers 0 - 2. Vermont Systems recommends setting '2.'
- 0 - No tone.
- 1 - A single long tone.
- 2 - Two short tones in quick succession.
- Click Save to save your changes. You will return to Profile Assignments.
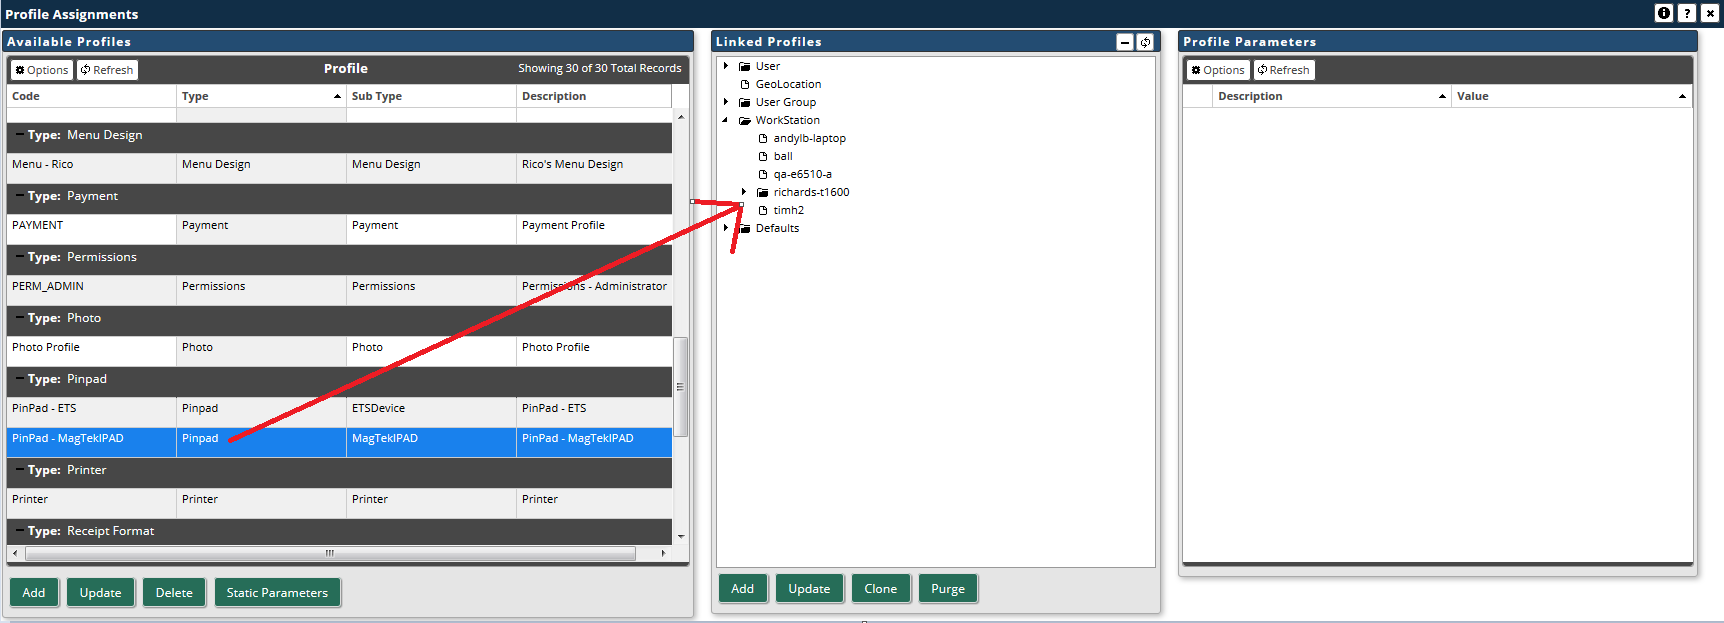
- In the Linked Profiles middle column, click to expand the Workstation folder.
- In the Available Profiles left-hand column, click to highlight the PinPad profile you just created.
- Click again and hold the mouse button down. When you have "grabbed" the profile, a red box will appear that displays the profile name.
- Drag and drop. Drag to the appropriate Workstation Name in the middle column. When the box turns green, release the mouse. This will place the profile at the Workstation level of hierarchy. Profile Assignments are saved automatically and take effect immediately.
The level of hierarchy can be changed later, if needed. - Click the 'X' in the upper-right hand corner of the Profile Assignments panel to Exit.
This completes the setup steps for your MagTek IPAD profile. Repeat these steps as necessary for other workstations on which you will process credit cards using a MagTek IPAD.
Create and Link a PlugNPay WebXPress Profile
- In RecTrac, go to Management Ribbon • System Management • User/Menu/Profile Management Group • Profile Assignments. Click Add.
- Enter a Profile Code for your Credit Card profile. For Example: "WebXPurchase."
- Expand the Drop-down list for Profile Type and select Credit Card.
- Expand the Drop-down list for Profile Subtype and select WebXPress.
- Enter a Profile Description. For Example: "WebXPress Credit Card Processing"
- Click Create. You will continue to the Profile Update screen.
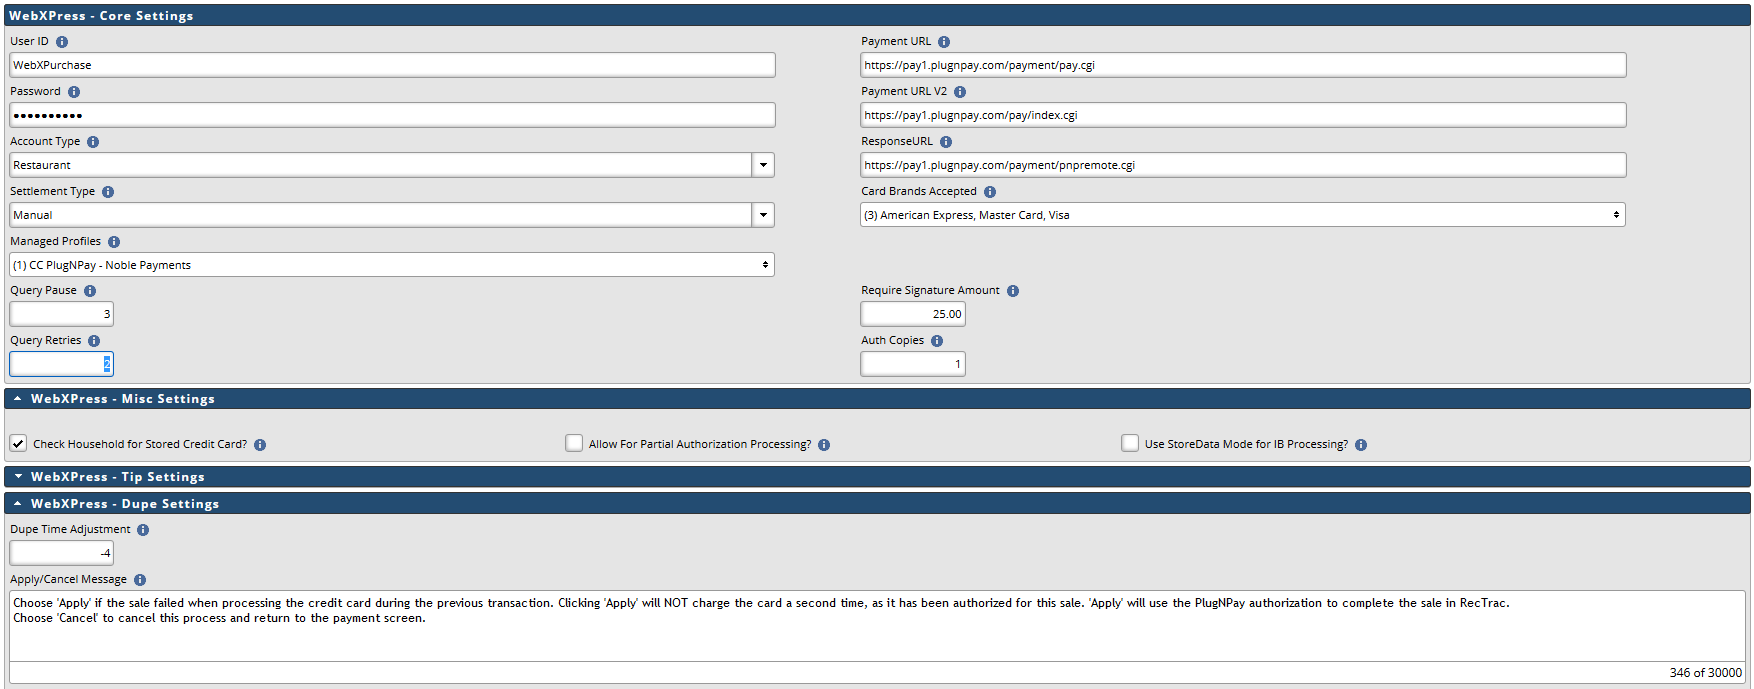
- Enter your PlugNPay User ID and Password in their respective fields. PlugNPay will provide you with this information.
Note: User IDs and Passwords are case-sensitive. Enter them exactly as they are given to you from PlugNPay.
- Expand the Drop-down list for Account Typeand make your selection.
- Normal Retail - Generally used for normal every day transactions performed in RecTrac.
- e-Commerce - Generally used for normal every day web-based transactions, such as those performed by patrons in WebTrac.
- Restaurant - Generally used where credit card transactions will include tip processing, such as in a restaurant or bar.
- MOTO - Generally used for Installment Billing processed through RecTrac.
- Vermont Systems recommends accepting the default value: Auto for your Settlement Type, unless you are processing Tips in a restaurant environment, in which case you would select Manual.
- Click the Combo Box icon and select the other Credit Card profiles you want the ability to work with during the Manual or Auto Settle process.
- Enter values in the Query Pause and fields. Vermont Systems recommends '3' and '2' respectively.
- Enter the Payment URL as given to you by PlugNPay. For Example: https://pay1.plugnpay.com/payment/pay.cgi
- Enter the Payment URL V2 as given to you by PlugNPay. For Example: https://pay1.plugnpay.com/pay/index.cgi
- Enter the Response URL as given to you by PlugNPay. For Example: https://pay1.plugnpay.com/payment/pnpremote.cgi
- Click the Combo Box icon and select the Credit Card Brand(s) you accept.
- Enter a threshold amount for requiring a signature on Credit Card purchases in the Require Signature Amount field, such as $20.00. Sales that do not meet this amount will bypass the signature screen and “Signature Not Required” will be printed on receipts. Receipts for sales that meet or exceed the threshold amount will be printed with a signature line for the patron.
- Enter the number of credit card authorization receipts you wish to print upon completion of a transaction in the Auth Copies field.
Note: An Authorization Receipt printer and an Auth Receipt profile will have to be linked.
- Expand the WebXPress - Misc Settings group.
- Determine whether you wish to Check Household for Stored Credit Card and Allow for Partial Authorization Processing. Use the "i" and "?" Help icons for field definitions, and examples if needed.
- Leave the Use StoreData Mode for IB Processing option de-selected unless you are instructed otherwise.
- Expand the WebXPress - Tip Settings group and fill out the Tip fields, if you are processing Tips in a restaurant environment.
- Expand the WebXPress - Dupe Settings group.
- Enter a value in the Dupe Time Adjustment field, if desired. Credit Card transactions are date/time stamped using Greenwich Mean Time(GMT)/Coordinated Universal Time(UTC). The Dupe Time Adjustment setting is used to adjust credit card transaction times so they display in real time based on your time zone. Enter the number of hours your time zone is behind/ahead of GMT/UTC in this field. For example, if your time zone is Eastern Standard Time (EST), you would enter -5. If your time zone is Eastern Daylight Savings Time (EDT), you would enter -4.
- Accept the default Apply/Cancel message or overwrite as needed.
The default message reads, Choose 'Apply' if the sale failed when processing the credit card during the previous transaction. Clicking 'Apply' will NOT charge the card a second time, as it has been authorized for this sale. 'Apply' will use the PlugNPay authorization to complete the sale in RecTrac.
Choose 'Cancel' to cancel this process and return to the payment screen. - Accept the default Force/Cancel message or overwrite as needed.
The default message reads, Choose 'Force' if this a brand new sale to the same credit card for the same dollar amount from a previous sale and you wish to charge the customer a second time.
Choose 'Cancel' to cancel this process and return to the payment screen. - Expand the WebXPress - Hash Settings group and input the Hash Verification Key you generated on the PlugNPay Portal. Hash Verification is an additional PlugNPay security feature used to ensure that transactions being sent into PNP have not been manipulated in transit or through use of web development tools.
Refer to Inbound Verification Hash below for further information. - Click Save to save your changes. You will return to Profile Assignments.
- Determine where you wish to link the profile. For purposes of example, this document will link the profile at the Workstation level.
- In the Linked Profiles middle column, click to expand the Workstation folder.
- In the Available Profiles left-hand column, click to highlight the Credit Card profile you just created.
- Click again and hold the mouse button down. When you have "grabbed" the profile, a red box will appear that displays the profile name.
- Drag and drop. Drag to the appropriate Workstation Name in the middle column. When the box turns green, release the mouse. The Profile Assignment Add dialog box will appear.
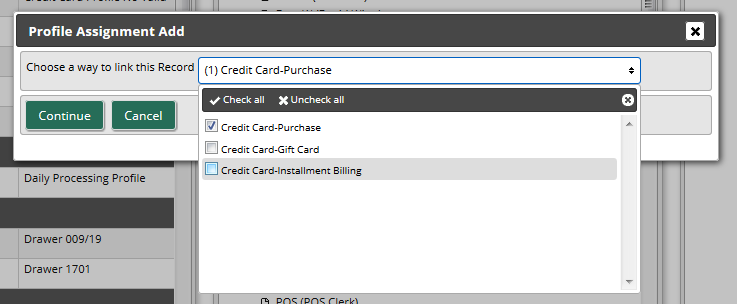
- Click the Combo Box icon and select the transaction type(s) for which this WebXPress Credit Card Profile will be used. Multiple selections are allowed.
- Click Continue. This will place the profile at the Workstation level of the hierarchy. Profile Assignments are saved automatically and take effect immediately.
The level of the hierarchy can be changed later if needed.
Note: A separate profile record will appear for each option you select.
- Click the 'X' in the upper-right-hand corner of the Profile Assignments panel to Exit.
This completes the setup steps for your PlugNPay WebXPress profile. Repeat these steps as necessary for other WebXPress Credit Card profiles.
WebXPress Profiles for Installment Billing
If you do Installment Billing/ACH, you need a MOTO merchant account specific for billing.
- Contact PlugNPay to create the account. Depending on how you run Installment Billing, you may need multiple accounts. PlugNPay will assist you with this determination.
- Once you have the billing merchant account(s), use the information above as well as that provided by PlugNPay to set up a Credit Card profile for Installment Billing.
- If you have multiple MOTO accounts, then you will need an equal number of Credit Card profiles for Installment Billing.
- Where you will link it in the Profile Hierarchy depends on how many MOTO accounts you have. When linking the profile, choose the Credit Card-Installment Billing option.
- If you have only one (1), then Vermont Systems recommends linking it at the Default level of the hierarchy.
- If you have multiple Installment Billing profiles, then you will have to link them elsewhere in Profile Hierarchy.
- If you have a Credit Card-Installment Billing profile, then the system will find it and use it for setting up bills REGARDLESS of whether you have a Credit Card Purchase profile linked higher in the Hierarchy.
- If you do not have a Credit Card-Installment Billing profile linked in Profile Hierarchy, then the system will use the Purchase profile. This may cause unexpected results.
Create and Link a MSR Wedge Profile
Complete the following steps only if you are using the MSR Wedge hardware. If you do not use the MSR Wedge proceed to Create and Link an Auth Receipt Profile.
Perform the steps outlined in this section on each workstation from which you will process transactions using a MSR Wedge. Vermont Integration Client (VIC) MUST be installed on those workstations.
Note: If you have an MSR profile linked to this workstation in RecTrac, it must be removed
- In RecTrac, go to Management Ribbon • System Management • User/Menu/Profile Management Group • Profile Assignments. Click Add.
- Enter a Profile Code for your MSR. For Example: "MSR - Wedge"
- Expand the Drop-down list for Profile Type and select MSR.
- Expand the Drop-down list for Profile Subtype and select Wedge.
- Enter a Profile Description. For Example: "MSR Wedge Cash Register 1."
- Click Create. You will continue to the Profile Update screen.

- Select the Pause After Swiping option if you want to review the credit card information after you swipe the card and before you click the Authorize button. De-select this option if you want to skip the review and have the system automatically authorize the sale.
- Select the Use Automatic Parsing option to automatically determine the credit card number and expiration date layout. Deselect this option to manually change the CC# Layout and Exp Date Layout fields.
- CC # Layout – This field is used to specify where and how to identify the credit card’s account number. You must specify the delimiting character within the scanned data, which field number (in relation to all other scanned fields) contains the card’s account number, as well as the maximum length that this field can be. The field format is dependent on the credit card reader type.
- Exp Date Layout – This field is used to specify where and how to identify the credit card’s expiration date. You must specify the delimiting character within the scanned data, and which field number (in relation to all other scanned fields) contains the card’s expiration date, as well as the maximum length that this field can be. The field format is dependent on the credit card reader type. RecTrac will always take the digits 3 and 4 to be the month of the exp date and digits 1 and 2 to be the year of the exp date. The swiper must be set up to read YYMM for this to work correctly.
- Click Save to save your changes. You will return to Profile Assignments.
- Determine where you wish to link the profile. For purposes of example, this document will link the profile at the Workstation level.
- In the Linked Profiles middle column, click to expand the Workstation folder.
- In the Available Profiles left-hand column, click to highlight the MSR Wedge profile you just created.
- Click again and hold the mouse button down. When you have "grabbed" the profile, a red box will appear that displays the profile name.
- Drag and drop. Drag to the appropriate Workstation Name in the middle column. When the box turns green, release the mouse. This will place the profile at the Workstation level of the hierarchy. Profile Assignments are saved automatically and take effect immediately.
The level of the hierarchy can be changed later if needed.
This completes the setup steps for your MSR Wedge profile. Repeat these steps as necessary for other MSR Wedge profiles.
Create and Link an Auth Receipt Profile
Perform the steps outlined in this section on each workstation from which you will print credit card authorization receipts. Vermont Integration Client (VIC) MUST be installed on those workstations.
Note: This section details how to create and link an Auth Receipt profile only. It does not cover the setup of the physical hardware, as many makes and models exist. If you require assistance with or documentation for physical printer set up and operation, contact Vermont Systems Support via the Customer Portal of our Vermont Systems website.
- In RecTrac, go to Management Ribbon • System Management • User/Menu/Profile Management Group • Profile Assignments. Click Add.
- Enter a Profile Code for your auth receipt printer. For Example: "EPSON CC Auth 1"
- Expand the Drop-down list for Profile Type and select Printer.
- Accept the default Profile Subtype, Printer.
- Enter a Profile Description. For Example: "EPSON TM-T88V Auth Receipt Printer 1"
- Click Create. You will continue to the Profile Update screen.

- In the Windows Printer Path/Name field, enter the name of the Printer as it appears in Windows on the workstation to which it is linked, regardless of whether it is a network printer or one dedicated to the single workstation only.
- Leave the Dupe Printer Code field blank.
- Click Save to save your changes. You will return to Profile Assignments.
- Determine where you wish to link the profile. For purposes of example, this document will link the profile at the Workstation level.
- In the Linked Profiles middle column, click to expand the Workstation folder.
- In the Available Profiles left-hand column, click to highlight the Printer profile you just created.
- Click again and hold the mouse button down. When you have "grabbed" the profile, a red box will appear that displays the profile name.
- Drag and drop. Drag to the appropriate Workstation Name in the middle column. When the box turns green, release the mouse. The Profile Assignment Add dialog box will appear.
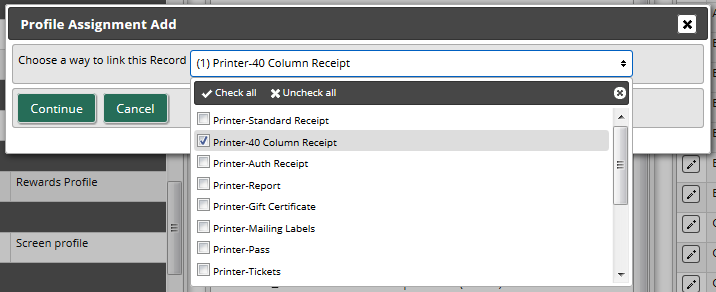
- Click the Combo Box icon and select the purpose(s) for which this printer will be used. Multiple selections are allowed, but in most cases you will select Printer-Auth Receipt only.
- Click Continue. This will place the profile at the Workstation level of hierarchy. Profile Assignments are saved automatically and take effect immediately.
The level of hierarchy can be changed later, if needed.
Note: A separate profile record will appear for each option you select.
- Click the 'X' in the upper-right hand corner of the Profile Assignments panel to Exit.
This completes the setup steps for your Auth Receipt Printer profile. Repeat these steps as necessary for other Auth Receipt profiles.
Create a Manual Entry Credit Card Payment Code
PlugNPay pin pads do not offer an onscreen option for Manual Card Entry. This prompt has to come from RecTrac, in the event it is needed. For this purpose, Vermont Systems highly recommends creating a Payment Code that will force the pin pad to prompt for manual entry. To do this, create a new Credit Card Payment Code and enter "Manual" in the Prefix Validation field.
- In RecTrac, go to Management Ribbon • System Management • System Management • Financial Management group • Payment Code Management.
- Click Add.
- Enter a Pay Code and Screen Description. For both instances, Vermont Systems recommends using something that clearly denotes that the purpose of this Pay Code is for "manual card entry."
- Expand the Drop-down list for Payment Type and select "Credit Card."
- Enter the word "MANUAL" (no quotes) in the Prefix Validation field. When this Payment Code is used, the Ingenico Pin Pad will prompt for manual entry of a Credit Card Number and Expiration Date.
- Fill out the remaining fields as you normally would. Use the "i" and "?" Help icons for field definitions, and examples if needed.
- Save your changes when done and exit back to the main RecTrac menu.
- Link the new Payment Code to your Payment profile(s) • Pay Code Restrictions group • Allowed Pay Codes field.
This completes the setup steps for manual entry of Credit Card Payment Code.
PlugNPay File Maintenance
Account Setup for Using the PlugNPay Web Site
Prior to using the PlugNPay website, perform the following instructions for the appropriate configuration.
- Open a web browser and go to https://pay1.plugnpay.com/admin
- Using the Login and Password given to you by PlugNPay, log into your account.
Note: User IDs and Passwords are case-sensitive.
- Under Settings, click Security Administration. It will open in a new tab.
- On the Security Administration Area screen, click Transaction Security Configuration.
- Scroll down to the Add IP Addresses section near the bottom of the screen, and type your organization’s public IP address(es). If you do not know your public IP address, you can obtain it by going to: http://whatsmyip.org.
- Click Add IP Address.

- Repeat steps 5 & 6 for EVERY public IP address your organization uses and/or through which you will process PlugNPay Transactions.
- Exit the tab when done. See also: Require IP Match below.
Note: Failure to register your public IP address(es) with PlugNPay will result in failed (No Authorization) credit card transactions on the PlugNPay site. Users will receive a pop-up message indicating the cause of the transaction failure If applicable, that pop up will include the IP Address that is NOT registered. See Troubleshooting below for further information
- On the main PlugNPay menu, go to Settings and click Account Settings. The screen will open in a new tab.
- In the Customizable Section Options group, click Payment Script Config.
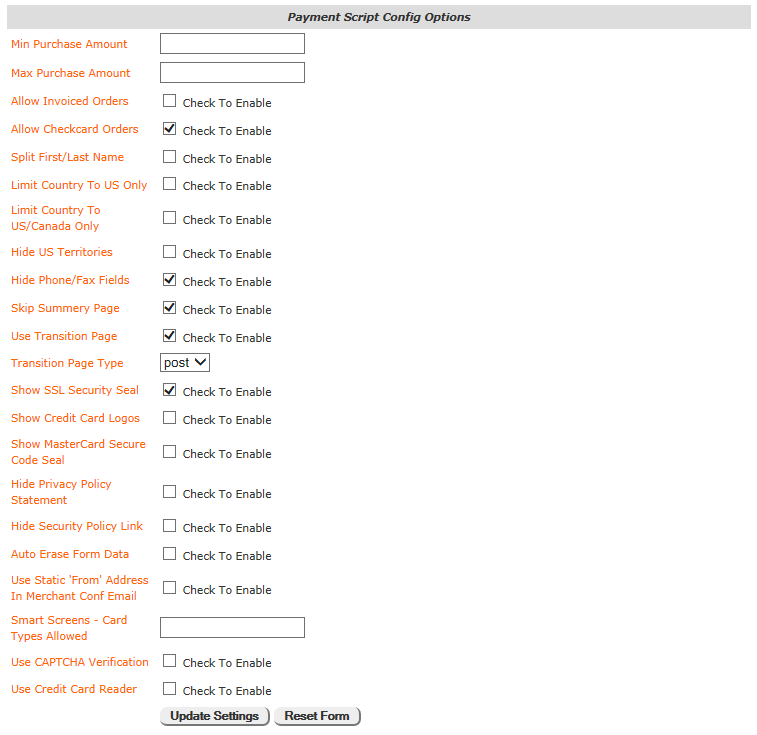
- Enable the Skip Summery Page page option.
- If your organization will be processing Installment Bills/Auto-Debit Transactions/Tee Time No Shows, etc…, enable the Allow Check card Orders option.
If your organization does not process Installment Bills/Auto-Debit Transactions/Tee Time No Shows, etc…, you may skip this step.
Note: The word “Check card” does NOT refer to a credit card type, such as the VISA Check card, but rather means that a customer’s regular credit card will be checked for validity. With this feature enabled, PlugNPay will do a $1.00 transaction against the card saved on the Household to ensure it is valid (Household Update • Financial Info tab • Auto Pay Option group). The $1.00 transaction will then be voided immediately.
- Click Update Settings at the bottom of the screen, and close the tab.
- On the main PlugNPay menu, go to Billing and click Billing Authorization. The screen will open in a new tab.
- Review the information for accuracy and then make your payment selection New Payment Information field. Your setting here determines how your department will pay PlugNPay:
- Credit Card
- Checking
- Fill out the fields that appear with your information and click Send Info at the bottom of the screen.
- Close the tab when done. Remain logged in to the PlugNPay site and continue to the next section, or Logout, if desired.
Set Up Remote Client Password
Using a Remote Client Password for your Vermont Systems software will prevent any interruption to transaction processing if your main PNP administration password is ever changed. Remote Client Password requires you to generate a new password while on the PlugNPay website and then enter that password in the appropriate field on your PlugNPay WebXPress profile(s).
VERMONT SYSTEMS HIGHLY RECOMMENDS USING THIS OPTION.
To setup a Remote Client Password:
- On the main PlugNPay menu, go to the Settings group and click Security Administration. The screen will open in a new tab.
- Click Username/Password Configuration.
- Scroll to the Remote Client Password section.
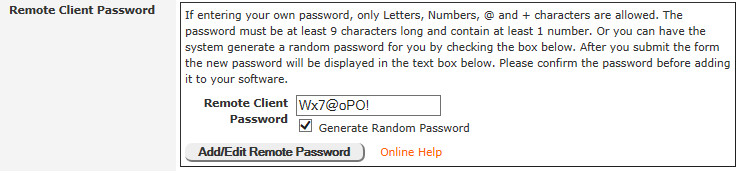
- Select the Generate Random Password option.
- Click Add/Edit Remote Password A password will be displayed in the Remote Client Password field.
- Make note of the password immediately. It will not display again.
- Close the tab.
- Enter the password into the Password fields on your PlugNPay WebXPress profile(s) and then continue with the PlugNPay setup, Install Deftran.html as Your Transition Page. Passwords are case-sensitive.
Install Deftran.html as Your Transition Page
Follow the steps below and ensure your transition pages in WebTrac will look like the examples presented.
- On the main PlugNPay menu, go the Settings group and click Account Settings. The screen will open in a new tab.
- On the Template Options group, expand the Drop-down list for Type and select Transition Page.
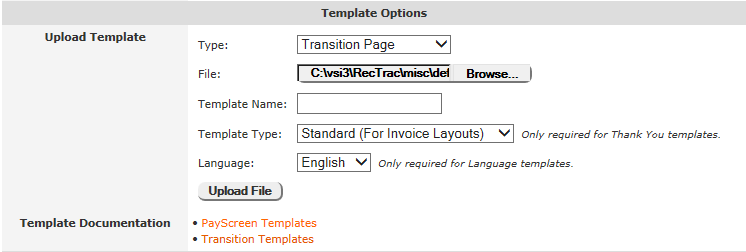
- Click the Browse button. Browse to deftran.html. By default, this file is located on your WebServer in <x>:\VSI3\RecTrac\Programs\ThirdParty\PlugNPay, where 'X' is the mapped partition on which RecTrac is installed.
- Leave the template name blank and leave the language as English.
- Click Upload File. You will be prompted when the process is complete.
- Save your changes.
- Look at the Current Templates section and verify that your Transition Templates = deftran.

- Close the tab.
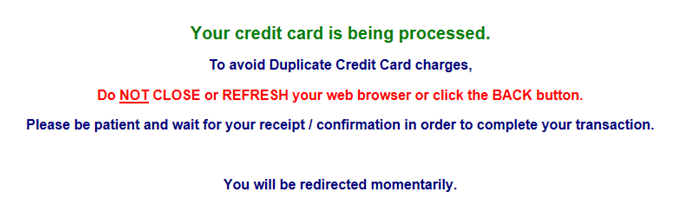
When processing a transaction in WebTrac with the deftran transition page in place, you will see the following screen transition before being redirected back to the WebTrac payment processing programs
Duplicate Transaction Checking and Fraud Track Set Up
Duplicate transactions can occur several different ways. For Example, A clerk closes the payment window before PlugNPay has had a chance to return an authorization code to RecTrac, and the clerk then tries to resend the same transaction amount on the same credit card that was previously used. This could be flagged as a potential duplicate transaction on the PlugNPay side.
To utilize Duplicate Transaction Checking you must enable the “Duplicate Check” option and frequency directly on the PlugNPay site, and then ensure that the appropriate messages are entered on your PlugNPay WebXPress profile(s).
Important Note: Customers who do Installment Billing with Credit Card Auto-Debit and/or WebTrac E-commerce accounts cannot use Duplicate Checking. DO NOT enable Duplicate Check on your PlugNPay Installment Billing Account or on your WebTrac E-Commerce Account.
To Enable Duplicate Check
- On the main PlugNPay menu, go the Settings group and click FraudTrak2. The screen will open in a new tab.
Note: Contact PlugNPay if you do NOT have the FraudTrak2 option. They will enable it for you. Enabling FraudTrak2 is free service for Vermont Systems customers. PlugNPay Tel: (800) 945-2538
- Enable the Check to skip IP frequency check option.
- Scroll down to Duplicate Check and place a checkmark in the Check to enable duplicate checking box.
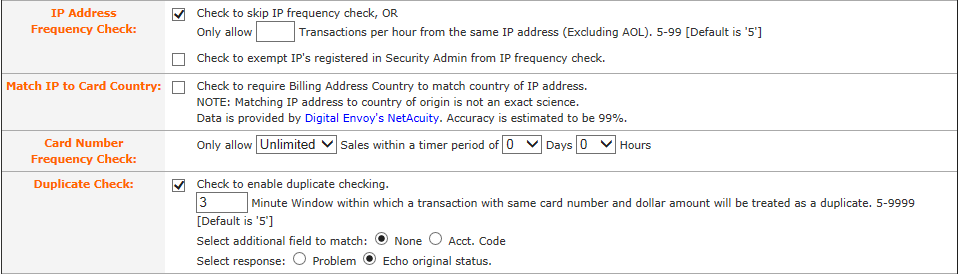
- Enter the number of minutes between transactions you would like to use when flagging duplicate transactions. For Example, 3.
- Ensure the Echo original status radio set option is enabled. Do not select Problem.
- Scroll down to the lower portion of the screen and click the Update Fraud Screen Configuration button.
- Log out of PlugNPay.
- Refer to Create and Link a PlugNPay WebXPress Profile for specific details on Apply/Cancel and Force/Cancel message fields, if desired. These messages will be displayed for clerks depending on the terms of the transaction.
Note: Any potential duplicate transactions will be flagged as “Fraud” on the PlugNPay website. This does NOT mean that a fraudulent charge has been made; rather it is an indication that a charge has been recognized as a potential duplicate.
Using PlugNPay WebXpress
Processing Transactions in RecTrac
The following provides brief examples of common credit card transactions in RecTrac. Other than the RecTrac Payment Screen, screens that you visit during the transaction process will vary depending on factors such as, but not limited to: Your PlugNPay Account type, the physical hardware you use to read credit cards, whether a household is opting to use a credit card they've used with you before, etc…. Screen shots used below are included for example only. You may or may not visit them during actual processing.
Note: Duplicate transaction logic has been added to PlugNPay credit card processing. If a duplicate transaction is found the program will prompt you to do one of the following:
- Apply the previous duplicate to the current sale (as long as there isn't already an rpcctxns record with that order ID).
- Force the transaction through as a separate sale.
- Cancel back to the payment screen.
Processing a Sale in RecTrac
- Process the sale as you normally would and proceed to the payment screen.
- Enter the appropriate Credit Card Payment Code.
- If the household has a credit card linked to their account, expand the Linked Credit Cards Drop-down list and select it, if desired by the patron.
For purposes of example, there is NO linked credit card for the transaction described here because you DO NOT visit the PlugNPay credit card entry screen when using a credit card already stored on a household. - Click Add Payment when ready. You will proceed to the secure PlugNPay gateway.
- Enter the card data via MagTek IPAD, MSR or manual entry and click Submit Payment at the bottom of the screen.
- When the transaction completes, click Close. You will return to the RecTrac Payment screen.

- Click Process and complete the sale as you normally do.
Processing a Refund in RecTrac
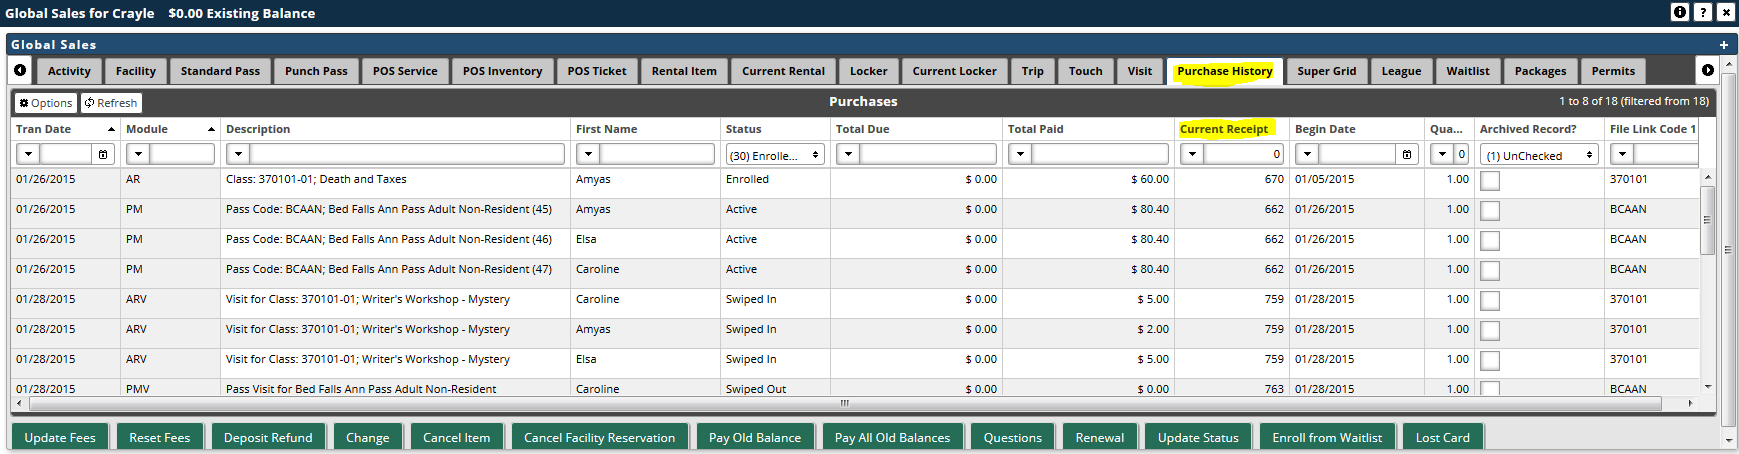
In order to process a Refund Now transaction in RecTrac to a credit card using PlugNPay, you will need a receipt number for a transaction for which the credit card was used. Optimally, the receipt number you use will be the receipt for which the original transaction was processed, but this is NOT a requirement.
Generally speaking, the fastest way to find a receipt number to look at the Purchase History tab (in Global Sales) for the household to whom you are processing the Refund, or for your Internal Household in the event of a Daily Sale. Household Transaction History inquiries/reports and Cash Journal reports also list receipt numbers.
- Once you have determined the Receipt number, process the refund like you normally would and proceed to the refund screen.
- Expand the Drop-down list for Refund Option, and select Refund Now.
- Enter the appropriate Credit Card Payment Code
- Enter the Receipt Number. Optimally this will be the same receipt that was used for the original transaction, but any receipt number linked to a transaction linked to credit card to which you are applying the refund will work.
- Expand the Linked Credit Cards field and select the appropriate record.
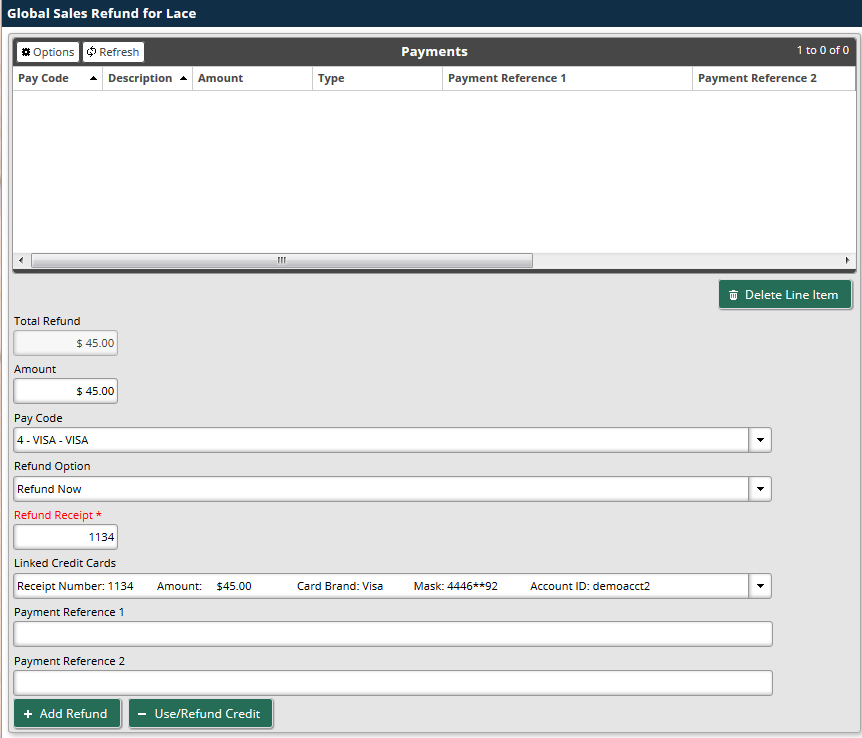
- Click Add Refund when ready and then click Process.
- Wait while the system completes the transaction. You will be returned to the Global Sales Lookup screen when done.
Processing Tips in RecTrac
Note: To process Tips via PlugNPay, ensure your WebXPress Credit Card profile is set as follows:
- Account Type = Restaurant
- Settlement Type = Manual
- Tip GL Code - This field must be populated.
- Tip Cost Center - (Optional)
- In RecTrac, go to Processing Ribbon • Tip Processing
- Process Tips as you normally would.
Use the "i" and "?" Help icons for field definitions, and examples if needed. - Settle the batch via your Credit Card terminal. Go to Management Ribbon • System Management • Period End Processes • Credit Card Terminal.
- Refer to Settling Credit Cards Manually in RecTrac for details.
Processing Transactions on the PlugNPay Website
You may not process blind credits in RecTrac Blind transactions can be processed only via the PlugNPay website. Some of the more common scenarios are discussed below.
Processing a Blind Sale on the PlugNPay Website
- Open a web browser and go to https://pay1.plugnpay.com/admin
- Using the Login and Password given to you by PlugNPay, log into your account.
- On the Administration group, click Transaction Administration. The screen will open in a new tab.
- Scroll down to Manual Authorizations & Returns.
- Follow PlugNPay's instructions.
- Fill out the remaining fields as needed.
- Ensure the Type is Authorize.
- Click Submit Payment to complete the process.
- Close the tab.
- Repeat as necessary or logout of the PlugNPay website.
Processing a Blind Refund on the PlugNPay Website
- Open a web browser and go to https://pay1.plugnpay.com/admin
- Using the Login and Password given to you by PlugNPay, log into your account.
- On the Administration group, click Transaction Administration. The screen will open in a new tab.
- Scroll down to Manual Authorizations & Returns.
- Follow PlugNPay's instructions.
- Fill out the remaining fields as needed.
- Ensure the Type is Return.
- Click Submit Payment to complete the process.
- Close the tab.
- Repeat as necessary or logout of the PlugNPay website.
Processing a Void on the PlugNPay Website
- Open a web browser and go to https://pay1.plugnpay.com/admin
- Using the Login and Password given to you by PlugNPay, log into your account.
- On the Administration group, click Transaction Administration. The screen will open in a new tab.
- Scroll to Card Queries Void Return (near the top of the screen)
- Select the appropriate information for which you would like to perform a query in order to locate the transaction you would like to void. Click Submit Query when ready.
- Click the Order ID for the transaction that you would like to void. You will proceed to the Transaction Area screen for your account.
- Click Void Transaction. You will receive a message that the transaction has been successfully voided.
- Close the tab.
- Repeat as necessary for other transactions or log out of the PlugNPay website.
Processing a Return on the PlugNPay Website
- Open a web browser and go to https://pay1.plugnpay.com/admin
- Using the Login and Password given to you by PlugNPay, log into your account.
- On the Administration group, click Transaction Administration. The screen will open in a new tab.
- Scroll to Card Queries Void Return (near the top of the screen)
- Select the appropriate information for which you would like to perform a query in order to locate the transaction you would like to void. Click Submit Query when ready.
- Click the Order ID for the transaction that you would like to void. You will proceed to the Transaction Area screen for your account.
- Click Return. You will receive a message that the transaction was successful.
- Close the tab.
- Repeat as necessary for other transactions or log out of the PlugNPay website.
Settlement and Reporting Options
Note: Vermont Systems advises to you to contact PlugNPay to ensure your account(s) are set to 'Extended Mask' so reports run in RecTrac will return the proper credit card brand. 'Extended Mask' is the PlugNPay default setting for RecTrac accounts, however the setting is controlled by PlugNPay. Contact Barbara Volpe at PlugNPay: (800) 945-2538 x7738 or barbara@plugnpay.com
Settings in both RecTrac and on the PlugNPay Website determine how your credit cards will be settled.
In RecTrac, your settlement options are Auto and Manual. Choose your option on your WebXPress Credit Card profile.
- For normal retail accounts, Vermont Systems recommends Auto.
- For restaurant accounts with Tip Processing, Vermont Systems recommends Manual
PlugNPay controls the settlement setting on their site. You cannot access this setting. By default, the PlugNPay setting is No, meaning PlugNPay will not initiate a settlement. This is the recommended option. Vermont Systems strongly advises you to contact PlugNPay and confirm their setting for your account.
The following table displays the option settings and settlement results. The Vermont Systems-recommended settings appear in bold italic type.
Note: When the PlugNPay settlement option is set to Yes/Automatic, the PlugNPay Settlement is automatic as well. Under certain conditions, automatic settlement on the PlugNPay side can produce incorrect settlement amounts and/or multiple charges to a patron’s credit card, most specifically when working with Tip Processing and WebTrac purchases.
| Account Type | RecTrac WebXPress Profile Setting | PlugNPay Setting | Settlement Result |
|---|---|---|---|
| Regular Retail | Automatic | Yes/Automatic | Automatic |
| Manual | Yes/Automatic | Automatic | |
| Automatic | No/Manual | Automatic | |
| Manual | No/Manual | Manual | |
| Tip Processing | Manual | No/Manual | Manual |
| WebTrac | N/A | No/Manual | Depends |
Vermont Systems Recommended Settlement Options
The Vermont Systems-recommended settings in the table above appear in bold italic type. A full explanation appears below.
- Regular Retail - Each credit card transaction that is authorized will be settled automatically by PlugNPay when they run their settlement sweep.
- Tip Processing - Authorization will occur when the patron’s credit card is swiped for the amount of the sale before the tip is added. Settlement occurs after the tip is added to the initial transaction and must be initiated through RecTrac. For Example: A patron’s food bill comes to $100. When you swipe the card, PlugNPay authorizes a $100 sale. The patron leaves a $20 tip. You add the tip to the transaction using the Tip Processing Program. When you settle the credit cards, the transaction goes to PlugNPay as a $100 + $20 transaction.
- WebTrac: Depends - When the PlugNPay settlement option is set to No/Manual, settlement will NOT occur until RecTrac “marks” the transaction for settlement. RecTrac “marks” the transaction as ready for settlement when the patron is returned to WebTrac from the PlugNPay site. Transactions “marked” for settlement will be settled when PlugNPay runs their settlement sweep.
Settling Credit Cards Manually in RecTrac
The following steps assume the Settlement Type option on your WebXPress Credit Card profile is set to Manual
If you opt to settle batches manually using the Credit Card Terminal, you will need to perform the following set of steps at the end of each day.
Your account type can be set to either Normal Retail or Restaurant. However, Vermont Systems strongly recommends you use the Manual Settlement option for Restaurant account types using Tip Processing only.
- In RecTrac, go to System Management • Period End Processes Group • Credit Card Terminal.
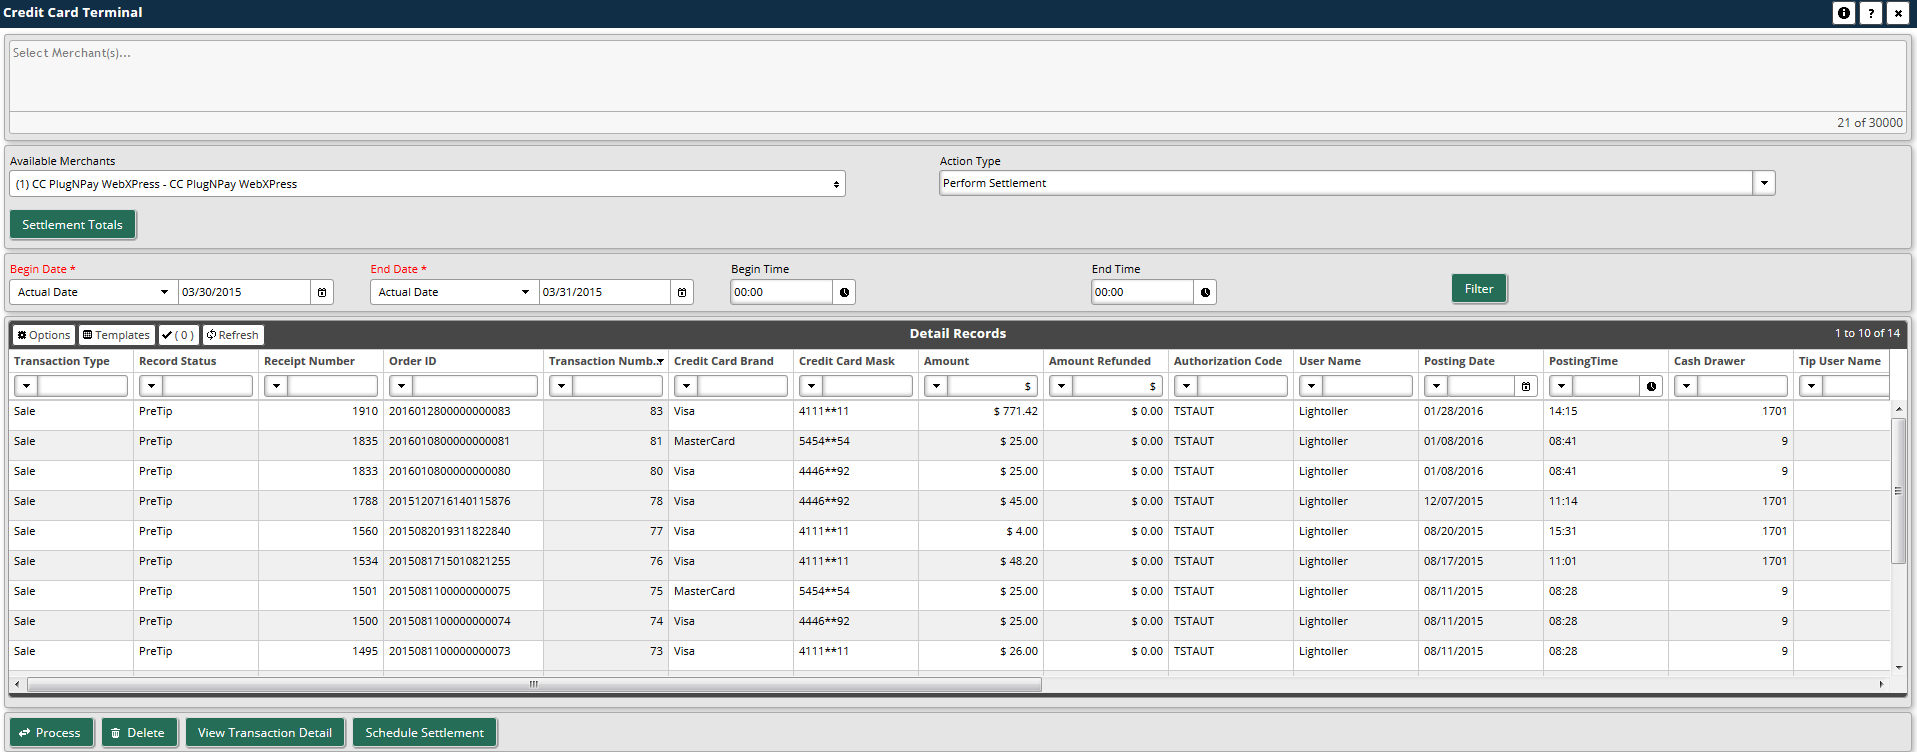
- Click the Combo Box icon for the Available Merchants field and select the merchant(s) for which you wish to manual-settle transactions.
- Enter the range of transaction dates and time for which you wish to auto-settle transactions and click the Filter button. Transactions linked to the merchant(s) you selected will appear in the DataGrid at the bottom of the screen.
- (Optional) Click Settlement Totals to see a summary total section at the top of the screen.
- Review the transactions. Highlight/select transactions in the DataGrid and click Delete to remove them, if necessary.
- Ensure your Action Type is "Perform Settlement."
- Click Process when ready to run the settlement.
- Choose your output option from the Information screen and click Yes - Process Settlement
- Click Close and exit the program. The Credit Card Settlement Journal will print as a by-product.
Reporting on Credit Card Transactions in RecTrac
Note: Vermont Systems advises to you to contact PlugNPay to ensure your account(s) are set to 'Extended Mask' so reports run in RecTrac will return the proper credit card brand. 'Extended Mask' is the PlugNPay default setting for RecTrac accounts, however the setting is controlled by PlugNPay. Contact Barbara Volpe at PlugNPay: (800) 945-2538 x7738 or barbara@plugnpay.com
- In RecTrac, go to Reporting Ribbon • All Reports • Credit Card Report.
- At the bottom of the screen, expand the Drop-down List for Output Template and make your selection:
- VSI - Credit Card Report - Allows you to view detailed information about credit card transactions.
- VSI - PNP Reconciliation Report - Allows you to view detailed information about credit card transactions and will display discrepancies between RecTrac and PlugNPay.
- Highlight/select the Profiles (i.e. Merchants) in the Credit Card Profiles DataGrid on which you wish to report.
- Accept the default entries in the Date/Time Filters group or make alternate date selections, if desired.
Note: Refer to RecTrac Date Select Fields for a listing of selection definitions and examples for the Processing Date fields, if necessary.
- On the Transaction Filters group, expand the Combo Box icons for Record Status, Transaction Type, and Pay Codes and make your selections.
- Fill in all remaining report selection criteria based on the data that you want to view on the report.
Use the "i" and "?" Help icons for field definitions, and examples if needed. - Click Process. You will continue to the Report Options screen. Make your selections and click Continue.
Click here to see a sample of the Credit Card Report.
Click here to see a sample of the PlugNPay Reconciliation Report.
Querying Credit Card Transactions on the PlugNPay Website
- Open a web browser and go to https://pay1.plugnpay.com/admin
- Using the Login and Password given to you by PlugNPay, log into your account.
- On the Administration group, click Transaction Administration. The screen will open in a new tab.
- Scroll to Card Queries Void Return (near the top of the screen)
- Select the appropriate information for which you would like to perform a query in order to locate the transaction you would like to void. Click Submit Query when ready.
- When you are finished reviewing the information, close the tab.
- Repeat as necessary for other transactions or log out of the PlugNPay website.
Processing Diagram/Flow Chart

Click to Download the .PDF
Inbound Verification Hash
PlugNPay has an additional security feature to verify that transactions being sent to them have not been manipulated in transit or through use of web development tools (web development tools are specific to WebTrac transactions). This functionality is available in RecTrac 3.1.06.00 and greater.
Depending on how you set this up it can be used for WebTrac Sales, WebTrac Check Card, RecTrac Sales Card Present, RecTrac Sales using a token for payment, RecTrac Check Card, RecTrac Billing.
The following outlines the steps required to configure this added security measure in PlugNPay and RecTrac .
- Log into the PlugNPay portal with the credentials for the merchant account that you want to configure.
- Go to Security Administration.
- Click the link (Click here to begin) below the Verification Hash section.
- Look for the section Inbound Verification Hash.
- Change the Action setting to Create.
- Select an appropriate value for the Transaction Time Stamp. Refer to the PlugNPay online help for more information, if needed.
- Select only the following:
- Publisher-name
- Card-amount
Note: If you select any of the other options, this will not work.
- Leave Custom Fields blank.
- Click Create/Change/Delete Verification Hash. This will populate the Verification Key field in the table at the top of this section. The screen will look similar to the following:
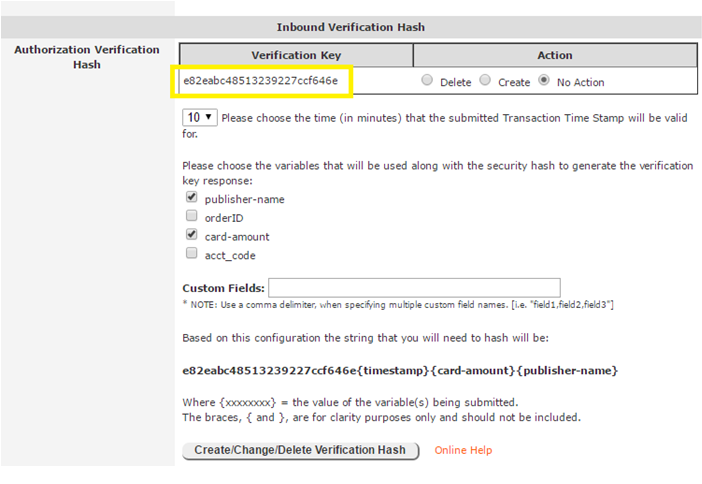
- Copy the contents of your Verification Key into Notepad (in Windows).
- Verify that the value in Notepad is EXACTLY the same as the Verification Key value on your screen. You will need this value later.
- Log out of the PlugNPay Portal.
- Log into RecTrac.
- Go to Profile Management. Highlight/select the WebXPress profile linked the Merchant Account you just changed in the PlugNPay portal.
- Expand the WebXPress - Hash Settings group.
- Copy the Verification Key from Notepad and paste it into the Verification Key’ field.
- Save your changes.

Note: This functionality is available in RecTrac 3.1.06.00 and greater. If you do not have a WebXpress – Hash Settings group, then you will need to get to the correct build.
- Repeat these steps in RecTrac for each WebXPress profile that is linked to the Merchant Account you just changed in the PlugNPay portal above.
At this point, after saving the profile change, you should still be able to process sales without issue. To use the Hash Verification, you still have to enable a setting in PlugNPay.
- Log back into the PlugNPay portal.
- Go to Security Administration.
- Click the link (Click here to begin) below the Transaction Security Configuration section.
- Look for the section Security Requirements.
- Look for the Require Match item .
- Select the option for Hash.
- Click Set Security Requirements.
At this point PlugNPay Inbound Verification Hash is configured for this Merchant Account. You can disable this option by de-selecting the Hash option and then clicking the Set security Requirements button.
Note: If you get an error during a sale that is similar to “Invalid value for passed Security Hash”. Most likely you have a profile in RecTrac that does not have a Verification Key or the Verification Key does not match the value in the PlugNPay portal.
Charging Convenience Fees
To help offset the “cost of doing business” and in lieu of raising prices across the board, many municipal organizations charge their customers convenience fees which are usually determined either by where (online or in the store, for example) or how (method of payment, for example) a customer shops.
Charging convenience fees for the use of credit cards/debit cards can be a superior solution to raising overall prices because it passes along the aforementioned “cost of doing business” to those most directly responsible for the increased operating costs (the credit card/debit card users) while sparing those who utilize other methods of remittance (cash, checks, gift certificates, etc…) any added expense.
If opting to charge these fees, PlugNPay will contact VISA/MasterCard. VISA/MasterCard will perform an audit of your department's finances to ensure the fees you wish to pass along to your customers are within industry standards. This process will take up to 60 days.
You can charge convenience fees using PlugNPay with little additional set up in RecTrac. However, set up is required with PlugNPay and Noble Payments to establish and charge convenience fees. The following steps outline the processes required and also offer some considerations prior to establishing convenience fees.
Note: Vermont Systems customers using WebTrac can charge convenience fees to their patrons who make purchases over the web. Processing limitations disallow charging convenience fees in RecTrac via GUI (Graphical User Interface) and we therefore offer the following solution through PlugNPay. For consistency, if you charge convenience fees through WebTrac and if you wish to charge convenience fees for purchases made via GUI, Vermont Systems recommends adopting the same solution for both methods.
To establish Convenience Fees, contact PlugNPay to discuss your options with Noble Payments.
Convenience Fees are Applied Outside of RecTrac
First and foremost: when contracting with PlugNPay/Noble Payments to charge convenience fees in RecTrac to your customers, be aware that NO record of the additional fee WILL EVER appear in RecTrac. Convenience fees are completely separate from the RecTrac application and you will not see them on receipts, cash journals, GL reports or any other report or inquiry found in RecTrac.
Convenience fees are between you, PlugNPay/Noble Payments and your bank only. Your customers will see them reflected on their credit card statements as a separate line item from their purchase with you.
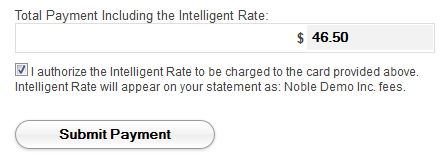
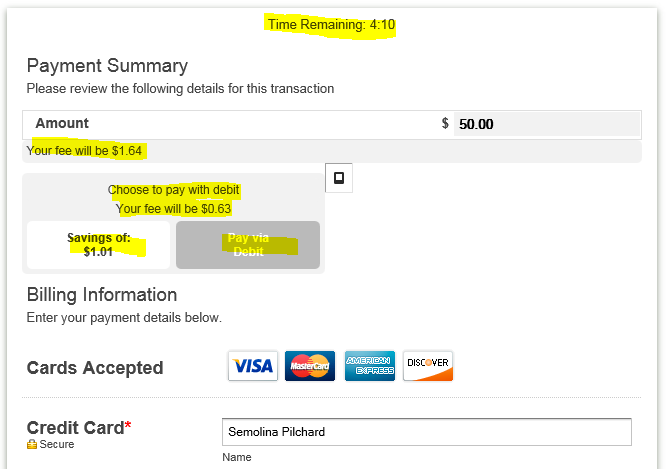
For Example: A $45.00 purchase with you results in a $1.50 service charge when the patron remits with a credit card. When the transaction gets sent to PlugNPay, the patron will be charged $46.50 ($45.00 for the purchase and $1.50 for the service charge). When the receipt prints from RecTrac, the customer will see ONLY the $45.00 charged. The customer will NOT see the additional $1.50 convenience fee charge on the RecTrac receipt. When you settle your credit cards for the day against RecTrac, you will have to account for the $45.00 only because the $1.50 convenience fee is contracted between you, PlugNPay and your bank and will take place on a separate merchant account. When the customer receives his/her credit card statement, two (2) line items for the purchase will appear: One for $45.00 to you for the purchase and one for $1.50 the convenience fee.
Include Convenience Fee Verbiage on Your Receipts
Since your customers will not see convenience fees on the receipts generated through RecTrac, Vermont Systems recommends updating your Daily Comment Codes in RecTrac to reflect your convenience fee policy. When linked to the proper modules on your Receipt Format device(s), Daily Comment Codes will print with every receipt generated. In this manner you can use RecTrac to inform your customers that, depending on their method of payment, an extra fee may be incurred. Once you have the contract details from PlugNPay/Nobel Payments, you can likely give them the calculation as well.
To Update Daily Comment Codes
- Daily Comment Codes are managed in Comment Code Management (Management Ribbon • System Management • Comment Management. Type = Daily Receipt).
- To Daily Comment Codes print on your receipts, link them to the appropriate module on the Daily Comments/Custom Receipt Title tab of your Receipt Format profile (Management Ribbon • System Management • User/Menu/Profile Management group • Profile Assignments).
PlugNPay/Noble Payments Processing Screen
When contracting with PlugNPay and Noble Payments to charge convenience fees, clerks will be brought the following Payment Summary screen when processing a credit card sale.
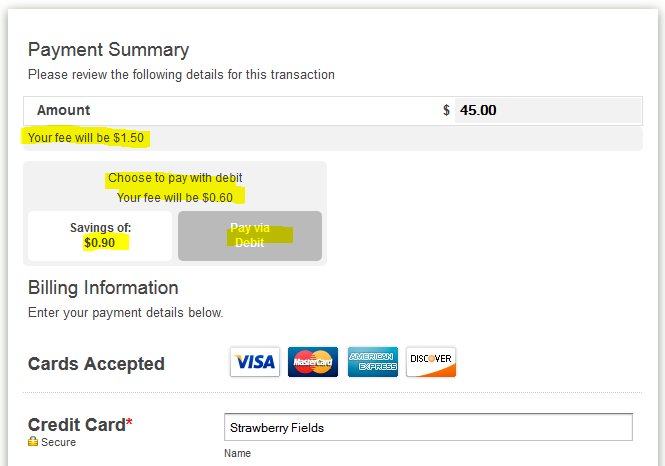
The Payment Summary screen displays the convenience fee and, if applicable, allows the patron to choose Credit Card at a higher rate or Debit Card at a lower one.
- If opting for Credit Card, the transaction is processed through the credit card network.
- Reward Points offered through credit card sales are awarded.
- Consumer protection offered by the credit card is in effect.
- If opting for Debit Card, the transaction is routed through the ATM network.
- No Reward Points are awarded.
- Consumer protection offered by the credit card is forfeited.
In order to complete the transaction, the sale must be authorized via the check box at the bottom of the screen.
The Payment Summary screen displayed in WebTrac is similar. It also includes a Timer at the top of the screen. Should the timer count down to 0, the transaction will be canceled and the patron will not be charged. As with the Payment Summary screen you see in RecTrac, Authorization is required.
For further information regarding Convenience Fees, contact Barbara Volpe at PlugNPay: (800) 945-2538 x7738 or barbara@plugnpay.com
Troubleshooting
No Card Entry Fields Available in WebTrac
Issue
Patron processes a sale in Webtrac sale and then submits the sale to the PlugNPay re-direct interface. The url at the top of the browser is correct, based on the value stored in the Credit Card profile, but the PlugNPay page does not display the fields that allow you to enter the credit card information.
Solution:
Ensure the PlugNPay User ID and Password on your Credit Card profile are entered EXACTLY as they were given to you from PlugNPay. The User ID and Password fields are case-sensitive.
For Example: If the User ID given to you from PlugNPay is vtdemoacct04 but is entered as VTdemoacct04, you will experience the Issue identified above.
Also: when testing a PlugNPay WebTrac Payment, make sure that the auth and post auth are recorded in PlugNPay. If they are not, your Password is likely incorrect. This field, too, is case-sensitive.
cURL Configuration Changes when using a Proxy Server
Issue
If using a Proxy Server for internet access from our transaction server there are certain changes required in order for the cURL.exe to route traffic through the Proxy Server to communicate with PlugNPay
Solution:
Add a curlrc file (with no file extension) to the folder where the cURL.exe resides.
- Create a .txt file containing a single line: proxy = https://<YourProxyServerName>:<YourProxyPortNumber>
- Save the file and make sure the file name is curlrc and make sure to remove the .txt file extension.
- On your Transaction Server, place the file in the location where the cURL.exe is stored. Typically this will be <X>:\VSI3\RecTrac\Programs\ThirdParty\Curl