Topic Doc: Profile Assignments Screen, Hierarchy, and Listing

Written by Seth Warren
Updated at December 29th, 2022
Table of Contents
Document Summary
The Profile Assignments screen lets you view and change the profiles linked to user IDs, User Groups, Workstations, and Defaults.
This document provides:
- An overview of the Profile Assignments screen
- Basic instruction for linking profiles in RecTrac
- Hierarchy linking recommendations
- A listing of all profile types and subtypes and a definition of what they do
If you have additional questions about Profile Assignments and/or the Types of Profiles and their purpose within RecTrac after reading this document, please contact Vermont Systems Customer Service by phone at 887-883-8757 or generate a Support Case through the Customer portal of the Vermont Systems web site using your Customer ID and password.
License — Maintenance Agreement
The use of this interface requires a Vermont Systems license and annual maintenance agreement for RecTrac and the component modules discussed in this document. Prior to implementing any process outlined in this document, please contact the Vermont Systems Sales department at 1-877-883-8757 to verify that you are authorized to use the modules discussed in this document and if not, to obtain a quote and/or approval.
Before You Begin
This document is written with the following assumptions. If any of the items listed below is NOT true, contact Vermont Systems Support prior to continuing, as the steps in this document may prove difficult to complete and unexpected results may occur.
- Your organization is running RecTrac 3.1.02.00 or greater.
- The User ID with which you sign into RecTrac has the requisite permissions and ability to access all modules and functions pertaining to device assignments.
- You understand RecTrac DataGrids and how to maneuver through them.
- You have a basic understanding of RecTrac Profiles and their purpose.
The Profile Assignments Screen
Note: All file paths and screen/tab locations in this document refer to file paths and screen/tab locations as they appear in the Standard Vermont Systems Design.
The Profile Assignments screen (Management Ribbon • System Management • User/Menu/Profile Management Group • Profile Assignments) lets you view and change the profiles linked to user IDs, User Groups, Workstations, and Defaults.
The Available Profiles DataGrid column displays the profiles that exist in your database and that can be linked within the Linked Profiles hierarchy tree.
NONE Profile Types - By default, the system contains a NONE profile for each Profile Type. This allows you to link a production profile low in the Hierarchy but link the "NONE" option for that profile higher in the Hierarchy for Users/User Groups and/or Workstations that do not need the production version.
For Example: You might have a Peripherals profile linked to a workstation that is set up to "pop" a cash drawer with each sale. However, there is a certain user that should not be allowed to "pop" that drawer. You could link "NONE" Peripherals profile to that user. When performing a sale, that user would never be allowed to "pop" the drawer.
The Linked Profiles column appears in "tree" format and lists the User, User Group, Workstation, and Defaults levels of hierarchy to which a profile may be liked. Top-to-bottom on the "tree" equates to "higher up" the profile hierarchy as outlined above.
The Profile Parameters DataGrid column displays the basic field structure of the profile you've selected from the Linked Profiles column. In-line editing is allowed in this DataGrid.
OR
Click of the Update button to continue to the Profile Add/Update screen where you make changes by screen for the selected profile, if desired.
Profile Hierarchy
You can assign profiles to an individual User ID, (the users linked to) a User Group, (the users logged into) a Workstation, or by Defaults to every user. Profiles can also be assigned in any combination of these four methods. The profile hierarchy establishes the order of precedence each profile takes as outlined below using a Household profile as example.
-
User Level of Hierarchy— A Household profile is linked to each individual User. In this case:
- Any Household profiles that are linked to User groups, Workstations, or Defaults would have no effect.
-
User Group Level of Hierarchy— A Household profile is linked to each User Group. In this case:
- Any Household profiles that are linked to Workstations or Defaults would have no effect.
- Any Household profiles linked to individual Users would take precedence over the User Group profile.
-
Workstation Level of Hierarchy— A Household profile is linked to each Workstation. In this case:
- A Household profile that is linked at the Defaults level would have no effect
- Any Household profiles linked to individual Users or User groups would take precedence — in that order — over the Workstation profile.
-
Site Level of Hierarchy— A Household profile is linked to each Site Record. In this case:
- A Household profile that is linked at the Defaults level would have no effect
- Any Household profiles linked to individual Users, User group, or Workstation would take precedence — in that order — over the Site profile.
-
Defaults Level of Hierarchy— A Household profile is linked to the Defaults level. In this case:
- Any Household profiles linked to individual Users, User Groups, or Workstations would take precedence — in that order — over the Defaults profile.
Most profiles can be linked at any level of Profile Hierarchy. For Example: A Household profile can be linked at the User level, the User Group level, the Workstation level, or the Default level.
Certain profiles, however, can be linked at certain levels only. For Example: An Encryption profile can be linked at the Defaults level only.
Buttons at the Bottom of the Screen
Click Add to add a new profile type. You will continue to the Profile Add/Update screen.
Highlight/select an existing profile and click Change to continue to the Profile Add/Update screen for that profile where you may make changes to the current settings.
Highlight/select an existing profile and click Delete to remove it from your database. All profiles of the same Code will be deleted regardless of where they are linked in Profile Hierarchy.
Click Static Parameters to continue to the Static Parameters Update screen where you may make changes to your Static Parameters profile.
Highlight/select a single User, single User Group, or single Workstation and click Clone to clone the profile assignments linked to the record you selected to another record of the same type.

Highlight/select a profile from the Linked Profiles column and click Purge to purge it from all levels of hierarchy. Purging a profile does not delete it from your database; it simply clears it from your hierarchy tree.
Click the X on the upper right-hand corner of the screen to exit.
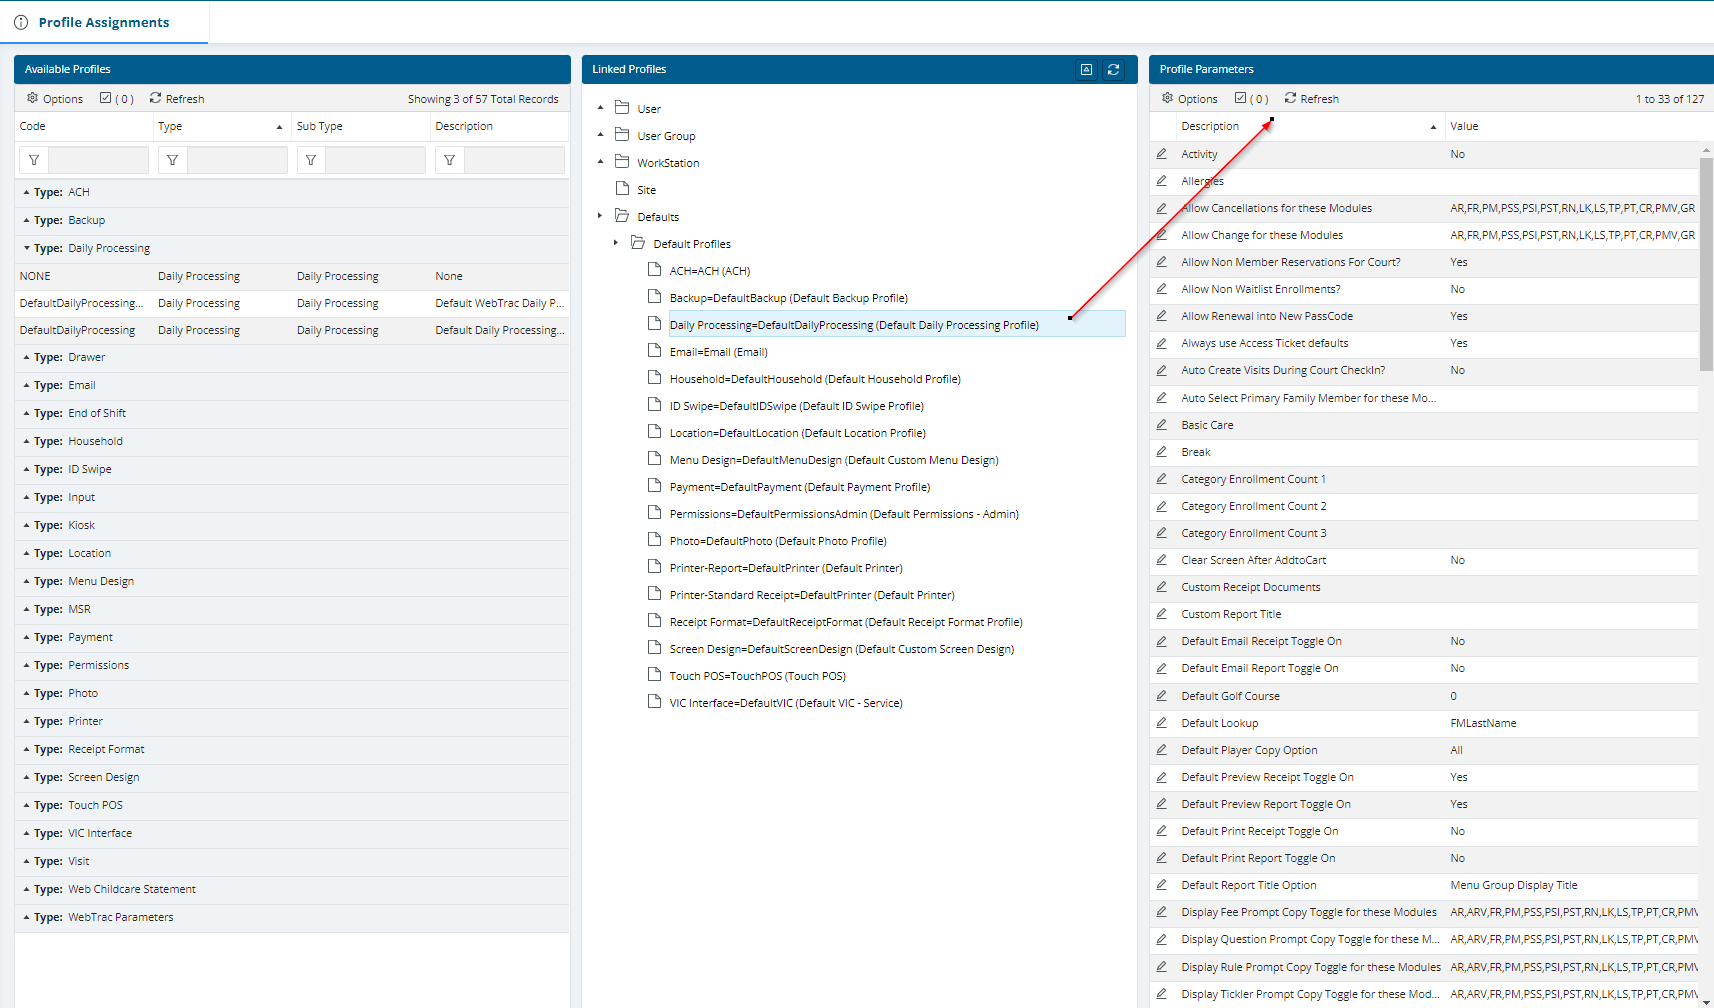
To Link a Profile
To link a profile within Profile Hierarchy:
- Determine the level of hierarchy at which you wish to link the profile and expand the appropriate folder in the Linked Profiles column.
- In the Available Profiles column, highlight/select the profile you wish to link.
- Click again and hold the mouse button down. When you have "grabbed" the profile, a red box will appear that displays the profile name.
- Drag and drop. Drag to the folder you expanded in the middle column. When the box turns green, release the mouse. This will place the profile at the level you choose. Profile Assignments are saved automatically and take effect immediately.
The example image assumes you have created a Household profile and describes how you might link a link it at the Defaults Level of Hierarchy.
- In RecTrac, go to Management Ribbon • System Management • User/Menu/Profile Management Group • Profile Assignments. You will continue to the Profile Assignments screen.
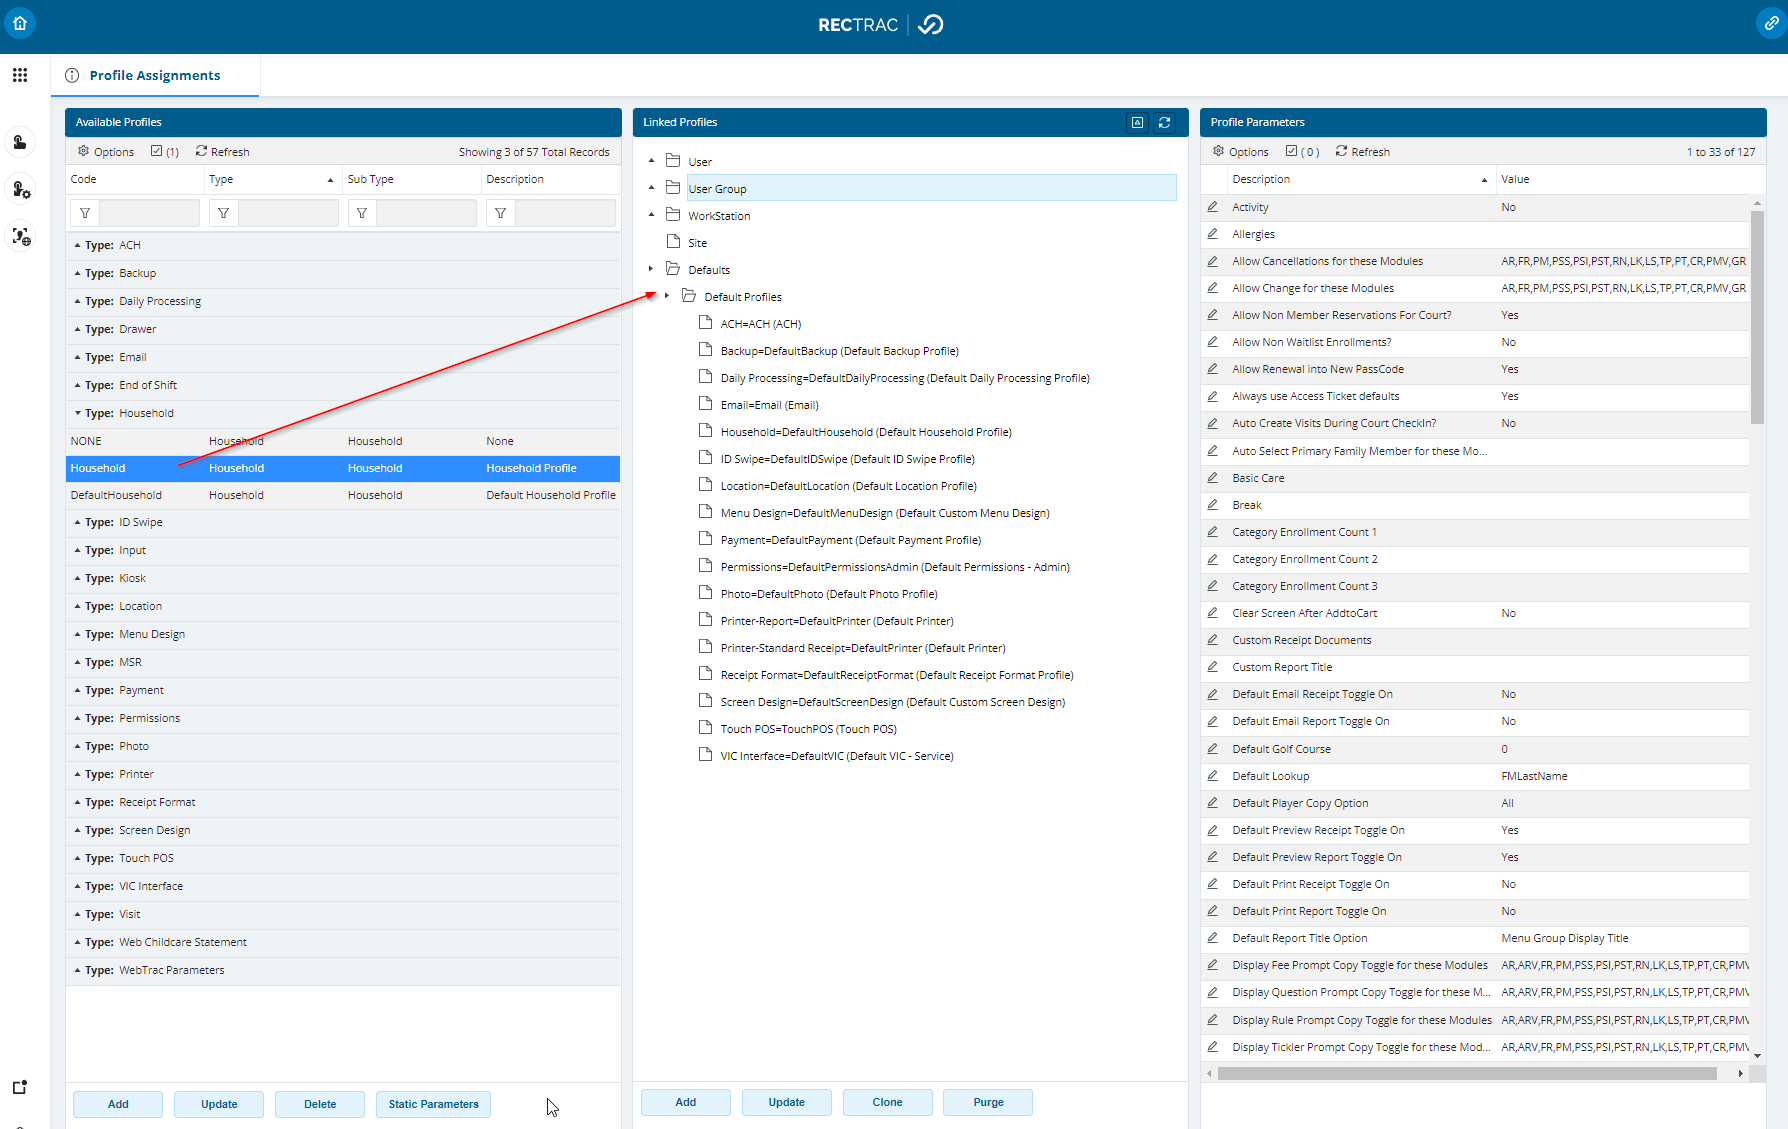
- In the Linked Profiles column, expand the Defaults folder.
- Expand the Default Profiles folder.
- In the Available Profiles column, highlight/select your Household profile.
- Click again and hold the mouse button down. When you have "grabbed" the profile, a red box will appear that displays the profile name.
- Drag and drop. Drag to the Default Profiles folder in the middle column. When the box turns green, release the mouse. This will place the profile at the Defaults level.
- Profile Assignments are saved automatically and take effect immediately.
Note: Certain Profile Types, such as Credit Card and Printer profiles can be used for different, specific, purposes. For Example: Credit Card profiles can be used for 'Purchase,' 'Gift Cards,' and 'Installment Billing.' Printer profiles can be used 'Standard Receipts,' '40-Column Receipts,' 'Auth Receipts,' 'Pass,' etc.. When linking a profile such as those mentioned above, the Profile Assignment Add dialog will appear.
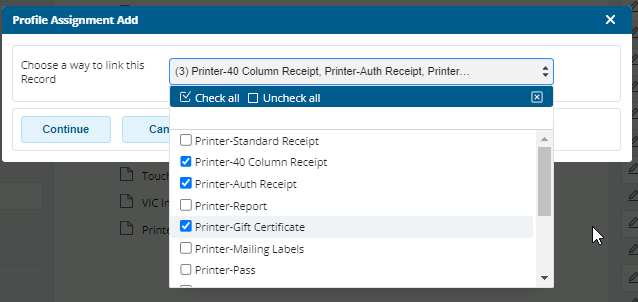
When it does, click the Combo Box icon and select the purposes(s) for which the profile will be used. Multiple selections are allowed, and a separate profile record for each purpose selected will appear as Linked Profiles.
Recommendations for Linking Profiles
As a general rule of 'best practice,' you want to link profiles at the lowest level of hierarchy where they impact the biggest number of users that need them.
For Example: If everyone uses the exact same Household profile, Payment profile and Daily Processing profile; your best practice would be to create one (1) Household profile, one (1) Payment profile, and one (1) Daily Processing profile and link them at the Defaults level of hierarchy. Linking the exact same profile to each individual User would make no practical sense when you can link it once and have it impact everyone.
Likewise, if you create User Groups based on location (i.e. Main Office, Pool, Rec Center, etc.), you might link Location and Visit profiles to User Groups so every User at the same physical location is impacted.
Profiles that are hardware-dependent (Credit Card profiles, Drawer profiles, etc.) might be linked at the Workstation level.
Lastly, profiles that are specific to individual users (i.e. an End-of-Shift profile for a Manager, a Permissions profile for the RecTrac Administrator, a Payment profile for the WWW User, etc.) should be linked at the User Level.
The following provides some basic guidelines:
- User – Link profiles at this level that specific individuals need, such as Permissions, End of Shift, Credit Card, etc. All WebTrac specific Profiles should be linked to the WWW User ID.
- User Group – Link profiles that all users in the same group will need, such as Permissions, End of Shift, Credit Card, Payment, etc.
- Workstation – Link workstation-specific hardware Profiles, such as Credit Card, Receipt, Drawer, Receipt/Auth Receipt Printers, etc. You can also link location specific Profiles, such as Permissions, Golf, Location, Visit, etc.
- Site – Link profiles that all users at the same Site will need, such as Permissions, Daily Processing (and SuperGrid), Receipt-Format, Payment, Golf, Photo, Screen Design, etc.
- Defaults – Link as many Profiles as possible at this level. Static profiles that set parameters everyone uses, such as Active Directory, Input, Input-Logon, License, Backup, Password, Household, ID Swipe, Password, Payment, Photo, Receipt-Format, Rewards, etc.
Note: A Static Parameters profile is linked by default to the Defaults level; it is hidden and cannot be removed.
RecTrac 3.1 Profile Listing
This table lists the various Profile Types and SubTypes available in RecTrac.
| Profile Type | SubTypes | Purpose |
|---|---|---|
| Access | N/A | Allows you to set parameters for running Access Control, which uses the RecTrac database to control admittance to selected doors or turnstiles. Generally speaking, this profile will be linked to the workstation from which Access Control will be run. |
| Access Relay | Phidget, SmartJ | Establishes parameters for Access Control/automatic doors using Phidget or SmartJ relays. |
| ACH | ACH | Allows you to view and change the Automated Clearing House settings for the database and is an integral part of the Installment Billing/Auto-Debit process. If you do not use auto-debit processing or installment bills, you do not need to use this profile. |
| Application Security | Application Security | Allows you to define a list of Whitelist (allowed) and/or Blacklist (disallowed) IP Addresses to determine which computers can access the RecTrac application. |
| Backup | Backup | Allows you to create and/or schedule automatic live backups of your database. |
| Bundle | Bundle | Definition Needed. |
| Check | ACH File, Marine, PStars, SelPay, USData | Allows you to set Electronic Check processing parameters. |
| Coin Dispenser | Coin Dispenser | Dispenses coins as change automatically whenever change is due. |
| Combination Log | Combination Log |
For use with the MainTrac Module. Allows you customize the look and function of the Combination Log DataGrid. |
| Credit Card | CardConnect, Demo, ETS, No Validate, PayTrac, VeriFone, WebXPress | Defines credit card authorization procedures. |
| CYS Parameters | CYMS Parameters | Establishes static parameters for selected CYMS Reports. This profile should only be created by Headquarters personnel from the appropriate Branch of Service (Army, Air Force, Maries, Navy, etc). |
| Daily Processing | Daily Processing | Establishes cross-module daily processing settings, such as Lookup Options, Pass Renewals into new Pass Code, Module Component selections, etc. |
| Data Access | Data Access | For use with Site Management. Allows you to set Table Permissions at the Site Level. |
| Drawer | Drawer | Defines physical drawer numbers (drawer 201, drawer 202, etc…) and assigns logical drawer numbers (drawer #1 and drawer #2) |
| Allows you to determine email parameters for reports, receipts, etc. within RecTrac. | ||
| Encryption | Encryption |
Sets encryption in the database. Once it is linked, it cannot be removed. Note: Encryption profiles may not be deleted or cloned. One Encryption profile only is allowed per database tenant. |
| End of Shift | End of Shift | Defines settings for cashing out drawers at the end of a shift, balancing tolerances, options to use, printer to use, etc. |
| End of Shift Reporting | End of Shift Reporting |
Defines End-of-Shift reports to run, report options to use, printer to use, etc. Note: End of Shift Reporting profiles are linked to End of Shift profiles in the Close Out Reports Profile and Consolidated Reports Profile fields. End of Shift Reporting profiles are NOT within standard Profile Hierarchy. |
| ePrepPASS | ePrepPASS | Defines default settings for the ePrepSolutions PASS Export. |
| ERange | ERange, Range-Express, Range Servant | Allows vendor and location information to be passed to the E-Range program. |
| ETicket | ETicket | Allows data transfer of Universal Studios/Orlando ticket sales from RecTrac to Universal. |
| Fidelio | Fidelio | Establishes settings for interfacing to MICROS Systems Fidelio. |
| Golf | Golf | Defines View/Book Parameters for Users (i.e. whether a user can "see" a golf course and book tee times on it),WebTrac parameters, Tee Sheet Color Display, Tee Sheet Settings, and Tee Time Credit Card Settings. |
| Household | Household | Establishes parameters for adding households to your database. |
| IDSwipe | IDSwipe | Establishes parameters for reading ID Card swipe information. |
| Input | Datalogic Dragon, Ethernet, Ethernet Access (Handkey II), FingerScan (M2Sys), FingerPrint Sagem Morpho USB, Genovation 904, Serial, Serial KeyPad, Serial M200 | Establishes settings for reading “mapped, 2-D” bar coded identification cards |
| Input Logon | FingerScan (M2Sys) | Allows ability for users to log into RecTrac using biometric fingerprint or finger vein scans. |
| Installation | Installation | Used by the US Military to link a unique Garrison's financial data from RecTrac to the military's General Ledger system. One (1) Installation profile is needed per Garrison and it should be linked at the default level of hierarchy. |
| Insurance | Insurance | Defines authorization procedures for AIG/RegSaver Insurance via the CardConnect credit card solution. |
| Keyonix | Keyonix | Sets parameters for connecting to the Keyonix iButton Smart Key (golf cart) System. |
| Kiosk | Kiosk | Sets parameters for Visit Processing using the Kiosk add-on. |
| License | License | Sets parameters for the RecTrac and WebTrac modules for which your Department is licensed, as well as total number of concurrent users. Also has flags for Hosted/Web Only Hosted and WAN Access via Vermont Systems. Entry to this profile is protected by Vermont Systems Access Code. This profile is linked at the Default level of Profile Hierarchy and cannot be moved. |
| Location | Location | Defines the physical facility location to which sales, pass visits, etc. will be linked when processed by User linked to the profile. |
| Logging Override | Logging Override | allows you to override logging settings on your Static Parameters profile for the fields displayed. The fields displayed on this profile perform the EXACT SAME functions as their counterparts on the Static Parameters profile. The difference is that the fields here supersede/take precedence over the fields on your Static Parameters profile. |
| Menu Design | Menu Design | Allows you to utilize customized Menu Designs in RecTrac. |
| Military Brochure | Military Brochure | Establishes set up parameters for Military WebTrac splash pages. |
| Mobile | Patron, Staff | Defines default look and functionality settings for access to WebTrac(Patron)and RecTrac (Staff) via Mobile devices, such as Smartphones. |
| MSR (MagStrip Reader) | Magtek, SimHD, Wedge | Defines settings for magnetic strip readers. |
| Online Payment Service | Online Payment Service |
Establishes settings that allow payment for WebTrac services through 3rd party payment processors, such as PayPal. Note: Refunds from 3rd party payment services must be processed through RecTrac. |
| Open Ticket | Open Ticket | Establishes settings for POS Open Ticket operations. |
| Payment | Payment | Establishes settings for processing payments and refunds in RecTrac, such as allowed Paycodes, etc. |
| Peripherals | Peripherals | Establishes settings (open codes, COM port, etc.) for Cash Drawers and Pole Displays. |
| Permissions | Permissions | Defines permissions settings (who can see and/or do what) by module (AR, FR, PM, etc…) and Table. Also defines Button permissions and Access Rights for various functions in RecTrac. |
| Photo | Photo | Defines settings for photo capture devices, such as cameras. |
| PinPad | CardConnect, ETS, InteliPin, MagTekIPAD, MX830, PayTrac, SC5000, VF 1000SE | Defines settings for PinPad (credit card/debit card swipe) devices. |
| Printer | Printer | Defines linked printers for receipts, reports, etc. |
| Receipt Format | Receipt Format | Defines receipt format parameters, such as whether to print a logo, 40-column or 80-column, number of receipt copies to print, etc. |
| Rewards | Rewards | Establishes setup information for a rewards programs in RecTrac. Allows patrons to earn points for every dollar spent in selected modules. |
| Rules and Fees | Rules and Fees | Expedites the process of adding Rules and Fees to your records in RecTrac by allowing you to establish "Favorite" criteria and Default Add opitons. |
| Scale | CK-Series | Sets defaults for linked weight scale peripherals. |
| Screen Design | Screen Design | Allows you to utilize customized Screen Designs in RecTrac. |
| Signature | SigGemColor 5.7, SignatureGemLCD1x5 | Allows for Signature Capture on Waivers and etc. |
| SSO | Active Directory, Shibboleth | Allows for the establishment of Single Sign On functionality for Windows/RecTrac. |
| Static Parameters | Static Parameters |
Defines parameters for numerous static settings in RecTrac, such as Root of FileSystem, Date/Time/Time Zone format, Logging/Debugging Settings, Financial Settings, Address, Password parameters, etc. Note: Static Parameter profiles may not be deleted or cloned. One Static Parameter profile only is allowed per database tenant. |
| SuperGrid | SuperGrid |
Establishes default view and processing settings for RecTrac SuperGrids (Rental, Facility, etc.). Note: SuperGrid profiles are linked in the Daily Processing profile • SuperGrid Profiles group. They DO NOT display in Profile Assingments. This is a system-wide setting and cannot be changed. To add/edit a SuperGrid profile, go to your Daily Processing profile OR go to Profile Management. |
| Touch POS | Touch POS | Controls settings for the Touch Point of Sale program, to include: menus, dwell and tee sheet options, screen resolution, Touch Courts, Rentals, etc. |
| Tunnel Connection | AppServer, FS Network, Progress Sonic | Allows Global RecTrac Data Transfer for the US Military |
| University Charge | Ncard | Allows Ncard processing for the University of Nebraska |
| VIC Interface | VIC Interface | Defines settings for the Vermont Integration Client (VIC). VIC allows you to utilize hardware peripherals on client workstations across your RecTrac network |
| Visit | Visit | Establishes Pass Visit parameters. |
| VSINews | VSINews | Provides connection setup to Vermont Systems for Web-based alert/news/automated downloads and upgrades |
| Web Brochure | Web Brochure | Controls the input parameters used by WebTrac Home, allowing you to customize your WebTrac home page. |
| Web Childcare Statement | Web Childcare Statement | Sets search and report parameters for Childcare Statements printed by patrons via WebTrac. This profile should be linked to your WebTrac User ID. |
| WebTrac Parameters | WebTrac Parameters | Establishes default parameters for WebTrac. |
| WebTrac Single Sign On | WebTrac Single Sign On | Establishes connection parameters for WebTrac single signon, a process by which patrons can sign into a secure web site using their credentials and then sign into WebTrac without having to re-login. |
| Work Order | Work Order |
For use with the MainTrac Module. Allows you to define the Work Order Processing status selections and permissions. You can also choose to restrict displayed work orders on the Work Order Processing screen to the current user only, check for duplicate work orders, send emails when work orders have been changed, as well as several other options. |