
Table of Contents
Document Summary
RecTrac Screen Management programs allow you to create custom screen designs for RecTrac. Custom screens provide great flexibility with the look and feel of RecTrac and can be used to filter unneeded content from selected programs (i.e. you users will see on the fields they need to see), re-label/rename fields, arrange fields on selected programs in an order of your choosing, add Custom Help to fields, and even add Tabs and Groups to screens, if desired. Screen Customization is a great tool for Departments that wish to make minor variations (or even major ones) to the Standard Vermont Systems Screen Design for their users. Modify only those screens you wish to. Any screen that you DO NOT modify will use the Vermont Systems Standard Design by default.
Note: This document does not provide instruction for adding Tabs or Groups to existing RecTrac screens.
License – Maintenance Agreement
The Screen Management Interface is free. Use of the interface requires a Vermont Systems license and annual maintenance agreement for RecTrac and the component modules discussed in this document. Prior to implementing any process outlined in this document, please contact the Vermont Systems Sales department at 1-877-883-8757 to verify that you are authorized to use the modules discussed in this document and if not, to obtain a quote and/or approval.
Setup Steps
Screen Customization consists of creating Design System Codes; manipulating the fields on the screens you wish to modify and applying them to the Design Code you created; linking the Design Codes to a Screen Design profile; and linking the profile within Profile Hierarchy. This document will walk you through the basic File Maintenace steps required to create a custom look for selected File Maintenance programs in RecTrac. However, the processes described here also apply to all Inquiry, Processing, and Reporting screens and programs in RecTrac.
If you have additional questions about Screen Customization within RecTrac after reading this document, please contact Vermont Systems Customer Service by phone at 887-883-8757 or generate a Support Case through the Customer portal of the Vermont Systems web site using your Customer ID and password.
Before You Begin
This document is written with the following assumptions. If any of the items listed below is NOT true, contact Vermont Systems Support prior to continuing, as the steps in this document may prove difficult to complete and unexpected results may occur.
- Your organization is running RecTrac 3.1.03.00 or greater.
- The User ID with which you sign into RecTrac has the requisite permissions and ability to access all modules and functions pertaining to screen customization.
- You understand RecTrac DataGrids and how to maneuver through them.
- You understand RecTrac Profile Management and hierarchy.
- You are aware of and understand the Standard Vermont Systems Design for the File Maintenance, Inquiry, Processing, and Reporting screens you wish to modify.
RecTrac Setup
The following provides the basic File Maintenance steps required to
- Create a Design System Code.
- Customize a File Management Screen and apply those changes to Design System Codes.
- Create a Screen Design profile and link Design System Codes to it.
- Link the Screen Design profile within Profile Hierarchy.
Note: All file paths and screen/tab locations in this document refer to file paths and screen/tab locations as they appear in the Standard Vermont Systems Design.
Create a Design System Code
Design Codes allow you to "name" screen designs. By default, a Custom Design Code is pre-included in RecTrac.
- Custom designs that will be applied globally throughout your RecTrac database should be linked to the default Custom Design Code.
- If further customization is required for certain individuals or locations, new Design Codes will be required.
- Multiple Design Codes can be linked to a Screen Design profile. When multiple Design Codes are linked to a Screen Design profile, customizations are applied in a hierarchical order from "top to bottom." Screen Design profiles are discussed in greater detail below.
If a single Design Code is all you require, Skip to the Next Section.
To Create a Design System Code
- In RecTrac, go to Management Ribbon • System Management • Misc Management Group • System Code Management.
- Click the Combo Box icon under the Type column and select Design. This will filter the DataGrid to show Design System Codes only. The DataGrid should contain a Custom code.
- Click Add. You will continue to the System Code Update field.

- Enter the name for this Design in the Record Code field. For Example: Managers
- Expand the Drop-down list for Type and choose Design.
- Enter a Description for your Design Code. For Example: Manager's Screen Design.
- Fill in the other fields as needed.
- Click Save when ready. You will be returned to the System Code DataGrid and your new entry should be present.
- Repeat these steps as needed to create additional Design System Codes or exit back to the main RecTrac menu.
Customizing Screens in RecTrac
The Screen Management programs (Management Screen Management, Inquiry Screen Management, Processing Screen Management, and Report Criteria Screen Management) allow you to customize screens in RecTrac for the Design System Code you select.
For purposes of example, this document will focus on the Activity Section Update screen and its tabs. However, the processes described here also apply to all Inquiry, Processing, and Reporting screens and programs in RecTrac.
The Screen Update Screen
This section discusses the three (3) primary areas of the Screen Update program and their basic functionality.
- In RecTrac, go to Management Ribbon • System Management • Screen Management Group.
- Select the entry that contains the screen which you wish to customize (Management Screen, Inquiry Screen, Processing Screen, Report Screen). You will continue to the Start DataGrid.
For purposes of this example, the choice is Management Screen Management because Activity Section Update is a Management Screen program. - The DataGrid contains an entry for every screen you have modified, if any. Search the DataGrid to see whether the screen you need is already present.
- If it is, highlight/select it and click Change. You will continue to the Update screen.
- If it is not, click Add. You will continue to the Maintenance Add screen. Expand the Drop-down list for Base Screen and make your selection from the available programs. If you want to use a custom title for the screen, uncheck the Use the Base Screen Title? checkbox and enter a suitable title in the Screen Title field. This screen title will be used as the panel title in RecTrac and as the browser tab title in WebTrac. This is useful for situations when the Vermont Systems language does not match; for example Activity Management could be renamed to Program Management. Once this is done, expand the Drop-down list for Design and choose a Design Code. Then click Continue. You will continue to the Update screen.
For purposes of this example, the selections on the Maintenance Screen Add dialog are Activity Section Update and Default Custom Screen Design

- The Available Fields DataGrid column displays the Types of fields that are available to be added to the screen you've selected. This list varies by screen and only those field types which are listed can be added.
Note: Anything you remove from the Fields on Screen column (a single field, a Group, or a Tab) will subsequently appear in this column and thus be "Available" to be re-added.
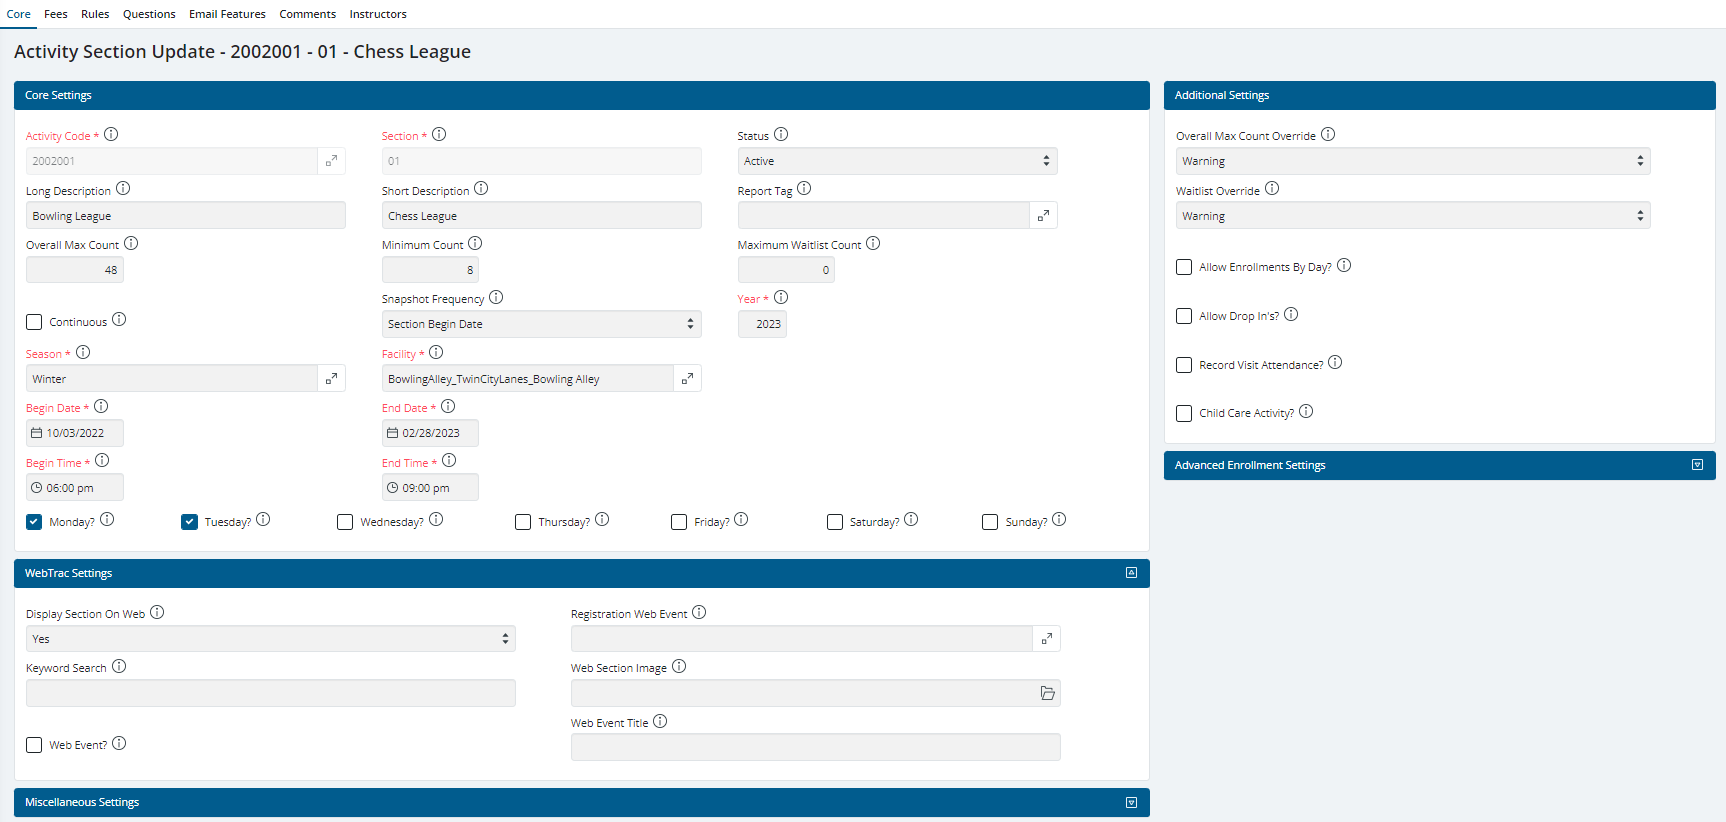
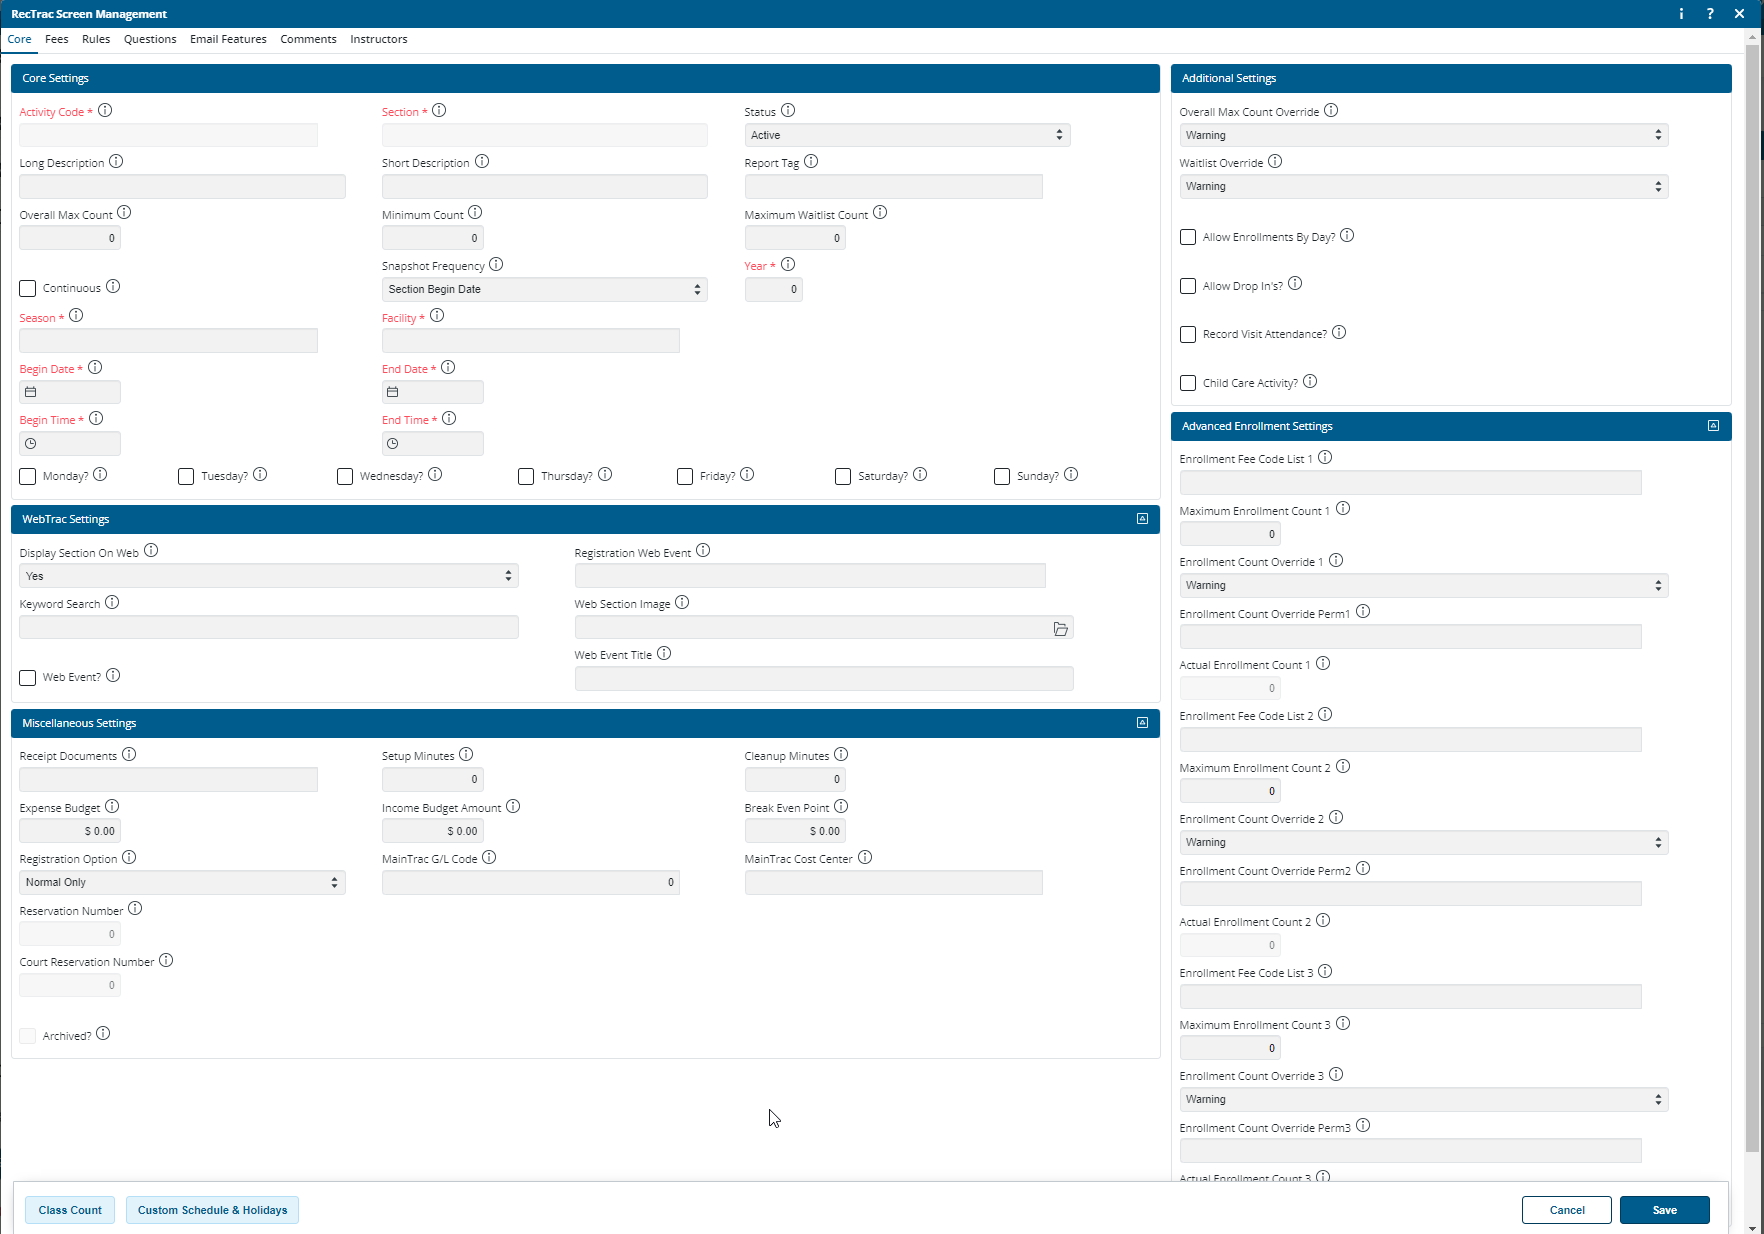
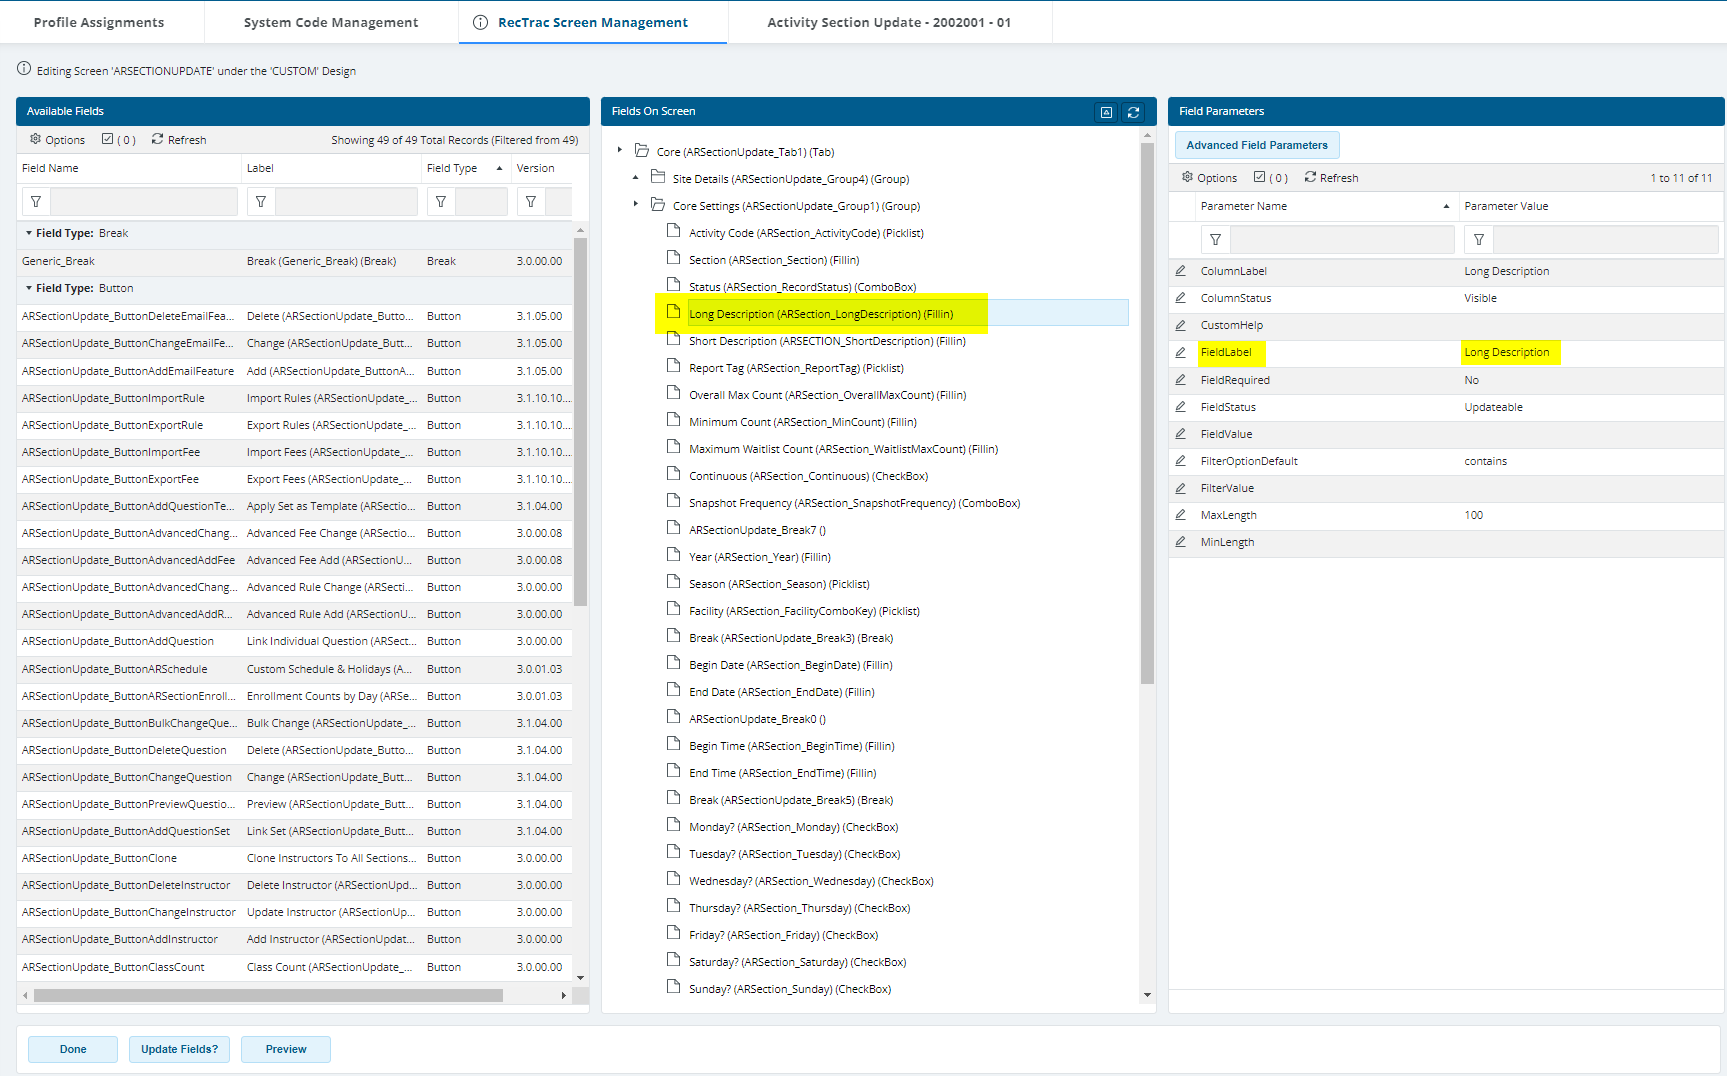
5. The Fields on Screen column appears in "tree" format and lists the Tabs, Groups, and Fieldsthat appear on the screen you've selected. As a general rule, Fields nest into Groups, and Groups nest into Tabs; and "top to bottom" on the tree equates to left to right on your screen. Refer to the image below.
- The Core (Tab) appears to the left of the Fees (Tab) on the Activity Update Screen because it is higher on the tree, and the Fees (Tab) appears to the left of the Rules (Tab) for the same reason.
- The Core Settings (Group) appears above the WebTrac Settings (Group) because both columns are the same size, and the Core Settings (Group) is higher on the tree. The same is true for the Additional Settings and Advanced Enrollment Settings groups.
- The fields within the WebTrac Settings (Group) appear left to right on the screen in the order they're listed on the tree.
- Use "drag and drop" to make changes. This is discussed in greater detail below.
6. The Field Parameters DataGrid column displays the basic field structure of the field you've selected from the Fields on Screen column. Basic Customization can be accomplished using In-line editing.
OR
Click the Advanced Parameters button to continue to the Edit Parameters screen where you make changes field parameter by field parameter, if desired.
Common functions from the Field Parameters screen include, but are not limited to:
- Renaming a field.
- Setting a default value for a field.
- Increasing or decreasing the field length.
- Add Custom Help a field.
- Changing the field status.
Note: Definitions for Advanced Field Parameters - Click Here for the Advanced Field Parameters listing..
- From the bottom of the screen:
- Click Done to Save your changes. You will return to the previous screen.
- Highlight/select a Node in the Fields on Screen column and click Update Fields? to invoke Update Logic and have any new fields or buttons that have been added to the Standard Vermont Systems Screen design for that Node added to your Custom Screen. Auto Update Logic is discussed in detail here.
- Click the Preview to launch the screen you're modifying. Preview offers an excellent option for proofing your screen before applying changes to anyone currently linked to the Design with which you are working. Vermont Systems advises you to use it often!
Basic Screen Layout and Options
This section provides basic information for the methodology used in RecTrac screen layout and basic "how to" information for common customization options. This will be helpful in the event you choose to alter entire screens beyond the more standard removal or re-arrangement or renaming of fields
Screens in RecTrac consist of Tabs, Groups, and Fields. As a general rule, Fields nest into Groups and Groups nest into Tabs.
Tabs
- Tabs are like are pages on a screen. The default Activity Section Update screen contains five (5) Tabs (Core, Fees, Rules, Questions, Email Features, Comments, and Instructors).
- A screen must have at least one (1) tab, but there is no upper limit to the number of Tabs you can have.
- By default, a Tab spans 100% of the width of your browser.
- Tabs can be divided into columns.
- The default Activity Section Update
- Core Tab spans 100% of the browser but it is divided into two (2) columns.
- The default Fees, Rules, Questions, Comments, and Instructors Tabs are not divided.
- Each Tab spans 100% of the browser but each consists of one (1) column only.
- Core Tab spans 100% of the browser but it is divided into two (2) columns.
- When dividing a Tab into columns, the width of each column is set/maintained in the ColumnWidth field in the Field Parameters DataGrid.
- Column widths consist of each column's percentage of the 100% of your browser and are delimited by the pipe "|" symbol. For Example: The following could be used for a 3-column Tab: 33%|34%|33% or 50%|25%|25% or any other variation provided the sum of the three percentages equals '100.'
- If using multiple columns, the total width of all columns must equal 100%.
- A single column Tab (such as the default Fees tab) will have nothing in the ColumnWidth field because it is one column only.
- To edit the ColumnWidths field, click the Stylus icon and use InLine Editing.
- Here is what the Core Tab of the Activity Section Update screen could look like with a few minor changes, such as:
- A ColumnWidth value of 50%|50% instead of the default 67%|33% look.
- A renamed Tab.
- A re-order of Tabs on the screen
- A deleted Tab.
Note: Whenever making changes to a screen design, Vermont Systems recommends using the Preview button to proof alterations before saving the record.
- To change the width of a Column:
- Update the ColumnWidth field.
- Click the Stylus icon and use InLine Editing.
- Ensure the sum of your various pipe-delimited columns equals 100.
- Note in the example above how the two columns are now each 50% of the browser width.
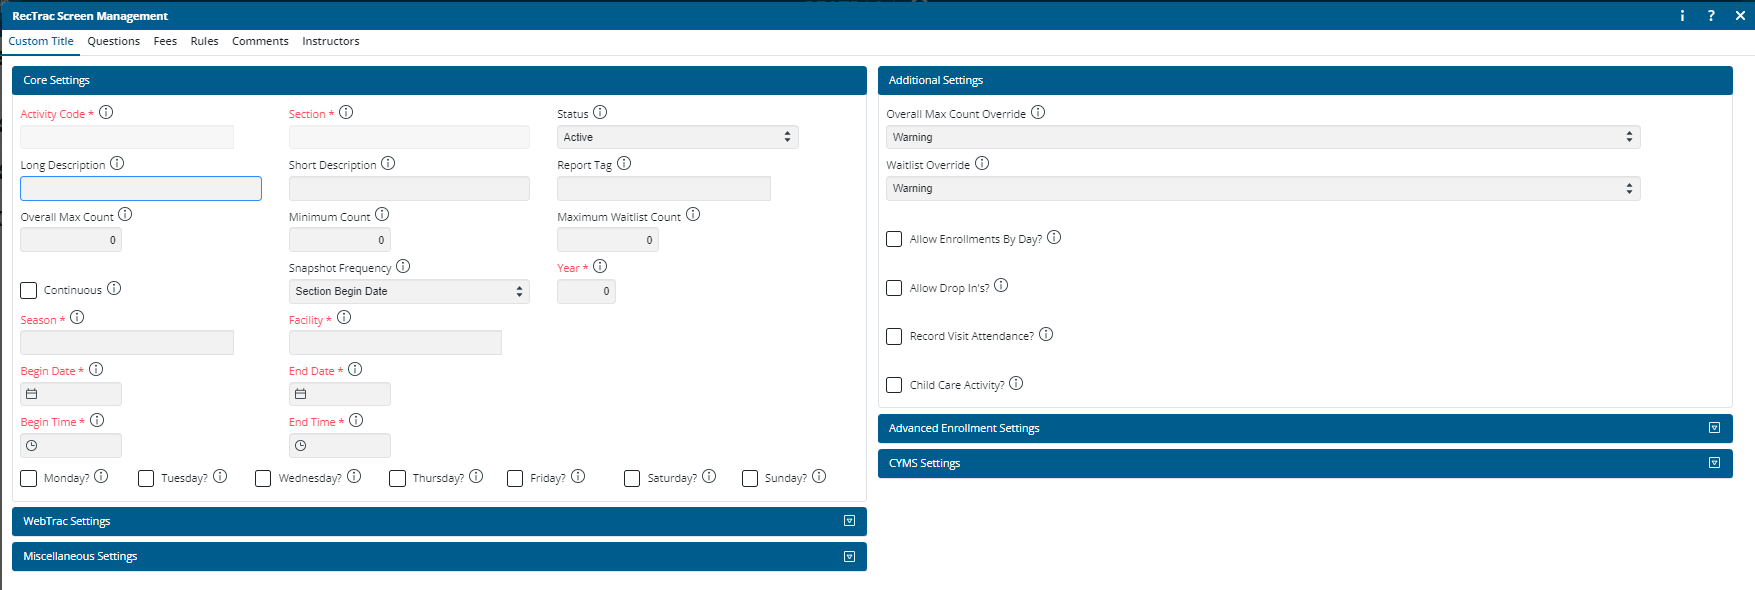
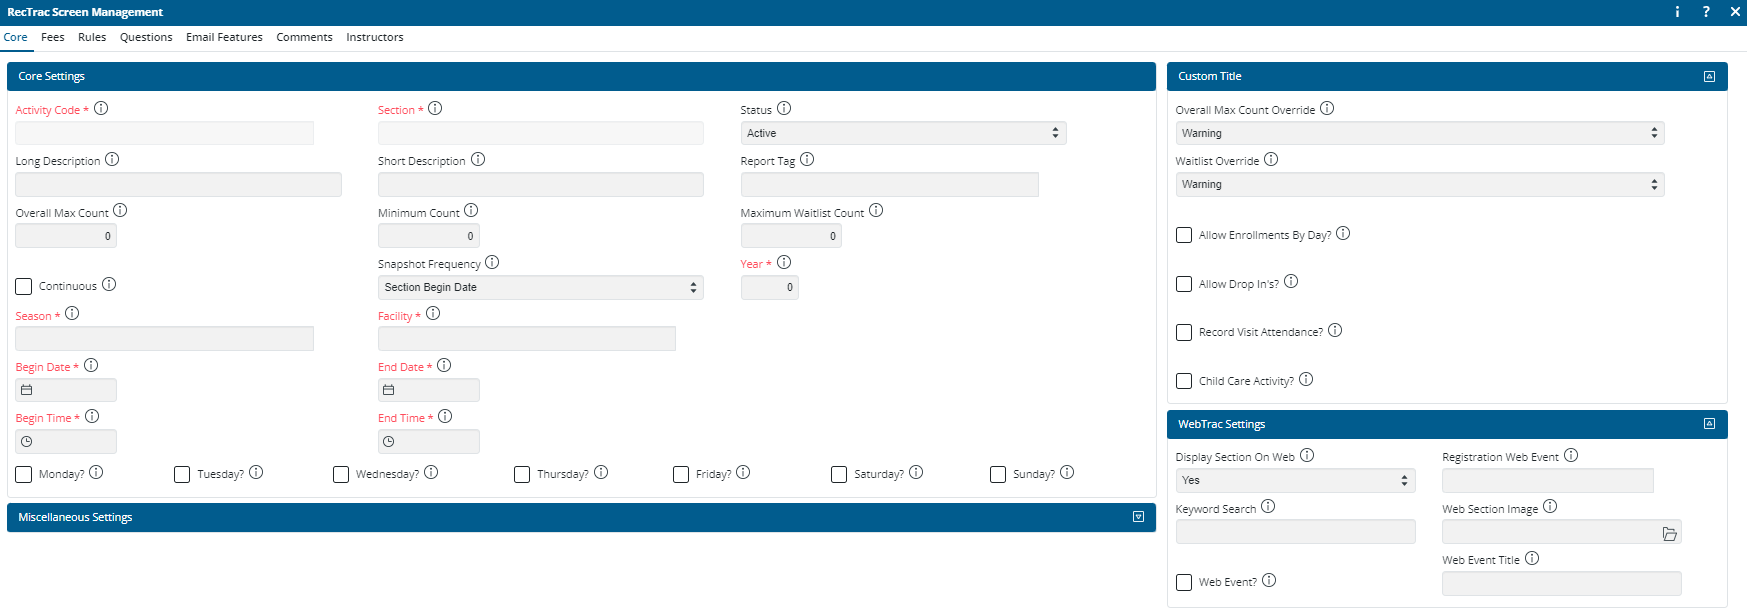
- To rename a Tab from its default:
- Update the FieldLabel field.
- Click the Stylus icon and use InLine Editing.
- Note in the example above how the Core Tab has been renamed Custom Title.
- To re-order Tabs from left to right on a screen:
- Highlight/select the Tab you wish to move.
- Click with your mouse and "drag and drop" it in the desired location.
- Note in the example above how the Comments Tab now appears immediately to the right of the Custom Title Tab as opposed to its default location to the right of the Questions Tab.
- To delete a Tab and all its contents from a screen:
- Highlight/select the Tab you wish to remove from the screen.
- Click with your mouse, "drag" it to the Available Fields DataGrid, and "drop" it.
- Note in the example above how the Instructors Tab no longer appears on the screen.
Note: Tabs and their contents removed from a screen can be re-added by reversing the process described above. In the Available Fields DataGrid, locate the Tab you wish to re-add, click on it with your mouse, "drag" it to the desired location in the Fields on Screen tree and "drop" it.
Groups
- Groups are sub-divisions within a Tab. The default Core Tab of Activity Section Update contains six (6) Groups (Core Settings, WebTrac Settings, Miscellaneous Settings, Additional Settings, Advanced Enrollment Settings, and the Buttons at the bottom of the screen).
- A Tab must contain at least one (1) Group, but there is no upper limit to the number of Groups you can have in a Tab.
- By default, a Group spans 100% of Tab column in which it is placed.
- If your Tab has one (1) column only, the Group will span 100% of your browser.
- If your Tab has multiple columns, the Group will span 100% of the column in which it is placed.
- For Example: The default Core Tab of the Activity Section Update Screen (shown above) is divided into two (2) columns: 67%|33%. The Core Settings, WebTrac Settings, and Miscellaneous Settings Groups are in Column Number 1 and so span 67% of the screen, or 100% of Column 1. The Additional Settings and Advanced Enrollment Settings Groups are in Column Number 2 and so span 33% of the browser or 100% of their Column 2. The Button group is not associated with a column and therefore appears at the bottom of each Tab.
- A Group's Column Number is maintained in the ColunmNumber field in the Field Parameters DataGrid and they work left-to-right across the screen where Column 1 is always the left-most column, Column 2 is to the right of Column 1, Column 3, if applicable, is to the right of Column 2, etc…
Note: The order of Groups in the same Column, top-to-bottom on the screen is determined by their position on the tree in the Fields on Screen field, so in the default Design for the Core Tab of Activity Section Update, Core Settings, WebTrac Settings, and Miscellaneous Settings are all in the same column (i.e. Column 1). Core Settings appears at the top of the screen because it is at the top of the tree in the Field on Screen field.
Columns, themselves, can be sub-divided into columns.
- Columns within a Group determine how many Fields will appear, left-to-right, across the group.
- For Example: The default Core Settings Group (shown above) has three (3) columns and the Activity Code, Section and Status fields are the top of their respective columns. The default Additional Settings Group has one (1) column and the Overall Max Count Override field is the top.
- The number of columns into which a group is sub-divided is maintained in the Columns field in the Field Parameters DataGrid.
- Here is what the Core Tab of the Activity Section Update screen could look like with a few minor changes to Groups, such as:
- A second column added to the Groups in Column 2.
- A repositioning of Groups into different Columns
- A renamed Group.
- A deleted Group.
Note: Whenever making changes to a screen design, Vermont Systems recommends using the Preview button to proof alterations before saving the record.
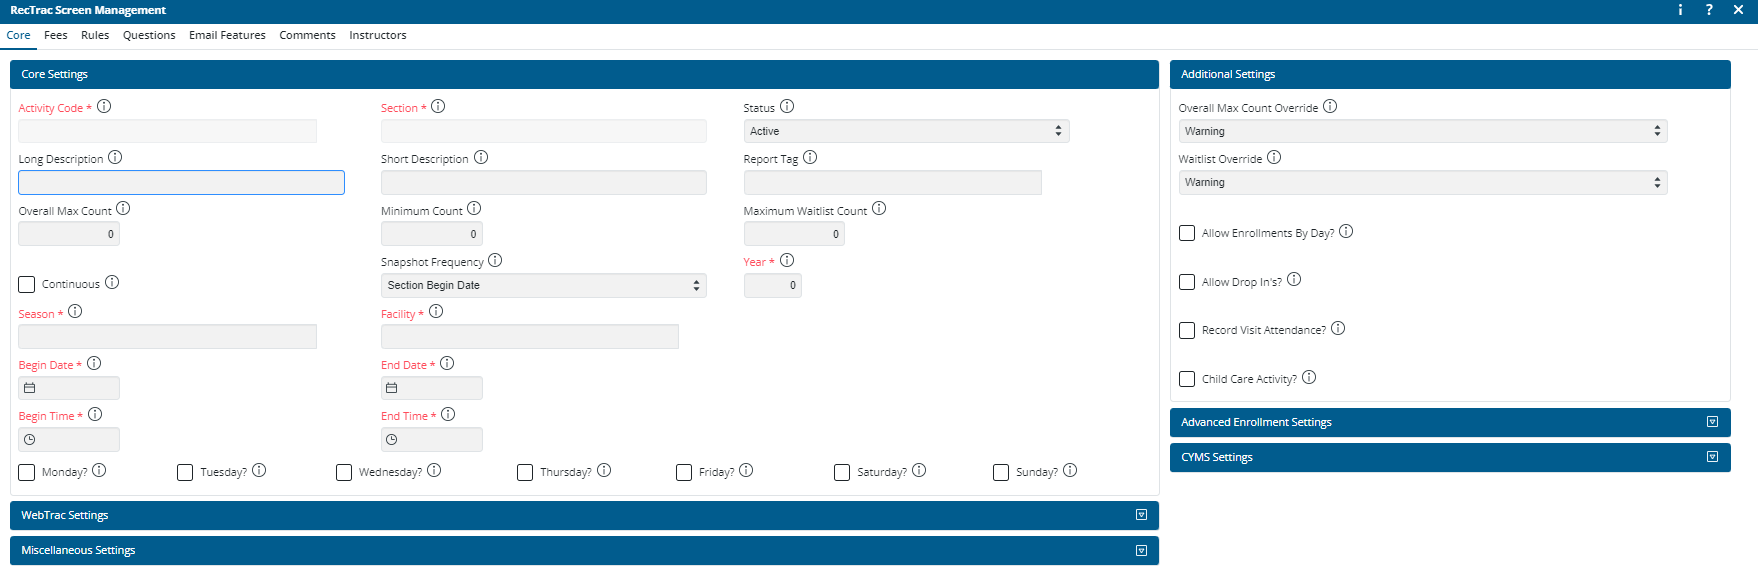
- To move a Group from one Column to another:
- Update the ColumnNumber field with Column Number you wish to use.
- Click the Stylus icon and use InLine Editing.
- Note in the example above how the WebTrac Settings Group has been moved from Column 1 to Column 2.
- To re-order Groups from top to bottom on a screen, within their Column:
- Highlight/select the Group you wish to move.
- Click with your mouse and "drag and drop" it in the desired location.
- To add increase/decrease the number of columns in a Group:
- Update the Columns field with Column Number of columns you wish to use.
- Click the Stylus icon and use InLine Editing.
- Note in the example above how the Custom Title (previously the Additional Settings Group) and WebTrac Settings Groups now have two (2) columns, whereas in the default Design, the Additional Settings Group has one (1) column and the WebTrac Settings group has three (3) columns.
- To set the expanded or collapsed view of a Group:
- Update the Collapse field with the setting of your choice.
- Click the Stylus icon and make your selection from the Drop-down List:
- None - The Group will always appear in its expanded view and the ability to expand or collapse the Group will be disabled. (The Core Settings Group in the example above.)
- Show - The Group will appear in its expanded view and the ability to expand or collapse the Group will be enabled. Click on the "up" arrow to collapse the Group. (The Custom Title and WebTrac Settings Groups in the example above.)
- Hide The Group will appear in its collapsed view and the ability to expand or collapse the Group will be enabled. Click on the "down" arrow to expand the Group. (The Miscellaneous Settings Group in the example above.)
- To rename a Group from its default:
- Update the FieldLabel field.
- Click the Stylus icon and use InLine Editing.
- Note in the example above how the Additional Settings Group has been renamed Custom Title.
- To delete a Group and all its contents from a screen:
- Highlight/select the Group you wish to remove from the screen.
- Click with your mouse, "drag" it to the Available Fields DataGrid, and "drop" it.
- Note in the example above how the Advanced Enrollment Settings Group no longer appears on the screen.
Note: Groups and their contents removed from a Tab can be re-added by reversing the process described above. In the Available Fields DataGrid, locate the Group you wish to re-add, click on it with your mouse, "drag" it to the desired location in the Fields on Screen tree and "drop" it.
Fields
- Fields are the points of data entry in a Group.
- Field Types are:
- Check Box For Example: Monday, Record Visit Attendance, etc….
- Combo Box For Example: Status, Overall Max Count Override, etc….
- Fill-in For Example: Section, Year, Begin Date, End Time, etc….
- Picklist For Example: Activity Code, Season, Facility, etc….
- Button For Example: Save, Cancel, Class Count etc….
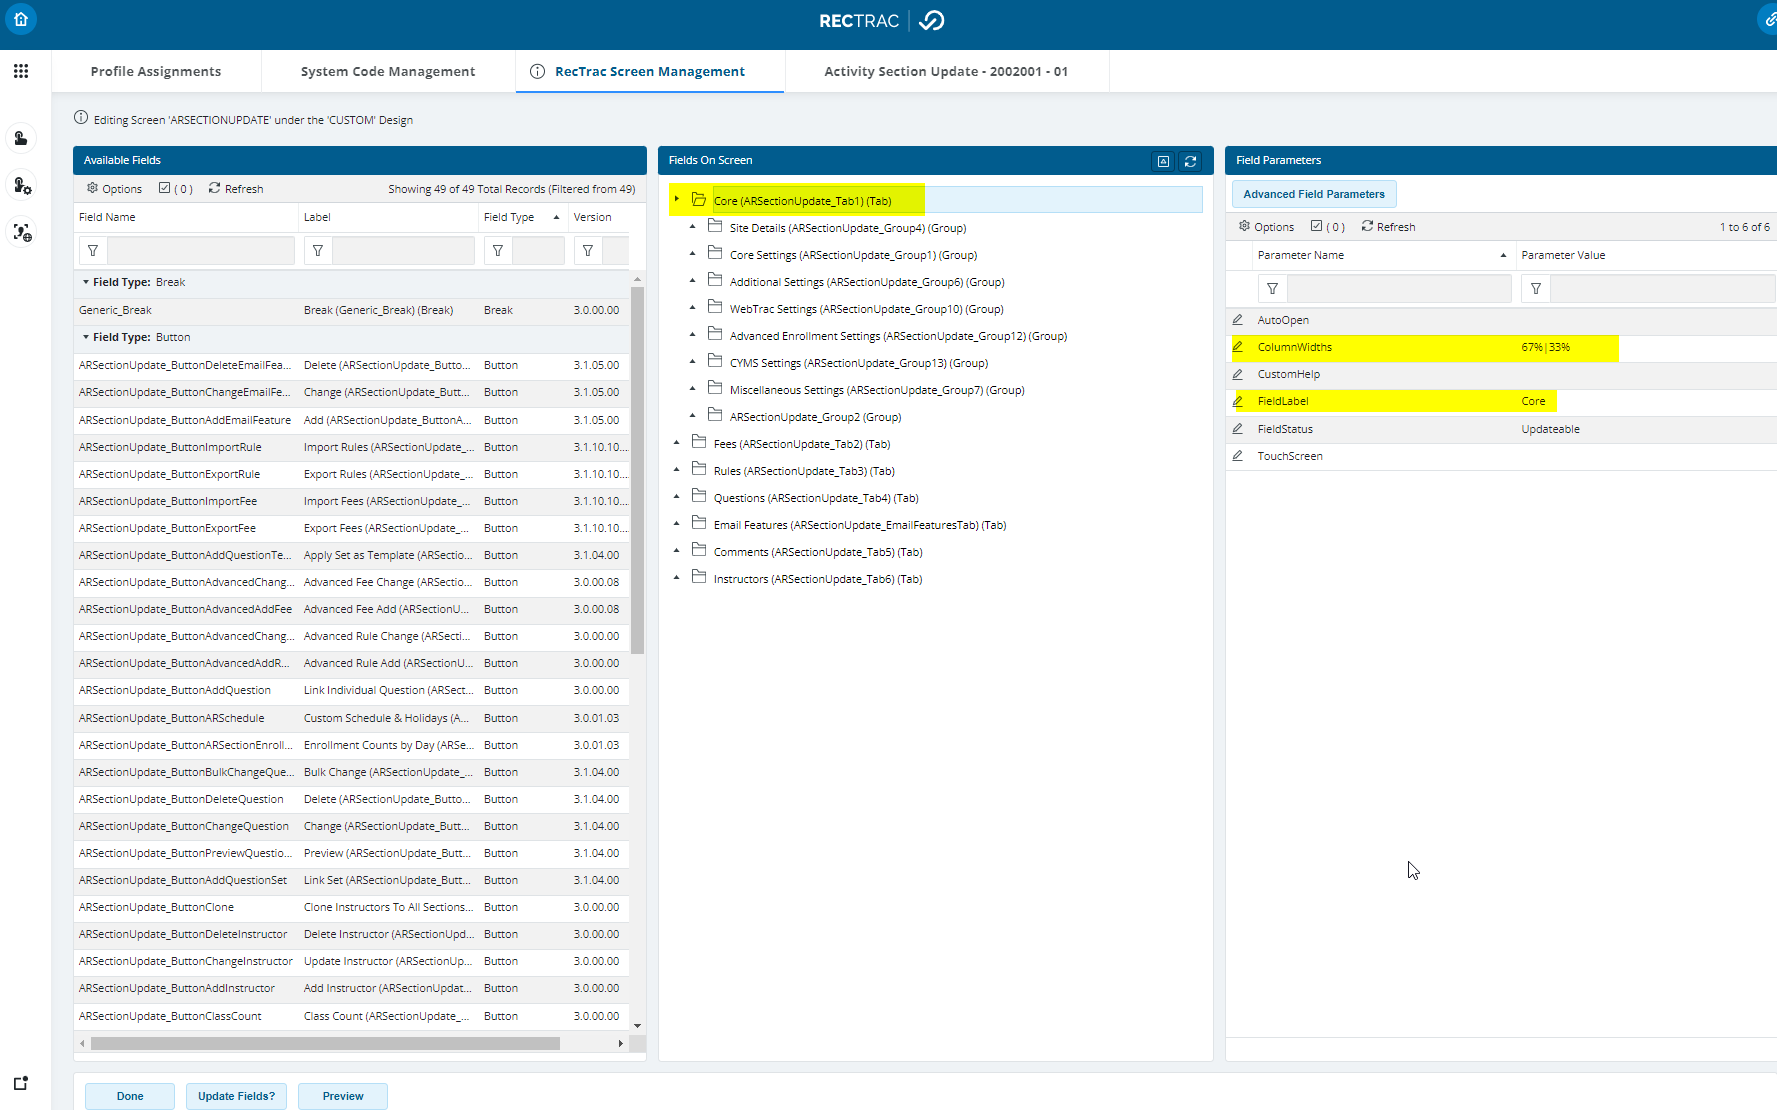
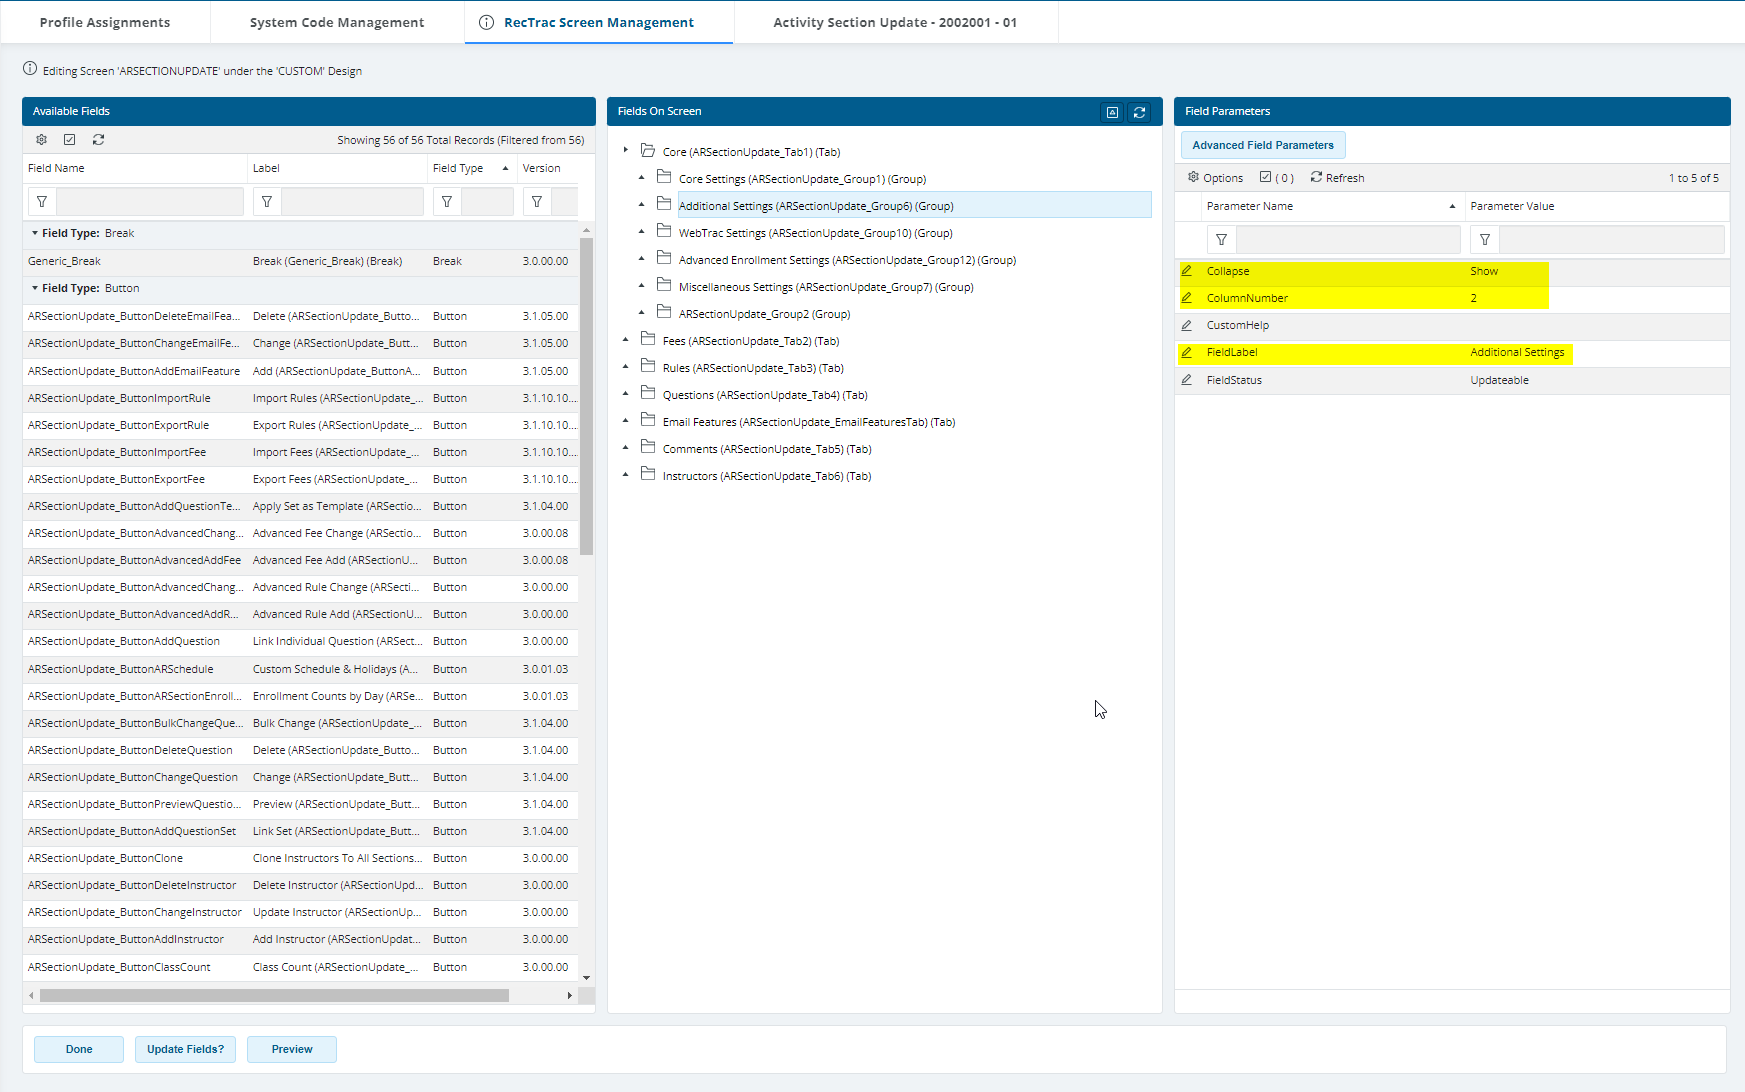
- Info Box - For Example: Editing Screen 'ARSECTIONUPDATE' under the 'CUSTOM' Design in the Maintenance Screen Update image below.
- Break - Invisible field insert a carriage return to force a new row of fields within a Group.
- Field Types cannot be changed. For Example: a Check Box will always be a Check Box, a Picklist will always be a Picklist, etc….
- Field with red labels* have been classified as mandatory in the Design.
- Fields appear left-to-right in their Group based on their location top-to-bottom in the Fields on Screen tree.
- The number of columns in a Group determines how many fields appear in a line on the screen.
- In the Standard Vermont SystemsDesign, the Core Settings Group of the Core Tab of the Activity Update screen is sub-divided into three (3) columns, so each row contains three (3) fields.
- Activity Code is the is the first field listed on the Fields on Screen tree, so it starts the first row.
- Long Description is the fourth field listed on the Fields on Screen tree, so it starts the second row.
- Row 2 contains two visible fields. The sixth field listed on the Fields on Screen tree (the 3rd field on Row 2) is an invisible Break.
- Overall Max Count is the seventh field listed on the Fields on Screen tree and thus starts Row 3, etc….
- The Additional Settings Group has one (1) column only, so each field appears on its own row.
- In the Standard Vermont SystemsDesign, the Core Settings Group of the Core Tab of the Activity Update screen is sub-divided into three (3) columns, so each row contains three (3) fields.
- Here is what the Core Settings Group of the Activity Section Update screen could look like with a few minor changes to Fields, such as:
- A rearrangement of Fields within the Group
- The move of a Field from one Group to another
- A renamed Field.
- The insertion of a Break Field to force a new Row
- The insertion of an Information Box
- A field being set to Mandatory*
- A deleted Field
Note: Whenever making changes to a screen design, Vermont Systems recommends using the Preview button to proof alterations before saving the record.
- To rearrange Fields on a Group:
- Highlight/select the field you wish to move.
- Click with your mouse and "drag and drop" it in the desired location.
- Note in the example above how Sunday? has been moved from its default location to the right of Saturday? to a new location, now to the left of Monday?.
- To move a Field from one Group to another:
- Expand the Group which contain the Field you wish to move.
- Highlight/select the field you wish to move.
- Click with your mouse and "drag and drop" it in the desired location.
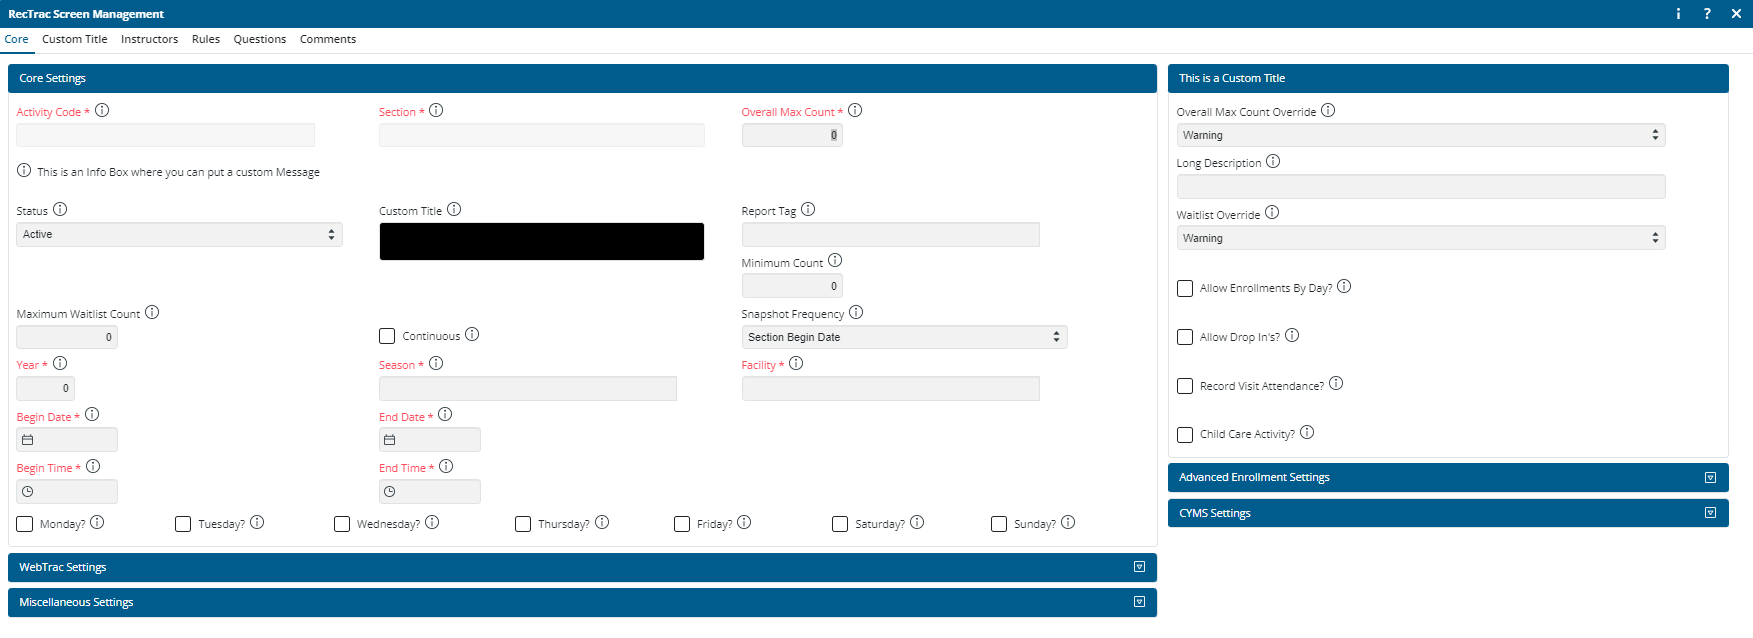
- Note in the example above how Child Care Activity? has been moved from its default location in the Additional Settings Group to second Field in the second Row of the Core Settings Group.
- To rename a Field from its default:
- Update the FieldLabel field.
- Click the Stylus icon and use InLine Editing.
- Note in the example above how the Short Description has been renamed Custom Title.
- To make a Field Mandatory*:
- Update the FieldRequired field.
- Click the Stylus icon and enable the check box.
- Note in the example above how the Custom Title field (formerly the Short Description field) is now color-coded as Mandatory*.
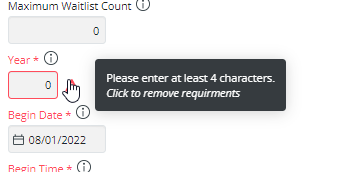
Note: The Advanced Field Parameter option to AllowRequiredOverride can be used to make a Mandatory* field more of a "Warning" field. When the AllowRequiredOverride field is enabled along with the RequiredField, users can bypass the Mandatory* field, if desired. Users will be presented with a red "X." Clicking the "X" will remove the Mandatory restriction. In the example image below, the Year field is configured with the AllowRequiredOverride option enabled. Clicking the "X" will bypass the restriction.
- To Override Vermont Systems Field Defaults: The Advanced Field Parameter option CSSStyle allows you to use .CSS commands to override the Vermont Systemsdefault for how a field appears in the GUI.
- In the Fields on Screen panel, highlight/select the field for which you want to change the default appearance and/or "fill."
- Click Advanced Field Parameters.
- In the CSSStyle field, enter the .CSS commands you want to use. For Example: background:#000000;color:#FFFFFF;font-family:times new roman !Important;font-size:larger !Important;font-weight:bold !important
- Click Save to return to the previous screen.
- Click the Preview button to ensure the field and its "fill" (if applicable) look as desired. Using the .CSS in the example above, the Short Description field in Section Update will be a black box with White, Bold, Larger Times New Roman font, as pictured below.

Note: If the .CSS command you enter does not result in the expected look, then you might need to add the !Important tag. In the example above, note how the "font-family, font-weight," and "font-size" commands require the !Important tag in order to override the VSI-Standard .CSS.
- To insert a Break Field to for a new Row:
- In the Available Field Types DataGrid, highlight/select the Generic_Break Field Type.
- Click with your mouse and "drag and drop" it in the desired location.
- Note in the example above how Begin Time now starts a Row, whereas in the default Design it appear to the right of End Date.
- To insert an Information Field:
- In the Available Field Types DataGrid, highlight/select the Generic_InfoBox Field Type.
- Click with your mouse and "drag and drop" it in the desired location.
- Update the FieldLabel field.
- Click the Stylus icon and overwrite InfoBox with the text you wish to have displayed.
- Note the Information Box that has been inserted to the example above.
- To delete a Field from a Group:
- Highlight/select the Field you wish to remove.
- Click with your mouse, "drag" it to the Available Fields DataGrid, and "drop" it.
- Note in the example above how the Long Description field no longer appears on the screen.
Note: Fields removed from the screen can be re-added by reversing the process described above. In the Available Fields DataGrid, locate the Field you wish to re-add, click on it with your mouse, "drag" it to the desired location in the Fields on Screen tree and "drop" it.
Putting It All Together
- Here is what the Core Tab of the Activity Section Update screen would look like with all the minor changes from the three (3) sections above incorporated.
- When creating a Custom Design, Vermont Systems advises the following:
- Think about what you want your screens to look like before making wholesale changes.
- Think about which Fields, Groups and Tabs are needed and which are not.
- Remove Fields, Groups, and Tabs that are not needed and arrange the remaining ones in an order that seems logical and intuitive to you and your users.
- Remember: You can always re-add Fields, Groups, and Tabs removed from a screen.
- If you are satisfied with the look of your screen, click Done on the Update screen to save your changes and apply them for your users.
- If you dislike the look of your screen, you can easily discard them and start again.
Applying Your Changes
The steps provided above constitute the basic information required to customize screens in RecTrac. Once you are satisfied with your new screen layout, it is time to apply the changes for your users.
- From the Screen Update screen, click Done to save your changes. You will be returned to the Screen Start DataGrid.
- The DataGrid contains an entry for every screen you have modified.
- Any screen NOT in the DataGrid uses the Standard Vermont Systems Design by default.

- Click Clear All Cache and click OK when prompted.
- Changes take effect immediately and will be realized the next time anyone linked to a Screen Design profile containing a Design for a screen you have modified enters one of those screens.
- In the example above, the DataGrid contains records for two (2) Designs: Custom and Manager's. By clicking Clear All Cache you ensure that anyone linked to a Screen Design profile that employs either Design (or both Designs) will have the changes realized when they enter any of the screens that appear in the DataGrid.
- Refer to a Create and Link a Screen Design Profile below for more details.
Note: RecTrac 3.1 comes with a Custom Design System Code and Custom Screen Design profile pre-loaded and linked at the Default Level of Profile Hierarchy. If left "as is," any changes made to a screen using the Custom Design Code will take effect immediately and will be applied to all users. Further customization for specific users or groups of users is easily possible through the creation of additional Design System Codes and by creating and linking additional Screen Design profiles at various levels of Profile Hierarchy.
Discarding Changes
In the event you do not like the Custom Design you have created, or if you no longer wish to use a Custom Design for a particular screen, you can discard changes and reset a selected screen to the Standard Vermont Systems Design.
- From the Screen Start DataGrid, highlight/select the screen for which you no longer want to use a Custom Design.
- Click Delete and answer Yes to the Challenge Message. The record will be discarded.
- Click Clear All Cache and click OK when prompted.
- Changes take effect immediately. The screen linked to the record you discarded will be reset to the Standard Vermont Systems Design. Users will realize this upon their next entry into that screen.
Create and Link a Screen Design Profile
The Screen Design profile allows you to utilize Custom Screen Designs in RecTrac.
RecTrac 3.1 comes with a Custom Screen Design profile pre-loaded and linked at the Default Level of Profile Hierarchy. If a single Profile linked at the Default Level is all you require, skip this section.
If you employ multiple Design System Codes for different users or groups of users, you will need multiple Screen Design profiles.
- In RecTrac, go to Management Ribbon • System Management • User/Menu/Profile Management Group • Profile Assignments.
- Click Add. You will continue to the Profile Add/Update screen.
- Enter a Profile Code for your Screen Design profile. For Example: Screen Design - Manager.
- Expand the Drop-down list for Profile Type and select Screen Design.
- Accept the default entry for Profile SubType.
- Enter a Profile Description, if desired, and click Create.

Click the Image to enlarge.
- Expand the Drop-down list to select the Language Code you wish to apply to this profile. Designs linked to this profile will use the Language Code selected here.
Note: Language Codes are maintained in System Code Management. Type=Language.
- In the Default Design Dual Selection List, select the Screen Design Code(s) you wish to have users linked to this profile use. To manipulate the Dual Selection List:
- To Add All or Remove All from one side or the other, click the applicable button.
- To add or remove single column headers from one side of the Dual Selection List to the other, double-click on it with your mouse.
- To move a column header up or down in its field, click with your mouse and then "drag and drop" as needed.
- Screen Design Codes "stack" when they are in the Selectedcolumn and the system will search for Screen Designs, top-to-bottom, and apply the first one found.
- Using the example above, when entering a screen in RecTrac, the system will look to profile linked to the user.
- The system will look to see whether a Custom Design exists for the Manager' Screen Design. If one is found, it will be used.
- If there is no Custom Design for the Manager's Screen Design, the system will look to see whether a Custom Design exists for the Default Custom Design. If one is found, it will be used.
- If there is no Custom Design for the Default Custom Screen Design, the system will use the Standard Vermont Systems Design.
- This allows you to apply the Default Custom Design to all users while applying special Screen Designs to selected uses only.
- Using the example above, when entering a screen in RecTrac, the system will look to profile linked to the user.
- Repeat the steps above for the Touch/Tablet Design Dual Selection List if desired.
- Click Save to save your changes. You will return to Profile Assignments.
- Determine where you want to link your Screen Design profile. For purposes of example, this profile will be linked at the User Group level.
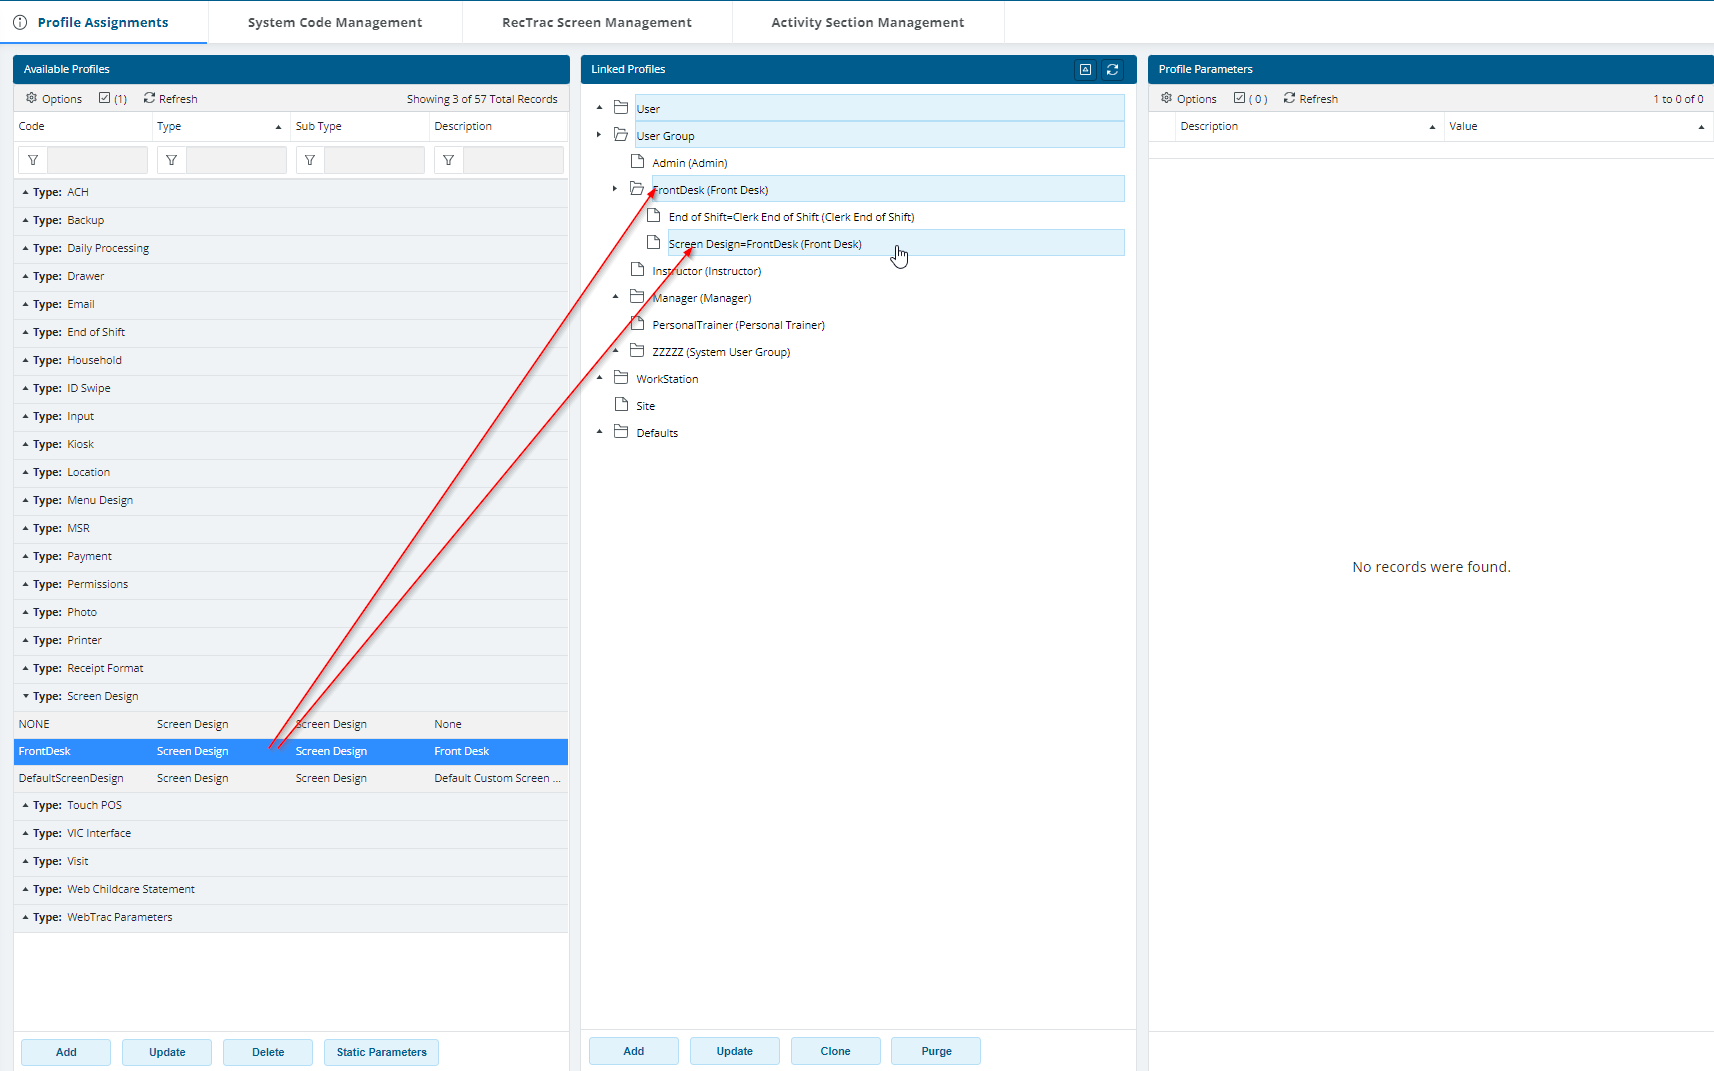
- In the Linked Profiles middle column, click to expand the User Group folder.
- In the Available Profiles left-hand column, click to highlight the Screen Design profile you just created.
- Click again and hold the mouse button down. When you have "grabbed" the profile, a red box will appear that displays the profile name.
- Drag and drop. Drag to the User Group to which you wish to link it in the middle column. When the box turns green, release the mouse. This will link the profile. Profile Assignments are saved automatically and take effect immediately.
The level of hierarchy can be changed later, if needed. - Click the 'X' in the upper-right hand corner of the Profile Assignments panel to Exit.
Repeat these steps to create and link additional Screen Design profiles, if necessary.
Customization Steps Review
The information presented above provides the basic tools required to customize screens in RecTrac. The steps required are as follows:
- Determine whether you wish to use the Custom Design System Code or whether new, additional Design Codes are necessary.
- If additional Design Codes are necessary, create them.
- Determine which screens you wish to customize.
- In RecTrac, go to Management Ribbon • System Management • Screen Management Group.
- Select the Screen Management program that contains the screen you wish to customize.
- The DataGrid contains an entry for every screen you have modified, if any. Search the DataGrid to see whether the screen you need is already present.
- If it is, highlight/select it and click Change. You will continue to the Update screen.
- If it is not, click Add. You will continue to the Maintenance Add screen. Expand the Drop-down list for Base Screen and make your selection from the available programs. Then expand the Drop-down list for Design and choose a Design Code. Then click Continue. You will continue to the Update screen.
- Make changes to Tabs, Groups, and Fields as necessary. Refer to the instruction above as needed.
- Think about what you want your screens to look like before making wholesale changes.
- Think about which Fields, Groups and Tabs are needed and which are not.
- Remove Fields, Groups, and Tabs that are not needed and arrange the remaining ones in an order that seems logical and intuitive to you and your users.
- Remember: You can always re-add Fields, Groups, and Tabs removed from a screen.
- Use Preview to check your changes before applying them.
- When ready, click Done from the Update screen. You will return to the Screen Start DataGrid.
- Click Clear All Cache to apply changes.
- If using multiple Design Codes, create and link additional Screen Design profiles as needed.
If further assistance is required, contact Vermont Systems Support by phone at 887-883-8757 or generate a Support Ticket through the Customer portal of the Vermont Systems web site using your Customer ID and password.
Auto Update Logic
Auto Update logic is designed to keep Custom Screens and Custom Menus updated with new fields and buttons when they are added to the Standard Vermont Systems design as part of a build/update release. The Auto Update feature runs automatically as part of a build/update process and updates any Custom Screens and Custom Menus with the Auto Update option enabled on the Screen/Menu Management DataGrid. You can also manage this process manually, if desired, in Screen/Menu Management Update by selecting individual nodes in the tree and using the Update Field? button.
Notes:
- The Auto Update process relies on the fact that the Group a field or button is in, in the Vermont Systems Designs also exists in your Custom Design. If a field is moved to a different Group or a Group is removed from a Node within your Custom Design, the Auto Update will not add that field or button.
- The version list includes all builds from 3.1.01.00 through to the current release.
- The process will check to see whether the field or button already exists on the screen somewhere.
- If found on your Custom Screen in the Group where Vermont Systems placed it, the system will NOT re-add it.
- If found on your Custom Screen in a Group other than the one where Vermont Systems placed it, it will be re-added.
- The above check is run for Screens only. This check is NOT run on menus.
To Update Screens Automatically

- In RecTrac, go to Management Ribbon • System Management • Screen Management Group.
- Select the entry that contains the screen which you wish to update (Management Screen, Inquiry Screen, Processing Screen, Report Screen). You will continue to the Start DataGrid.
For purposes of this example, the choice is Management Screen Management. The DataGrid contains an entry for every screen you have modified, if any. - Find a screen for which you wish the Auto Update logic to apply. Click the Stylus icon to enable InLine Editing and enable the option for Auto Update.
- Click the Stylus icon again to disable InLine Editing.
- Repeat this step for each Custom Screen/Custom Menu as needed.
To Update Screens Manually
- Open the desired Management screen/menu program that you wish to update (i.e. Management Screen Management, Inquiry Screen Management, Processing Screen Management, WebTrac Management Screen Management, WebTrac Processing Screen Management, Menu Management, WebTrac Menu Management, etc….)
- To update all fields for a given screen/menu, use InLine Editing (as described above) to enable the Auto Update? option for the screens/menus in question.
- Click on Update All Screens?. This will launch the Auto Update Options dialog.

- Accept the default entry or expand the Drop-drop list to select the version that you wish to use as your Starting Version to Update From. The system will update ALL new fields from the version you select through to the current release. Using the example above, the system would add all new fields and buttons from Version 3.1.5.00 through the current release.
- Click Continue to update the selected screens/menus and add the fields/buttons/menus for the version(s) selected.
To Auto Update Fields within a Specific Screen
- Open the desired Management screen/menu program that you wish to update (i.e. Management Screen Management, Inquiry Screen Management, Processing Screen Management, WebTrac Management Screen Management, WebTrac Processing Screen Management, Menu Management, WebTrac Menu Management, etc….)
- Highlight/select the screen/menu item that you wish to update and click Change. You will continue to the Update Screen.
- In the Fields On Screen column, click to open the tree and select the Node that you wish to update.
- Click Update Fields?. This will activate the Auto Update Options window.
Note: You will receive a warning message if you do NOT have a Node selected in the tree.

Click the Image to enlarge.
- Accept the default entry or expand the Drop-drop list to select the version that you wish to use as your Starting Version to Update From. The system will update ALL new fields from the version you select through to the current release. Using the example above, the system would add all new fields and buttons from Version 3.1.5.00 through the current release.
- Select your Skip Checking Lower Levels option. This option determines whether you want the system to include Nodes within Nodes or skip Nodes within Nodes when you process the update. For Example: You might select the Core Settings (Group) Node and disable this option. This would result in the system adding new fields and buttons to ALL Nodes/Groups within the Core (Tab) group. With this option selected/enabled, ONLY the fields directly within the Core Node will be updated.
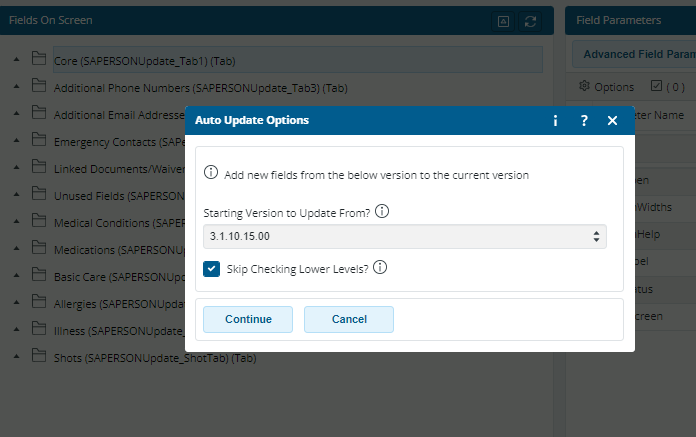
- Click Continue to update the selected Node(s) and add the fields/buttons/menus for the version(s) selected.
Default Widgets
Note: The Update Default Widgets? button appears on the Management Screen Management • Management Screen Start DataGrid only.
"Widgets" are the fields that appear on RecTrac screens and include, but are not limited to: DataGrids, Date Fields, Time Fields, Phone Fields, Fill-in Fields, Check Boxes, Combo Boxes, Images, Buttons, Radio Set Fields, etc…. "Default Widgets" are those widgets that are not impacted by another screen design. You can customize elements of those widgets and have them appear consistently throughout RecTrac, if desired, by using the Update Default Widgets button.
To Customize a Default Widget
- In RecTrac, go to Management Ribbon • System Management • Screen Management Group • Management Screen Management.
- Click Update Default Widgets. You will continue to the Management Screen Update for Editing Screen 'DEFAULTWIDGETS' under the '<GLOBAL>' Design. This screen is a copy of the Management Screen Update program with three (3) noticeable differences:
- The Informational Note across the top which reads, "Editing Screen 'DEFAULTWIDGETS' under the '<GLOBAL>' Design."
- The Available Fields panel is blank.
- The Preview button at the bottom of the screen has been replaced with a Reset Default Widgets button.

- In the Fields On Screen panel, highlight/select the widget to which you wish to make global changes. The Field Parameters panel will populate.
- Use InLine Editing to change the Field Parameters as desired.
- In the example above, the Phone Number Widget is selected and the FieldRequired option is being set to 'Enabled.'
- When changes are saved, ALL Phone Number fields in RecTrac will be set to *Required, unless a Custom Screen Design exists and the Phone Number field within that design has been modified.
- Make changes to other Default Widgets as needed.
- Click Done when ready. You will be returned to the Management Screen Start DataGrid.
- Changes take effect immediately and will be realized upon your next entry to a screen that contains a Default Widget of the type you modified.
- Using the Example above, entry into any screen containing a Phone Number field will display the Phone Number field as *Required. The table below contains examples from Household Update, Facility Location Update, and Staff Update.
|
Click the Image to enlarge.
|
Click the Image to enlarge.
|
Click the Image to enlarge.
|


Resetting Default Widgets
You can reset Default Widgets to their standard RecTrac default settings at any time by clicking the Reset Default Widgets button from the Editing Screen 'DEFAULTWIDGETS' under the '<GLOBAL>' Design page.
- In RecTrac, go to Management Ribbon • System Management • Screen Management Group • Management Screen Management.
- Click Update Default Widgets. You will continue to the Management Screen Update for Editing Screen 'DEFAULTWIDGETS' under the '<GLOBAL>' Design.
- Click Reset Default Widgets. This is an "All or Nothing" option. You cannot pick and choose which Widgets to reset to their defaults.
- Click OK when the process completes.
- Click Done. You will be returned to the Management Screen Start DataGrid.
- (Recommended) Click Clear All Cache to clear the browser cache for the all screens in RecTrac. Clearing cache forces a web browser to retrieve all files again and completes the Default Widget Reset process.