Logic Controls CR3000 Series USB Cash Drawer Installation
RecTrac 3.1

Written by Daniel Rotondi
Updated at November 18th, 2022
Table of Contents
This document will walk you through the process of installing and configuring the Logic Controls USB CR3000 Series Cash Drawer foruse with RecTrac 3.1 and 10.3.
Note: Logic Controls is the new brand for Bematech as of2020. Logic Controls-branded and Bematech-branded CR3000 series cash drawersare exactly the same (except for the brand name). This document works for both.
Requirements
· Windows 10 workstation with available USB port
· Access to Logic Controls installation files (https://logiccontrols.com/products/)
· Administrator privileges to install and configure hardware
· RecTrac 3.1 or 10.3
· Have a RecTrac user with the requisite permissions to add andlink Profiles/Devices
· For RecTrac 3.1 only, the Vermont Integration Client (VIC) is installed on the workstation and is running
· For RecTrac 3.1 only, RecTrac connects to the VIC after logging in
Installing and Configuring Logic Controls USB CR3000 Series Cash Drawer
Virtual COM Port from a USB Device: RecTrac non-printer driven drawers to be configured for serial port communication. When you first plug the CR3000 series drawer in, it installs as a USB device (LCI_CRin Windows System Settings/Device Manager). The manufacturer provides a driver that emulates a virtual COM port for this USB drawer and meets RecTrac’s requirements, which you will enable in the steps that follow.
Note: The instructions included from Logic Controls were not very helpful and Vermont Systems recommends using the following instructions to install and configure the Logic Controls cash drawer for use with RecTrac.
Attaching the Drawer
1 Ensure the workstation is poweredon and you're logged in.
2 The drawer arrives with the USB cable attached. Plug the drawer’s USB cable into your workstation. The drawer is powered via the included USB cable.
Installing the Manufacturer’s Drivers
Use the Cash Drawer USB driver to install the Virtual COMport driver. The hardware should include a CD containing the needed drivers. Drivers are also available on the manufacturer’s website.
1 Drivers for 64-bit and 32-bitoperating systems are provided. Use the version appropriate for the Microsoft Windows version installed on your workstation.
2 Locate the manufacturer’s USB Drivers.
Notes: Insert the manufacturer’s driver CD provided with your hardware, and then open the \USB Drivers\ folder.
Alternatively, download the drivers from Logic Controls’s website(https://logiccontrols.com/products/.Download and then extract the Cash Drawer USB ZIP file (required for step 3).Download and then extract the Cash Drawer Utility (required for step 7).
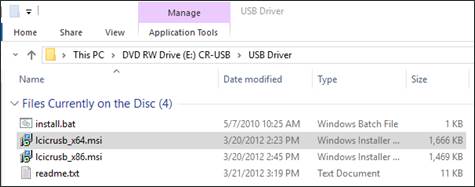
3 For 64-bit OSes, right-click onthe lcicrusb_x64.msi and then select Run as Administrator.
4 The Setup Wizard opens.
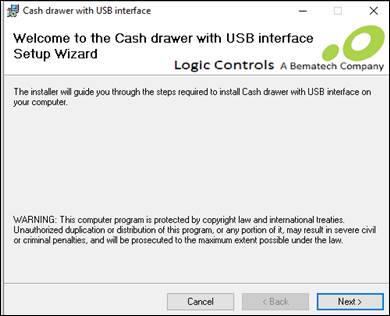
5 Click Next to begin the installation, accept all default installation options, and then click Close after its completion.
Identifying the COM Port Used by Drawer
You MUST take note of the COM Port used by your drawer. Later, this COM Port is entered into RecTrac for this workstation.
1 In the Windows search bar (besidethe Start menu) enter Settings and press Enter.
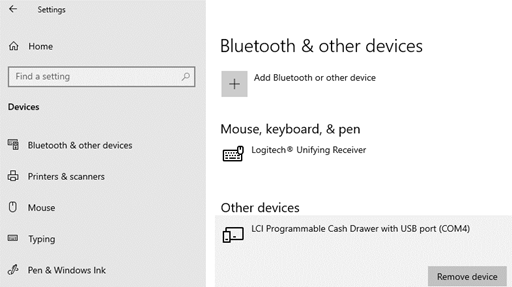
2 Click Devices.
3 You should now have a LCI Programmable Cash Drawer with USB port (COMX), where X is the COM Port used.

4 Write down the COM Port used.
Testing the Drawer Pop with Manufacturer’s Utility
This section verifies that the drawer operates with Windows. This section should be completed before configuring RecTrac.
1 Locate and then run the CREdit.exe located on the root of CD, or downloaded as the Cash Drawer Utility.
2 Select the COM Port number youwrote down earlier.
3 Leave all defaults (Code 1 shoulddefault to "7" for the Opening Command).
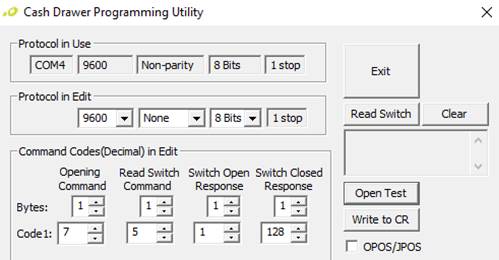
4 Click Open Test and thedrawer should pop.
5 Click Exit to close theprogram and free up the COM port.
Configuring RecTrac 3.1/10.3 Peripherals Profile/Device
In this section, you set the appropriate PeripheralsProfile/Device for this workstation to use the COM Port number you wrote downearlier with an Open Code of "7."
For RecTrac 3.1
1 Log in to RecTrac 3.1, andverify VIC is running.

2 Search for and go to ProfileAssignments.
3 Find the Peripherals profilelinked to the workstation to which you'll attach the printer. Click the Updatebutton.
Note: This document assumes:
1.) You already have a unique Peripherals profile created for thisworkstation.
2.) That Peripherals profile is linked to this workstation within the profilehierarchy.

4 For Drawer #1 Port Options,select the COM Port number you wrote down earlier.
5 For Drawer #1 Open Codes, enter"7."
6 Click Save.
7 Process a sale that pops thedrawer. Depending on configuration, certain sales might not pop the drawer. Forexample, you might process a cash sale to pop the drawer. For those with anOpen Cash Drawer button placed on your Touch POS screen, then that can be usedto test the drawer operation, as well.
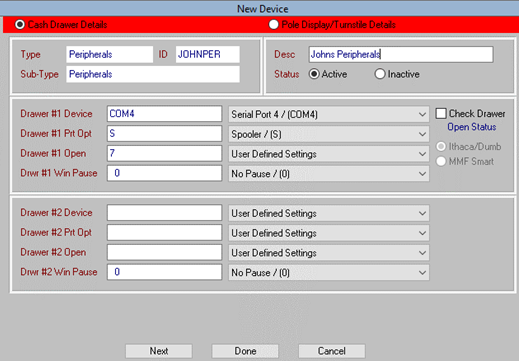
For RecTrac 10.3
1 Log in to RecTrac 10.3.
2 Go to the Func menu • FileMaintenance • System • Device Maintenance • Printer/Device Maintenance.
3 Open the Peripherals device forthis station.
Note: This document assumes:
1.) You already have a unique Peripherals device created for this workstation.
2.) That Peripherals device is linked to this workstation within the device hierarchy.
4 For Drawer #1 Device, select theCOM Port number you wrote down earlier..
5 For Drawer #1 Prt Opt, select Spooler.
6 For Drawer #1 Open,enter"7.".
7 Click Done.
8 Process a sale that pops thedrawer. Depending on configuration, certain sales might not pop the drawer. Forexample, you might process a cash sale to pop the drawer. For those with anOpen Cash Drawer button placed on your Touch POS screen, then that can be usedto test the drawer operation, as well.
Troubleshooting
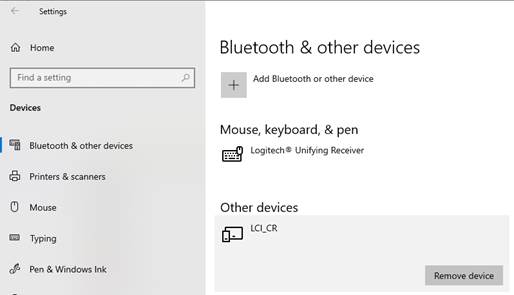
· Plugging the USB in prior to installing the drivers will resultin Windows showing a LCI_CR device under Window’s Settings • Bluetooth &Other Devices.
· After running lcicrusb_x64.msi, you should instead see LCIProgrammable Cash Drawer with USB port (COMX), where X is the COM port used. Inthe example that follows, COM4 was used.