Topic Doc: Activity Visit Processing
Rectrac 3.1

Written by Daniel Rotondi
Updated at November 3rd, 2022
Table of Contents
Document Summary
The purpose of Activity Visit Processing is to allow you to record attendance for the enrollees in the activities (i.e. classes, programs, …) you offer. You can also record attendance for 'Drop-ins,' people who are not enrolled in a specific activity but who wish to participate in a meeting (or two) of the class. You may allow 'Drop-in' participation as an incentive to get patrons to register or you may offer it simply as a means to let them attend part-time without having to pay the full enrollment fee. For example: One of your members has a pass to your gym and wants to participate occasionally in your Tuesday evening Spinning class. However, the individual does not have a set schedule and so does not want to register for the full 10-week session nor take advantage of your Per Class enrollment option. Drop-In Visit processing allows you this flexibility.
Activity Visit Processing can be set up to charge Drop-In fees, if desired. You can also charge extra fees for enrolled participants as well to cover such incidentals as materials costs, off-site trips, etc….
License – Maintenance Agreement
The Activity Visit Processing Interface is free. Use of the interface requires a VSI license and annual maintenance agreement for RecTrac and the component modules discussed in this document. Prior to implementing any process outlined in this document, please contact the Vermont Systems Sales department at 1-877-883-8757 to verify that you are authorized to use the modules discussed in this document and if not, to obtain a quote and/or approval.
Setup Steps
This document provides the basic File Maintenance steps required to prepare your RecTrac database for Activity Visit Processing. It also provides a few Visit Processing and reporting examples of this interface. If you have additional questions about Activity Visit Processing setup and operation after reading this document, please contact Vermont Systems Customer Service by phone at 887-883-8757 or generate a Support Case through the Customer portal of the Vermont Systems website using your Customer ID and password.
Before You Begin
This document is written with the following assumptions. If any of the items listed below is NOT true, contact Vermont Systems Support prior to continuing, as the steps in this document may prove difficult to complete and unexpected results may occur.
- Your organization is running RecTrac 3.1.03.01 or greater.
- You have a full understanding of how programs and memberships are managed in your organization, including but not limited to: the programs for which attendance will be tracked; whether drop-in visits are allowed, and if yes, for which patrons; and whether fees are associated with visits, and if yes what those fees are and how they will be charged.
- The User ID with which you sign into RecTrac has the requisite permissions and ability to access all modules and functions pertaining to Activity Visit Processing, including but not limited to: Activity Management, Pass Management, and Profile Management.
- You understand Activity and Pass Management and have created the Activities and Pass Codes for which Activity Visit Processing will be allowed.
- You understand RecTrac DataGrids and how to maneuver through them.
- You understand RecTrac Profile Management and hierarchy.
- IF you charge fees for Drop-Ins and/or if you charge extra fees for enrollees to attend a class meeting, you must have an understanding of RecTrac Fees, Fee Groups, Fee Sets and Criteria, and the multiple levels of hierarchy at which Fees can be linked in RecTrac. This document does not provide instruction for RecTrac Fee Maintenance beyond the minimum requirements necessary to set up and run Activity Visit Processing.
File Maintenance Setup
You will visit the following program modules to configure Activity/Pass Visit logic in RecTrac:
- Activity Section Management
- Pass Code Management
- Profile Management - Visit profile
- Set Management - Fee Set Management
Note: All file paths and screen/tab locations in this document refer to file paths and screen/tab locations as they appear in the standard, default VSI Design. Your setup and Design may vary.
Activity Section Management
The Allow Drop-Ins and Record Visit Attendance options must be enabled for every Activity Section for which you wish to allow Activity Visits for drop-in visits and/or for class attendance.
- Allow Drop-Ins? - This option tells the system that you wish to allow Drop-In visitors for this class. 'Drop-Ins' are defined as patrons who did not register for the class (they are not on the program Roster) but who attend on an ad hoc basis. If you do not wish to allow 'Drop-Ins' (i.e. if you are recording attendance for enrollees only), de-select this option.
- Record Visit Attendance - This option tells the system that you are recording attendance for this program. The attendance check works for regular enrollees (i.e. members on the activity roster) and for Drop-Ins. In other words, this option must be enabled in order to process Activity Visits.
Note: When processing activity drop-in visits, custom dates set up from the Custom Schedule & Holidays button will be checked; however, the logic will check the custom dates if specified OR the normal date/time/day-of-the-week set up. It does not check both. If a custom date is found on the section, the uses only the custom dates.
- In RecTrac, go to Management Ribbon • System Management • Activity Management • Section Management.
- Highlight/select the first section for which you wish to track attendance and/or allow Drop-In visits and click Change.
- Enable the Record Visit Attendance option, which is located on the Additional Settings group.
- If you will be allowing drop-ins for this program, enable the Allow Drop-Ins option.

- Click Save. You will be returned to the Activity Section DataGrid.
- Repeat Steps 2-5 above for each additional section for which you want to allow Record Visit Attendance/Allow Drop-Ins.
- Exit Section File Management when done.
This completes the setup steps for your Activities. Use the "i" and "?" Help icons for field definitions, if needed, or continue to Pass Code Management to continue the File Maintenance Setup for Activity Visit Processing.
Pass Code Management
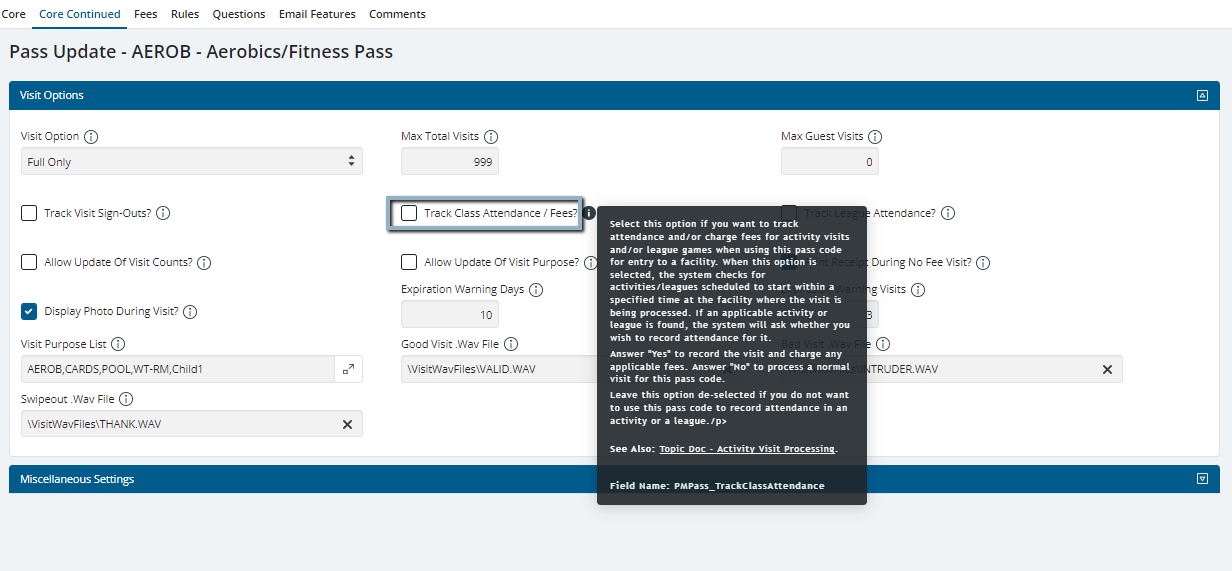
The Track Class Attendance/Fees? option must be selected on each pass code (Regular/Punch Pass Codes and Daily Pass Codes) for which you will record attendance and/or allow Drop-Ins. This option prompts the system to check for activities set to Record Visit Attendance that are scheduled to start within a specified time of the visit being processed at the facility where the visit takes place. If an activity is found, the system will ask whether you wish to record attendance for it. By default, the "specified time" is 30 minutes prior to the start time of the activity through its ending time.
If this option is not selected, no check for starting activities takes place when a visit for a pass of this code is processed. In other words, this option must be enabled in order to process Activity Visits.
- In RecTrac, go to Management Ribbon • System Management • Pass Management • Pass Management.
- Highlight/select the first Pass Code which you wish to use to track attendance in activities and click Change.
- Click the Core Continued tab.
- Enable the Track Class Attendance / Fees? option, which is located in the Visit Options group.
- Click Save. You will be returned to the Pass Management DataGrid.
- Repeat Steps 2-5 above for each additional Pass Code which you wish to use to track attendance in activities.
- Continue with Pass Management (immediately below) or Exit Pass Code Management when done.
Track Visit Sign-outs and the Capacity Option
Optional: Tracking capacity allows you to establish a threshold limit for individuals in your facility at any given time. RecTrac can be configured to Warn you when the capacity limit is reached while still allowing you to swipe patrons into your facility or Stop you from processing any additional visits (drop-in OR ‘regular’) into that facility. Either is a good idea if you want to monitor the number of people in your facility at any given time.
If you do not wish to track capacity, proceed to the next section.
If you wish to track capacity, set up must be performed in Pass Code Maintenance and on your Visit profile, for which instruction follows below.
- From the Core Continued tab of a pass code for which you will track attendance/allow drop-ins, enable the Track Visit Sign-Outs? option.
- Click Done to return to the Pass Code Management DataGrid.
- Repeat these steps for each additional Pass Code that you wish to use to track attendance/allow drop-ins in activities.
This completes the setup steps for your Pass Codes. Use the "i" and "?" Help icons for field definitions, if needed, or continue to Visit Profile Maintenance to continue the File Maintenance Setup for Activity Visit Processing.
Visit Profile Maintenance
Visit profile settings are central to the success of Activity Visit Processing. The following steps walk you through the mandatory setup requirements and also present a few options for your consideration.
Mandatory Setup Steps
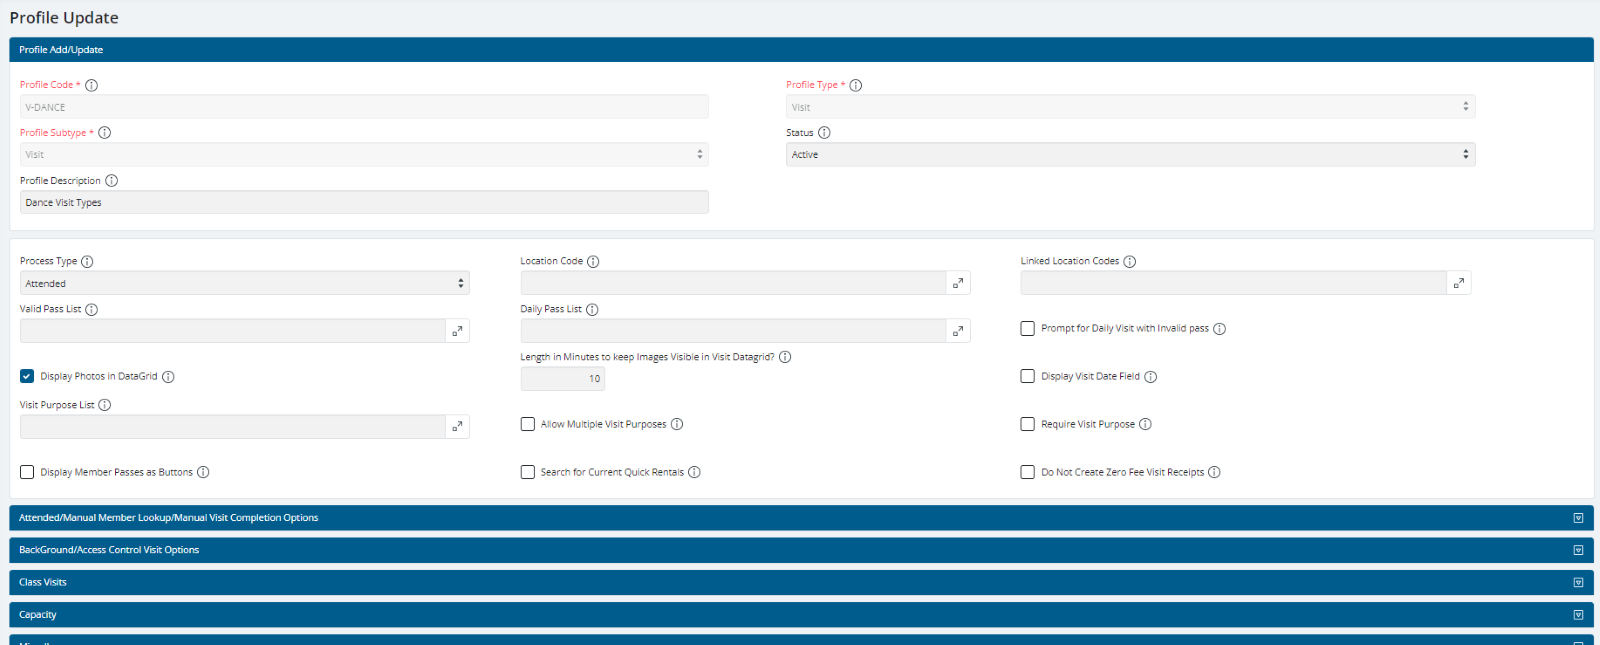
Set the Default Process Type and Visit Location
- In RecTrac, go to Management Ribbon • System Management • Profile Management.
- Highlight/Select the Visit Processing profile for the location at which you wish to process Activity Visits/Drop-In Visits and click Change.
- Expand the Drop-down list for Process Type and select "Attended." Attended Visit Mode is preferred for Activity Visit Processing, as you will have to answer visit prompts during the swipe process.
- Click the Picklist icon for Location Code and select the Location Code you wish to link to this profile. Generally speaking, this should be the facility location at which you will be processing visits using this profile. Remain in the Visit Processing profile.
Set Valid Pass Codes and Daily Pass List
- Click the Picklist icon for Valid Pass List and select the Pass Codes which are allowed for this profile. In most instances, these are the Pass Codes you allow at the location at which you will be processing visits using this profile.
- Click the Picklist icon for Daily Pass List and select the Daily Pass Codes which are allowed for this profile. These are the Daily passes (if any) you allow at the location at which you will be processing visits using this profile.
- Optional Select the Allow Class Drop Ins with Daily Visits option if you allow Drop-In Visits for patrons who purchase a Daily Pass. De-select this option if you allow Drop-In Visits for patrons holding Regular membership and/or Punch Pass Codes only.
Set Activity Visit Options and Drop-in Options
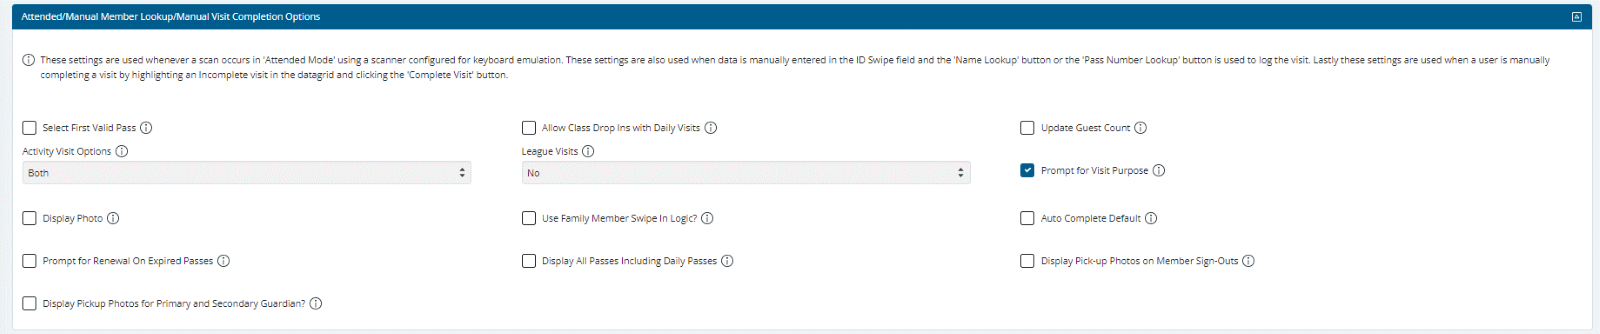
Expand the Attended/Manual Member Lookup/Manual Visit Completion Options group.
- Expand the Drop-down list for Activity Visit Optionsand make your selection. This determines the enrollment type(s) you will accept for Activity Vists with this profile.
- None - You do not use this profile for Activity Visit Processing or Drop-In Visit Processing.
- Enrollments Only - You use this profile for Activity Visit Processing for patrons who are enrolled in your programs.
- Drop Ins Only - You use this profile for Drop In Visit Processing for patrons who are NOT enrolled in your programs.
- Both - You use this profile for Activity Visit Processing and Drop In Visit Processing.
- Determine whether you wish to Allow Class Drop-Ins with Daily Visits. Selecting this option allows non-members (i.e. Patrons who do not have a Pass Membership but rather who use Daily Passes) to attend classes.
Set Class Visit Prompt Options

Expand the Class Visits group
- Expand the Drop-down list for Class Enrollment Options and select the option you wish to use for displaying Class Visit information for programs at the location to which this profile is linked. The option you choose determines what message a patron will see when swiping into your facility provided a program for which you track attendance/allow drop-ins is starting within your Minutes before Start and Minutes after Startwindow. Your options are:
- Notify if No Class - The system will provide a message indicating no classes are meeting within <x> minutes of the visit being processed and will ask whether you wish to allow the visit. In this instance, <x> minutes is the Minutes before Start value. If there are classes which will be starting within the time window, no message will be provided.
- Prompt for Class Visit - The system will provide a message asking whether you wish to record attendance for a class that is starting (or has started) within your Minutes before Start and Minutes after Start window provided the swipe takes place within the time frame of the window. If multiple classes are starting within the time window, the system will ask you to pick a class. If no classes are starting within the time window, no message will be provided.
- Both - The system combines the above options and provides messages accordingly. If a class (or classes) are starting/have started within your Minutes before Start and Minutes after Start window, the system will ask whether you wish to record attendance. If no classes are meeting within the time window, the system will provide the message that no classes are meeting and ask whether you wish to process the visit. This is the default option.
- Accept the default entry ("30") in the Minutes before Start field or overwrite with another value, if desired. The value you enter is the number of minutes prior to the start of an activity that messages for it will begin displaying in Visit Processing, depending on the Class Visits option you selected.
- Accept the default entry ("120") in the Minutes after Start (Never after Class/Game Ends) field or overwrite with another value, if desired. The value you enter is the number of minutes after the start of an activity that messages for it will remain displaying during Visit Processing, depending on the Class Visits option you selected. Attendance prompts for a program stop displaying upon reaching their end time regardless of whether the value in this field has been reached.
Note: Refer to the Class/Game Visits Prompt Table for a graphical representation detailing how these fields work together.
Optional Setup Steps
Classes as Buttons and Show Full Classes (Class Visits group)
- Select the Display Classes as Buttons option if you want upcoming classes to show as a clickable button when processing Visits. De-select this option to have upcoming classes display in a DataGrid.
If opting NOT to Display as Buttons, upcoming classes display in a DataGrid, if there is more than one available. If there is one only available, it displays a toggle option/question. When classes are displayed in the DataGrid, multi-selection is allowed, meaning patrons may opt to attend more the one class per visit.
If opting to Display as Buttons:- The Button will display "Attend <Class>" if the Visit being processed is for a member enrolled in the class.
- The Button will display "Drop-in to <Class>" is for a member or guest who is not enrolled in the class.
- When displaying Classes as Buttons, multi-selection is NOT allowed.
- Select the Show Full Classes option if you would like to display classes that have reached maximum attendance during Visit Processing. In this instance, "full" means that total attendance for the class has been reached (due to visits being processed) for the current day/meeting. Selecting this option is a good idea to help avoid confusion for patrons who are expecting to drop-into a class but would not see it listed in the event it became full. When this option is selected, the class will be displayed with the word "Full" next to the class description thus alerting the prospective attendee that no further openings exist for "today's" meeting.
Note: The "maximum attendance" value for any one meeting of a class is equal to the value in the Overall Max Count field for the Activity Section in question.
Determine whether to Track Capacity (Visit profile Capacity group)
- If Tracking Capacity (as discussed above), enter a value in the Visit Location Capacity field that is representative of the maximum number of patrons who can be in your facility at any given time.
- Then, expand the Drop-down list for the Warning field and determine whether you want RecTrac to provide a Warning when the capacity threshold is met or Stop the patrons from swiping in.
- Save changes and exit the Visit profile when done.
- Exit Profile maintenance.
This completes the setup steps for your Visit profile. Use the "i" and "?" Help icons for field definitions, if needed.
- IF your intention is to record attendance for paid enrollees in your programs and/or if you wish to allow non-enrollees to attend your programs on a Drop-In basis with no extra fees (while recording their participation as well), then set up is complete because you are opting NOT to associate fees with Activity Visits. Proceed to Daily Processing and Visit Reporting.
- IF you wish to charge fees, either for Drop-In visitors only, registered enrollees only or both; then continue to continue to Fees Maintenance to complete the File Maintenance Setup for Activity Visit Processing.
Visit Drop-In and Visit Registered Fees Maintenance
Complete the steps in this section only if you:
- Charge Fees for Drop-In Visits to your Activities/classes, where "Drop-In" is defined as Members or guests who have NOT ENROLLED for the program/class in which they wish to participate AND who are being charged over and above the base cost of their pass (i.e. they are being charged a "Drop-in Fee").
- Charge Fees for Members who are ENROLLED in the program/class they are attending and are being charged above and beyond the initial enrollment cost to attend class on the day they swipe into your facility (i.e. they are paying a "Registered (Member) Visit Fee").
- Both.
If you do not charge fees for Activity Visits (beyond normal Activity Enrollment, Pass Membership or Daily Pass fees), proceed to Daily Processing and Visit Reporting.
Activity Visit Fees are divided into Fee Types by the type of visit being processed: Visit Drop-In Fees and Registered (Member) Fees. Additionally, a Criterion for Pass Prerequisite must be added to each Visit Fee. Activity Visit Fees are based on Pass Code (i.e. Pass Codes are linked to the Fee), but Visit Fees are linked to the Activities to which they will apply. Where in Fee Hierarchy a Fee is linked is up to your local policy, though VSI recommends linking Fees as high as possible in the hierarchy as doing so makes managing easier/more expedient.
The number of Fees you need to create is dependent upon a number of variables. Variables include but are not limited to:
- Whether you charge visit fees for Members who are enrolled in the class.
- Whether you allow/charge Members who are NOT enrolled in the class to "drop-in."
- Whether you allow/charge Non-members (i.e. Daily Pass sales) to "drop in."
- Whether you charge different rates for different people (i.e. Member drop-in rates vs. Non-Member drop-in rates, Resident drop-in rates vs. Non-Member drop-in rates, Senior Citizen rates, etc…).
The following chart provides basic information on the number of rates needed to cover some of the scenarios listed above. This chart does not provide an inclusive solution to every rate structure. It is meant to give you a few examples of various rates you may charge. Some of these examples may not apply to your situation.
| Charge Fees For: | Rate Charged/Visit | # of Fees | Type (Criteria) |
|---|---|---|---|
| Enrolled Members | $5.00 | 1 | Visit -Registered (Member Pass Codes) |
| Enrollees/Members/Non-Members | $5.00/$5.00/$5.00 | 3 | Visit - Registered (Member Pass Codes)/Visit - Drop In (Member Pass Codes)/Visit - Drop In (Daily Pass Codes) |
| Non-enrolled Members/Non-Members | $5.00/$10.00 | 2 | Visit - Drop In (Member Pass Codes)/Visit - Drop In (Daily Pass Codes) |
| Non-enrolled Members | $5.00 | 1 | Visit - Drop In (Member Pass Codes) |
| Non-Members | $10.00 | 1 | Visit - Drop In (Daily Pass Codes) |
| Non-enrolled Resident Members and NR Members | $3.00/$5.00 | 2 | Visit - Drop In (Member Resident Pass Codes)/Visit - Drop In (Member Non-Resident Pass Codes) |
| Non-enrolled Resident Members/NR Members/Non-Members | $3.00/$5.00/10.00 | 3 | Visit - Drop In (Member Resident Pass Codes)/Visit - Drop In (Member Non-Resident Pass Codes)/Visit - Drop In (Daily Pass Codes) |
If you charge one fee only for your Activity Visit/Drop-In Fee structure, create the single fee and link it as needed.
When two (2) or more Fees are required to accommodate your Activity Visit/Drop-In Fee structure, VSI highly recommends using Fee Groups/Sets, as the "one match only" logic offered by Fee Groups allows for greater flexibility during daily processing than the "all or nothing" flexibility of individual Fees and because linking a single Fee Set is more time expedient than linking multiple individual fees.
Note: There are hundreds of scenarios with regard to how Visit Fees can be charged and to whom they will apply. As a result, there are hundreds of ways to establish fees, Fee Groups, and Fee Sets to accommodate your structure. This document does not attempt to discuss every nuance. For purposes of example, this section of the document assumes the following:
- Activity = Writer's Workshop and all its Sections
- Fees charged to:
- Enrolled Members - $2.00
- Non-Enrolled Members - $4.00
- Non-Members/Daily Pass - $10.00
The setup steps required to establish this fee structure will be discussed. VSI realizes this may not mirror your structure; however, the basic information is consistent. VSI encourages you to read the entire document and use the portions that apply to you.
Drop-In Fees for Members Not Enrolled in a Program
This section will walk you through the process of creating a Drop-In Fee that can be charged to Pass-holding Members who are not enrolled into the Activity they will be visiting but who will be charged an extra fee (above and beyond the original price of their pass) at check-in/swipe-in for attending the class.
When creating a "Drop-In" Fee that will be charged to Members NOT enrolled your Fee Type will be Visit - Drop In and your Transaction Type will be Visit.
Note: When working with Fee Sets, VSI advises you to create the Set first and then add the individual Fees to it. Current processing limitations do not allow for the linking of existing Fees to a newly created Fee Set. In other words, you cannot create the Fees first and then put them into a Set. You need to create the Set first and then add Fees to it.
- In RecTrac, go to Management Ribbon • System Management • Fee/Rule/Question Management Group … Set Management. You will continue to the Set Maintenance DataGrid.
- Click Add. You will continue to the Set Update Core Settings screen.
- Enter a Description for your Activity Drop-In Fee Set.
- Expand the Drop-down list for Record Type and choose Fee Set.
- Apply Permissions as needed and ensure the Active option is selected. A blank DataGrid will appear.
- Click Add Fee. The Fee Details screen will open.
Note: Fee Default Record Permissions determine whether or not you receive a Default Record Add pop-up message upon clicking Add Fee.
If you receive the pop-up message, you have Permissions to add "Regular" Fee Records and Default Fee Records to your database. Expand the Drop-down list and make your selection:
- If you have a Default Fee(s) established in your database, you may opt to use it, if desired.
- If you do NOT have a Default Fee(s) established in your database, VSI recommends choosing --New Blank Record-- as that option will create a new Fee.
If you do NOT receive the pop-up, you do NOT have Permissions to add Default Fee Records to your database. You will be adding a new Fee Record only.
Fee Default Record Permissions are maintained on your Permissons profile • Default Record Permissions group. Default Fees are maintained in Fee Management.

- Enter a Fee Description, the Amount you wish to charge, and a Revenue GL Code.
Note: If you charge one flat rate amount only for Drop-ins, you need one (1) Fee only. If the rate you charge varies, multiple Fees will be required to account for the different rates you will charge.
- Expand the Drop-down list for Fee Type and select Visit - Drop In. Selecting this Fee Type tells the system to charge Drop-In fees for people who are not Registered/Enrolled in the program to which this fee will be linked.
- Click the Combo Box icon for Transaction Type and click the Uncheck All option.
- THEN select Visit and close the Combo Box. This tells the system to charge the Fee only for Pass Visits.
The Transaction Type field should read, "(1) Visit" when done. - Fill in the other fields as needed. Use the "i" and "?" Help icons for field definitions, if needed.
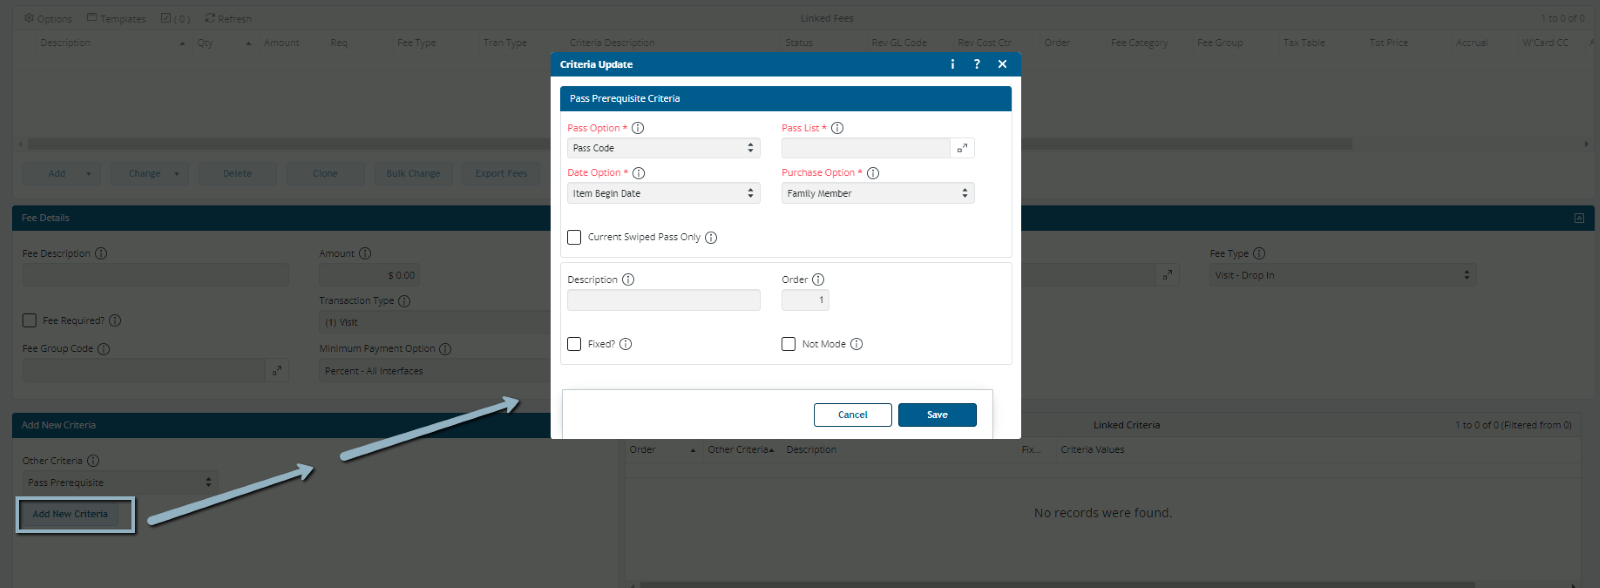
- When ready, expand the Drop-down list for Criteria and select Pass Prerequisite.
- Click Add New Criteria.

- Expand the Drop-down list for Pass Option and make a selection. For purposes of this example, the selection is Pass Code. Your options are:
- Pass Code - The criterion will be to match one or more of the Pass Codes you enter in the Pass List field.
- Pass Category - The criterion will be to match one or more of the Pass Categories you enter in the Pass Category field.
- Pass Code - The criterion will be to match one or more of the Pass Codes you enter in the Pass Code field.
- Expand the Drop-down list for Passes/Pass Codes/Categories(the field label is dependent upon your Pass Option) and select the Pass(es), Pass Code(s) or Pass Categories that you wish to subject to this fee. For purposes of this example, the choice is a Resident Annual Pass (BCAAR) and a Non-Resident Annual Pass (BCAAN).
- IF You are setting up Drop-In Fees for Members (i.e. patrons who have a pass but who are NOT enrolled), the choices you make here should be inclusive of the passes that your Members will hold, either by Pass, Pass Code, or Category.
- Expand the Drop-down list for Date Option and select Transaction Date.
- Expand the Drop-down list for Match Option and select Family Member.
- Enable the option for Current Swiped Pass Only.
- Click the Save button that appears immediately below the Criteria Type field.
Determine Whether to Add Additional Fees
The steps above provide the minimum guidance needed to add a single Drop-In Fee for a single segment of the overall demographic in your department: Pass-holding members who are NOT enrolled into the activty they wish to attend. Whether you need to add additional Fees to your Set is dependent upon how many Fees/Rates you have for "drop-ins" and to whom they apply. Refer to the following examples for guidance and add more Fees to your Set if applicable.
IF you have one fee only for one segment of your demographic, you can click Save at the bottom of the screen because you are done. You can then Link this Fee Set within your Activity hierarchy so it will go into effect.
- For Example: You charge the same Drop-In rate for all members regardless of their pass code, residency status, etc…. In this event, you are done because one (1) fee only is needed.
IF you have multiple fees for different segments of your demographic, click Add Fee and repeat Steps 6-19 above. Fee Sets can contain multiple fees. A patron needs to match only one (1) Fee within the Set to be charged.
- Example 1: You charge a $4.00 Drop-In fee for Resident members and a $6.00 Drop-In Fee for Non-Resident Members. In this event, you would need to add Resident Criteria to the first fee you created and then create a second fee for Non-Residents with applicable criteria.
- Example 2: You charge Drop-In Visit Fees to Members and to Non-Members (Daily Passes). In this event, you would need to add an additional fee for Daily Pass Visits. See below.
- Example 3: You do both. In this event, you would need at least two (2) additional Fees: one for the Non-Residents (Steps 6-19 above with an additional Criteria for residency) and one for the Non-Members. See below.
Once you have added all necessary Fees to your Fee Set, you can Link the Fee Set within your Activity hierarchy so it will go into effect.
Drop-In Fees for Daily Pass Visits
This section will walk you through the process of creating a Drop-In Fee that can be charged to Non-Members who must purchase a Daily Pass in order to drop-in to an Activity.
Important Note: Programming for Visit Fees for Daily Pass codes remains under construction. Current processing limitations result in Fees that are charged on an "all or nothing" basis for Daily Pass codes. At present, your options are:
- Create a Drop-in Fee using no Criteria. This fee will apply to all Daily Pass codes and will ensure any non-pass holder gets charged a Drop-In fee, if you opt to "drop-in" to an activity. However, Members will be charged the Drop-In Fee as well. If you charge different rates for Non-enrolled Members vs. Daily Pass holders, the Daily Drop-In Fee will be added to the Member Drop-In Fee because Fees with no criteria are applied to everyone.
- Create a Drop-In Fee using the same criteria discussed above. Use Advanced Fee Add when creating the Fee and enable Not Mode when adding the Pass Prerequisite Criteria. This will ensure that your Daily passes are charged the Drop-In fee you desire for Daily Passes and Members will be charged the Member rate. (Basically, Not Mode will ensure that the rate you enter is charged to every Pass NOT listed in the criterion.) This fee will apply to all Daily Pass codes (as well as any other passes you omit from the criterion) and will be charged as desired if you opt to "drop-in" to an activity.
In either event, VSI advises linking the Daily Drop-in fee to Fee Group and enabling the Fee Prompt option. This will allow you to choose the Fee you wish to charge.
This section will be revisited when programming for Daily Drop-In Fees is completed.
Visit Fees for Members Enrolled in a Program
This section will walk you through the process of creating a Visit Fee that can be charged to patrons who have enrolled in the class they are attending. In this instance, patrons are on the class roster and you are opting to charge a Visit Fee above and beyond whatever enrollment fee you charged for the program.
When creating a Visit Fee that will be charged to Members who are enrolled in the class they are attending (i.e. they are on the roster), your Fee Type will be Visit - Registered and your Transaction Type will be Visit. Visit - Registered Fees are just like Visit - Drop-In Fees with the exception of the Fee Type.
Note: The following steps provide, basically, the same information as outlined in Drop-In Fees for Members above.
- IF you created a Fee Set for Drop-Ins, you can Add Visit - Registered Fees to it in the event you also charge Visit Fees for enrolled members. You do not need to make a new Fee Set for this purpose. Return to your original Fee Set and add new Visit-Registered fees as needed. Begin with Step 6 below and ensure the Fee Type for Visit Fees is Visit - Registered.
- IF you have NOT created a Fee Set but rather charge Visit Fees for enrolled members only (i.e. you do NOT allow and/or do NOT charge any Drop-In fees for Members/Non-Members), begin with Step 1 below.
- In RecTrac, go to Management Ribbon • System Management • Fee/Rule/Question Management Group … Set Management. You will continue to the Set Maintenance DataGrid.
- Click Add. You will continue to the Set Update Core Settings screen.
- Enter a Description for your Activity Visit Fee Set.
- Expand the Drop-down list for Record Type and choose Fee Set.
- Apply Permissions as needed and ensure the Active option is selected. A blank DataGrid will appear.
- Click Add Fee. The Fee Details screen will open.
Note: Fee Default Record Permissions determine whether or not you receive a Default Record Add pop-up message upon clicking Add Fee.
If you receive the pop-up message, you have Permissions to add "Regular" Fee Records and Default Fee Records to your database. Expand the Drop-down list and make your selection:
- If you have a Default Fee(s) established in your database, you may opt to use it, if desired.
- If you do NOT have a Default Fee(s) established in your database, VSI recommends choosing --New Blank Record-- as that option will create a new Fee.
If you do NOT receive the pop-up, you do NOT have Permissions to add Default Fee Records to your database. You will be adding a new Fee Record only.
Fee Default Record Permissions are maintained on your Permissions profile • Default Record Permissions group. Default Fees are maintained in Fee Management.

- Enter a Fee Description, the Amount you wish to charge, and a Revenue GL Code.
Note: If you charge one flat rate amount only for Drop-ins, you need one (1) Fee only. If the rate you charge varies, you multiple Fees will be required to account for the different rates you will charge.
- Expand the Drop-down list for Fee Type and select Visit - Registered. Selecting this Fee Type tells the system to charge Visit fees for people who are enrolled (i.e. on the roster) in the program to which this fee will be linked.
- Click the Combo Box icon for Transaction Type and click the Uncheck All option.
- THEN select Visit and close the Combo Box. This tells the system to charge the Fee only for Pass Visits.
The Transaction Type field should read, "(1) Visit" when done. - Fill in the other fields as needed. Use the "i" and "?" Help icons
 on the upper-right hand corner of the screen for field definitions, if needed.
 - When ready, expand the Drop-down list for Criteria and select Pass Prerequisite.
- Click Add New Criteria.
- Expand the Drop-down list for Pass Option and make a selection. For purposes of this example, the selection is Pass Code. Your options are:
- Pass Code - The criterion will be to match one or more of the Pass Codes you enter in the Pass List field.
- Pass Category - The criterion will be to match one or more of the Pass Categories you enter in the Pass Category field.
- Pass Code - The criterion will be to match one or more of the Pass Codes you enter in the Pass Code field.
- Expand the Drop-down list for Passes/Pass Codes/Categories (the field label is dependent upon your Pass Option) and select the Pass(es), Pass Code(s) or Pass Categories that you wish to subject to this fee. For purposes of this example, the choice is a Resident Annual Pass (BCAAR) and a Non-Resident Annual Pass (BCAAN). The choice you make here should be inclusive of the passes that your Members will hold, either by Pass, Pass Code, or Category.
- Expand the Drop-down list for Date Option and select Transaction Date.
- Expand the Drop-down list for Match Option and select Family Member
- Enable the option for Current Swiped Pass Only.
- Click the Save button that appears immediately below the Criteria Type field.
Determine Whether to Add Additional Fees
The steps above provide the minimum guidance needed to add a single Visit Fee for single segment (All Enrolled Members in a Program) of the overall demographic in your department using. Whether you need to add additional Fees to your Set is dependent upon how many Fees/Rates you have for "drop-ins" and to whom they apply. Refer to the examples in Drop-In Fees for Members not Enrolled in a Program above for guidance and add more Fees to your Set if applicable.
Linking Your Fee Set
Fee Sets must be linked in some manner to the Activity for which you wish to charge for Visit and/or Drop-In. Where a Fee Set is linked determines what it will impact.
The following chart displays where you can link a Fee Set to the Activity Module and what impact it will have.
| Fee Set Linked | Fee Applies To |
|---|---|
| To the Activity Module | All Activities and their Sections in your database |
| To an Activity | All Sections in the Activity to which the Fee Set is linked |
| To an Activity Section | That Section only |
| To an Activity Category | All Activities in your database to which that Category System Code is linked |
| To an Activity Type | All Activities in your database to which that Type System Code is linked |
| To an Activity SubType | All Activities in your database to which that SubType System Code is linked |
| To a Season | All Activities in your database to which that Season System Code is linked regardless of Year |
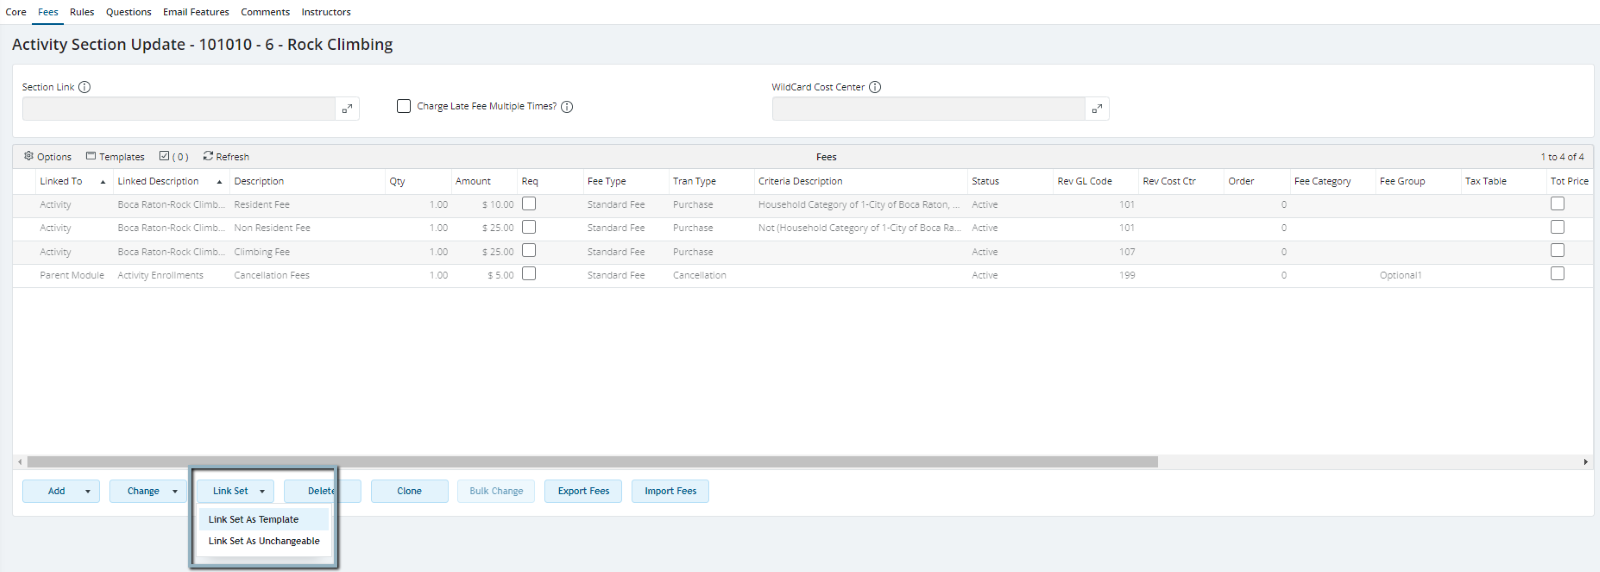
When linking your Fee Set, determine whether you wish to link it as a Set or as a Template. The choice you make determines how updates to the fees linked within the Set are managed.
-
Fee Set Linked as a Set - Changes to Fees must be done in Set Management. Changes take effect immediately and changes are populated to ALL items where the Fee Set is linked. This is a good option if you charge the same rates for multiple items.
For Example: You offer a number of Yoga classes (Activity Type=YOGA) and a number of Spinning classes (Activity Type=SPIN). You allow Daily Pass Drop-ins and Non-Enrolled Member Drop-ins for both and you charge the exact same amount for drop-ins for each. Linking a Fee Set as a Set to both Activity Type Codes would result in all classes linked to those System Codes using the exact same fees/fee structure. Any change to any fee within the Set would take effect immediately for all Yoga and Spinning classes, so if you raised your rates for the coming year, you would have to update Fees in one Fee Set only and all classes would be impacted. -
Fee Set Linked as a Set Template - Changes to Fees can be done in the Template where it is linked. Changes take effect immediately and changes are populated only to the Template that you modified. This is a good option if you use the same fee structure for multiple items but charge different rates.
For Example: You offer a number of Yoga classes (Activity Type=YOGA) and a number of Spinning classes (Activity Type=SPIN). You allow Daily Pass Drop-ins and Non-Enrolled Member Drop-ins for both but you charge different rates for Yoga vs. Spinning. Linking a Fee Set as a Template to both Activity Type Codes would result in all classes linked to those System Codes using the same fees/fee structure. You build the Set once but make changes to the Activity Type Code where it is linked. Any change to any fee within the Template would take effect immediately for all classes linked to that Template only, so if you raised your rates for Spinning for the coming year, (but not Yoga),changes would take effect immediately for the Spinning classes only. Yoga would not be impacted.
For purposes of example, the Fee Set created above will be linked as a Set to the Writer's Workshop Activity at the Activity Level. Your choices, such as where you choose to link Fees/Fee Sets and whether you choose to link your Fee Set as a Set or a Template may vary.
To Link a Fee Set at the Activity Level
- In RecTrac, go to Management Ribbon • Activity Management • Activity Management Programs Group • Activity Management. You will continue to the Activity Management DataGrid.
- Highlight/select the Activity to which you wish to link your Visit/Drop-In Fee Set and click Change.
- Click the Fees tab. Any Fees you charge for enrollment into this program will be displayed in the Fees DataGrid.
- Click Link Set. The Set Maintenance - Fee Set screen will open.
- Highlight/select the Fee Set you wish to link and click Create Set Link.
- You will be returned to your Activity Fees DataGrid and the Fee Set you linked will be on it. Depending on the number of other fees you have linked, you may have to scroll to see it.
- Click Save at the bottom of the DataGrid. You will be returned to the Activity Management DataGrid.
- Repeat these steps, as needed, to link this or other Fee Sets to other Activities or exit the Activity Management DataGrid.
Note: If you use the same Visit/Drop-In Fee Set for multiple Activities, consider linking the Set at a level of hierarchy other than the Activity Level, such as Type or Category. VSI recommends linking Fees as high as possible in the hierarchy as doing so makes managing easier/more expedient.
Daily Processing and Visit Reporting
Processing Visits
The following section offers screen shots and basic information regarding Activity Visit processing.
Note: The following images assume the following:
-
Visit profile is set to:
- Visit Process Option = Attended.
-
Visit Purpose Listcontains six (6) options:
- Aerobics, Pool, Gym, Sauna, Weight Room, and Attending a Class.
- Require Visit Purpose = Yes.
- Allow Multiple Visit Purposes = No.
- Class Visits = Both.
- Auto Complete = Yes.
- Allow Class Drop Ins with Daily Visits = Yes.
- Display Classes as Buttons = No.
- Show Full Classes = Yes.
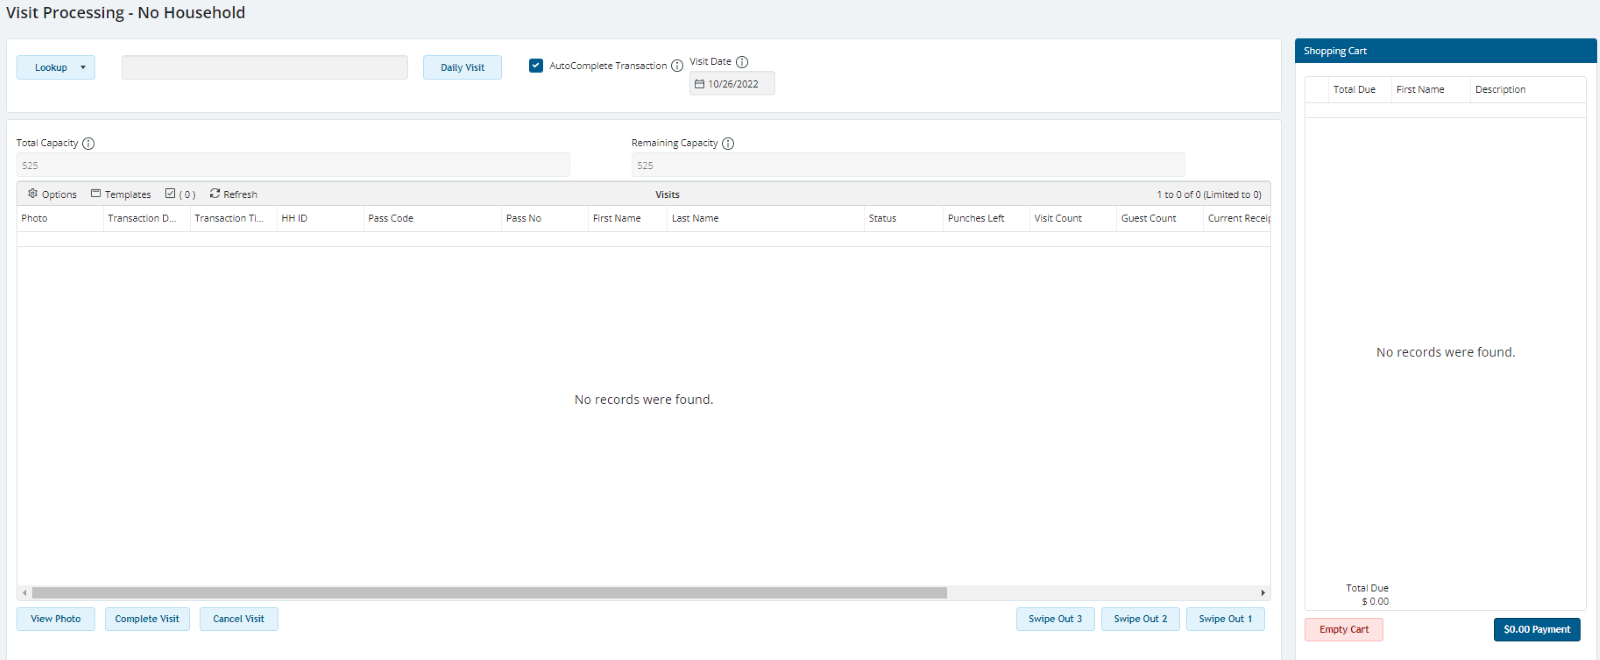
Processing Ribbon • Pass Visit Processing • Pass Visit Processing Screen
Upon swipe-in, patrons will be asked whether they wish to record an attendance visit with their swipe. If only one potential class exists, it will be a yes/no question.

Attend Activity Prompt with One Activity Only on Offer
If multiple options exist, the patron will be presented with a DataGrid. The system will tell you whether the patron is enrolled in any of the programs on offer.

Attend Activity Prompt with Multiple Activities on Offer
If no programs are meeting within your Visit Prompt Time (as determined on your Visit profile), the system will provide a message.

Notify if No Class Message
In the event one (1) program only is available for Drop-in and that enrollment is full, the patron will receive a message indicating enrollment criteria are not met.

Full Class Message
In the event multiple programs are available for Drop-in and the enrollment for one or both is full, the browser will provide indication.

Program Selection DataGrid Showing Full Enrollment
Visit Reporting
Activity Visit Report
The Activity Visit Report allows you to report on Drop-Ins and regular enrollee attendance.
- In RecTrac, to go Reporting Ribbon • All Reports • Activity Visit Report.
- Make selections as necessary and click Process
- Select your Output option.
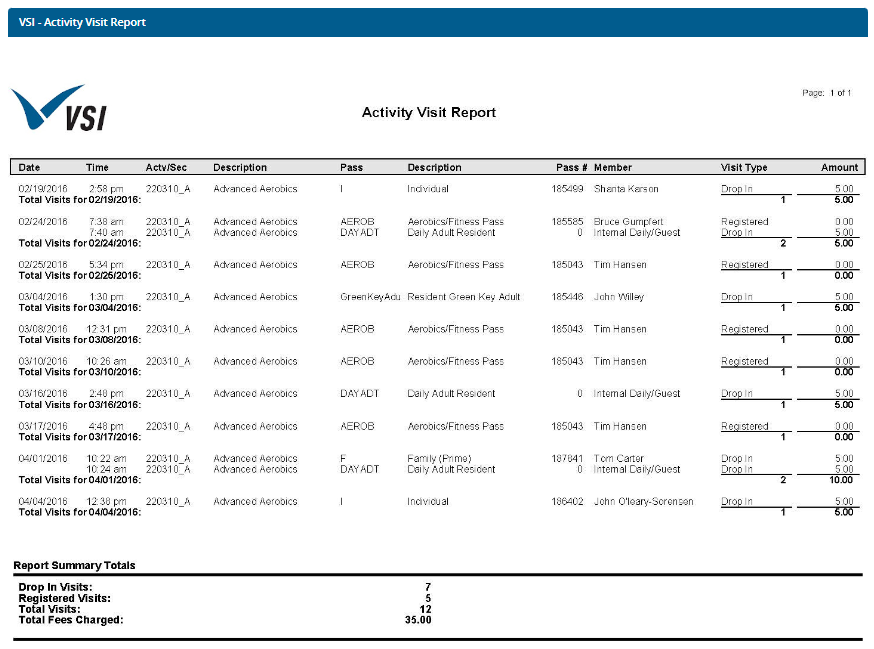
Activity Visit Report
Activity Visit Inquiry
The Activity Visit Inquiry lists all enrollees and drop-ins in a selected Activity Section and displays their swipe status for the date range selected.
- In RecTrac, to go Inquiry Ribbon • Section Inquiry.
- Filter the DataGrid to find the Activity Section you wish to view.
- When ready, click Visits.
- Filter the DataGrid as desired to increase/decrease the number of visits you can see.
- Click Back when done and repeat as necessary for other sections.

Activity Visit Inquiry