Code Conversion Multiple Records Import File
RecTrac 3.1

Written by Daniel Rotondi
Updated at September 15th, 2023
Table of Contents
The Code Conversion program allows you to convert various codes in RecTrac, such as Activity Codes, Pass Codes, GL Codes, Payment Codes, etc. The program converts Codes only; it does not convert descriptions. It converts the code on the table from which it is called and updates the code anywhere it is linked.
Choose a File Type and Delimiter
The import file can be a comma-separated value (.csv) or a text (.txt) file.
- .csv File – If using a .csv file, your delimiter will be comma ( , ) by default. You can change this, if desired, in your spreadsheet program.
- .txt File - If using a .txt file, your delimiter options are comma ( , ), pipe ( | ), space, or tab.
Note: If using a .txt file, be certain to insert a carriage return after the last line of your file.
Create the Import File
The import file you create is based on the file structure of a single record for the Code Type you wish to convert. Most Code types contain two (2) fields only. However, some Code types contain multiple fields. For Example: If the Code Type you are converting has two (2) fields, then your import file will have two columns. If your Code Type has four (4) fields, then your import file will have four columns, etc.
- Go to the Code Conversion program.
- Select "Single Record" as your Conversion Option and then select your Code Type. For Example: "Activity."

- Open the program with which you will create your import file.
- The import file will contain as many columns as there are fields on the screen. Using "Activity" as the example Code Type, your import file will contain two (2) columns. DO NOT USE COLUMN HEADERS.
- Enter your codes exactly as they appear on the screen in RecTrac. For Example, if you are converting an "Activity" Code Type, then you enter the "old" (existing) Code in the left-hand column. Then you would use your delimiter and enter the new Code in the right-hand column.
For best results, select an existing Code as if you were going to convert it. Note how the information is displayed on the screen, then enter Codes in your import file and make them match the layout.
Notes: If using a .csv file type, you do not need to enter a delimiter, as your spreadsheet program will supply them automatically. Delimiters are needed only if your file type is .txt.
If using a .txt file, remember to insert a carriage return after the last entry. Here is an example showing a spreadsheet, where column A shows the "old" Activity Codes and column B shows the "new" ones.

- Repeat Step 5 until you have entered all the Codes that you wish to convert.
- Save the file to a local directory and proceed to Run the Code Conversion Program for Multiple Records.
Facility Code Conversion
When using the Multiple Record Conversion Option with Facility Codes, make sure your import file contains the proper formatting for your "old/existing" Facility Combo Key. The steps are similar to those outlined above.
- Go to the Code Conversion program.
- Select "Single Record" as your Conversion Option and then select "Facility" as your Code Type.
- Select a Facility. Note how the Combo Key is displayed.

- Open the program with which you will create your import file.
- The import file for a multiple record Facility Code conversion will contain four (4) columns. DO NOT USE COLUMN HEADERS.
- Enter your codes exactly as they appear on the screen in RecTrac.
- The first column will contain your "old/existing" Facility Combo Key, complete with underscores.
- The second column will contain your New Facility Class. You can keep the existing Code or enter a new one.
- The third column will contain your New Facility Location. You can keep the existing Code or enter a new one.
- The fourth column will contain your New Facility Code. Here is an example using a comma-delimited .txt file, where the Facility Location and Facility Code are changing. Note the carriage return at the end.

- Enter all the Codes you wish to convert.
Notes: If using a .csv file type, you do not need to enter a delimiter. Delimiters are needed only if your file type is .txt.
If using a .txt file, remember to insert a carriage return after the last entry.
- Save the file to a local directory and proceed to Run the Code Conversion Program for Multiple Records.
System Code Conversion
When using the Multiple Record Conversion Option with System Codes, make sure your import file contains the proper formatting for your "old/existing" code. The steps are similar to those outlined above.
- Go to the Code Conversion program.
- Select "Single Record" as your Conversion Option and then select "System Code" as your Code Type.
- Select a System Code Record Type and an Old System Code.
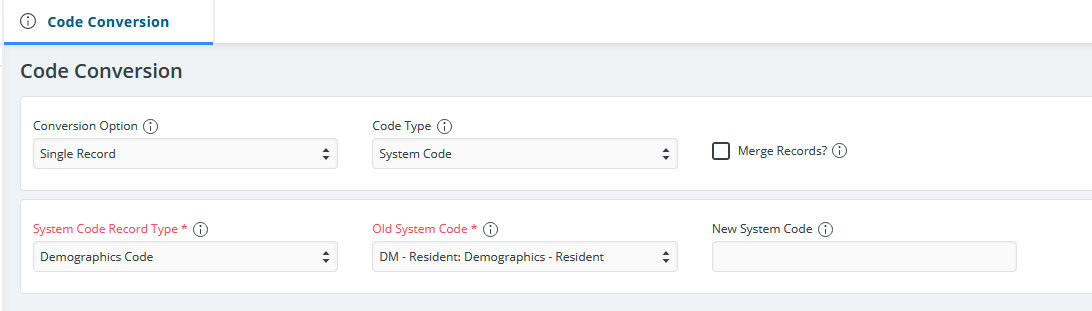
- Open the program with which you will create your import file.
- The import file for a multiple record Facility Code conversion will contain three (3) columns. DO NOT USE COLUMN HEADERS.
- Enter your codes exactly as they appear on the screen in RecTrac.
- The first column will contain your "old/existing" System Code Record Type,
- The second column will contain your "old/existing" System Code.
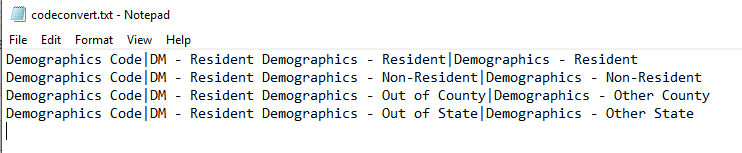
- The third column will contain your New System Code. Here is an example using a pipe-delimited .txt file.
- Enter all the Codes you wish to convert.
Notes: If using a .csv file type, you do not need to enter a delimiter. Delimiters are needed only if your file type is .txt.
If using a .txt file, remember to insert a carriage return after the last entry.
- Save the file to a local directory and proceed to Run the Code Conversion Program for Multiple Records.
Trip Code Conversion
When using the Multiple Record Conversion Option with Trip Codes, make sure your import file contains the proper formatting for your Date and Time fields.
- In RecTrac, go to the Code Conversion program.
- Select "Single Record" as your Conversion Option and then select "Trip" as your Code Type.
- Click the Picklist icon and select a Trip. Note how the Date and Time fields are displayed.
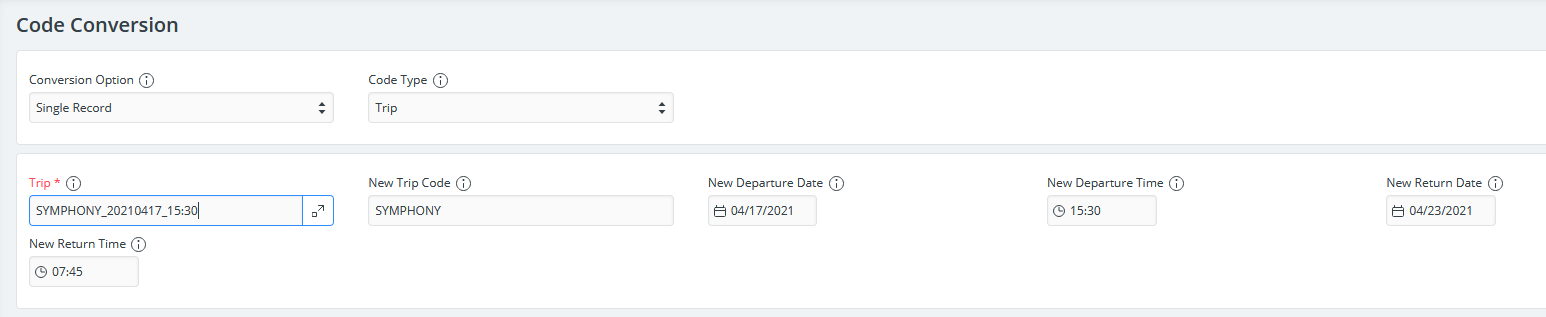
- Open the program with which you will create your import file.
- The import file for a multiple record Trip Code conversion will contain six (6) columns. DO NOT USE COLUMN HEADERS
- Enter your codes exactly as they appear on the screen in RecTrac.
- The first column will contain your "old/existing" Trip Combo Key, complete with underscores.
- The second column will contain your New Trip. You can keep the existing Code or enter a new one.
- The third column will contain your New Departure Date. You can keep the existing date or enter a new one. When adding the date to your import file, make sure it is formatted exactly as it appears on screen, complete with slashes.
- The fourth column will contain your New Departure Time. You can keep the existing time or enter a new one. When adding the time to your import file, make sure it is formatted exactly as it appears on screen, complete with "A" and/or "P" as applicable.
- The fifth column will contain your New Return Date. You can keep the existing date or enter a new one. When adding the date to your import file, make sure it is formatted exactly as it appears on screen, complete with slashes.
- The sixth column will contain your New Return Time. You can keep the existing time or enter a new one. When adding the time to your import file, make sure it is formatted exactly as it appears on screen, complete with "A" and/or "P" as applicable. Here is an example using a spreadsheet where all options change.

- Enter all the Codes you wish to convert.
Notes: If using a .csv file type, you do not need to enter a delimiter. Delimiters are needed only if your file type is .txt.
If using a .txt file, remember to insert a carriage return after the last entry.
- Save the file to a local directory and proceed to Run the Code Conversion Program for Multiple Records.
Code Types with (Optional) Fields
"Activity Section" and "League" Code Types contain (Optional) fields. Optional fields are just that. You can leave them blank and have the system use the existing entries OR you can fill them in with new values and have the system overwrite the existing entries.
When using the Multiple Record Conversion Option with Activity Section or League Codes, make sure your import file contains the proper formatting and account for the (Optional) fields, as needed.
- In RecTrac, go to the Code Conversion program.
- Select "Single Record" as your Conversion Option and then select "Activity Section" or "League" as your Code Type. This document uses "Activity Section" as the example.
- Select an Activity Section. Note how the New Season (Optional) and New Year (Optional) fields display.

- Open the program with which you will create your import file.
- The import file for a multiple record Activity Code conversion will contain at least three (3) and up to five (5) columns. DO NOT USE COLUMN HEADERS
- Enter your codes exactly as they appear on the screen in RecTrac.
- The first column will contain your "old/existing" Activity/Section Code, along with an underscore.
- The second column will contain your New Activity. You can keep the existing Code or enter a new one.
- The third column will contain your New Section.
- The fourth column is for Season and it is (Optional). You may leave this field blank to use the existing Season Code, OR you may enter a New Season.
- The fifth column is for Year and it is (Optional). You may leave this field blank to use the existing Year, OR you may enter a New Year.
Notes: You can mix and match with optional fields, if desired. For Example: When converting Activity Sections for Activity 900100, you might want to convert the season and year, but when converting Activity Sections for Activity 900500, you might want to convert the Section only and leave the existing season and year. In this event, your import file would have some lines that contain five (5) entries and others that contain only three (3). The system will allow this. Here is an example using new sections, a new season, and year.

- Enter all the Codes you wish to convert.
Notes: If using a .csv file type, you do not need to enter a delimiter. Delimiters are needed only if your file type is .txt.
If using a .txt file, remember to insert a carriage return after the last entry.
- Save the file to a local directory and proceed to Run the Code Conversion Program for Multiple Records.
Run the Code Conversion Program for Multiple Records
- Select "Multiple Records" as your Conversion Option.
- Select a Code Type.
- Determine whether you wish to Merge Records when applicable. Use the "i" Help as needed for definitions.
- Browse to and select your import file. The import file must be a .csv or a .txt file.
- Accept the default entry in the File Delimiter field ("Comma") or make an alternate selection, if needed.
Note: By default, when saving a .csv file in Excel, each column will be separated by a comma – hence the name "Comma Separated Value." Therefore, a selection other than "Comma" is needed only if you change the default delimiter in Excel or if you are using a .txt file type and then only if the delimiter being used in your .txt file is other than a comma.
- Click Process when ready. The system will present an Information message detailing the changes that will be made.
Note: Your import file must be error-free in order to run the Code Conversion for multiple records. The system runs a check on your import file prior to running the conversion. If an error is found, the process will be stopped and no codes will be converted. A dialog box will appear that lists up to 10 error messages.
- Click Continue to complete the Conversion. The system will notify you when the process is complete.