Topic Doc: Graphical Email Templates
RecTrac 3.1

Written by Seth Warren
Updated at October 17th, 2023
Table of Contents
Document Summary
Graphical Email Templates are a free feature of RecTrac 3.1 that provide you with an HTML-based "shell" which allows you to deliver professional-grade emails to your patrons for various purposes, such as promoting upcoming events and registration periods, emailing receipts, sending reminders, etc. Text and images are easily updateable. The templates are maintained in Email Template Comment Codes that can be linked to "purpose-specific" fields on your Email profile and on any RecConnect Results screen. Graphical emails are delivered to your customers when you email receipts or by using a RecConnect program for email blasts that target certain audiences and demographics.
The templates provide a solution for you that spotlights your upcoming events and registrations through customizable text, graphics, and links to URLs such as your registration pages in WebTrac, your department's home page, or any other valid location.
Currently, Vermont Systems has four (4) templates available, all developed with responsive design, so your patrons can receive and read the emails you generate from RecTrac on any Smartphone, tablet or computer.

License – Maintenance Agreement
Graphical Email Templates are a free feature in RecTrac 3.1. Use of the interface requires a Vermont Systems license and annual maintenance agreement for RecTrac and the component modules discussed in this document. Prior to implementing any process outlined in this document, please contact the Vermont Systems Sales Department at 1-877-883-8757 to verify that you are authorized to use the modules discussed in this document and if not, to obtain a quote and/or approval.
Setup Steps
This document provides the basic File Maintenance steps required to:
- Download the Graphical Email Templates from the Vermont Systems sFTP site.
- Update text and images within the Template you select
- Copy the Template HTML to an Email Template Comment Code. You can make as many Email Template Comment Codes as needed.
- Link Email Template Comment Codes to "purpose-specific" fields on your Email profile.
- If running a RecConnect program, update the {PROGRAM_GENERATED_EMAIL} portion of the Template from the RecConnect Results screen.
- Process your RecConnect and/or process transactions in RecTrac as you normally would. Graphical emails can be used for receipts, processing RecConnect, or running reports.
If you have additional questions about Graphical Email Templates setup and processing after reading this document, please contact Vermont Systems Customer Service by phone at 877-883-8757 or generate a Support Case through the Customer portal of the Vermont Systems web site using your Customer ID and password.
Before You Proceed
This document is written with the following assumptions. If any of the items listed below is NOT true, contact Vermont Systems Support prior to continuing, as the steps in this document may prove difficult to complete, and unexpected results may occur.
- Your organization is running RecTrac 3.1.07.00 or greater.
- You understand Comment Code Management and can make and edit Comment Codes in RecTrac.
- You understand the RecTrac profile hierarchy and can edit Email profiles.
- You understand how RecConnect programs work and can run a RecConnect report with output to email and achieve the expected results.
- You have access to a forward-facing server (such as your WebTrac server) and can copy and paste files to it.
Note for Vermont Systems Fully Hosted and Vermont Systems WebTrac Only Hosted Customers: Vermont Systems maintains your forward-facing WebTrac server. Any files you wish to store on your forward-facing WebTrac Server must be sent to Vermont Systems. Contact the Vermont Systems Hosted Team to arrange this.
- You have a basic understanding of HTML and can navigate a .html file, either using an HTML editor (strongly recommended) or using another program, such as WordPad or Notepad.
- This document does not provide instructions for HTML beyond the minimum requirements necessary to update text and images on the stock Template of your choice in order to change the Vermont Systems defaults to your custom needs.
Recommendations
When working with Graphical Email Templates, Vermont Systems recommends the following:
- Upon selecting a Template, save it to a directory on your WebTrac Server and make a copy. Update the copy. Do not update the original. This will allow you to easily reset the Template to its defaults in the event you need to "start over."
- Use an HTML editor to open, update, and preview your Templates. While HTML can be created and edited using other applications, such as WordPad and Notepad, they do not offer the features or flexibility of an actual HTML editing application.
- A good list of free HTML Editors can be found here.
- Create a new directory on your forward-facing server to store the images you want to use in your email.
Note for Vermont Systems Fully Hosted and Vermont Systems WebTrac Only Hosted Customers: Vermont Systems maintains your forward-facing WebTrac server. Any files you wish to store on your forward-facing WebTrac Server must be sent to Vermont Systems. Contact the Vermont Systems Hosted Team to arrange this.
- Give your images unique names. Avoid using spaces in the file name.
- Pre-size your images to the dimensions provided in the Template or to a direct proportion thereof. When sized proportionately, your images will not lose aspect ratio and appear skewed when displayed in the email.
- Create a new Email Template Comment Code for each Template you wish to use. Having a separate Comment Code for your different Templates will make it easier for you to remain organized.
- Link those Comment Codes to the field on the Email profile that corresponds to the Comment Code's purpose.
- When you've completed the edits to your Template and Email profile, process a transaction and run a RecConnect report. Send the emails to yourself before processing customer receipts or running a mass email.
- Proofread the emails for accuracy and ensure your images and text look as expected.
- Open the emails using different platforms, such as Outlook and your smartphone. Vermont Systems' Graphical Email Templates use responsive design so should look "good" regardless of the email platform being used by your customers.
File Maintenance Setup
Select a Template
Graphical Email Templates are a free feature of RecTrac 3.1. Vermont Systems currently offers four (4) Templates from which to choose. You may download any or all of the Templates and update them as needed to fit the needs of your department. Sample Templates appear below. When viewing the samples, keep in mind that the entire Template is updateable.
| Template 1 Sample | Template 2 Sample | Template 3 Sample | Template 4 Sample |
Note: The downloadable Templates use "placeholder images" that you will replace with your own images. The images that appear in the Template Samples are property of Vermont Systems, Inc. and may not be re-used.
How to Use the Templates
Any of the four (4) current templates can be used for multiple purposes, such as sending receipt emails following a transaction or contact/marketing emails using a RecConnect program. However, you may find it beneficial to use a particular Email Template for receipts, and a different Template for certain RecConnect emails where you are marketing your programs or memberships. For Example: Template 1 could accompany the receipt following a transaction where you choose to send the patron an email. You may feel Template 2 is most appropriate for a RecConnect email blast where you are reminding your patrons of an upcoming program for which they are registered.
Recommended: If you decide to use more than one Template, then Vermont Systems recommends creating a separate Email Template Comment Code for each Template. For Example: You might decide to use Template 1 for your Receipts and Template 2 for your RecConnect email blasts. In this instance, Vermont Systems recommends that you link the Comment Code for Template 1 to the Receipt HTML Email Template field on your Email profile; you would also link the Comment Code for Template 3 to the RecConnect HTML Email Template field.
Download Your Template(s)
Graphical Email Templates are stored on the Vermont Systems FTP Site. Graphical Email Templates are a free feature in RecTrac 3.1; the Templates may be downloaded multiple times, if needed.
- Open an sFTP client such as FileZilla or WinSCP
- Enter the login credentials for the FTP site.
- Refer to the Vermont Systems Support Portal or contact Vermont Systems Support for the current login credentials.
- Passwords are case-sensitive.
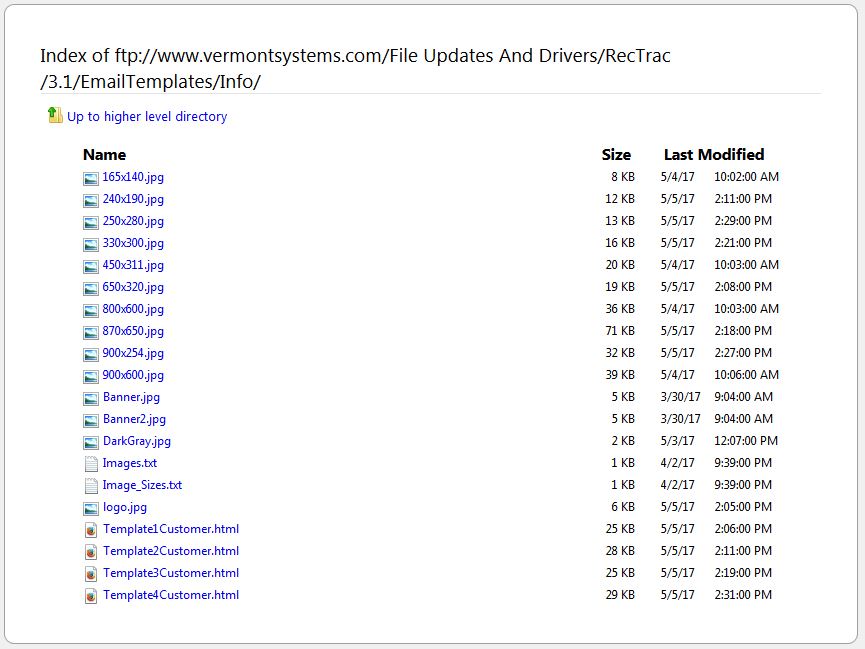
- Once you're logged in, browse to /File Updates And Drivers/RecTrac/3.1/EmailTemplates/
- Download the entire Info directory. This directory contains all four (4) Email Templates and placeholder images. Download this to a directory that is accessible to you, on your WebTrac Server. Depending on your web browser, your download options will vary.
- Note: the naming convention where "Customer" is appended to the Template number. For Example: If the Template you want to work with is "Template 3 Sample," above, then you would open Template3Customer.html after downloading the Info directory.
- Exit the sFTP site when done.
Edit Your Template(s)
Note: Regardless of the Template(s) you downloaded, the steps outlined below are essentially the same from one Template to the next. For purposes of example, this document uses Template2Customer.
- Prior to editing your Template, Vermont Systems recommends making a copy of it and updating the copy. This will allow you to easily reset the Template to its defaults in the event you need to "start over."
- Open the "working copy" of your Template in an HTML Editor and launch the Preview.
Note: HTML can be created and edited in other applications, such as WordPad and Notepad. However, Vermont Systems recommends using an HTML editor.
- Everything you see on the Template (the image on the right) has a corresponding line item in the HTML (the image on the left), and everything you see on the Template is updateable.
- This document DOES NOT provide updated instructions for every last field on the Template. Rather, it presents basic guidelines to get you started.
 |
 |
Guidelines for Editing Your Template
The following presents basic "how to" for certain areas of your Template. The steps outlined here are essentially the same from Template to Template, though certain items might appear in different places.
- Title - At/around Line 9 of your Template, there is a <title>Vermont Systems HTML Email Template <x></title>. This should be changed to reflect your organization and Template Title.
-
Text - To update text, locate it in the Template and overwrite as needed.
Note: DO NOT overwrite or delete {PROGRAM_GENERATED_EMAIL}! When you run a RecConnect program and enter text in the Email Body field, the text you enter appears on your Template in the space occupied by {PROGRAM_GENERATED_EMAIL}.
-
Font - The Email Templates use the "font-family:" command. To change the font, replace the first word in the font-family: list with the font you wish to use.
For Example: To use Helvetica, change font-family: Garamond, Baskerville, … to font-family: Helvetica, Baskerville, ….Note: You can remove the extra font types in the list, if desired, and go with one (1) only. For Example: You can change "font-family: Garamond, Baskerville, 'Baskerville Old Face', 'Hoefler Text', 'Times New Roman', serif; line-height: 100%;" to "font-family: Helvetica; line-height: 100%;" if desired.
-
Images- To update images, find the place holder in Template and replace it with your own image.
- Images must be stored on a forward-facing server, such as your WebTrac server.
Note for Vermont Systems Fully Hosted and Vermont Systems WebTrac Only Hosted Customers: Vermont Systems maintains your forward-facing WebTrac server. Any files you wish to store on your forward-facing WebTrac Server must be sent to Vermont Systems. Contact the Vermont Systems Hosted Team to arrange this.
- Give your images unique names. Avoid using spaces in the file name.
- Pre-size your images to the dimensions provided in Template or to a direct proportion thereof. When sized proportionately, your images will not lose aspect ratio and appear skewed when displayed in the email.
- Optionally, you can forgo the resizing of your images. Use just the width="<x>" attribute and delete the height="<x>" attribute (i.e. width="650" to use a fixed pixel width or width="75%" to use a width based on percentage of the column). Doing this will size your image's height proportionately with its set width.
- Replace the "img src" path with the path to where your images are stored and the unique file name of your image.
For Example: The location of the "Logo.jpg" image on default Template is: img src="https://www.vermontsystems.com/images/htmlemail/info/logo.jpg." Replace this information with: img src="the URL to your forward-facing server/the directory (or directory tree) in which the image is stored/the image file name and extension."- Note: The img src path must include the website domain so that the path is a fully qualified URL.
- Replace the alt="Vermont Systems" with something more appropriate to your organization. The text between the quotation marks is what will appear on your Template in the event the image fails to appear.
- Images must be stored on a forward-facing server, such as your WebTrac server.
-
Links- To update links, locate them in the Template and replace the path with your own information. In the Template, search for instances of "href="https://www.Your WebTrac Site Here/" and enter your organization's information. Links in the Template include, but are not limited to:
- Your organization's main web page (href="https://www.Your Website Page").
- Your WebTrac Splash page (href="https://www.Your WebTrac Page/splash.html).
- Your WebTrac "Contact Us" page (href="https://www.Your WebTrac Page/contactus.html).
- Optionally, you might use an Email tag here: (href="mailto:your email address@your domain.com/org/edu?subject=whatever text you want in the Subject line")
- Links to specific items you wish to highlight. (https://www. Your WebTrac Site Here/search.html?module=AR&primarycode=110510").
- Links to specific items work exactly like WebTrac SplashPage links and should be updated accordingly.
- Background Colors - To update background colors, locate the area in the Template and update the bgcolor="#<hex color code>" accordingly.
- Save changes often and use the Preview feature on your HTML Editor to proof and verify. The images below show the original Template2Customer.html (left) and an updated copy that incorporates all the Guidelines discussed in this section.
 |
 |
Create an Email Template Comment Code and Copy the HTML to It
Note: All file paths and screen/tab locations in this document refer to file paths and screen/tab locations as they appear in the standard, default Vermont Systems design. Your setup and design may vary.
When you have finished updating your Email Template, you need to copy the raw HTML to an Email Template Comment Code. Vermont Systems recommends creating a new Email Template Comment Code for each separate Email Template you want to use. You will link these Comment Codes to your Email profile in the next section. For Example: You might decide to use Template 1 for your Receipts and Template 2 for your RecConnect email blasts. In this instance, you would create a Comment Code for Template 1 and a second Comment Code for Template 2. You would then link the Comment Code for Template 1 to the Receipt HTML Email Template field on your Email profile; you would also link the Comment Code for Template 3 to the RecConnect HTML Email Template field.
- Open the Template in your HTML Editor or in an application, such as WordPad or Notepad.
- Use the Windows <Ctrl> + A command to highlight/select all text.
- Use the Windows <Ctrl> + C command to copy it to your computer's clipboard.
- In RecTrac, go to Management Ribbon • System Management • Comment/Documentation Management group • Comment Code Management.
- Click Add.
- Enter an identifier (i.e. a "title") in the Comment Code field.
THEN
Expand the Drop-down list for Record Type and select "Email Template. - Enter a Description, if desired.
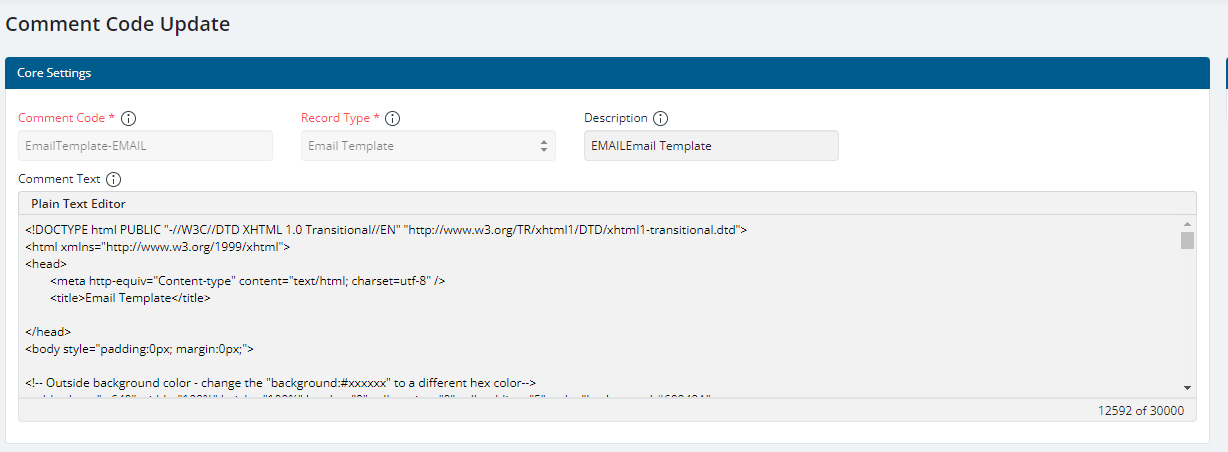
- Put your cursor in the Comment Text field and use the Windows <Ctrl> + V command to paste the HTML.
Note: The Comment Text field accepts up to 30,000 characters. Be certain that your character count does not exceed this number.
- (Optional) Embed an 'Unsubscribe' link.
- Enter '{UNSUBSCRIBE_LINK}' anywhere in the Comment Code. The link will appear where you place the text.
- Click Save. You will return to the Comment Code Management DataGrid.
- Repeat these steps, as needed, for each Graphical Template you will use.
Link Comment Codes to your Email Profile
Email profiles in RecTrac have four (4) HTML Email Template fields. These are specific to the function as defined by their label. You can link an Email Template Comment Code in any or all of them, as desired. You can also leave these fields blank. In that event, the email body will be composed of system-generated text. Refer to the "i" Information icons if needed.
- In RecTrac, go to Management Ribbon • System Management • User/Menu/Profile Management group • Profile Management.
- Highlight/select an existing Email profile and click Change.
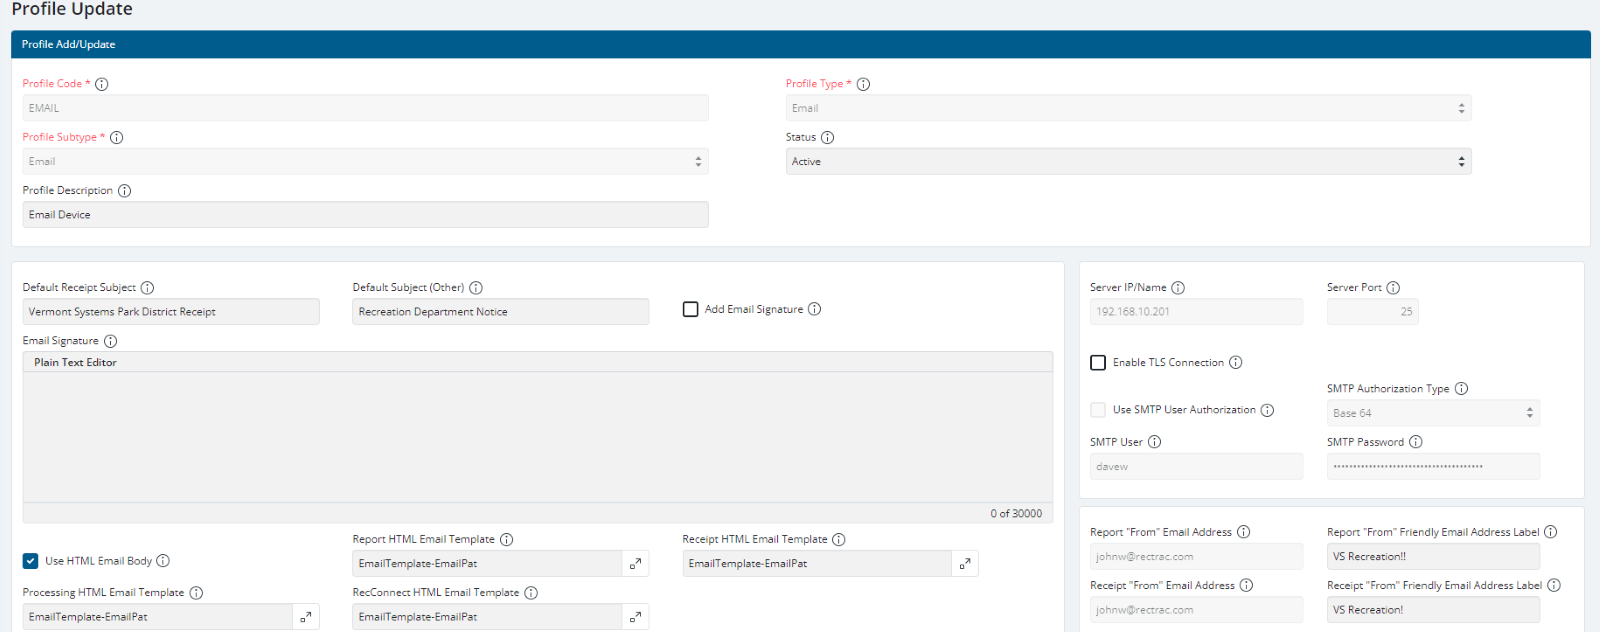
- Click the Picklist icon for the field that corresponds to the Email Template Comment Code you wish to use when sending emails generated by the system for the process selected.
- Processing HTML Email Template - These are the emails that get sent due to processes being run, such as but not limited to, Scheduled Events, emailing Statements, etc.
- Report HTML Email Template - These are the emails that get sent when you run a report (or when a Scheduled report is run) and you opt to email the report.
- RecConnect HTML Email Template - These are the emails that get sent when you process a RecConnect.
- Receipt HTML Email Template - These are the emails that get sent when you opt to email receipts, either from RecTrac or WebTrac.
- Repeat Step 3 until all desired fields are populated. In the example image above, we are opting to use Graphical Email Templates for Receipts and RecConnect only. The body for Processing and Report emails will be generated by the system.
- Update the other fields on the profile as necessary. Use the "i" Information icons for field definitions, if needed.
Note: Vermont Systems recommends leaving the Email Signature field blank, though your organization's needs may differ.
- Save changes when done and exit back to the main menu.
Run a RecConnect Program
To send your Email Template, run a RecConnect program and generate results. Refer to Topic Doc - RecConnect Programs for step-by-step instructions and examples, if needed.
Note: Vermont Systems recommends sending the RecConnect email to yourself (or to a limited number of staff members) before running a mass email.
- Proofread the email for accuracy and ensure your images and text look as expected.
- Open the email using different platforms, such as Outlook and your smartphone. Vermont Systems' Graphical Email Templates use responsive design so should look "good" regardless of the email platform being used by your customers.
- If you make any changes, then you will need to re-copy the HTML from your HTML Editor to your Email profile.
- Upon running a RecConnect program, you will proceed to the RecConnect Results page.

- Ensure the RecConnect Results DataGrid contains your target audience.
- Be certain to enable the Process Email option.
- Expand the Email Options group.
- Leave the HTML Email Template field blank to use the HTML Template you linked on your Email Profile
OR
Click the Picklist icon to select an alternate Email Template Comment Code, if desired. Any selection you make in this field will overwrite your selection (if any) on the Email profile. - Enter any additional text in the Email Body field. This text will appear in your Template where {PROGRAM_GENERATED_EMAIL} appears in your Template preview.
- Use the Formatting icons at the top of the field if desired.
- Fill out the remaining fields. Use the "i" Information icons for field definitions, if needed.
- Click Process RecConnect when done to queue your emails to your email server.