Topic Doc: Enterprise Site Management
RecTrac 3.1

Written by Daniel Rotondi
Updated at May 5th, 2023
Table of Contents
Document Summary
Enterprise Site Management allows large, enterprise-scale RecTrac customers who have multiple business units (Sites) operating in a single database to associate users, items, and transactions with a particular Site. Site association, in turn, allows for reporting and analytics both within and outside of the RecTrac application to utilize these Sites as a basis for filtering and aggregating data within and across Sites.
Enabling Enterprise Site Management does the following:
- Allows for the association of RecTrac users to a Site or Sites. Users linked to multiple Sites must select a Site at log in.
- Places Site Code, Site Category, and Site Area fields on all core File Management, Inquiry, Daily Processing, and Reporting screens within the application.
- Requires a Site Code value to be linked to all File Management records for which a transaction can be processed (Activities, Facilities, Inventory, etc).
- Stores Site Code data on transactional records that include: Transaction Detail (SADetail), Receipts (SAReceipt), Credit Card History (SACreditCardHistory), and General Ledger (SAGLDistribution).
- Allows for filtering and aggregating reports by Site, Site Category, Site Group, Site Area, and Site Type.
License – Maintenance Agreement
Enterprise Site Management is free. Use of the interface requires a license and annual maintenance agreement for RecTrac and the component modules discussed in this document. Prior to implementing any process outlined in this document, please contact the Vermont Systems Sales department at 1-877-883-8757 to verify that you are authorized to use the modules discussed in this document and if not, to obtain a quote and/or approval.
Setup Steps
This document provides the basic steps required to:
- Enable Enterprise Site Management in your database.
- Create Site Category, Site Type, Site Group, and Site Area system codes
- Create Site Codes within the Site Management program for each of your Sites.
- Link Sites to all of the items you sell.
- Link User IDs to Site Codes.
- Create and link Data Security profiles at the Site Code level in Profile Assignments to define user access to database records within the application.
- Set Permissions Profiles to use Data Security Profile settings for Table Permissions.
- Identify some RecTrac reports that allow you to sort or aggregate data based on Site Code, Site Area, Site Category, Site Type, or Site Group.
If you have additional questions about Enterprise Site Management setup and reporting after reading this document, please contact Vermont Systems Customer Service by phone at 887-883-8757 or generate a Support Case through the Customer portal of the Vermont Systems web site using your Customer ID and password.
Before You Proceed
This document is written with the following assumptions. If any of the items listed below is NOT true, contact Vermont Systems Support prior to continuing, as the steps in this document may prove difficult to complete and unexpected results may occur.
- Your organization is running RecTrac 3.1.10.06.00 or greater.
- You have a a site scheme to divide up the business units within your enterprise. You will use this when creating your Site Codes and your Site Category, Site Type, Site Group, and Site Area system codes.
- The User ID with which you sign into RecTrac has the requisite permissions and ability to access all modules and functions pertaining to Enterprise Site Management, to include but not limited to: File Management for all modules you own, Profile Assignments, Profile Management, and User Management.
File Management Steps
This document uses the default Vermont Systems design. Your design may vary.
Enable Enterprise Site Management
The option for enabling Enterprise Site Management is located on your License profile. When activated, a Site Detail group will appear on all core file management screens in the system. The group contains three (3) site fields: Site Code, Site Area, and Site Category.
Entry to this profile is protected by Vermont Systems Access Code. Contact Vermont Systems Support.
- In RecTrac, search for and go to Profile Management.
- Highlight/select the License profile and click Change.
- Enter the Access Code given to you by Support and click Validate.
- When you're in the License profile, find the Enable Enterprise Site Management option and select it.
- Click Save and exit Profile Management.
Site Scheme
The next step is to implement your site scheme. The site scheme outlines how you divide up the business units in your enterprise. To do this, you will create Site Category, Site Type, Site Group, and Site Area system codes and link them to Site Codes in Site Code Management.
In RecTrac terms, a Site is an enterprise segment or business unit within the overall enterprise. An individual site can be categorized by its Site Area, Site Group, Site Type, and Site Category to allow for intelligent grouping of different business units or enterprise segments. Here are some examples of what these grouping could look like for an enterprise customer in both a municipal and military landscape.
| Municipality/Military | Site Category | Site Area | Site Group | Site Type | Site Code | Site Description |
|---|---|---|---|---|---|---|
| Example Description | Broad Categorization of Business Unit. This could be geographical or contextual. | Geographic Area or Location of the Business Unit | Parent Group under which this the Business Unit operates or reports to. | Finite categorization of the Department or Context the Business Unit operates in. | Unique Code identifying the business unit. | Code description. |
| Municipality | Aquatics Facility Aquatics Facility Recreation Center |
Ward 2 Ward 2 Ward 2 |
Harry Bailey Recreation Complex Harry Bailey Recreation Complex Harry Bailey Recreation Complex |
Indoor Pool Facility Outdoor Splash Pad Fitness Center |
Ward 2 001 Ward 2 002 Ward 2 003 |
Harry Bailey Indoor Pool Harry Bailey Spash Pad Harry Bailey Fitness Center |
| Military | CYMS CYMS RecTrac |
USAG Fort Leonard Wood USAG Fort Bliss USAG Italy - Vincenza |
Training Directorate Readiness Directorate IMCOM Europe |
Child Development School Age Bowling |
MOLeonard – Alexander CDC TXBliss - SAC ITVincenza-StrikeZone |
Alexander Child Development Center School Age Center StrikeZone |
Create Site System Codes
Note: The order in which you do these next two steps is up to you. You can create Site Codes first and add the Site system codes "on the fly" or you can create the system codes first (as this we'll do here) and then link them to the Site Codes as you add them to the system.)
- In RecTrac, search for and go to System Code Management.
- Click Add.
- Enter a System Code. For example, Aquatics Facility.
- Put your cursor in the Type field and type Si." You'll skip to the four "Site" system codes. Select the one you want. For example, Site Category.
- Enter a Description. For example, Aquatics Facility.
- Add Permissions.
- Click Save.
- Repeat these steps to add your other Site Category, Site Type, Site Area, and Site Group codes. You can use the Clone feature to expedite the process as needed.
Create Site Codes
- In RecTrac, search for and go to Site Management.
- Click Add.
- Enter a Record Code. This is your Site code For example, Ward 2 001.
- Enter a Site Name. This is the description of the Site. for example, Harry Bailey Indoor Pool.
- Enter address and phone information as needed. Remember: Some Sites may not have a physical presence.
- Select Site Group, Site Area, Site Category, and Site Type codes as needed. These are the systems codes you created in the previous step. For example, Harry Bailey Recreation Complex, Ward 2, Aquatics Facility, Indoor Pool Facility.
- Add Permissions.
- For military installations only. Select your USDA Region if your garrison is in the United States. If your garrison is not in the US (or if you are a municipal customer), then leave this field at its default setting.
- Click Save.
- Repeat these steps to add your other Site codes. You can use the Clone feature to expedite the process as needed.
Link Sites to Items You Sell
Once you've created Site codes, you'll need to link them to the items you sell. We'll use the Harry Bailey Indoor Pool Facility as an example. If you rent the pool for parties, then you would link the Ward 2 001 Site code to your Harry Bailey pool facility. Likewise, if you hold swimming lessons in the pool, then you would link the Ward 2 001 Site code to all the swimming activities you hold there.
The following steps will walk you through linking a Site code to an Activity, and by extension, all of its Sections. Remember: when setting up Site Management, you'll want to link Site codes to everything you sell. This includes inventory and service items, tickets, rounds of golf, equipment and site rentals, etc.
To Link a Site Code to an Activity
- In RecTrac, search for and go to Activity Management.
- Highlight/select an Activity that takes place in the Site you want to link and click Change.

Click Image to Enlarge
- Find the Site Code field, open it and select the Site code you want to link. Site Code is a mandatory field when using Enterprise Site Management. The Site Area and Site Category fields will populate automatically based on the Site system codes you linked the Site code above.
Note: The Site Detail group was added to all file management screens when you enabled the Site Management option on your License profile. If you use custom screen designs, you may have to update them in order to see the new group. Go to Management Screen Management.
- Click Save. You'll return to the Activity Management DataGrid. If you go to Section Management, you'll see that the Site code information you entered here as filtered down to the sections.
- Repeat these steps for other Activities as needed.
Use Bulk Change to Link Site codes to Multiple File Management Records
To save time and effort, consider using Bulk Change if you have multiple file management records that use the same Site. For example, you have 10 separate swimming activities that meet at the Harry Bailey Indoor Pool. To add Ward 2 001 to all 10 activities, you would:
- Go to Activity Bulk Change.
- Select the 10 swimming activities that meet at the Harry Bailey Indoor Pool.
- In the Available Fields group, select "Site Code" and click Add.
- Select the "Ward 2 001" code and click Continue.
- Click Process Bulk Change.
Perform these steps using your own Site codes. Remember: when setting up Site Management, you'll want to link Site codes to everything you sell. This includes inventory and service items, tickets, rounds of golf, equipment and site rentals, etc.
Note: Some File Management tables will inherit their site code values from a parent record
- ARSection: This table inherits Site Code, Site Category, and Site Area values from the parent ARActivity record. When adding a new ARSection, these fields will populate automatically based on the Activity Code selected.
- LKLocker: This table inherits Site Code, Site Category, and Site Area values from the parent LKLockerRoom record. When adding a new LKLocker, these fields will populate automatically based on the LockerRoom selected.
- PSTicketBlock, PSSerialTicket: These tables inherit Site Code, Site Category, and Site Area values from the parent PSTicketMain record. When adding a new PSTicketBlock and PSSerialTicket record, these fields will populate automatically based on the PSTicketMain record selected.
- GRTeeTime: This table inherits Site Code, Site Category, and Site Area from the parent GRCourse record. These records are created by the Tee Time Generation program. The system assigns the appropriate values based on the Course for which the tee times are being generated.
Link User IDs to Site Codes
You can link User IDs to Site Codes. Doing this ensures that SADetail, SAReceipt, SACreditCardHistory, and SAGLDistribution records for transactions are linked appropriately to the users who performed the transactions at a Site. You can also link a User ID to multiple Sites. When you do this, the user we be prompted to select a Site when logging in.
- In RecTrac, search for and go to User Management.
- Highlight/select a User ID and click Change.
- Expand the Miscellaneous Settings group.
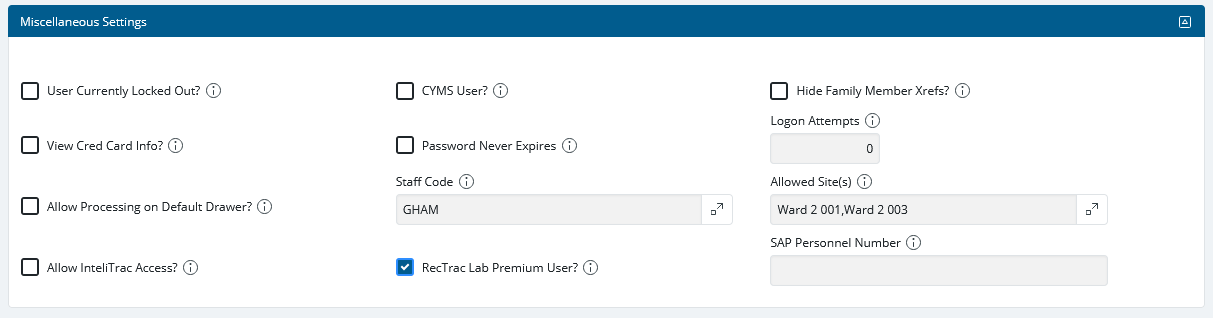
Click Image to Enlarge
- Open the Allowed Site field and select the Site code/codes you want to link to this user. Multiple selection is allowed.
- Click Save. You'll return to the User Management DataGrid.
- Repeat these steps for other Users as needed.
Note: To save time and effort, consider using Bulk Change if you want to link the same Site code/codes to multiple User IDs. Use the instructions above if you require guidance for the Bulk Change program.
Logging in to RecTrac when Linked to Site Codes
When logging in to RecTrac, User IDs linked to a single Site will simply log in as they always have. User IDs linked to multiple Site codes will be prompted to select one before they're allowed to log in.

Click Image to Enlarge
Create and Link Data Access Profiles
The Data Access profile are used in lieu of regular Permissions profiles to define Table Permissions settings (who can see and/or do what) in Site Management. Once created, Data Access profiles get linked at the Site level of Profile Hierarchy.
- In RecTrac, search for and go to Profile Assignments.
- Click Add.
- Enter a Profile Code. For example, Data Access HBRC.
- Put your cursor in the Profile Type field, type "D" and select "Data Access." The Profile SubType will populate automatically.
- Enter a description. For example, Data Access Harry Baily Recreation Complex.
- Click Create. You'll continue to the Data Access profile where all Table Permissions will be set to 'Administrator.'

Click Image to Enlarge
- In the Access Rights field, select "With Matching Codes.
THEN
Enter the Permissions Code(s) people linked to this profile need.
THEN
Select the Function Types (the Tables) you want them to have access to. - Click Change All Table Permissions. The profile will update with the Permissions Codes you selected. In the example below, we added the Harry Bailey Recreation Complex permission to all tables.
Note: For further information on Table permissions (or Permissions in general), refer to the Permissions topic doc linked in online help for your Data Access profile.

Click Image to Enlarge
- Click Save. You'll return to Profile Assignments.
- Link the Data Access profile at the Site level of prole hierarchy.
- In the Linked Profiles column, expand the "Site."
- Click the new Data Access profile. Drag and drop it onto the appropriate Site Code(s).
- Repeat these steps as needed for any additional Data Access profiles you need to create.
- Remain in Profile Assignments and continue to the next step.
Update Permissions Profiles
The last step is to update your existing Permissions profiles and have them point to your newly created Data Access profiles for Table permissions.
- Still in Profile Assignments, go to your Permissions profiles. Select one and click Update.
- Click the Table Permissions tab.
- In the Access Rights field, select "Using Data Access Profile.
THEN
Select the Function Types (the Tables) you want them to have access to. - Click Change All Table Permissions.
- Click Save.
Note: For further information on Table permissions (or Permissions in general), refer to the Permissions topic doc linked in online help for your Data Access profile.
- Repeat these steps for all of your Permissions profiles.
This completes the set up for Site Management.
Reporting by Site
When set up is complete, your users will not notice an operational difference when processing transactions in RecTrac. (Some users may have to select a Site at log in), but once logged in, they'll notice no operational differences.)
Behind the scenes, however, Site Code data will be written on transactional records that include: Transaction Detail, Receipts, Credit Card History, and General Ledger. In order to provide reporting capability, a Site Filters group has been added to all SADetail, SAReceipt, SACreditCardHistory, and SAGLDistribution reports in RecTrac. This will allow for filtering and aggregating data by Site. These reports include, but are not limited to: Cash Journal reports, GL reports, credit card reports, sales reports, bottom line reports, enrollment reports, memebership reports, etc.
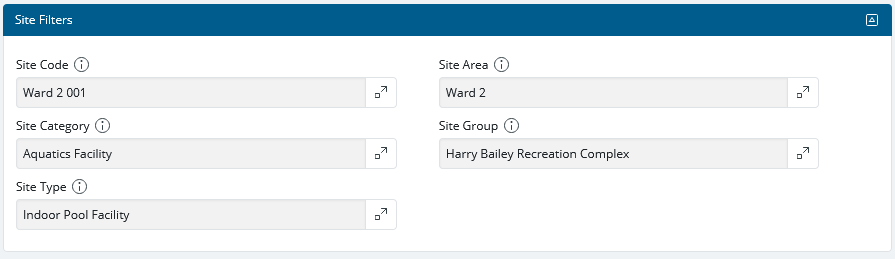
Click Image to Enlarge
Additionally, two (2) new report outputs have been added: VSI-Site Listing Report and VSI – Site Lisitng by Site Area Report.
Note: To see these report outputs, you may have to go to Report Output Management and set their status from "New" to "Active."