
Table of Contents
Document Summary
The Elavon/ETS External Redirect Interface (ERI) is a certified and secure gateway credit card processing system that allows patrons to remit for your services with credit cards while ensuring that no credit card data is entered, transmitted, or stored within a Vermont Systems application.
License – Maintenance Agreement
The use of the interface requires a Vermont Systems license and an annual maintenance agreement for RecTrac and the component modules discussed in this document. Prior to implementing any process outlined in this document, please contact the Vermont Systems Sales department at 1-877-883-8757 to verify that you are authorized to use the modules discussed in this document and if not, to obtain a quote and/or approval.
Setup Steps
This document provides the basic File Maintenance steps required to prepare your RecTrac database for credit card processing using the Elavon/ETS gateway solution. If you have additional questions about Elavon/ETS Credit Card Processing setup and operation after reading this document, please contact Vermont Systems Customer Service by phone at 887-883-8757 or generate a Support Case through the Customer portal of the Vermont Systems website using your Customer ID and password.
Before You Begin
This document is written with the following assumptions. If any of the items listed below is NOT true, contact Vermont Systems Support prior to continuing, as the steps in this document may prove difficult to complete and unexpected results may occur.
- Your organization is running RecTrac 3.1.03.01 or greater.
- You have a valid Elavon/ETS user account. If you do not have an Elavon/ETS account, you cannot proceed. To establish an Elavon/ETS account, contact Elavon/ETS Sales at(800) 834-7790 or ets_sales@elavon.com or https://elavonpayments.com/support.
- You understand your Credit Card solution; which credit card brands you accept; and the processes for which you allow them, such as Purchases, Installment Billing, Tip Processing, Gift Cards, etc….
- The User ID with which you sign into RecTrac has the requisite permissions and ability to access all modules and functions pertaining to Credit Card Processing, including but not limited to: Profile Management, Payment Code Management, Sales screens, Credit Card Terminal, and Tip Processing.
- You understand RecTrac Profile Management and hierarchy.
- You understand RecTrac DataGrids and how to maneuver through them.
Elavon/ETS Overview
The Elavon/ETS External Redirect Interface (ERI) is a certified and secure gateway credit card processing system that allows patrons to remit for your services with credit cards while ensuring that no credit card data is entered, transmitted, or stored within a Vermont Systems application.
The Elavon/ETS ERI option allows credit cards to be swiped on a magnetic stripe reader or manually entered by your staff into RecTrac, or manually keyed on a web portal by your customers in WebTrac. This option:
- Stores NO card data in the Vermont Systems database other than the card mask returned by the processor (For Example: the first digit and last four (4) digits of a credit card).
- Ensures NO card entry is performed on the screen of a Vermont Systems application.
Warning:
You MUST set up at least one (1) separate Elavon/ETS account for EVERY separate function for which you accept/allow credit cards. If you use RecTrac and WebTrac, and if you do Installment Billing/Auto-Debit and if you run a restaurant/bar and process credit card tips, you MUST setup at least one (1) separate account with Elavon/ETS for EACH function.
For Example: Your organization uses all of these functions – RecTrac, WebTrac, Installment Billing/Auto-Debit and Tip Processing. In order to use the Elavon/ETS solution, you need to setup a minimum of four (4) accounts with Elavon/ETS: an account for normal retail transactions (RecTrac), an account for e-Commerce transactions (WebTrac), an account for MOTO transactions (Installment Billing/Auto-Debit), and an account for tip processing (restaurant). If you use RecTrac, WebTrac and run Installment Billing/Auto-Debit only (i.e. if you do not run a restaurant), you will need three (3) accounts. Etc….
When creating and linking ETS Credit Card Profiles, at least one (1) separate profile will be required for each function, because information (Terminal IDs, Client IDs, ECOM Request IDs, etc…) will vary by account type. So once you create and link a Credit Card profile for your Normal Retail account (RecTrac) but you also have WebTrac and you run Installment Billing, you will need to create and link at least two (2) more profiles: one for your e-Commerce account and one for your MOTO/billing account.
Server and Workstation Minimum Requirements
Server Minimum Requirements
In order to process credit card transactions using Elavon/ETS, the servers through which transactions will be processed (Database Server, Transaction Server, VIC AppServers, and WebSpeed Brokers, if applicable) must meet the following requirements.
- Have .NET Framework 4.0 installed.
- Have Transvault 3.0 installed. (This is required only if you run Installment Billing/Auto-Debit, run Household Balance Auto Pay, do Golf No Show Tee Processing, and/or use Restaurant-style Tip Processing.)
- Have access to the World Wide Web.
- Have a Firewall Rule that is open bi-directionally between the server and the Elavon/ETS ECOM Verify URL, which is http://www.etsemoney.com/ecomh/verify.aspx
Note:
All servers that will be used for credit card transaction processing (and/or EMoney Website Access) need the following list of exceptions added to the “whitelist” of allowed sites. Go to your Internet browser properties and add the websites shown below to the Trusted Sites list.
- >*.emoney.com [Processing, Browser Access]
- *.emoneygc.com [Processing, Browser Access]
- *.etsms.com [Processing, Browser Access]
- *.etsemoney.com [Processing, Browser Access]
- *.emoney2k.com [Processing, Browser Access]
- *.networkgls.com [Processing]
- *.etsemoney.ca [Processing, Browser Access]
- *.pmoney.com [Processing, Browser Access]
- *.eftregistration.com [Browser Access]
- *.losethewallet.com [Browser Access]
- *.billpay.io [Processing, Browser Access]
Elavon/ETS does NOT recommend IP-level filtering as IP addresses can and do change. Refer to IP Addresses and Domain Names for Elavon/ETS for the current list of IP Addresses and domains.
Additionally, if you are using software for web filtering, you will need to allow the above websites as well.
Workstation Minimum Requirements
To process credit card transactions using Elavon/ETS, the workstations on which you process transactions must meet the following requirements:
- Have a valid URL to your RecTrac Server.
- Have access to the World Wide Web.
- Have the Vermont Integration Client (VIC) installed as an .EXE. This is mandatory. VIC MUST be installed as an .EXE on workstations from which you will process credit card transactions using Elavon/ETS.
- Credit Card Pin Pads must be registered with Elavon/ETS.
Limitations
- You may not process blind credits in RecTrac Blind transactions can be processed only via the Elavon/ETS website. Processing blind transactions on the Elavon/ETS website is discussed here.
- The Merchant Account at Elavon/ETS must have Counter Tip disabled.
- Partial Auths are an option for 'normal' sales only. The Merchant Account at Elavon/ETS used for Installment Billing cannot allow for Partial Auths. Likewise, the Ecommerce account cannot allow for Partial Auths. Contact Elavon/ETS with any questions.
- To process Tips, you must be running RecTrac 3.1.04.12 or greater.
- Having installment billing periods of six months or more (billing semi-annually, annually, etc…) is not recommended. Elavon/ETS stores unique tokens for approximately six months after which it becomes "stale." If you bill semi-annually or annually, you run the risk of not having unique tokens for your households and billing for those households will fail. Vermont Systems recommends no more than quarterly installment billing (quarterly, monthly, semi-monthly, bi-weekly, weekly).
Fraud Controls
Elavon/ETS has fraud controls in place that will stop a negative batch. The batch will be released once all corresponding sales are validated and Elavon/ETS contacts the merchant. Listed below are all of the fraud control features default values. These amounts can be adjusted per merchant depending on yearly volume and what was submitted to underwriting.
- Maximum Authorization Amount - Merchant will not be able to process an authorization over a certain limit. The default is set to $10,000.00
- Maximum Credit Amount - Merchant cannot issue a credit refund for over $5,000.00
- Maximum Gratuity Amount - Merchant cannot add a gratuity for over 300% or $500.00
- Maximum Settlement Amount - Merchant cannot settle an amount over $20,000
RecTrac File Maintenance Setup
Note:
The following steps assume you have a valid Elavon/ETS user account. If you do not have an Elavon/ETS account, you cannot proceed. To establish an Elavon/ETS account, contact Sales: (800) 834-7790 or ets_sales@elavon.com.
To use Elavon/ETS credit card processing, you will need to complete the following setup steps:
- Install ETSTransvault 3.0 on all applicable servers
- Create and link an ETS ERI Pin Pad profile.
- Create and link an ETS Credit Card profile.
Note:
All file paths and screen/tab locations in this document refer to file paths and screen/tab locations as they appear in the standard, default Vermont Systems Design. Your setup and Design may vary.
Install ETSTransvault 3.0
Installation of ETSTransvault 3.0 is NOT required on any client workstations. However, it may be required on one or more of your servers, depending on your set up and what processes you run.
ETSTransvault 3.0 is required for Installment Billing/Auto-Debit, Household Balance Auto Pay, Golf No Show Tee Time Processing, and Restaurant-style Tip Processing. It is also required if you allow patrons to perform Cancellation transactions using WebTrac. If you do not run any of these processes, then you do not need to install ETSTransvault 3.0.
Complete the following steps only if you:
-
Run any or all of the following: Installment Billing/Auto-Debit, Household Balance Auto Pay, and/or Golf No Show Tee Time Processing.
- In this event, install ETSTransvault 3.0 on the server which houses your Event AppServer.
-
Process Restaurant-style Tips.
- In this event, install ETSTransvault 3.0 on the server which houses your WebSpeed brokers.
-
Allow patrons to perform Cancellation transactions using WebTrac.
- In this event, install ETSTransvault 3.0 on the server which houses your WebSpeed brokers.
To Install ETSTransvault 3.0
- On the appropriate Server, log in to Windows as Administrator.
- Open Windows explorer and browse to,<x>:\VSI3\RecTrac\Programs\ThirdParty\ETS 3.0, where <x> is the mapped partition on which VIS3 is installed.
Note:
Optionally you can get the .exe from the Vermont Systems sFTP site. Open a file transfer client program. Use "sftp.vermontsystems.com" as the Host and "22" as the Port. Login credentials can be found on our support site. Contact Support if you require login assistance. Once logged in, browse to: /File Updates and Drivers/ETSERI/ETS 3.0 for V3 Integration/ETSTransVault_Net40_x64.exe.
- Right-click and Run as Administrator.
- Click Next> to continue.
- Follow through the installation process, accepting all default options.
- Click Close when the installation is complete.
- Repeat these steps as necessary for other Servers as noted above.
Create and Link an ETS Pin Pad Profile
The following steps will walk you through the process of creating and linking a Pin Pad profile for use with Elavon/ETS ERI credit card processing. These steps assume that you will link a separate Pin Pad profile to each workstation from which you will process credit cards.
Notes:
Complete this section for all Elavon/ETS Pin Pads that you will use for processing credit card transactions in RecTrac. This IS NOT for WebTrac. DO NOT link a Pin Pad profile to the WebTrac transaction server or to your WebTrac user ID.
You can link the same Pin Pad profile to multiple workstations, if desired, unless you are configuring Hypercom L5300 Pin Pads. If using Hypercom L5300 Pin Pad, each Hypercom Pin Pad will need its own Pin Pad profile.
- In RecTrac, go to Management Ribbon • System Management • User/Menu/Profile Management Group • Profile Assignments. Click Add.
- Enter a Profile Code for your Pin Pad. For Example: ETS_Pinpad_POS_1
- Expand the Drop-down list for Profile Type and select Pinpad.
- Expand the Drop-down list for Profile Subtype and select ETSDevice.
- Enter a Profile Description. For Example: ETS Pinpad Cash Register 1.
- Click Create. You will continue to the Profile Update screen.

- Enter the Terminal ID for this Pin Pad. Elavon/ETS will provide you with this information.
Note:
If a value is not entered in this field, the system will use the Terminal ID as it appears on the ETS Credit Card profile. Unless you are using a GUI-only solution (i.e. unless you are processing Credit Cards manually in RecTrac without aid of a Pin Pad), you should always enter the Terminal ID given to you by Elavon/ETS in this field.
- Expand the Drop-down list for Device Type and select the physical Pin Pad hardware for which you are creating this profile. Your most likely options are:
- Hypercom - Equinox L5300 Pin pad
- Ingenico iSC250
- Click Save to save your changes. You will return to Profile Assignments.
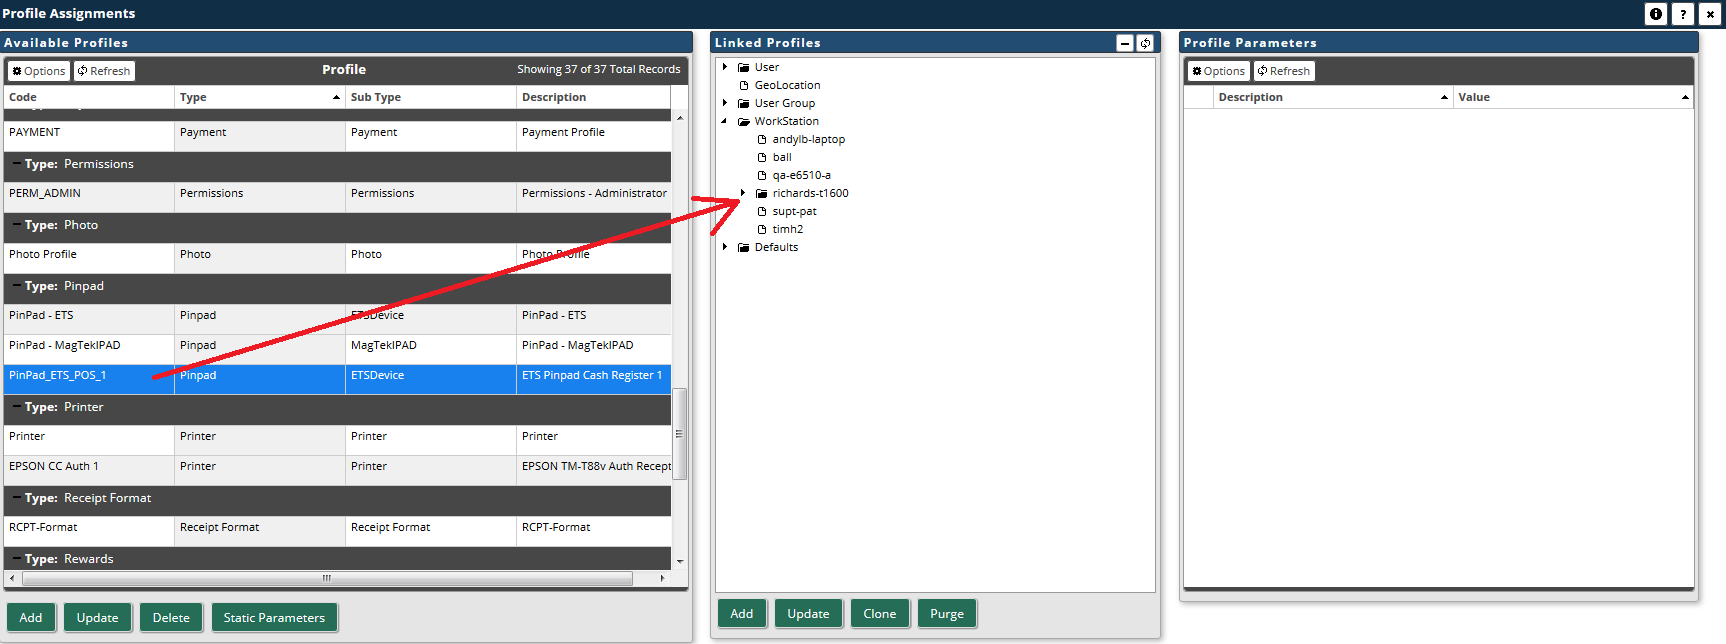
- In the Linked Profiles middle column, click to expand the Workstation folder.
- In the Available Profiles left-hand column, click to highlight the Pin Pad profile you just created.
- Click again and hold the mouse button down. When you have "grabbed" the profile, a red box will appear that displays the profile name.
- Drag and drop. Drag to the appropriate Workstation Name in the middle column. When the box turns green, release the mouse. This will place the profile at the Workstation level of the hierarchy. Profile Assignments are saved automatically and take effect immediately.
The level of the hierarchy can be changed later if needed. - Click the 'X' in the upper-right-hand corner of the Profile Assignments panel to Exit.
This completes the setup steps for your ETS Pin Pad profile. Repeat these steps as necessary for other workstations on which you will process credit cards using Elavon/ETS.
Create and Link an ETS Credit Card Profile
Warning:
You MUST set up at least one (1) separate Elavon/ETS account for EVERY separate function for which you accept/allow credit cards. If you use RecTrac and WebTrac, and if you do Installment Billing/Auto-Debit and if you run a restaurant/bar and process credit card tips, you MUST setup at least one (1) separate account with Elavon/ETS for EACH function.
For Example: Your organization uses all of these functions – RecTrac, WebTrac, Installment Billing/Auto-Debit and Tip Processing. In order to use the Elavon/ETS solution, you need to setup a minimum of four (4) accounts with Elavon/ETS: an account for normal retail transactions (RecTrac), an account for e-Commerce transactions (WebTrac), an account for MOTO transactions (Installment Billing/Auto-Debit), and an account for tip processing (restaurant). If you use RecTrac, WebTrac and run Installment Billing/Auto-Debit only (i.e. if you do not run a restaurant), you will need three (3) accounts. Etc….
When creating and linking ETS Credit Card Profiles, at least one (1) separate profile will be required for each function, because information (Terminal IDs, Client IDs, ECOM Request IDs, etc…) will vary by account type. So once you create and link a Credit Card profile for your Normal Retail account (RecTrac) but you also have WebTrac and you run Installment Billing, you will need to create and link at least two (2) more profiles: one for your e-Commerce account and one for your MOTO/billing account.
- In RecTrac, go to Management Ribbon • System Management • User/Menu/Profile Management Group • Profile Assignments. Click Add.
- Enter a Profile Code for your Pin Pad. For Example: ETS_Purchase.
- Expand the Drop-down list for Profile Type and select Credit Card.
- Expand the Drop-down list for Profile Subtype and select ETS.
- Enter a Profile Description. For Example: ETS Credit Card Processing.
- Click Create. You will continue to the Profile Update screen.
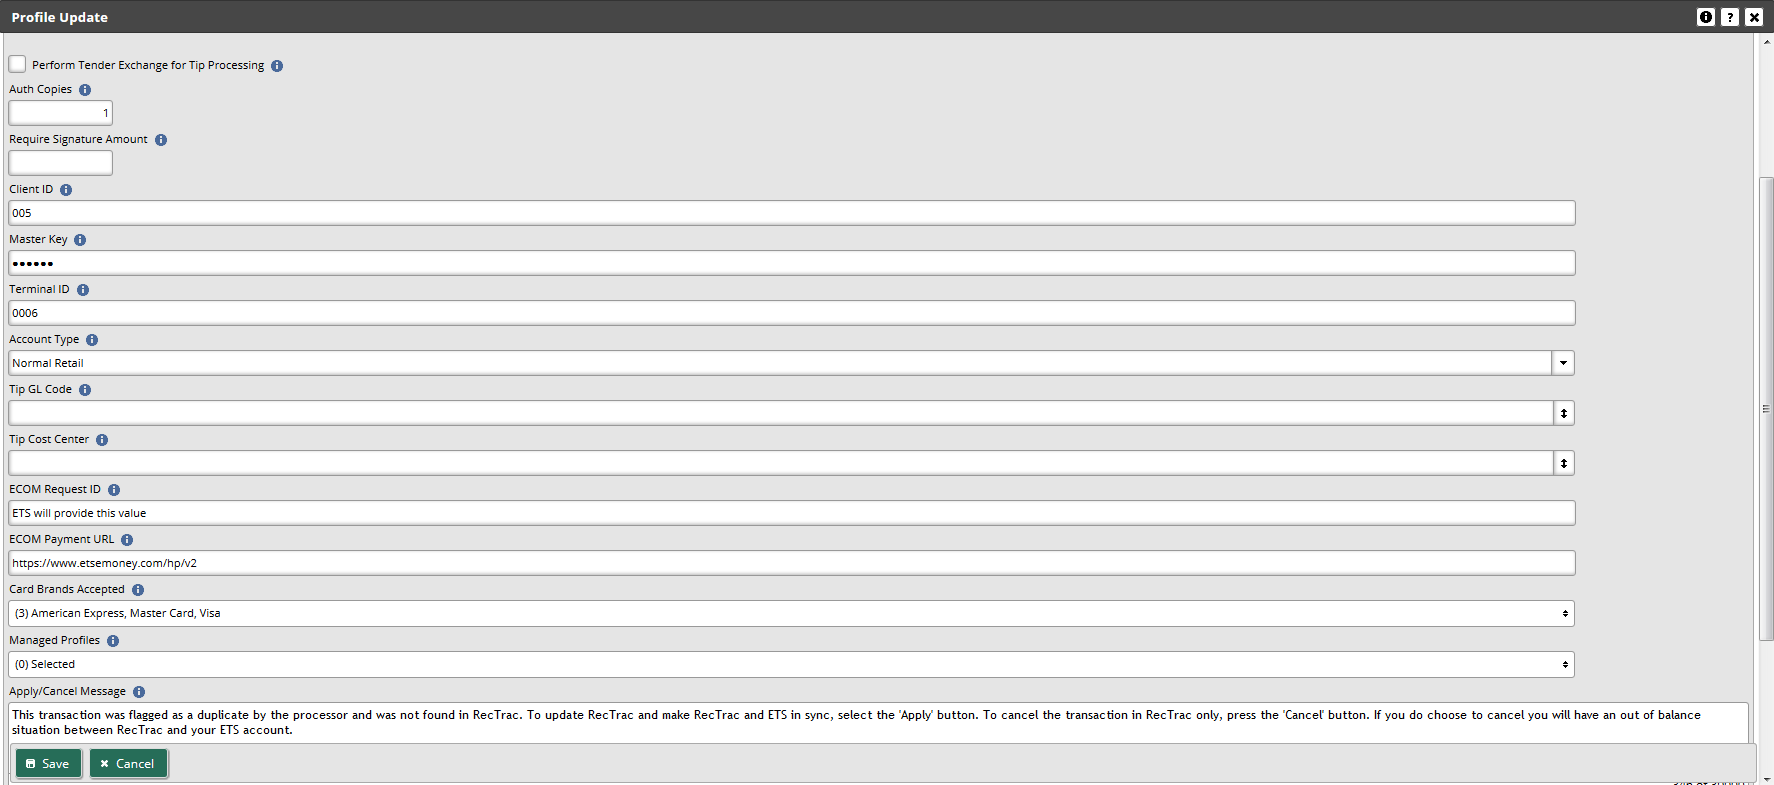
- Determine whether you wish to Perform Tender Exchange for Tip Processing. This field is applicable only if you are using this profile to processes restaurant-style tips via Elavon/ETS.
- Enter the number of credit card authorization receipts you wish to print upon completion of a transaction in the Auth Copies field.
Note:
An Authorization Receipt printer and an Auth Receipt profile will have to be linked.
- Enter a threshold amount for requiring a signature on Credit Card purchases in the Require Signature Amount field, such as $25.00. Sales that do not meet this amount will bypass the signature screen and “Signature Not Required” will be printed on receipts. Receipts for sales that meet or exceed the threshold amount will be printed with a signature line for the patron.
- Enter the Client ID for this profile as given to you by Elavon/ETS.
- Enter the Master Key for this profile as given to you by Elavon/ETS. This is a masked field and data entry in it appears as a series of dots (i.e. • • • • •).
- Enter the Terminal ID for this Profile. Elavon/ETS will provide you with this information.
Note:
If a value is not entered in the Terminal ID on ETS Pin Pad profile, the system will use the Terminal ID entered here. Unless you are using a GUI-only solution (i.e. unless you are processing Credit Cards manually in RecTrac without aid of a Pin Pad), you should always enter the Terminal ID given to you by Elavon/ETS on the Pin Pad profile, though a separate entry here is good for purposes of redundancy.
- Expand the Drop-down list for Account Type and make your selection:
- Normal Retail - Generally used for normal every day transactions performed in RecTrac.
- e-Commerce - Generally used for normal every day web-based transactions, such as those performed by patrons in WebTrac.
- Restaurant - Generally used where credit card transactions will include tip processing, such as in a restaurant or bar.
- MOTO - Generally used for Installment Billing processed through RecTrac.
- IF this is a restaurant account, expand the Picklist for Tip GL Code and Tip Cost Center and make the appropriate selections.
- Enter the ECOM Request ID as given to you by Elavon/ETS.
Note:
Strip out any braces/curly brackets from these fields IF they appear. For Example: Elavon/ETS provides the following for ECOM Response ID: { 596689AD-4C7F-40D2-9824-3FB143452F9}. You would remove the braces/curly brackets “{ }” from both ends of the field and enter only the alpha-numeric characters and dashes as they appear.
- Enter the Payment URL as given to you by Elavon/ETS.
For Example: https://www.etsemoney.com/hp/v2 - Click the Combo Box icon and select the Credit Card Brand(s) you accept.
- Click the Combo Box icon and select the additional Credit Card profiles that any user linked to this profile will have the authority to manage.
- Fill out the remaining fields as needed.
Use the "i" and "?" Help icons for field definitions, and examples if needed. - Click Save to save your changes. You will return to Profile Assignments.
- Determine where you wish to link the profile. For purposes of example, this document will link the profile at the Workstation level.
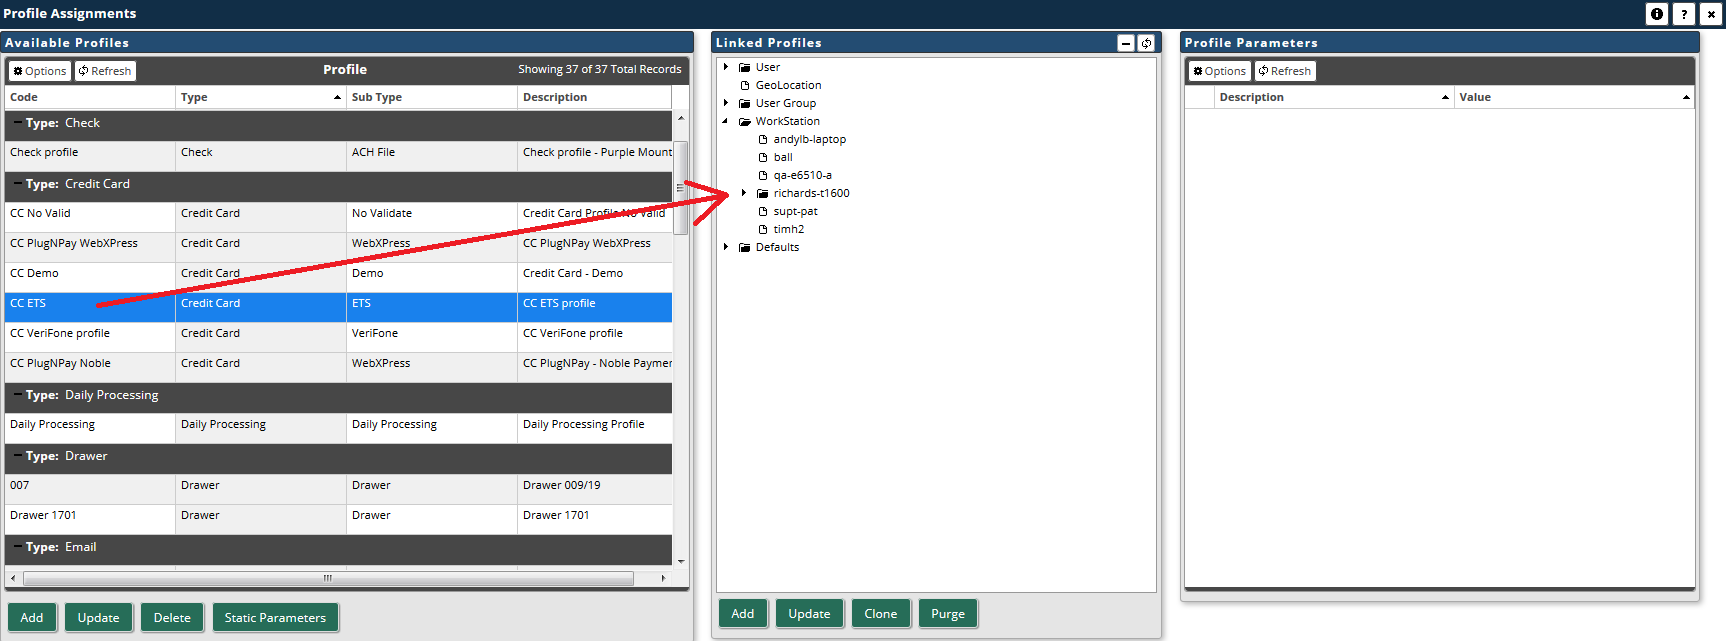
- In the Linked Profiles middle column, click to expand the Workstation folder.
- In the Available Profiles left-hand column, click to highlight the Credit Card profile you just created.
- Click again and hold the mouse button down. When you have "grabbed" the profile, a red box will appear that displays the profile name.
- Drag and drop. Drag to the appropriate Workstation Name in the middle column. When the box turns green, release the mouse. The Profile Assignment Add dialog box will appear.
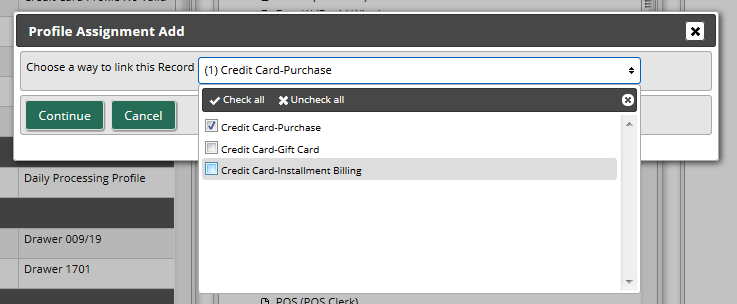
- Click the Combo Box icon and select the SINGLE transaction type for which this ETS Credit Card profile will be used. DO NOT MAKE MULTIPLE SELECTIONS IN THIS DIALOG.
- Click Continue. This will place the profile at the Workstation level of hierarchy. Profile Assignments are saved automatically and take effect immediately.
The level of hierarchy can be changed later, if needed. - IF you process both retail sales and installment billing from this workstation, then you will want to create and link a separate credit card profile for billing. Two separate profiles (with separate Profile IDs) must created for this purpose.
- Click the 'X' in the upper-right hand corner of the Profile Assignments panel to Exit.
This completes the setup steps for your ETS Credit Card profile. Repeat these steps as necessary for other ETS Credit Card profiles.
Warning:
You MUST set up at least one (1) separate Elavon/ETS account for EVERY separate function for which you accept/allow credit cards. If you use RecTrac and WebTrac, and if you do Installment Billing/Auto-Debit and if you run a restaurant/bar and process credit card tips, you MUST setup at least one (1) separate account with Elavon/ETS for EACH function.
For Example: Your organization uses all of these functions – RecTrac, WebTrac, Installment Billing/Auto-Debit and Tip Processing. In order to use the Elavon/ETS solution, you need to setup a minimum of four (4) accounts with Elavon/ETS: an account for normal retail transactions (RecTrac), an account for e-Commerce transactions (WebTrac), an account for MOTO transactions (Installment Billing/Auto-Debit), and an account for tip processing (restaurant). If you use RecTrac, WebTrac and run Installment Billing/Auto-Debit only (i.e. if you do not run a restaurant), you will need three (3) accounts. Etc….
When creating and linking ETS Credit Card Profiles, at least one (1) separate profile will be required for each function, because information (Terminal IDs, Client IDs, ECOM Request IDs, etc…) will vary by account type. So if you have created and linked a Credit Card profile for your Normal Retail account (RecTrac) but you also have WebTrac and you run Installment Billing, you will need to create and link at least two (2) more profiles: one for your e-Commerce account and one for your MOTO/billing account.
Create and Link an Auth Receipt Profile
Perform the steps outlined in this section for each workstation from which you will print credit card authorization receipts. Vermont Integration Client (VIC) MUST be installed on those workstations.
Note:
This section details how to create and link an Auth Receipt profile only. It does not cover setup of the physical hardware, as many makes and models exist. If you require assistance with or documentation for physical printer set up and operation, contact Vermont Systems Support via the Customer Portal of our Vermont Systems website.
- In RecTrac, go to Management Ribbon • System Management • User/Menu/Profile Management Group • Profile Assignments. Click Add.
- Enter a Profile Code for your auth receipt printer. For Example: "EPSON CC Auth 1"
- Expand the Drop-down list for Profile Type and select Printer.
- Accept the default Profile Subtype, Printer.
- Enter a Profile Description. For Example: "EPSON TM-T88V Auth Receipt Printer 1"
- Click Create. You will continue to the Profile Update screen.

- In the Windows Printer Path/Name field, enter the name of the Printer as it appears in Windows on the workstation to which it is linked, regardless of whether it is a network printer or one dedicated to the single workstation only.
- Leave the Dupe Printer Code field blank.
- Click Save to save your changes. You will return to Profile Assignments.
- Determine where you wish to link the profile. For purposes of example, this document will link the profile at the Workstation level.
- In the Linked Profiles middle column, click to expand the Workstation folder.
- In the Available Profiles left-hand column, click to highlight the Printer profile you just created.
- Click again and hold the mouse button down. When you have "grabbed" the profile, a red box will appear that displays the profile name.
- Drag and drop. Drag to the appropriate Workstation Name in the middle column. When the box turns green, release the mouse. The Profile Assignment Add dialog box will appear.
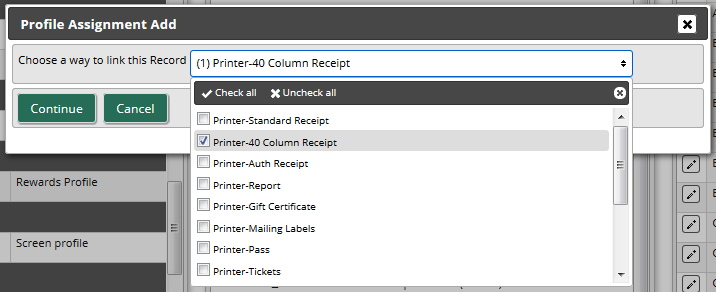
- Click the Combo Box icon and select the purpose(s) for which this printer will be used. Multiple selections are allowed, but in most cases, you will select Printer-Auth Receipt only.
- Click Continue. This will place the profile at the Workstation level of the hierarchy. Profile Assignments are saved automatically and take effect immediately.
The level of the hierarchy can be changed later if needed.
Note:
A separate profile record will appear for each option you select.
- Click the 'X' in the upper-right-hand corner of the Profile Assignments panel to Exit.
This completes the setup steps for your Auth Receipt Printer profile. Repeat these steps as necessary for other Auth Receipt profiles.
Using ETS
Processing Transactions in RecTrac
The following provides brief examples of common credit card transactions in RecTrac. Other than the RecTrac Payment Screen, screens that you visit during the transaction process will vary depending factors such as, but not limited to: Your Elavon/ETS Account type, the physical hardware you use to read credit cards, whether a household is opting to use a credit card they've used with you before, etc…. Screen shots used below are included for example only. You may or may not visit them during actual processing.
Processing a Sale in RecTrac
- Process the sale as you normally would and proceed to the payment screen.
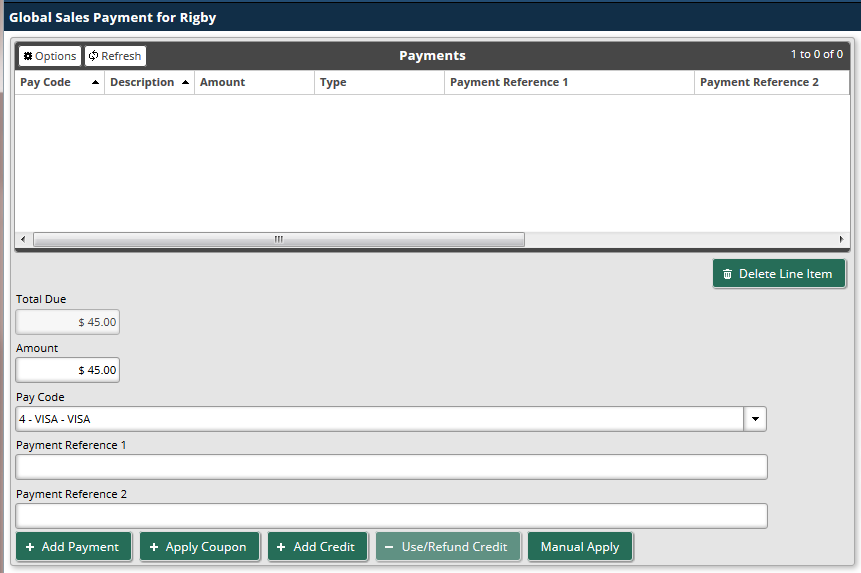
- Enter the appropriate Credit Card Payment Code.
- If the household has a credit card linked to their account, expand the Linked Credit Cards Drop-down list and select it, if desired by the patron.
For purposes of example, there is NO linked credit card for the transaction described here because you DO NOT visit the Elavon/ETS credit card entry screen when using a credit card already stored on a household. - Click Add Payment when ready. You will proceed to the secure Elavon/ETS gateway where you will be prompted to swipe the card, if using a Pin Pad or enter the card manually if no Pin Pad is connected. Make sure the Elavon/ETS Window has been clicked and is in focus before swiping the card.
For purposes of example, manual card entry will be performed.
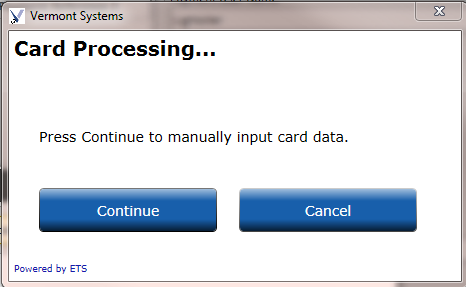
- Regardless of Pin Pad entry or Manual entry, click Continue. When using Manual entry, you will proceed to the Enter Card Information screen.
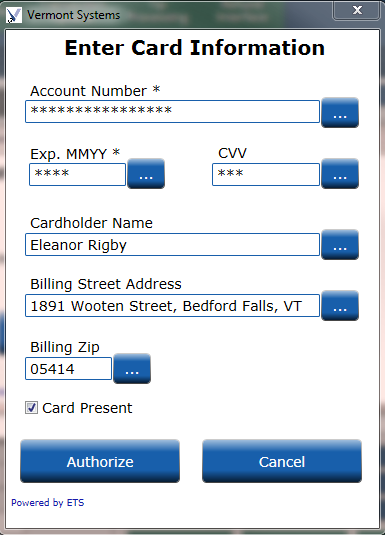
- Click Authorize. When the transaction authorizes, you will be returned to the RecTrac payment screen.
- Click Process and complete the sale as you normally do.
Processing a Refund in RecTrac
In order to process a Refund Now transaction in RecTrac to a credit card using Elavon/ETS, you will need a receipt number for a transaction for which the credit card was used. Optimally, the receipt number you use will be the receipt for which the original transaction was processed, but this is NOT a requirement.
Generally speaking, the fastest way to find a receipt number to look at the Purchase History tab (in Global Sales) for the household to whom you are processing the Refund, or for your Internal Household in the event of a Daily Sale. Household Transaction History inquiries/reports and Cash Journal reports also list receipt numbers.

- Once you have determined the Receipt number, process the refund like you normally would and proceed to the refund screen.
- Expand the Drop-down list for Refund Option, and select Refund Now.
- Enter the appropriate Credit Card Payment Code
- Enter the Receipt Number. Optimally this will be the same receipt that was used for the original transaction, but any receipt number linked to a transaction linked to credit card to which you are applying the refund will work.
- Expand the Linked Credit Cards field and select the appropriate record.
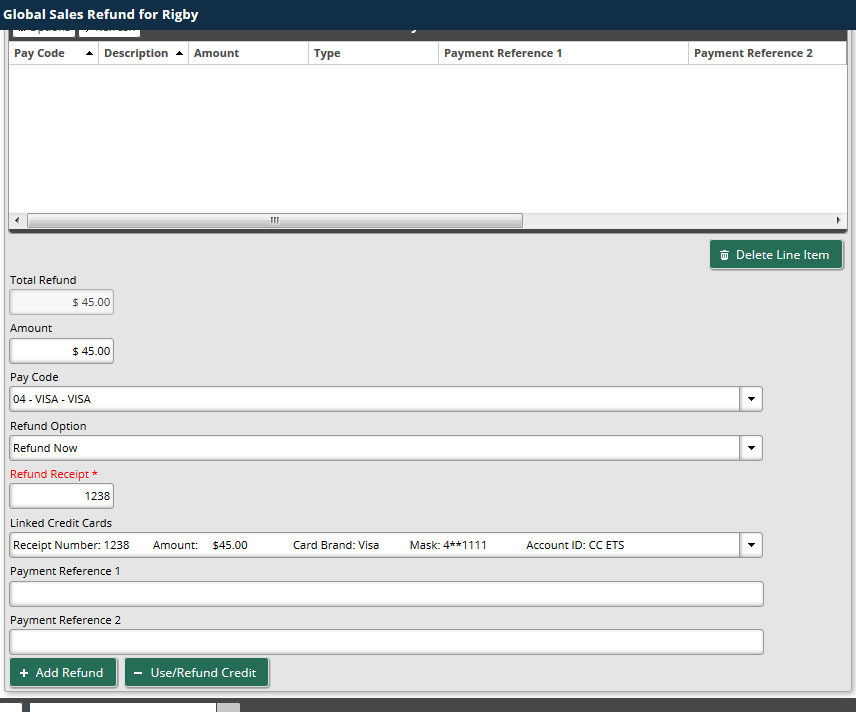
- Click Add Refund when ready and then click Process.
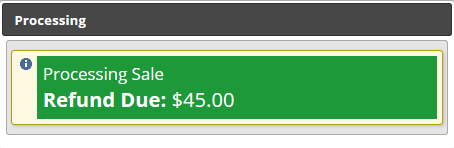
- Wait while the system completes the transaction. You will be returned to the Global Sales Lookup screen when done.
Duplicate Transaction Checking
Duplicate transaction logic has been added to Elavon/ETS credit card processing. If a duplicate transaction is found the following message will appear
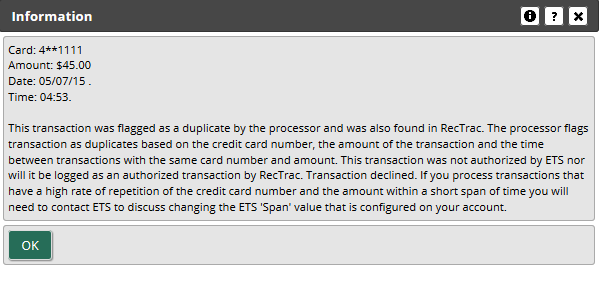
- Click OK. You will return to the RecTrac Payment Screen where you may attempt to process the transaction again using the same credit card, or you may process the transaction using another form of payment.
Processing Tips in RecTrac
Note:
To process Tips via Elavon/ETS, ensure your ETS Credit Card profile is set as follows:
- Account Type = Restaurant
- Tip GL Code - This field must be populated.
- Tip Cost Center - (Optional)
- In RecTrac, go to Processing Ribbon • Tip Processing
- Process Tips as you normally would.
Use the "i" and "?" Help icons for field definitions, and examples if needed. - When you click Submit Tip Amount, the amount entered will be added to the original amount of the sale on your Elavon/ETS Account page as a Gratuity.
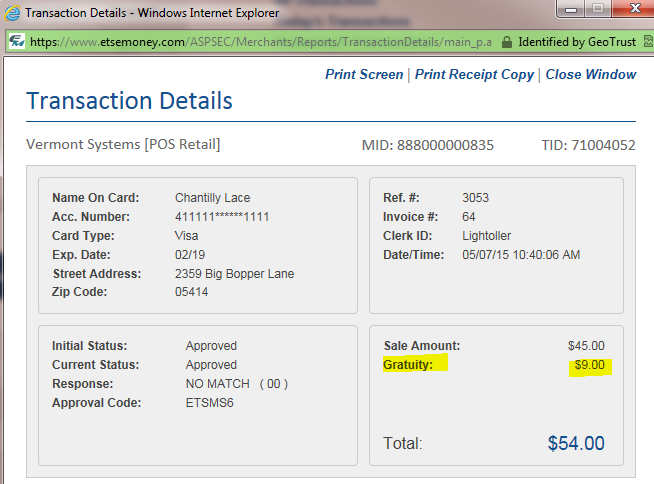
Note:
To update or revise a Tip Amount that you have submitted, return to the Tip Processing program, set the Status to show and find the transaction. Process the Tip again as you normally would (i.e. re-enter the exact amount of the tip). The Elavon/ETS site will update the Gratuity with the new amount as if you were entering it for the first time.
Processing Transactions on the Elavon/ETS Website
You may not process blind credits in RecTrac Blind transactions can be processed only via the Elavon/ETS website. Some of the more common scenarios are discussed below.
Processing a Blind Sale on the Elavon/ETS Website
- Open a web browser and go to https://www.etsemoney.com/ASPSEC/Login/Main.asp
- Using the Login and Password given to you by Elavon/ETS, log into your account.
- Click Direct Transaction Input.
- Complete the appropriate information and be sure that the Authorization Type is Credit/Refund.
- Click Submit Transaction.
Processing a Blind Refund on the Elavon/ETS Website
- Open a web browser and go to https://www.etsemoney.com/ASPSEC/Login/Main.asp
- Using the Login and Password given to you by Elavon/ETS, log into your account.
- Click Direct Transaction Input.
- Complete the appropriate information and be sure that the Authorization Type is Credit/Refund.
- Click Submit Transaction.
Processing a Void on the Elavon/ETS Website
Note:
Typically you will NOT void a transaction via the Elavon/ETS website unless you processed an irregular transaction in RecTrac or WebTrac. The normal process for issuing a refund/cancellation is to processing a refund in RecTrac to ensure accurate reporting and transaction history records.
- Open a web browser and go to https://www.etsemoney.com/ASPSEC/Login/Main.asp
- Using the Login and Password given to you by Elavon/ETS, log into your account.
- Click Edit Unsettled Transactions.
- You can use any of the search options on this screen to find a specific transaction.
- Once you have found the transaction you wish to void, click the down arrow in the Status column for that transaction and choose Void.
- Scroll to the bottom of the screen and click Update.
- The Transaction Summary area of the screen will reflect the total count and total amount of all Voids within the selected range of transactions.
- Click Delete All Voided Transactions when you are finished if you wish to permanently delete all of the voided transactions within the selected range.
- Repeat as necessary or logout of the Elavon/ETS website.
Settlement and Reporting Options
Settlement
The Elavon/ETS settlement process is automatic. Transactions are settled as they are processed. There is no need to use the RecTrac Credit Card Terminal, nor is there a need to settle transactions via the Elavon/ETS website.
Reporting on Credit Card Transactions in RecTrac
- In RecTrac, go to Reporting Ribbon • All Reports • Credit Card Report.
- At the bottom of the screen, expand the Drop-down List for Output Template and select VSI - Credit Card Report.
- Highlight/select the Profiles (i.e. Merchants) in the Credit Card Profiles DataGrid on which you wish to report.
- Accept the default entries in the Date/Time Filters group or make alternate date selections, if desired.
Note:
Refer to RecTrac Date Select Fields for a listing of selection definitions and examples for the Processing Date fields, if necessary.
- On the Transaction Filters group, expand the Combo Box icons for Record Status, Transaction Type, and Pay Codes and make your selections.
- Fill in all remaining report selection criteria based on the data that you want to view on the report.
Use the "i" and "?" Help icons for field definitions, and examples if needed. - Click Process. You will continue to the Report Options screen. Make your selections and click Continue.
Click here to see a sample of the Credit Card Report.
Processing Diagram/Flow Chart

Charging Convenience Fees
To help offset the “cost of doing business” and in lieu of raising prices across the board, many municipal organizations charge their customers convenience fees which are usually determined either by where (online or in the store, for example) or how (method of payment, for example) a customer shops.
Charging convenience fees for the use of credit cards/debit cards can be a superior solution to raising overall prices because it passes along the aforementioned “cost of doing business” to those most directly responsible for the increased operating costs (the credit card/debit card users) while sparing those who utilize other methods of remittance (cash, checks, gift certificates, etc…) any added expense.
If opting to charge these fees, Elavon/ETS will contact VISA/MasterCard. VISA/MasterCard will perform an audit of your department's finances to ensure the fees you wish to pass along to your customers are within industry standards. This process will take up to 60 days.
You can charge convenience fees using Elavon/ETS with no additional set up in RecTrac. However, set up is required with Elavon/ETS.
IP Addresses, Domain Names, and Ports for Elavon/ETS
Below are the IP Addresses and Domain Names for Elavon/ETS:
IP Addresses
216.109.70.32/27
_ permit ip 65.220.43.192 0.0.0.31 (CISCO ACL)
65.207.75.0/24
_ permit ip 65.207.75.0 0.0.0.255 (CISCO ACL)
209.120.173.0/24
_ permit ip 209.120.173.0 0.0.0.255 (CISCO ACL)
65.213.222.0/26
_ permit ip 65.213.222.0 0.0.0.63 (CISCO ACL)
205.178.152.165
_ permit ip host 205.178.152.165 (CISCO ACL)
65.220.43.192/27
_ permit ip 65.220.43.192 0.0.0.31 (CISCO ACL)
65.220.43.224/27
_ permit ip 65.220.43.224 0.0.0.31 (CISCO ACL)
65.221.14.0/26
_ permit ip 65.221.14.0 0.0.0.63 (CISCO ACL)
173.72.184.194/27
_ permit ip 173.72.184.194 0.0.0.31 (CISCO ACL)
50.232.238.65/28
_ permit ip 50.232.238.65 0.0.0.15 (CISCO ACL)
Domain Names
*.emoney.com [Processing, Browser Access]
*.emoneygc.com [Processing, Browser Access]
*.etsms.com [Processing, Browser Access]
*.etsemoney.com [Processing, Browser Access]
*.emoney2k.com [Processing, Browser Access]
*.networkgls.com [Processing]
*.etsemoney.ca [Processing, Browser Access]
*.pmoney.com [Processing, Browser Access]
*.eftregistration.com [Browser Access]
*.losethewallet.com [Browser Access]
*.billpay.io [Browser Access]
*.eftregistration.com [Browser Access]
*.gamechangerpos.com [Browser Access]
Ports
80 [Egress]
443 [Egress]