Topic Doc: Linking Household & Family Member Documents
RecTrac 3.1

Written by Daniel Rotondi
Updated at May 12th, 2023
Table of Contents
Document Summary
RecTrac gives you the ability to link waivers and documents to households and family members. This is great for organizations that need to keep permission slips, birth certificates, waiver letters, proof of residency, etc… on file. In addition, you can decide how often (in days) documents need to be updated.
Note: Electronic signature capture is available for waiver letters using a Topaz signature pad. Signature capture with the Topaz unit is optional. Household and Family Member documents can be linked with or without an electronic signature. For more information see Electronic Signature Capture.
License – Maintenance Agreement
The Household/Family Member Documents Interface is free. Use of the interface requires a Vermont Systems license and annual maintenance agreement for RecTrac and the component modules discussed in this document. Prior to implementing any process outlined in this document, please contact the Vermont Systems Sales department at 1-877-883-8757 to verify that you are authorized to use the modules discussed in this document and if not, to obtain a quote and/or approval.
Setup Steps
This document will walk you through the basic steps required to set up and link documents and waivers to records in RecTrac.
If you have additional questions about adding documents to your records after reading this document, please contact Vermont Systems Customer Service by phone at 887-883-8757 or generate a Support Case through the Customer portal of the Vermont Systems web site using your Customer ID and password.
Before You Begin
This document is written with the following assumptions. If any of the items listed is NOT true, contact Vermont Systems Support prior to continuing.
- Your organization is running RecTrac 3.1.04.00 or greater.
- The User ID with which you sign into RecTrac has the requisite permissions and ability to access all modules and functions pertaining to waivers and documents to include but not limited to: Letter/Waiver Management, Letter Group Management, System Codes, Profile Assignments, as well as management of the various RecTrac modules in which you want to configure waivers: Activity Management, Facility Management, and etc….
- You understand RecTrac DataGrids and how to maneuver through them.
- You understand RecTrac Profile Assignments and hierarchy.
File Maintenance Setup
This topic document will guide you through use of waivers:
- Creating waivers/letters
- Linking waivers/letters to Letter Groups
- Linking Letter Groups to RecTrac modules
- Linking a global waiver
- History of household and family member waivers
Additionally, this topic document will guide you through attaching other documents to households and family members:
- Creating System Codes for document types
- Linking documents to households or family members
- Deleting linked household/family member docs in bulk
Note: All file paths and screen/tab locations in this document refer to file paths and screen/tab locations as they appear in the standard, default VSI Design. Your setup and Design may vary.
Configuring Waivers
Configuring waivers is a two-step process: create the Letter with the desired text, and then create the Group that determines when the letter prints. In this section, you'll create the Letter/Waiver and link it to a Letter Group. The Letter Group is what is assigned to records within RecTrac (a record at-a-time, through a batch process, or globally across a RecTrac Module). Global waivers are great for when your organization has a policy that everyone must agree to the same, exact liability waiver across a RecTrac module.
Creating Letters/Waivers
The following steps provide the basic information needed to create a Letter/Waiver in RecTrac. This includes the text you want to print within the body of the waiver. For Example: I recognize that by participating in this activity there are inherit risks, I will obey all rules, and not hold the parks district liable for my injury.
- In RecTrac, go to Management Ribbon • System Management • Comment/Document/Letter Management group • Letter/Waiver Management.
- Click Add. You will continue to the Letter Update screen.
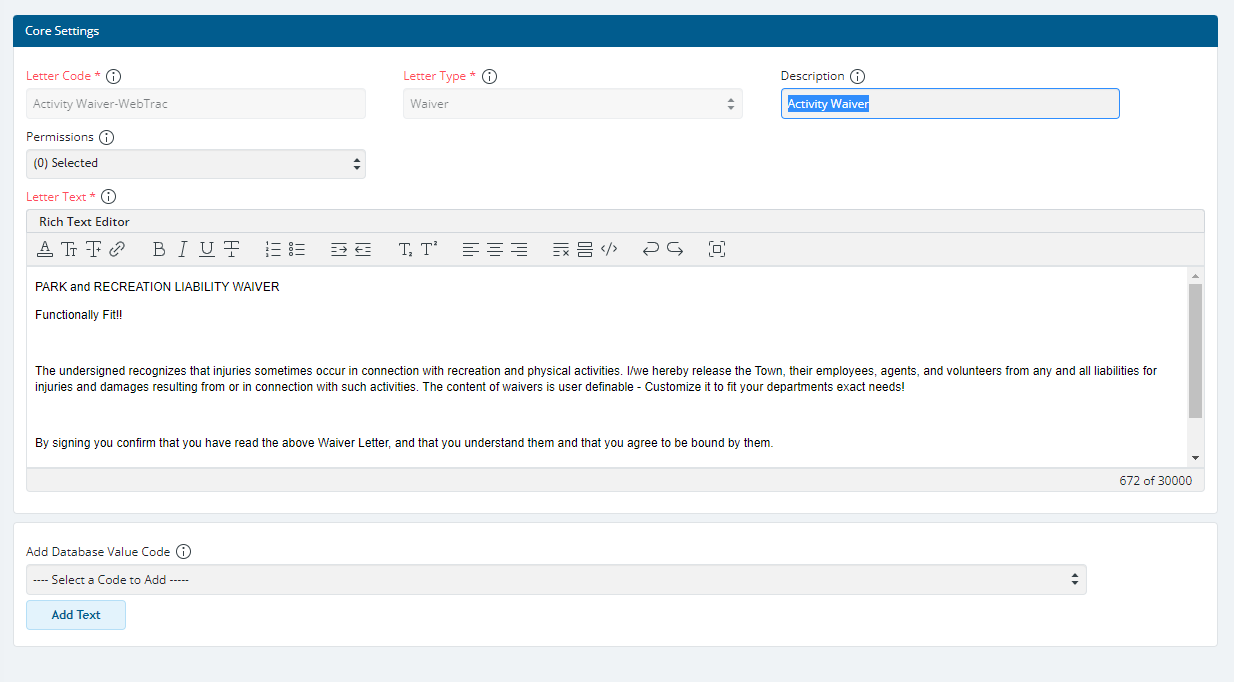
- Enter a code for the letter in the Letter Code field. For Example: If you were creating a liability waiver for use with use of a boat, then you might create a code such as: BOATING.
- Click the Drop-down List and select the Letter Type. Using the example above, you would select "Waiver."
- Enter a Description to help others identify this waiver. To continue with the prior example, you might enter a description such as: Boating Waiver.
- Click in the Combo Box icon to select the Permissions Code(s) you want to apply to this Letter/Waiver Code.
- Enter the waiver text you wish to print within the Letter Text area.
Note: If opting to "Copy, Cut, and Paste" text from a pre-generated document, then VSI highly recommends using .txt or .rtf file documents as the source. Using programs, such as Microsoft Word and .pdfs as your source is not recommended because they insert thousands of extra - often unseen - HTML characters into the code that result in problems ranging from unexpected formatting issues in RecTrac to exceeding the character count in this field.
If you wish to use text from a MS Word doc or .pdf, then VSI recommends the following "best practice:"
- Copy the original document to a .txt file, such as Notepad. Copying from MS Word or .pdf into a .txt or .rtf format strips any hidden HTML formatting.
- Proof-read for accuracy and ensure:
- All special characters copied correctly into Notepad.
- Pay special attention to Smart Quotes (aka: curly quotes), if you use them. Smart Quotes cannot be read and show up as random characters or blocks. IF you have Smart Quotes enabled in MS Word, then VSI recommends doing a Search and Replace in Notepad. Highlight the Smart Quote in Notepad, copy it, and then press + H to launch the Replace dialog. Paste the Smart Quote into the Find field and manually enter a quotation mark in the Replace field. Click Replace All.
- Text is fully left-justified in Notepad. All tabs, indentations and other formatting have been removed.
- Mid-line breaks have been removed, so text for any one line appears on its own line and/or with proper text wrapping.
- All special characters copied correctly into Notepad.
- Re-copy the text from Notepad and paste into the email field in RecTrac.
- Format text as needed using the Formatting icons at the top of this field.
- Proof-read again for accuracy.
- Database Value Codes allow you to automatically insert fields (such as First Name, Last Name, Home Address, Phone Number, Activity Number, Pass Expiration Date, Reservation Number, Trip ID, etc…) into the body of your letter.
-
Note: If you are using the Topaz signature capture, then the following text must be resident within the letter body on each Waiver and/or Rules/Regulations letter you wish patrons to sign electronically. This text is an auto text field and should be placed exactly where you wish to capture your customer's signatures: [SignatureCapture|Signature|height=40|x-position=10| |]. For more information, see "Topic Doc - Electronic Signature Capture."
- Use the Formatting Icons across the top of the Text Field to manipulate your text as desired. Mouse-hover over the icons for definitions of their purpose. The Text Field is WYSISYG (What You See Is What You Get) formatted.
- Use the "i" and " ?" Help icons on the upper-right hand corner of the screen for field definitions to complete your letter.
- Click Save and continue to the "Linking Letters/Waivers to Letter Groups" section that follows.
Linking Letters/Waivers to Letter Groups
Every letter/waiver must be linked to a Letter Group, which allows you to determine when, where, and how often the waiver will print. It is the Letter Group that you actually link to an activity, pass, rental item, and so forth, and not the waiver letter itself.
- In RecTrac, go to Management Ribbon • System Management • Comment/Document/Letter Management group • Letter Group Management.
- Click Add. You will continue to the Letter Group Update screen.
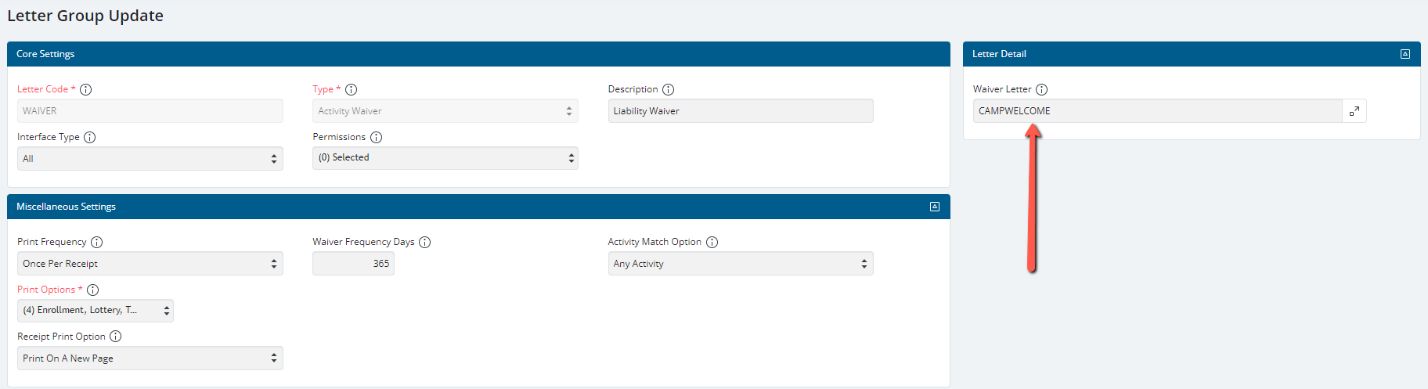
- Enter a Letter Code. For Example: If you were creating a Letter Group for use with boating rental, then you might create a code such as: BOATING.
- Click the Drop-down list and select the waiver Type. You can create a waiver for a specific module, such as the Rental Module, or use the Global Waiver type when your organization uses the same waiver across RecTrac Modules.
- Enter a Description. To continue with the prior example, you might enter a description such as: Boating Waiver. However, if you had different waivers for sailboats versus jet skis, then you would need a different Letter Group for each.
- Click in the Combo Box icon to select the Permission code(s) you want to apply to this Letter/Waiver Code.
- In the Letter Detail group, click the Picklist icon and select the Waiver Letter you wish to associate with this Letter Group. In this example, you would select the BOATING Waiver you created in the previous section.
- Expand the Drop-down list and choose the frequency (i.e. how often/how many times) you want the waiver linked to this Letter Group header to print.
- After every days - The wavier will print at its first opportunity for this household/family member when the Waiver Frequency Days threshold has been met. IF you choose this option, enter a value in the Waiver Frequency Days field. When that number of days has passed, the waiver will reprint when the household/family member processes a transaction that meets this waivers requirement. For Example: You have a Pass Visit Waiver and want it re-validated every three months. You would select After every 'X' days and enter '90' in the Waiver Frequency Days field. The waiver will print the first time a member swipes in. That waiver will be 'good' for 90 days from that first swipe-in. 90 days pass. The first time the member swipes in after the 90th day, the waiver will print again and the 90-day count will reset.
- Every Time - The waiver will print every time the conditions for the waiver are met. In the event the same receipt contains multiple instances that a wavier can print, it will print that many times.For Example: You have a wavier linked to your soccer programs. It is set to print with each registration. Maxwell Silverhammer registers his daughters, Rose and Valerie, into soccer. The waiver would print twice because both registrations meet the requirement.
- Once per Receipt - The waiver will print each time a receipt is generated that meets the requirements, but it will print only once per receipt regardless of how many times the conditions are met. For Example: You have a wavier linked to your soccer programs. It is set to print with each receipt. Maxwell Silverhammer registers his daughters, Rose and Valerie, into soccer. The waiver would print once only because even though both registrations meet the requirement, the enrollments are on the same receipt.
- Expand the Drop-down list to select your Receipt Print Option for the waiver linked to this Letter Group header.
- Print on a New Page - The waiver will print as part of the receipt. The system will insert a page break and the waiver will print on its own page.
- Print as a Separate Document - The waiver will print as its own document, separate from the receipt.
-
Within Receipt Detail - The waiver will print as part of the receipt. There will be no page break. When the receipt ends, the waiver will begin.
Note: When capturing Electronic Signatures on Waivers and/or Rules/Regulations Letters, VSI strongly recommends selecting Print on a New Page
See Also: Topic Doc - Electronic Signature Capture.
- Use the "i" and " ?" Help icons
 on the upper-right hand corner of the screen for field definitions to complete your letter group.
 - Click Save when done and exit back to the main RecTrac menu.
- Continue with the "Linking Waivers to RecTrac Modules" and/or "Linking Global Waiver" sections.
Linking Letter Groups to RecTrac Modules
Once you have created your Letter Groups, you need to link them to the appropriate records in RecTrac (i.e., specific activities, facilities, etc…). This section describes how to link a Letter Group to records one at-a-time and describes the Bulk Process option.
- In RecTrac, go to Management Ribbon, select the desired module and the management menu indicated below.
- Activity Management and then Activity Management
- Court Management and then Court Management
- Facility Management and then Facility Management
- Golf Management and then Golf Course Management
- League Management and then League Management
- Locker Management and then Locker Room Management
- Rental Management and then Rental Class Management
- Pass Management and then Pass Management
- POS Management and then Service Item Management
- Trip Management and then Trip Management
- Select the desired record within the DataGrid and then click Change.
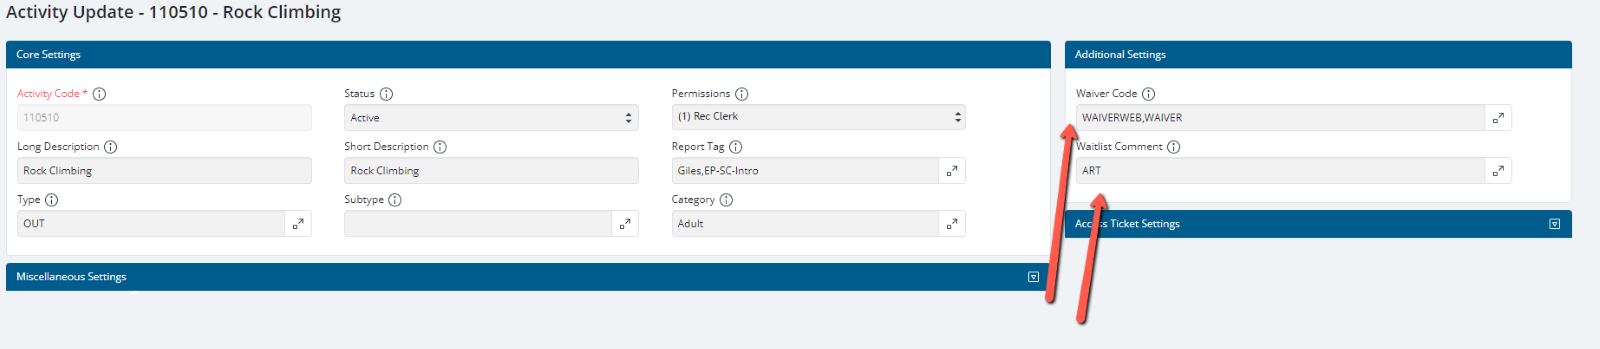
- Click in the Combo Box icon to select the Permissions code(s) you want to apply to this record. Permissions allow you to control which users can "see" the record when using RecTrac.
- In the Additional Settings section of the page, click the Combo Box icon to select the Waiver Code(s). You can only select from Letter Group Codes that are set to Waiver and configured for use with your current RecTrac module.
- Click Save.
- Repeat these steps, as needed, to link Waivers to additions items in RecTrac.
Note: To set the Waiver Code for multiple records in bulk (as opposed to doing it by individual record as outlined above), use the Bulk Change button in place of the Change button. Add the WaiverCode field to the Bulk Changes to Complete box and choose your desired value when prompted. Process your bulk changes as you normally would.
Use the "i" and "?" Help icons  on the upper-right hand corner of the screen for field definitions, if needed.

Linking a Global Waiver
If your organization has a universal – or “global” – liability waiver to which ALL customers must agree, you can link a global waiver through your Static Parameters profile. This will allow you to link ONE waiver (in ONE place) for all Activity Enrollments, Pass Registrations, Rentals (Equipment and Campsites), Locker Rentals and Personal Trainer Reservations without having to link it to all of the module specific records. For Example: Prior to sale, you might require everyone agree to follow all park rules and regulations while on the premises.
- In RecTrac, go to Management Ribbon • System Management • User/Menu/Profile Management • Profile Assignments.
- Click Static Parameters and the Profile Update window opens.
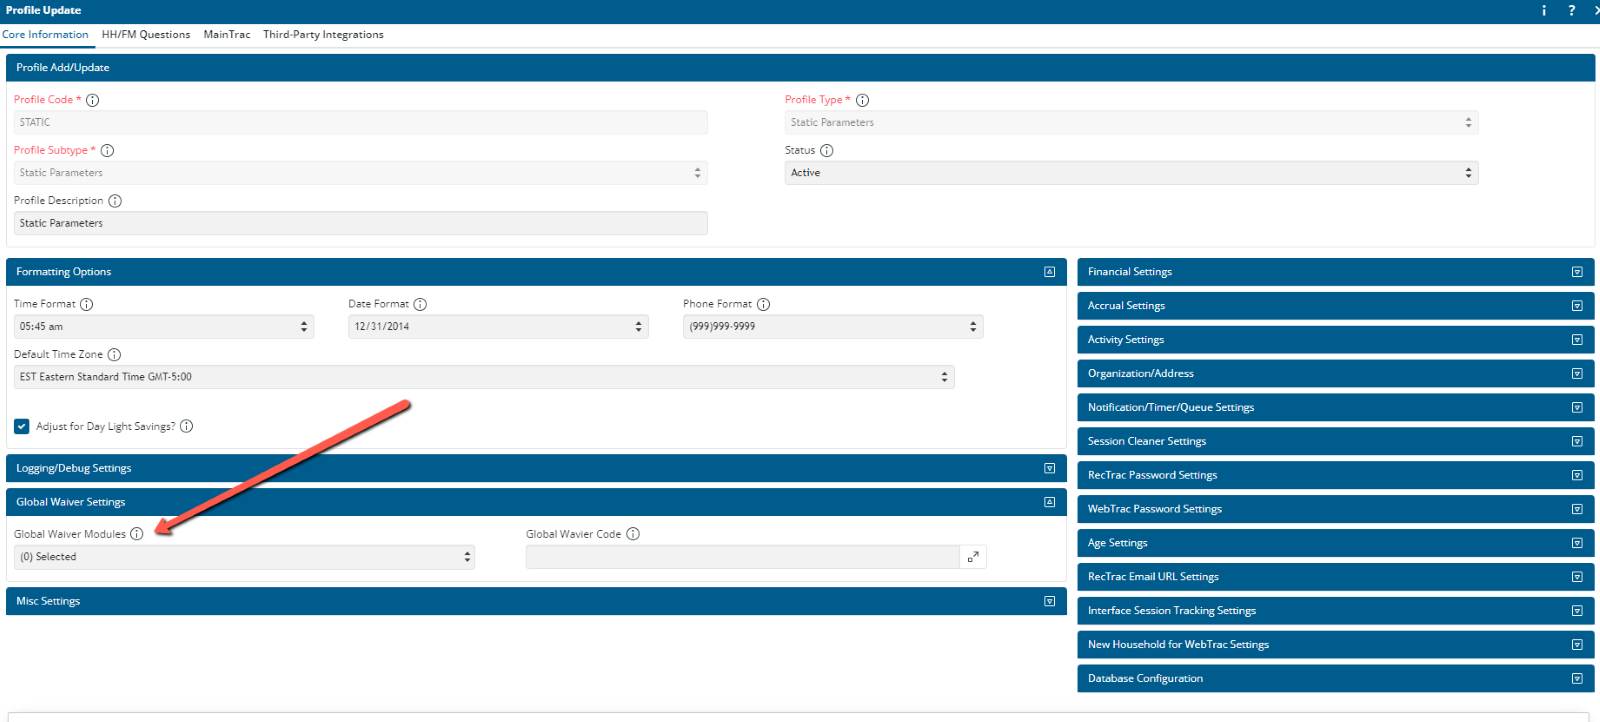
- Expand Global Waiver Settings.
- Click the Combo Box icon to select the Global Waiver Modules in which this global waiver should to apply (i.e., Activity Enrollments and Facility Reservations).
- Click the Picklist icon to select the Global Waiver Code you wish to use. For Example: You might have a code, such as GLOBAL. You can only select ‘Global Waiver’ type Letter Group Codes through this picklist.
- Click Save. Changes take effect going forward with the next transaction.
Viewing a History of Household and Family Member Waivers
Once a letter group is properly linked to records in RecTrac (to an Activity, Facility, etc…), it will print and get linked to the household and/or family member as determined by the settings on your Letter Group. You do not have to do anything further. Your patrons will purchase items, classes, and so on within WebTrac and the RecTrac and a waiver history is associated with their record. You can view the waiver history through Household Management.
- In RecTrac, go to Management Ribbon • Household Management.
- Select the desired household and then click Change.
- For a history of household waivers, click the Household Documents/Waiver History tab and continue with step #5.
- For a history of family member waivers, click Member Details for the desired family member. Click the Linked Documents/Waiver History tab.
- The Waiver History DataGrid displays their history.
Other Household and Family Member Documents
Document Categories allow you to organize Household documents within RecTrac. You will manually attach a document to a household or family member in RecTrac. The docs that get linked are external, such as a scanned image of your driver's license or of your child’s immunization record.
Creating System Codes for Document Categories
If you plan to manually link documents to households and family members then it is helpful to have categories for those documents.
- In RecTrac, go to Management Ribbon • System Management • Misc Management group • System Code Management.
- Click Add. You will continue to the System Code Update screen.

- Enter a Record Code. For Example: If you are creating a document category for use with proof of residency documents, then you might create a code such as: RESIDENCY.
- Click the Picklist icon to select Document Category for Type.
- Enter a Description. For Example: you might enter Proof of Residency.
- Click a Save.
- Repeat these steps as needed to create additional System Codes.
- Continue with the "Linking Documents to a Household or Family Member" section when ready.
Linking Documents to a Household or Family Member
Note: For best results, individual documents should not exceed 10MB in file size. If your document exceeds the 10MB threshold, you may experience a SABlobFile not found error when viewing it.
You can manually link documents to households or family members from within Household Management. This is great in the event you need to keep permission slips, birth certificates, waiver letters, proof of residency, etc… for your members on file.
- In RecTrac, go to Management Ribbon • Household Management.
- Select the desired household, and click Change. You will continue to the Household Update screen.
- To link a document to a Household:
- Click the Household Documents/Waiver History tab.
- The Household Documents section of the page lists the documents associated with this house and includes the buttons needed for adding, changing, deleting, and viewing them.
- Continue with step #5.
- To link a document to a Family Member:
- Click Member Details for the desired family member and then the Person Update window opens.
- Click the Linked Documents/Waiver History tab.
- The Uploaded Documents section of the page lists the documents associated with this family member and includes the buttons needed for adding, changing, deleting, and viewing them.
- Click Add Document. You will continue to the Document Update screen.

- Enter a Description to help others quickly identify the purpose of this document (i.e. Proof of Residency).
- Click the Pick list icon to select the Document Code you selected above.
- Click the File Upload icon, browse to and select the file you wish to link. Acceptable file types include: .bmp, .csv, .doc, .docx, .jpg, .pdf, .png, .txt, .xls, and .xlsx.
- The Link Date automatically uses today's date.
- Accept the default entry ("today's" date) or click the Calendar icon to select the "as of" Date for this document. The "as of" date is the date "as of" which the document is in effect.For Example: You require physicals for children's programs and link the document to the family member record when you receive it. You could link a family member's physical in the system "today" that was actually signed by the physician "last week." In this event, you would enter the date on which the physical was signed in this field, since that is the effective or "as of" date.
- Click the Calendar icon to select the Expiration Date for this document. This is the date after which this document will no longer be considered valid.For Example: You require physicals for children's sports programs and link the document to the family member record when you receive it. Physicals are good for a calendar year. Upon linking a family member's physical, you would enter a date in this field that corresponds to a year from when the physical was signed by the physician. So a physical that was signed on 08/28/20xx would have an expiration date of 08/28/20xy.
- Click Save.
- Repeat these steps to link additional documents as needed.
Note: Documents must be linked individually. There is no way to link Documents in bulk.
Deleting Linked Household/Family Member Docs in Bulk
All household and family member documents including waivers are stored within your RecTrac database and you will want to periodically clean them out. This section describes how to use the Document Purge program to delete those documents based on the date criteria you specify. The Delete Documents Older Than Date Select allows you to specify an exact date. This program can be run on demand as a one-off/run now event or can be Scheduled to run periodically and continually purge documents that are no longer needed.
Employ EXTREME CAUTION when running this program!!!! Purged records are completely deleted from your database. They cannot be recovered.
- In RecTrac, go to Management Ribbon • System Management • Period End Processes group • Document Purge.

- (Recommended) Make a backup of your database OR make certain your most recent backup is valid. In the event you purge more records than intended, your only recourse for their recovery will be to perform a full database restoration from a backup.
- Click the Combo Box icon to select the Document Types you wish to purge. For Example: If you want to purge both household and family member documents, you would select Documents - Household and Documents - Family Member.
- Expand the Drop-down list and select the Delete Documents Older Than date option for your Document Purge process.
THEN
Take appropriate action in the right-hand column to specify the actual date you wish to select. Documents older than the date you select will be purged by the process.
As a general rule, VSI recommends keeping at least three (3) years of data based on your organization's policy that might represent a calendar or fiscal year. - Click Process to run the purge. The program is run on the AppServer and the Notification Center will inform you when the process is complete.