GlobalSalesPayment Help

Written by Zach Malloch
Updated at August 7th, 2023
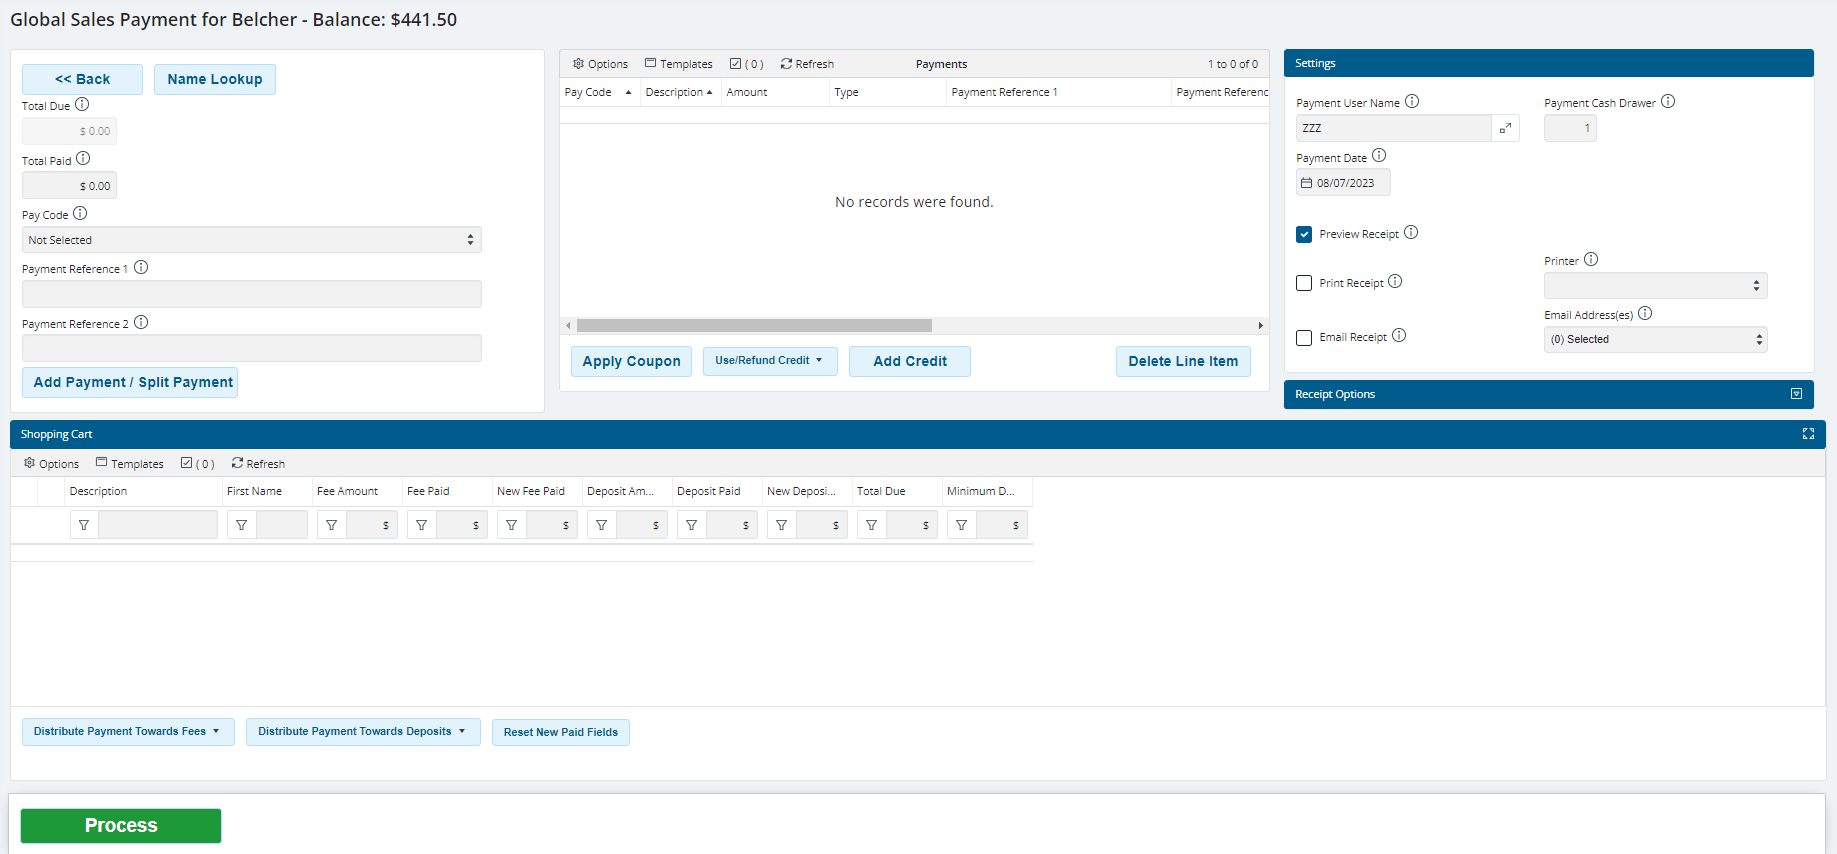
The Global Sales Payment for <Household> screen is where you go to complete a Global Sales transaction in RecTrac. From this screen, you can Add Payments, Add Coupons, Add Credits, Use/Refund Credits, use Manual Apply, and opt to use an Alternate Payee, if desired. These buttons are discussed in detail below.
See Also: Topic Doc - Refunds.
Basic Steps to Process a Sale Transaction where the Patron is Paying in Full
Notes: These steps assume the customer is paying in full, so no distribution of payment is required. In the event the customer is NOT paying in full, then refer to The Shopping Cart and Distribute Payment Buttons section below, which appears after the button definitions.
- Upon landing on this screen, the Total Due field will be populated with the sum of charges linked to the transaction.
- If the customer is using a Coupon (or Coupons), then click Add Coupon and select the appropriate Coupon Code(s) from the Picklist. Coupons must be applied before any Payments. Coupon Codes do NOT appear in the Payments DataGrid upon being applied. You will not see them. Rather, the Amount field is simply reduced by the value of the Coupon being applied.
- Enter the amount the patron is paying in the Amount field.
- Expand the Drop-down list for Pay Code and make your selection. For Example: Cash, Check, Charge Card, etc….
- Enter Payment References as needed. For Example: If the patron is remitting with a Check, you might enter the Check Number in this field..
- Click Add Payment. A line item matching your amount paid and payment code will appear in the Payments DataGrid.
- Accept the default entries for Payment Information (User Name, Drawer, and Date) and Receipt Information (Preview, Print, and/or Email).
- Expand the Receipt Options group, if needed, to make additional selections.
- IF this transaction will result in a Credit being applied to the household (i.e. if the Household is paying more than is due), then expand the Add Credit/Refund Apply - Restrictions group, if needed, to set parameters on how that credit can be used in a future transaction.
- Click Process when ready to complete the Sale. Receipt(s) will be generated and you will be returned to the Global Sales Lookup screen.
Buttons on the Screen
<<Back - This button returns you to the Global Sale screen. The current transaction will be in force and all items that were in the Shopping Cart will remain.
Name Lookup - This button can be used to cancel the current transaction. Click Name Lookup to return the Global Sales Lookup screen. The current transaction will be cancelled and any items in the Shopping Cart will be removed.
Add Payment - This button is used to add a record to the Payments DataGrid. When you have entered a value in the Amount field and selected a Pay Code, you use this button to place the payment record in the Payments DataGrid.
Alternate Payee - This button allows you to select an Alternate Household when completing a transaction. Click this button to continue to the Global Sales Lookup screen and select a different household, if desired. Payment for the items being purchased will post to the alternate household selected by the clerk. When using Alternate Payee logic, be sure to click this button BEFORE applying any payments. In other words, click Alternate Payee, select the household, and then start applying payments.
To use Alternate Payee logic, enable the Allow Alternate Payee option on your Static Parameters profile • Financial Settings group.
Note: When using Alternate Payee logic:
- The payment record does NOT show under the Alternate Payee's Purchase History. The payment record is found in Purchase History on the original household for whom the item was purchased. The receipt shows the alternate payee's name.
- Refunds go back to the alternate payee. They don't go to household for whom the item was purchased.
- You can refund only to an alternate payee who is linked to the initial sale. In other words, you can't use Alternate Payee logic to refund to a third party. For example, Winthrop Paroo is enrolled in Boys Band. His grandmother paid for the enrollment. His mother, Marian Paroo, cancels Winthrop's enrollment in Boys Band. She wants the refund to go to Harold Hill. The system will disallow this because Harold wasn't the original alternate payee for the enrollment. The refund has to go back to Winthrop's grandmother.
- Payments made toward Childcare-eligible programs and services using an alternate payee are recorded under the alternate payee's household and will appear on Childcare Statements printed from RecTrac/WebTrac for the alternate payee.
- Alternate Payee logic is available only for payments toward balances made through RecTrac Global Sales at this time. There is no alternate payee option for Auto-Debit through Installment Billing.
- This is a system-wide setting, so once the Allow Alternate Payee option is enabled, the Alternate Payee button will appear on all RecTrac payment screens that use the standard Vermont Systems design. Alternate Payee buttons may have to be added to payment screens that use a Custom design.
Apply Coupon - This button is used to apply a coupon against the Total Due. Click Apply Coupon to continue to the Available Coupons DataGrid. Highlight/Select the Coupon Code you wish to apply against the Total Due, enter a Serial Number if needed, and click Select. You will be returned to the Payment screen.
Notes:
- Coupons must be applied before Payments are added, so if a coupon is being used during a transaction, then this button must be clicked FIRST.
- Coupon Codes do NOT appear in the Payments DataGrid upon being applied. You will not see them. Rather, the Amount field is simply reduced by the value of the Coupon being applied.
Use/Refund Credit - This button is used to either apply an existing credit against the Total Due OR to process a Refund of a credit.
- In a Refund scenario, the system assumes the patron wants a full refund.
- In an Apply Credit scenario (i.e. when using a Credit to pay for a balance), the system will simply apply the credit toward the balance. However, you also have the option to apply the credit manually, meaning you can use the credit toward balances as you see fit. To do this, expand the Drop-down list and select Manual Apply Credit. You will continue to the Manual Apply Credit screen.
Add Credit - This button is used to create a credit balance on the household as a result of the transaction. When a patron wishes to pay more than is due (i.e. "overpay" or "pay ahead" or etc…), you click this button to add the value in the Amount field to the Payments DataGrid. Credits must be added to the Payment DataGrid as a separate line item. For Example: The patron is purchasing a Pass Membership that costs $100.00. The patron wants to pay $150.00. To do this, you must add the $100.00 for the Pass Membership first (use the Add Payment button) and then add the $50.00 credit using this button.
Notes:
- Do NOT use the Add Payment button to add a credit. That will result in a Change Back transaction. Follow the steps above to add a credit.
- You can place restrictions on how Credits can be used, if desired. Prior to adding a Credit to the Payments DataGrid, expand the Add Credit/Refund Apply - Restrictions group and make a selection in the Credit Modules and other fields as needed.
Delete Line Item - This button is used to remove records in the Payments DataGrid. Highlight/select a record in the Payments DataGrid and click this button to remove it.
Process - This button is used to complete the transaction.
The Shopping Cart and Distribute Payment Buttons
The Shopping Cart DataGrid always displays all items in the current transaction.
The Distribute Payment buttons beneath the Shopping Cart come into play if and only if the customer is NOT paying in full for the transaction but rather is making a partial payment. Reasons that a customer may not remit in full for a transaction include, but are not limited to:
- The customer is paying a Deposit Fee only.
- You require a down payment for the transaction but full remittance is not due until a later date.
- The customer has insufficient funds to remit in full.
The Global Sales Payment screen provides two (2) options for partial payment scenarios. Basic instruction for each scenario appears below.
- Use InLine Editing to distribute the payments.
- Use the Distribute Payment buttons to distribute the payment.
Use InLine Editing to Distribute Payments
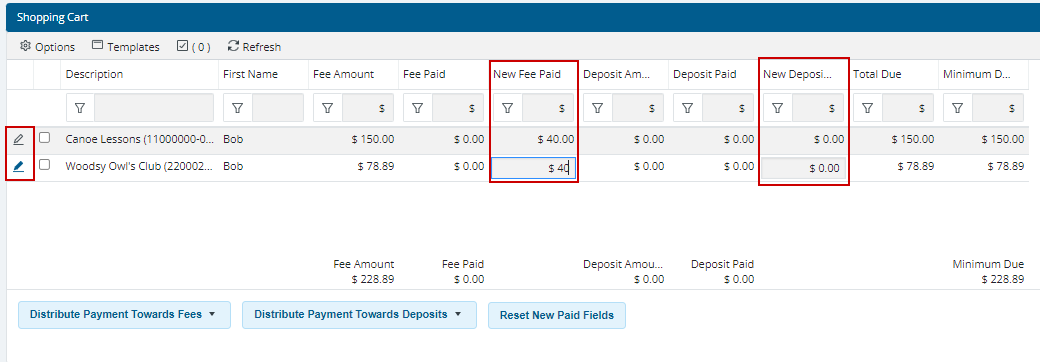
Using InLine Editing to distribute partial payments is the recommended method because it the most direct, as it allows you to enter partial payment amounts to the customer's specifications in the fields where they belong. In the scenario below, the customer is enrolling into two (2) Activities. The Total Due is $228.89. The customer is paying $80.00 total and wants to distribute it, $40.00 each to both Fees. There is no deposit.
- Upon landing on this screen, the Total Due field will be populated with the sum of charges linked to the transaction.
- If the customer is using a Coupon (or Coupons), then click Add Coupon and select the appropriate Coupon Code(s) from the Picklist. Coupons must be applied before any Payments. Coupon Codes do NOT appear in the Payments DataGrid upon being applied. You will not see them. Rather, the Amount field is simply reduced by the value of the Coupon being applied.
- Click the Stylus icon on the first transaction in the Shopping Cart. Fields for New Fee Paid and New Deposit Paid will become active.
- Enter the amount the customer is paying in each applicable field.
- If the customer is paying toward the Fee, then enter the specified amount.
- If the customer is paying toward a Deposit, then enter the specified amount.
- In the example above, the customer is paying $40.00 toward the Fee.
- Click the Stylus icon again to close InLine Editing.
- Repeat Steps 3 -5 as needed for each applicable Fee.
- Click Add Payment. A line item matching your amount paid and payment code will appear in the Payments DataGrid.
- Complete the transaction as you normally would. The payments will be distributed and the customer will be left with a balance due for the remainder.
Note: When using InLine Editing to distribute payments, you can click the Reset New Paid Fields button at any time. This will reset all distributions back to 0.00 so you may start again.
Use the Distribute Payment Buttons
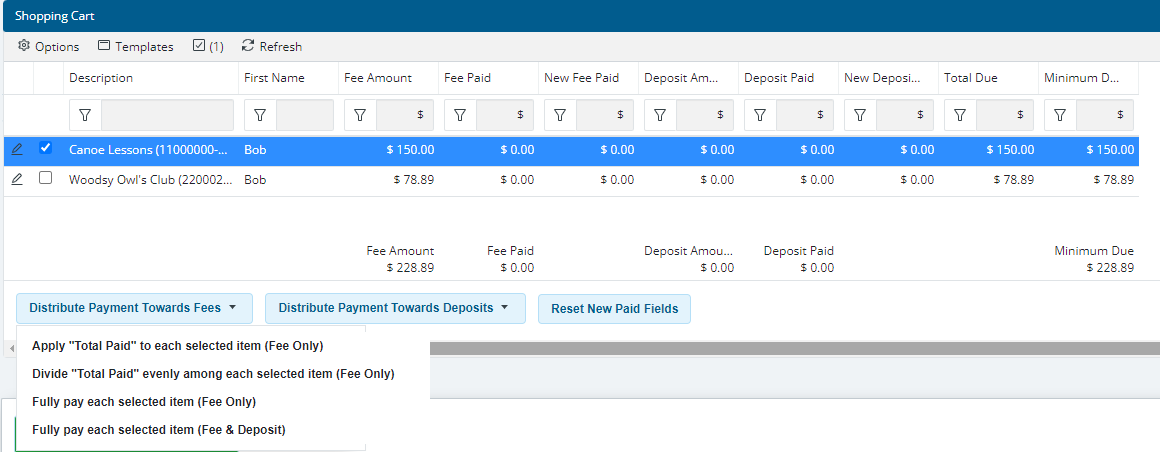
The Distribute Payment Buttons are more complex because they offer different options for distributing payments. However, the process is faster, provided you are familiar with the functionality. In the scenario below, the customer is enrolling into two (2) Activities. The Total Due is $228.89. There is no deposit.
- Upon landing on this screen, the Total Due field will be populated with the sum of charges linked to the transaction.
- If the customer is using a Coupon (or Coupons), then click Add Coupon and select the appropriate Coupon Code(s) from the Picklist. Coupons must be applied before any Payments. Coupon Codes do NOT appear in the Payments DataGrid upon being applied. You will not see them. Rather, the Amount field is simply reduced by the value of the Coupon being applied.
- Determine whether the customer is paying toward Fees, Deposits, or both. The answer here determines which button you will use. For purposes of example in these steps, the customer is paying toward Fees.
- In the Shopping Cart, select/highlight the line item(s) toward which the customer is paying. In the example above, the customer wants to make payment toward both Fees, so both line items have been selected.
- Enter a dollar amount in the Total Paid on the top half of the Global Sales Payment screen,
THEN
Expand the Drop-down list that corresponds to the answer from Step 3 above (making payments toward Fees or Deposits). In this example, the customer is paying toward a Fee, so the Drop-down list for Distribute Payments Toward Fees is being used. - Make your selection from the following:
- Apply 'Total Paid' toward each selected item (Fee Only) - The system will apply the same amount in the Total Paid toward each item selected in the Shopping Cart, so if the Total Paid=$40.00 and two line items are selected in the Shopping Cart, then the system will pay $40.00 toward each item and the total charge to the customer will be $80.00 because 40 x 2 = 80.
- Divide 'Total Paid' evenly among each selected item (Fee Only) - The system will split the amount in the Total Paid as evenly as possible and apply it to each item selected in the Shopping Cart, so if the Total Paid=$40.00 and two line items are selected in the Shopping Cart, then the system will pay $20.00 toward each item and the total charge to the customer will be $40.00.
- Fully pay each selected item (Fee Only) - The system will override whatever is in the Total Paid field and simply pay the Fee for each item that is selected in full, so if the Total Paid=$40.00 and two line items are selected in the Shopping Cart, then the system will pay the Fee amount for each item in full. In the example above, the charge to the customer would be $228.89.
- Fully pay each selected item (Fee and Deposit) - The system will override whatever is in the Total Paid field and simply pay the Fee and Deposit (if any) for each item that is selected in full, so if the Total Paid=$40.00 and two line items are selected in the Shopping Cart, then the system will pay the Fee amount for each item in full. In the example above, the charge to the customer would be $228.89 because there is no Deposit.. Assuming there was a $25.00 Deposit on each Activity, the Total Amount would be $278.89.
Notes:
- The options for the Distribute Payments Towards Deposits menu work exactly as described above except the system makes payments toward Deposit Fees instead of Transaction Fees.
- If the total amount being paid exceeds the total amount due for an item, then the system will simply apply as much as the fee. Using the example above, if you were applying $100.00 toward each Fee, the system would apply $100.00 toward the top line item in the Shopping Cart (leaving a balance of $50.00) and $78.89 toward the second line item in the Shopping Cart for a Total Payment of $178.89. The system will not "over pay" and create a credit situation.
- The Reset New Paid Fields button is not applicable when using the Distribute Payments buttons.
- Click Add Payment. A line item matching your amount paid and payment code will appear in the Payments DataGrid.
- Complete the transaction as you normally would. The payments will be distributed and the customer will be left with a balance due for the remainder.
Payment
Total Due (GlobalSalesPayment_TotalDue)
You will not visit this field.
This field displays the current Total Due for the current transaction. As payments coupons and/or credits are added to or deleted from the Payments DataGrid this value will increase or decrease accordingly.
Note: In the event of a Refund situation the field label will be Total Refund.
Total Paid (GlobalSalesPayment_Amount)
Enter the remittal amount in this field. The value you enter here should be equal the amount the patron is paying for the Pay Code selected.
Note: The default amount that appears in this field upon arrival on the Payment screen is determined on a Module-by-Module basis in the Default Payment Amount Settings group of the Payment profile to which your User ID is linked. Your options are Total Due Minimum Due and None.
Pay Code (GlobalSalesPayment_PayCode)
Accept the default value or expand the Drop-down list to select the Payment Code being used for this transaction. Depending on the Payment Code you select other fields may appear onscreen.
Notes:
- The default Pay Code that appears in this field is established on a Module-by-Module basis on the Default Payment Pay Code Settings group of the Payment profile to which your User ID is linked.
- The list of Payment Codes that appear in this field is established in the Allowed Pay Codes field on the Pay Code Restrictions group of the Payment profile to which your User ID is linked so if this list is missing certain Payment Codes or if it lists too many Payment Codes then go to your Payment profile and add them to or delete them from the Allowed Pay Codes list.
- Payment Codes themselves are maintained in Payment Code Management.
Refund Option (GlobalSalesPayment_RefundOption)
Accept the default entry or expand the Drop-down list to select the Refund Type you wish to use for this transaction. The Refund Options that appear in this list are set in the Allowed Refund Pay Codes field of the Payment profile • Pay Code Restrictions group to which your User ID is linked.
See Also: Topic Doc - Refunds.
Possible Refund Options include:
- Refund Apply - The refund will be applied back to the household as a credit in RecTrac. The household balance will be updated accordingly.
- Refund Finance - Your Finance department will ensure the household gets refunded. The household balance in RecTrac will be updated accordingly.
- Refund Now - The refund will be processed "now" as a cash back situation either as literal cash back or a credit to the patron's credit card. This is determined by local policy. The household balance in RecTrac will be updated accordingly.
- Refund Void - The refund will be processed "now" as a cash back situation. The Refund Void option was created to replace using the Refund Now option for when mistakes are made allowing you to determine whether the refund was processed to correct an error. The difference between Refund Now and Refund Void is that the refund void will never debit the Refund GL code associated with the bill code only the original Revenue GL code will be debited. Refund reports can also report on Refund Void refund types.
If no options are selected on the Payment profile the refund choice during a transaction will have the value "No refund options are available" and the user will not be able to process the refund.
Notes:
- You can override the "No refund options are available" message if desired. When attempting to process a refund and the user is linked to a Payment profile with no refund options selected a lock icon will appear next to the Refund Options field. Clicking the icon "pops" a user override window. Enter a valid User ID and password. The system will allow you to use the Refund Options and Refund Pay Codes from that User's Payment profile for the current Refund Transaction.
- You can set a maximum limit for Refund Now and Refund Void transactions if desired. The settings for this are maintained on the Payment Profile • Maximum Refund Now/Void Amount group
Payment Reference 1 (GlobalSalesPayment_TransactionReference1)
Enter text in this field as needed. The Payment Reference fields allow you to enter notes regarding this transaction. Payment Reference information is stored on the receipt record.
Note:The label for this field can be customized if needed by entering alternate text in the Payment Reference 1/2 fields on the Payment Code itself.
Payment Reference 2 (GlobalSalesPayment_TransactionReference2)
Enter text in this field as needed. The Payment Reference fields allow you to enter notes regarding this transaction. Payment Reference information is stored on the receipt record.
Note:The label for this field can be customized if needed by entering alternate text in the Payment Reference 1/2 fields on the Payment Code itself.
Payment User Name (GlobalSalesPayment_PaymentUser)
This field displays your User ID. The User ID listed here is the User ID that will be linked to the receipt that gets generated as a result of this process. Accept this entry or click the Picklist icon to select an alternate User ID, if needed.
Note: The ability to update this field is determined by your Payment User - Allow Override Permissions (Permissions profile • Button/Misc Permissions tab • Miscellaneous Settings group.)
Payment Cash Drawer (GlobalSalesPayment_PaymentDrawer)
This field displays the Drawer to which your User ID is linked. The Drawer listed here is the Drawer that will be linked to the receipt that gets generated as a result of this process. Accept this entry or overwrite with an alternate Drawer, if needed.
Note: The ability to update this field is determined by your Payment Drawer - Allow Override Permissions (Permissions profile • Button/Misc Permissions tab • Miscellaneous Settings group.)
Payment Date (GlobalSalesPayment_PaymentDate)
This field displays the current Date. The date listed here is the date that will be linked to the receipt that gets generated as a result of this process. Accept this entry or click the Calendar icon to select an alternate date, if needed.
Note: The ability to update this field is determined by your Payment Date - Allow Override Permissions (Permissions profile • Button/Misc Permissions tab • Miscellaneous Settings group.)
Preview Receipt (GlobalSalesPayment_PreviewReceipt)
Select this option to have the receipt open in Preview Mode upon completion. From the preview, you can print or save the receipt as needed.
Default options for Print, Preview and Email are defined on your Daily Processing profile • Global Sales Default Print Options group.
DeleteEmail Receipt (GlobalSalesPayment_EmailReceipt)
Select this option to email the receipt upon completion.
THEN
Click the Combo Box icon to select the email address(es) you want to use. The receipt will be sent to the address(es) listed in the Email Address(es) field. The address(es) listed are those entered in the various Email fields for this household in Household Update.
AND/OR
Select the Enter a freeform email address" option and enter the alternate address(es) in the Freeform Email Address(es) field that appears.
Default options for Print Preview and Email are defined on your Daily Processing profile • Global Sales Default Print Options group.
Note: On the Standard VSI Design an Email Body field is located on the Receipt Options group. Enter text in this field if desired. Any text in that field will print in addition to whatever text is included in the Email Template Comment Code you use for Receipts as defined on your Email profile.
Email Address(es) (GlobalSalesPayment_ReceiptEmailAddress)
Select this option to email the receipt upon completion.
THEN
Click the Combo Box icon to select the email address(es) you want to use. The receipt will be sent to the address(es) listed in the Email Address(es) field. The address(es) listed are those entered in the various Email fields for this household in Household Update.
AND/OR
Select the Enter a freeform email address" option and enter the alternate address(es) in the Freeform Email Address(es) field that appears.
Default options for Print Preview and Email are defined on your Daily Processing profile • Global Sales Default Print Options group.
DeleteFreeform Email Address(es) (GlobalSalesPayment_ReceiptFreeFormEmailAddress)
This field is applicable only if opting to Email Receipt and only when using the "Enter a freeform email address" option.
Enter the alternate email address(es) in this field. The receipt will be emailed to the address(es) you enter.
To include multiple recipients separate email addresses with a comma and no space. For Example: john@rectrac.com paul@rectrac.com george@rectrac.com ringo@rectrac.com
DeletePrint as Mailer (GlobalSalesPayment_PrintAsMailer)
Select this option to have the receipt printed in mailer" format. When printed as a 'Mailer ' the patron's name and mailing address information appears on the left side of the header and your department's address information appears on the right. When printed in 'Standard' format this information is reversed and the patron's email address and phone information are included.
Default options for Receipts as Mailers are defined by Module on the Receipt Format profile • Standard Receipt Options group.
DeleteDaily Comment Code (GlobalSalesPayment_DailyCommentCode)
Accept the default value or click the Picklist icon to select an alternate Comment Code if desired. The Comment Code listed here, if any, will print on the receipt.
Default options for Daily Comment Code are defined, by Module, on the Receipt Format profile • Daily Commnet Codes/Custom Receipt Titles tab.
Comment Codes are maintained in Comment Code Management. Type = Daily Comment.
DeleteDaily Comments (GlobalSalesPayment_DailyComments)
Enter any free form text in this field that you want to have printed on the receipt that gets generated for this transaction.
Free form comments may consist of up to 30,000 characters. The right-hand side of the field contains a character counter.
Delete