Topic Doc: VIC Installation using Windows Installer
RecTrac 3.1

Written by Seth Warren
Updated at March 19th, 2024
Table of Contents
Document Summary
Vermont Integration Client (VIC) is the component piece that allows workstations and tablets running RecTrac 3.1 to interface with peripheral hardware, such as but not limited to: printers, cash drawers, credit card pin pads, bar code readers, and cameras. So, if you're running cash drawers, taking credit cards, tracking visits, or printing reports from your workstations, then you need to install VIC on those workstations, either as a Windows Service, an .exe or both.
For ease of operation, Vermont Systems recommends following the steps outlined in this document and installing both the Service and .exe because it is a simple process that doesn't require a lot of effort. If it turns out that you don't need one or the other (For example, if you don't need the Service on a particular workstation), then you can just disable it in Windows.
A quick word about that: Most departments run both the .exe and the Service and never worry about it. However, IF you use any of the following on a particular workstation, then you MUST install and use the .exe: the ETS credit card gateway solution, Topaz Signature Capture units, M2Sys Fingervein Readers.
This document provides the basic steps required to install and uninstall VIC on a client workstation. If you have additional questions about VIC installation and operation after reading this document, please contact Vermont Systems Customer Service by phone at 887-883-8757 or generate a Support Case through the Customer portal of the Vermont Systems web site using your Customer ID and password.
VIC Service or .exe?
VIC can be run as a Windows Service or an .exe. You can have both running on a workstation at the same time, or you can choose to run one or the other. For overall ease of use, Vermont Systems recommends using VIC as a Windows Service when viable. The VIC.exe will be used in circumstances where either organizational policy or hardware resources require its use. The table below provides some guidelines.
| When VIC is run as a Windows Service | When VIC is run as an .exe |
|
|
Contact Vermont Systems Customer Support if you are unsure whether to run VIC as a Windows Service or as an .exe. They will be glad to review your options with you.
VIC Installation with Windows Installer
Before you proceed, ensure:
- You are running RecTrac 3.1.10.01 or higher
- Your workstations are Microsoft Windows 10 or higher
- .NET Framework 4.6.2 (or higher) is installed on the workstations.
Good to know: All file paths and screen/tab locations in this document refer to file paths and screen/tab locations as they appear in the standard, default Vermont Systems Next Gen design. Your setup and design may vary.
Create and Link a VIC Profile
A quick word: Do not reuse an existing VIC profile. Regardless of whether you already have a VIC profile, Vermont Systems recommends creating a new one. Your other best option is to clone the existing profile. Additionally, if you were using VIC ClickOnce as your VIC installation platform, then Vermont Systems recommends removing/purging any old VIC profiles from the profile hierarchy, as they will no longer work due to a change in port numbers.
- Log in to Windows as an Administrator.
- Log in to RecTrac. Search for and go to Profile Assignments.
- Click Add to create a new profile.
- Enter a Profile Code (i.e. a name for your profile. For Example: VIC Service or VIC EXE.)
- Enter a Profile Description and then select "VIC Interface" as your Profile Type.
- Click Create.
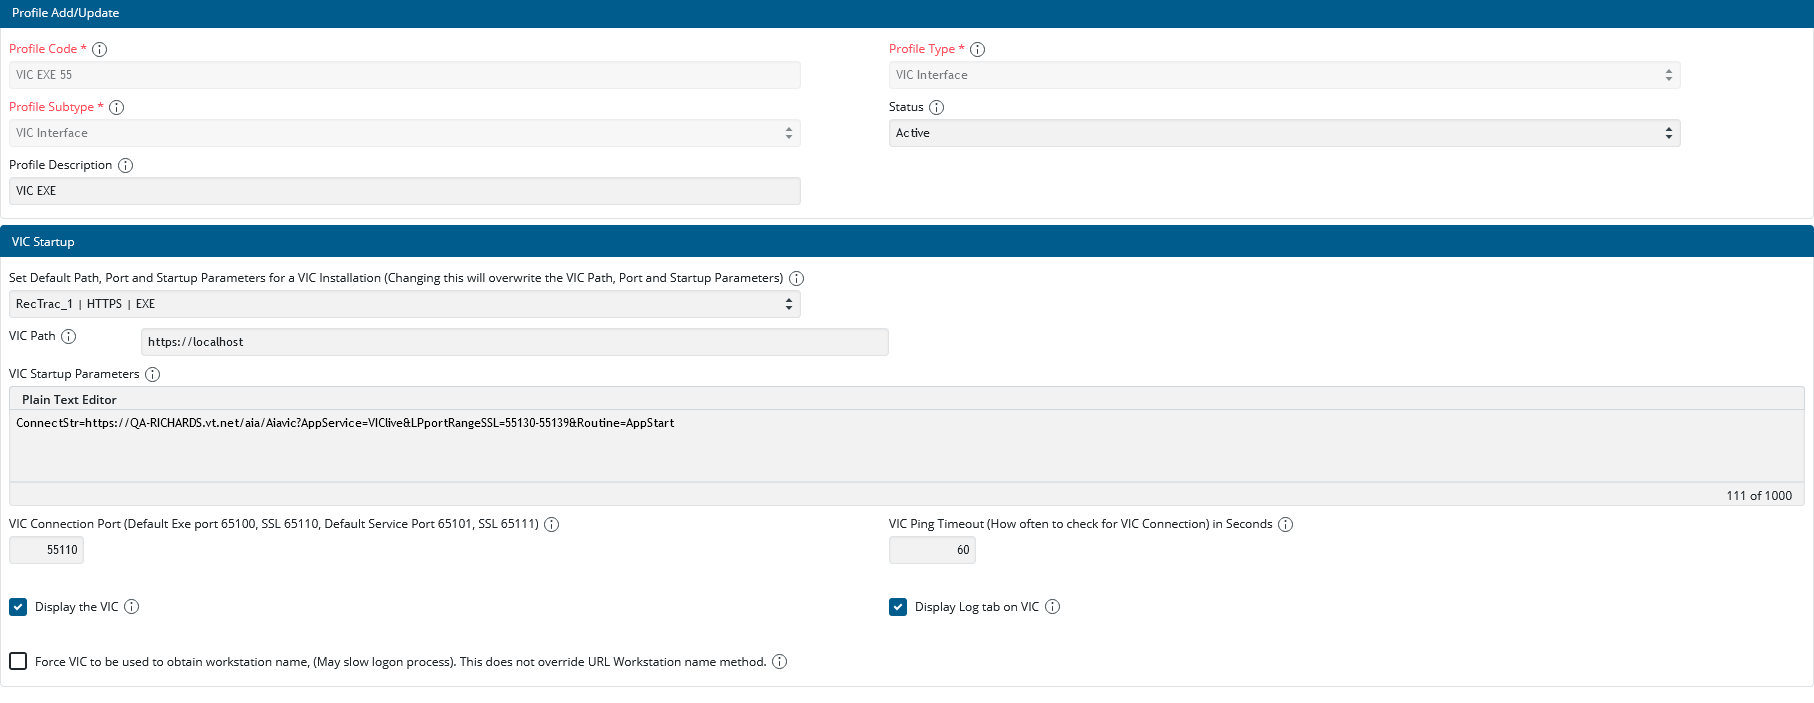
- Select your default RecTrac Interface Parameter. For example, RecTrac_1 | HTTPS | EXE. This will supply your default path, port, and startup parameter.
- Go to the VIC Startup Parameters field and ensure:
A quick word: The AppService Name defaults to "VIClive," as in the example above. If you are using a different AppServer, then you must input that name instead. For example, VICdemo.
- In the VIC Connection Port field, overwrite "65" with "55."
- Address the other fields if needed. Use the "i" Information icon for field descriptions.
- Go to the VIC Installation tab.
- Scroll down to the bottom of the screen. Enter the name of your Deployment Server in the Windows VIC Deployment Server URL field.

- Click Save.
- Link the profile to the Default level of the profile hierarchy. You can go back and change this later, if needed.
Good to know: In order for the workstation name to be resolved, you must have a VIC Profile linked at the Default Level of the profile hierarchy, unless you are using Reverse DNS Lookup or passing the workstation name in the URL.
-
Repeat these steps to create additional VIC profiles, if you need them.
OR
Continue to the next section.
Install VIC with Windows Installer
- Be sure you are logged into Windows as an Administrator and then log in to RecTrac, if you are not already.
- Search for and go to Profile Management.
- Select the VIC profile you created above and double-click to open it. Then go to the VIC Installation tab.
- Scroll down and click Download VIC Installer. Windows Installer will launch.
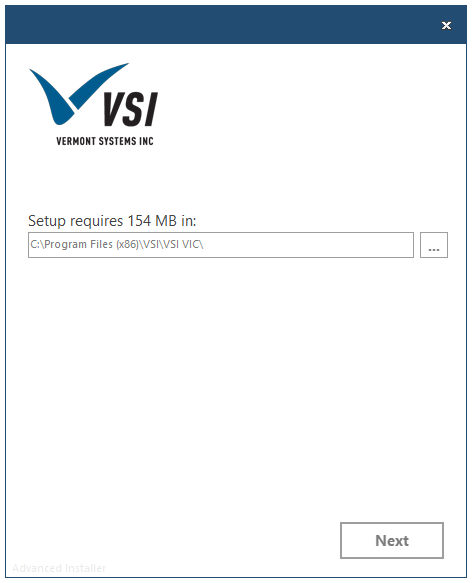
- Click Next and decide whether you want to install the VIC Service. Vermont Systems recommends installing the VIC.exe and the VIC Update Service only.
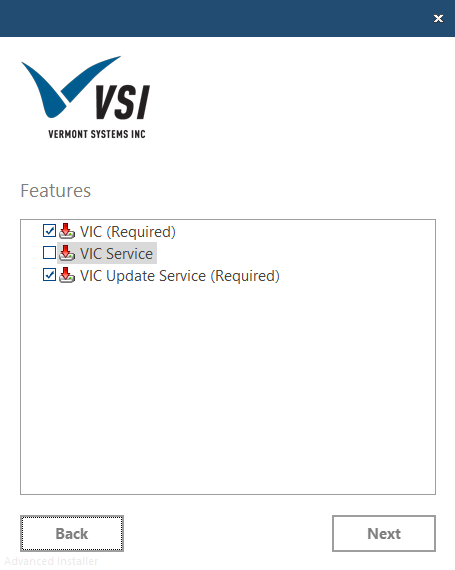
- Click Next.
- If you opted to install the VIC Service:
- Click Install.
- Click Finish to complete the process.
- The VSI VIC.exe will appear in the Windows tray on your workstation. You can also go to Services and confirm that the VSI VIC Update Service and VSI VIC Service (if you installed it) are running.

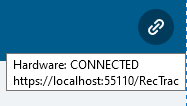
- Log in to RecTrac. Ensure the VSI VIC.exe begins logging and that Hardware icon shows as "Connected."
Installing VIC under a Custom RecTrac Installation
In the event you used one of the custom installation options when installing RecTrac and you are connecting VIC to RecTrac through an Offload AppServer over your LAN, then you cannot use the VIC installation steps outlined above.
Rather, you must install VIC from a Windows Command Line prompt using the following parameters:
- VSI_VIC_Setup.exe vsi.vic.autoupdater.configurl="https://<servername>:<port>/VIC/Exe/Windows/vicupdates.txt"
- The above <servername>:<port> may need to be modified depending on your setup.
Contact Vermont Systems Support with any additional questions.
Updating VIC
The VSI VIC Update Service checks for updates on a scheduled basis. If an update is found, the service will update VIC automatically the next time that workstation connects to RecTrac.
Change the VIC URL in your Server's Registry
In order for the VIC Update Service to work on your client workstations, you need to make a change to the VIC URL in your server's registry.
Perform the following steps on ALL RecTrac/WebTrac servers (i.e. Transaction/Deployment server, Web server, etc.).
- On the server, go to Start • VSI3 • DB_Utilities.
- Select "Update VIC Deployment" and click Next.
- In the Webspeed Client VIC field, enter your domain. For example, https://myparksdepartment.com.
A quick word about that: If you are unsure, the URL entered should be everything prior to "/wbwsc" on your respective WebTrac or RecTrac server.
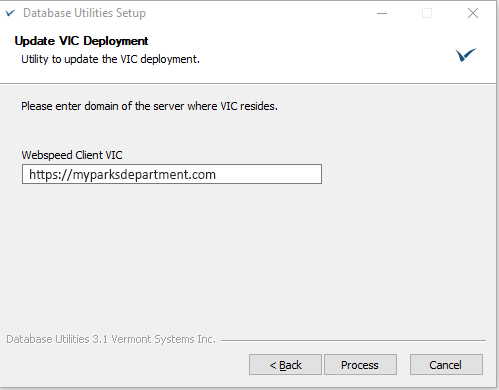
- Click Process.
- Click Next when the process completes.
- Opt NOT to run another utility and click Done.
- On the server, open your Registry Editor.
- Browse to HKEY_LOCAL_MACHINE\SOFTWARE\VSI3\VIC
- In the VIC URL key, ensure "/VIC" has been appended. For example, https://myparksdepartment/VIC.
- Exit the Registry editor.
- Repeat these steps on ALL RecTrac/WebTrac servers (i.e. Transaction/Deployment server, Web server, etc.).
Determine/Verify Your Current VIC Version
- Log in to RecTrac on the workstation for which you wish to verify VIC version.
- Click the Support icon on the Sidebar. Your RecTrac and VIC version information appears at the bottom of the window.
Deploying the VIC MST/MSI through Microsoft Active Directory’s GPO
Vermont Systems recommends using Microsoft Active Directory Group Policy to run the VIC deployment. Use the following URL.
Advanced Installer • Deploying an MSI through GPO: https://www.advancedinstaller.com/user-guide/tutorial-gpo.html
Additional GPO Information
If you are unfamiliar with GPO, the following URLs may be helpful:
- https://docs.microsoft.com/en-us/microsoft-desktop-optimization-pack/agpm/step-by-step-guide-for-microsoft-advanced-group-policy-management-40
- https://support.microsoft.com/en-us/help/324802/how-to-configure-group-policies-to-set-security-for-system-services-in
- https://docs.microsoft.com/en-us/windows/win32/srvnodes/group-policy
- https://docs.microsoft.com/en-us/microsoft-desktop-optimization-pack/agpm/
Uninstalling VIC
Uninstalling VIC should be done on a workstation-by-workstation basis. The primary reason you might need to uninstall and reinstall VIC is if the deployment URL changes. For Example: Moving your RecTrac deployment to a new server. In some instances, anti-virus software may corrupt the VIC installation. This would be another reason to uninstall and then reinstall.
On the workstation from which you will Uninstall VIC:
- Exit all programs.
- Log in to the workstation using a Windows administrator account.
- Exit the VIC.exe, if it is running. You can do this from the Windows System Tray.
- Stop the VSI VIC Service if it is running. This can be done through Control Panel • Admin Tools • Services.
- If you installed the VSI VIC Update Service, then stop that as well.
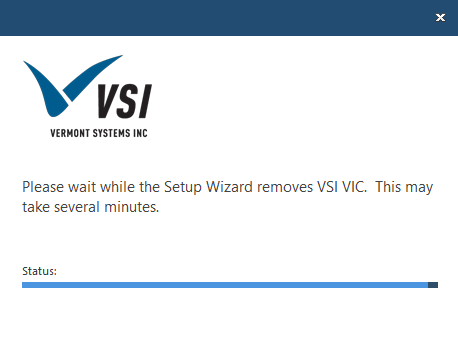
- In Windows, search for and go to Add or Remove Programs.
- Scroll down to "VSI VIC." Highlight/select it and click Uninstall.
- Click Uninstall again and answer "Yes" to the Challenge message.
Troubleshooting
The following lists some common questions regarding VIC and their possible solutions.
Problem:
Windows Defender SmartScreen is preventing VIC from running and wants to delete it. When launching the VIC.exe on a Windows 10 workstation, the following message appears, "Windows Protected your PC. Windows Defender SmartScreen prevented an unrecognized app from starting. Running this app might put your PC at risk. App: VICexe.exe. Publisher: Vermont Systems, Inc."
Solution:
As a User, click More Info and then click Run anyway. This will resolve the issue and allow you to start the VIC.exe.
Windows Defender SmartScreen is managed in Windows under Windows Defender Security Center • App & browser control. See Also: https://www.pcworld.com/article/3197443/windows/how-to-get-past-windows-defender-smartscreen-in-windows-10.html.
Problem:
Shortly after launching RecTrac, the following message appears: "Hardware Startup Error: The startup connection for hardware failed. No hardware will be available until this is fixed and the browser is refreshed."

Solution:
This message means that you have a VIC profile linked to the workstation where you're receiving the error but that VIC is either not setup properly or not running on that workstation. Here is a list of areas you might troubleshoot:
- VIC is not running on the workstation and needs to be started.
- VIC is not installed on the workstation, as neither a Service nor an Executable.
- The VIC AppServers are not running.
- VIC is out of date.
-
If VIC is not needed on the workstation, then link the NONE VIC profile.
Problem:
VIC AppServers are not running.
Solution:
Go to your RecTrac Database Server and restart the AppServers.
- On the RecTrac Server, launch the OpenEdge Explorer. (Alternatively, use a browser from another machine to get to OpenEdge Explorer on the server. For Example: http://<hostname>:9094).
- Find the VIClive AppServer and click on the name to get options.
- Click Broker Control.
- Click Stop Appserver and wait several seconds to make sure it stops. Click the Refresh button, if desired.
- Click Start Appserver and wait several seconds to make sure it starts. Click the Refresh button, if desired.
- Repeat as needed for VICdemo.
-
Exit OpenEdge Explorer.
Problem:
I can't find the VIC log files.
Solution:
Log files can be found on the client PC in Event Viewer.
- On the workstation, search for and go to "Event Viewer."
- Expand Application and Services Logs.
- Look for "VSIVICexe," "VSIVICService," (if you installed the Service), and "VSIVICUpdateService."
Logs from the RecTrac server are often needed for troubleshooting as well. The logs that match up with the time of error or issue should be retrieved from the server. Files needed from server:
- VIClive.server.00000x.log
- Clientlive.server.00000x.log
These logs should be located on the installation drive on the RecTrac database server. Example: C:\VSI3\logs
Good to know: There will be multiple files with date/time stamps. Be sure to look at the ones that match date/time of issue in question.
Problem
Unable to install VIC due to an "Application is improperly formatted" message.
Solution
This is likely due to an incompatible version of .NET Framework being installed on the client workstation. To install and run VIC, the workstation must have .NET Framework 4.6.2 (or higher) installed.
Problem
How can I verify my current VIC Version?
Solution
- Log in to RecTrac on the workstation for which you wish to verify VIC version.
- Click the Support icon on the Sidebar. Your RecTrac and VIC version information appears at the bottom of the window.