Running the Transaction Update Program
RecTrac 3.1

Written by Daniel Rotondi
Updated at August 1st, 2023
Table of Contents
The Transaction Update program allows you to reverse payments by receipt number and/or change the payment information on receipts. The system provides the following options:
-
Reverse Receipts Payments- This option can be used to:
-
Reverse - To make a Payment Reversal to correct a transaction made in error for such circumstances as applying a payment to the wrong household, reversing a payment record for a household because the payment method failed (For Example: A bounced check), etc….
Note: This option can also be used to Reverse Refund Nows/Refund Voids given to households and, in effect, turn the Refund Now/Void into a Refund Apply.
- Reverse & Payment - To make a Payment Reversal and subsequent Payment to the same household for such circumstances as selecting the Cash Payment Code when the patron actually remitted with a Check.
-
Reverse - To make a Payment Reversal to correct a transaction made in error for such circumstances as applying a payment to the wrong household, reversing a payment record for a household because the payment method failed (For Example: A bounced check), etc….
- Update Receipt - This option can be used to update User ID, Cash Drawer Number, Payment Date, and Payment Reference information on receipts for such circumstances as entering a payment on the wrong date. When this option is selected, Cash/GL, Transaction History, and Refund Records (if applicable) are updated to reflect the new information for purposes of reporting and transaction history. The system will always store the original Posting Date for the receipt.
This document provides the basic steps required to perform each function. If you have additional questions regarding the Transaction Update program after reading this document, please contact Vermont Systems Support by phone at 887-883-8757 or generate a Support Ticket through the Customer portal of the Vermont Systems website using your Customer ID and password.
Receipt Number / Searching for a Receipt
The Transaction Update program requires a valid Receipt Number. If you know the Receipt Number you wish to update, enter it in the Receipt Number field and click the button that corresponds to the action you wish to perform. If you do not know the Receipt Number, use the fields below to search for it.
To Search for a Receipt Number
- Set your ranges in the fields provided. Use the "i" and "?" Help icons for field definitions, if needed.
- Click Search
- The Receipt Records DataGrid on the lower left-hand panel of the screen will populate with receipts that meet your criteria.
- Highlight/select the receipt you wish to update. It will populate the Receipt Number field as shown below, where Receipt Number 1910 is selected in the DataGrid and subsequently displays in the Receipt Number field.

Click Image to Enlarge
- Once the Receipt Number field is populated, click the button that corresponds to the action you wish to perform.
Skip to the appropriate section below.
Reverse Receipt Payments
The Reverse Receipts Payment button allows you to perform payment reversals (i.e. it allows you to back a payment out of RecTrac). Reasons for payment reversals are many and they vary greatly, but three (3) of the most common are:
- A payment was made toward the wrong household (i.e. Bobby Jones makes a payment but the clerk applies the payment to the Robert Jones household, which is different).
- The wrong Payment Code was used when processing the transaction (i.e. Bobby Jones paid with a check, but the clerk recorded the payment as a cash).
- A payment was recorded in RecTrac but subsequently rejected (i.e. Bobby Jones paid with a check, and three days later the bank returned due to Insufficient funds).
Depending on the reason for the reversal, options exist to expedite the reversal process. See below for examples. The Reverse Only option also allows you to reverse Refund Nows/Voids given to households. Doing this effectively turns the Refund Now/Void into a Refund Apply for that household. Refer to Reverse a Refund below.
Reverse Only
The Reverse only option allows you to back a payment out of RecTrac. Using the examples above, you would use a straight reversal in the event of a payment being made to the wrong household or a payment being rejected due to insufficient funds. Again, there are many reasons to perform a Payment Reversal; these are but two (2) examples.
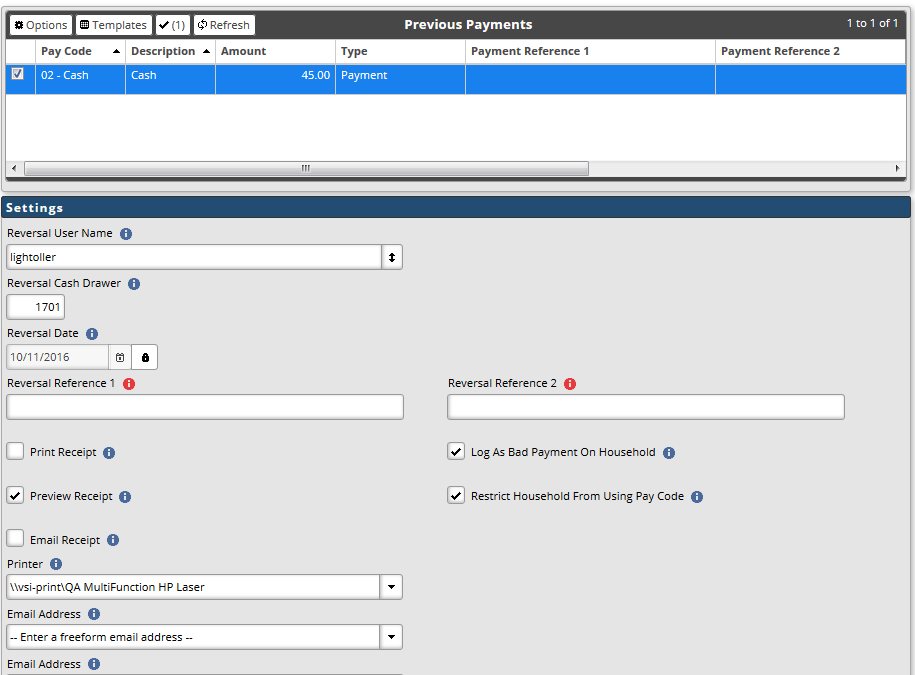
- With the Receipt Number displayed in the Receipt Number field, click Reverse Receipt Payments. The right-hand panel of the screen will populate with Update parameters.
Click Image to Enlarge
- The Previous Payments DataGrid displays all payment records linked to the receipt. The example above contains one (1) payment record only. Multiple line items could be exist due to such circumstances as multiple items being purchased, multiple payment codes being used, etc…
- Select the line item(s) you wish to reverse. Multiple selections is allowed.
- Accept the default values in the Reversal User Name, Reversal Cash Drawer, and Reversal Date fields or overwrite as necessary. The values displayed in this field are those linked to your User ID and are the values that will appear on the new receipt generated from performing the reversal.
Notes: Performing a Reversal generate a new receipt. Changing the values in these field DOES NOT change the User Name, Cash Drawer, and/or Date linked to the original receipt. To change the values on the original receipt, select the Update Receipt option instead.
The ability to update the New User Name, New Cash Drawer, and New Payment Date fields is determined by your <applicable payment field> - Allow Override Permissions (Permissions profile • Button/Misc Permissions tab • Miscellaneous Settings group.)
In the example image above, the User ID logged into RecTrac does not have Permissions to change the Transaction Date. This is represented by the Lock icon that is displayed.
- Determine your Receipt Print/Preview/Email options. Use the "i" and "?" Help icons for field definitions, if needed.
- IF you are performing the reversal due to a Bad Payment, select the Log as Bad Payment on Household and Restrict Household from Using Pay Code options if desired. Use the "i" and "?" Help icons for field definitions, if needed.
- Click the Reverse button when ready. The system will process your changes and your field focus will be returned to the left-hand panel of the screen when done.
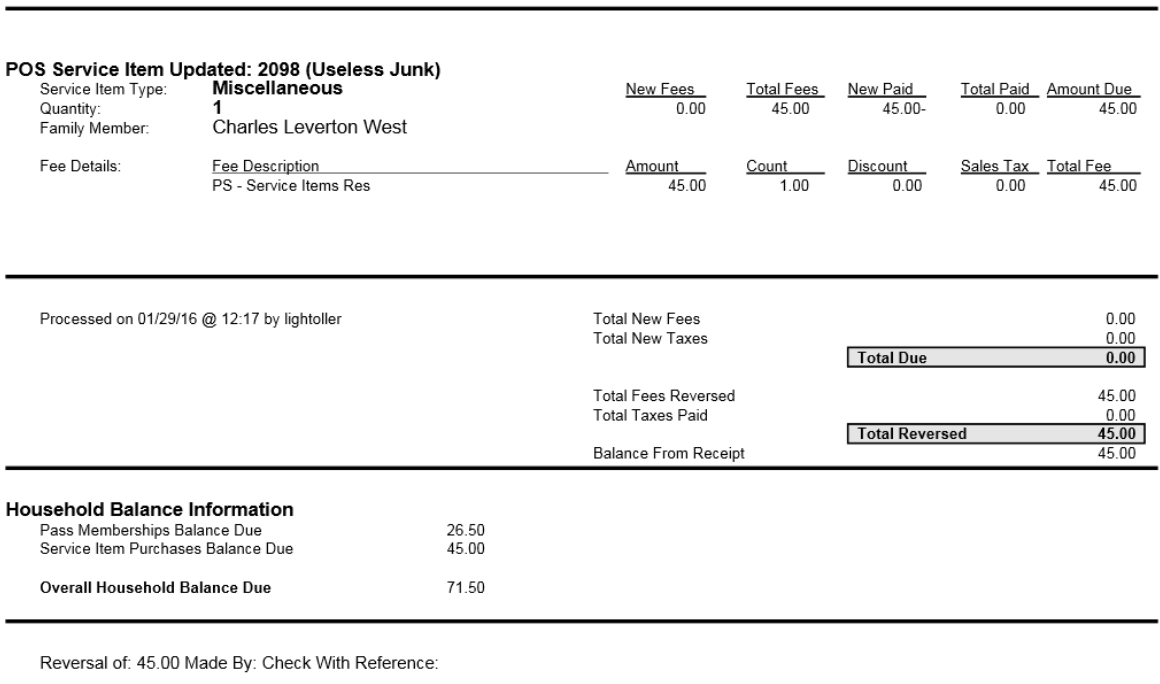
Depending on your Receipt Options, you may see a preview or your receipt may be queued to a printer. - To verify your changes, access the receipt in the Document Center, if desired. The receipt will document the reversal and the payment will be backed out of RecTrac.
- Repeat these steps to update other receipts as needed or exit back to the main RecTrac menu.
Reverse a Refund
The Reverse Only option also allows you to reverse Refund Nows/Voids given to households. Doing this effectively turns the Refund Now/Void into a Refund Apply.
- Follow the steps above, from finding the proper receipt to clicking the Reverse button. The process is exactly the same.
- Upon clicking Reverse, the refund record will be changed to a Refund Apply and a credit will be added to the household.
- Proper GL and Cost Center entries are made.
Caveats:
- Receipts must be linked to a household. You cannot use this process to reverse refunds that were done by the Internal/Guest Household.
- The original Refund Now/Refund Void tender type must be Cash, Misc, Journal or Check only. No E-Check, Credit Card, etc….
Note: This process can also be used to refund payments made by household credit toward a purchase. With payments by credit, the payment is removed from the item toward it was paid, and the credit is added back to the household.
Reverse & Payment
The Reverse & Payment option allows you to back a payment out of RecTrac and then immediately make a payment back into RecTrac for the same Household. Using the examples above, you would use this option in the event of a payment being made using the wrong Payment Code. Again, there are many reasons to perform a Payment Reversal and subsequent Payment back to the same Household; this is but one (1) example.
- With the Receipt Number displayed in the Receipt Number field, click Reverse Receipt Payments. The right-hand panel of the screen will populate with Update parameters.

Click Image to Enlarge
- Follow Steps 2-6 above to determine your options in the Settings group.
- Click Reverse & Payment when ready.
- The system will process the Reversal and you will be taken to Global Sales where the item(s) you reversed will be in the Shopping Cart.

Click Image to Enlarge
- Click Payment. You will proceed to the Payment Screen.
- Complete the Payment as your normally would. You will be returned to the Transaction Update screen.
- This process creates two (2) separate receipts:
- A Receipt for the Reversal
- A Receipt for the subsequent payment.
- To verify your changes, access the receipts in the Document Center, if desired.
Note: This option is for Reversals and Payments to the same household only. You CANNOT use this option to Reverse a Payment from one Household and apply a Payment to another Household. To do that, process a Reversal for the original Household, exit this program and go to Global Sales to make the Payment for the new Household.
- Repeat these steps to update other receipts as needed or exit back to the main RecTrac menu.
Update Receipt
This option can be used update User ID, Cash Drawer Number, Payment Date, and Payment Reference information on receipts for such circumstances as entering a payment on the wrong date and needing to correct it, or entering a payment under a wrong User ID, etc….
Note: This option is NOT used to change a Payment Code linked to a Receipt. To change the Payment Code, use the Reverse & Payment option detailed above.
When this option is selected, Cash/GL, Transaction History and Refund Records (if applicable) are updated to reflect the new information for purposes of reporting and transaction history. The system will always store the original Posting Date for the receipt.
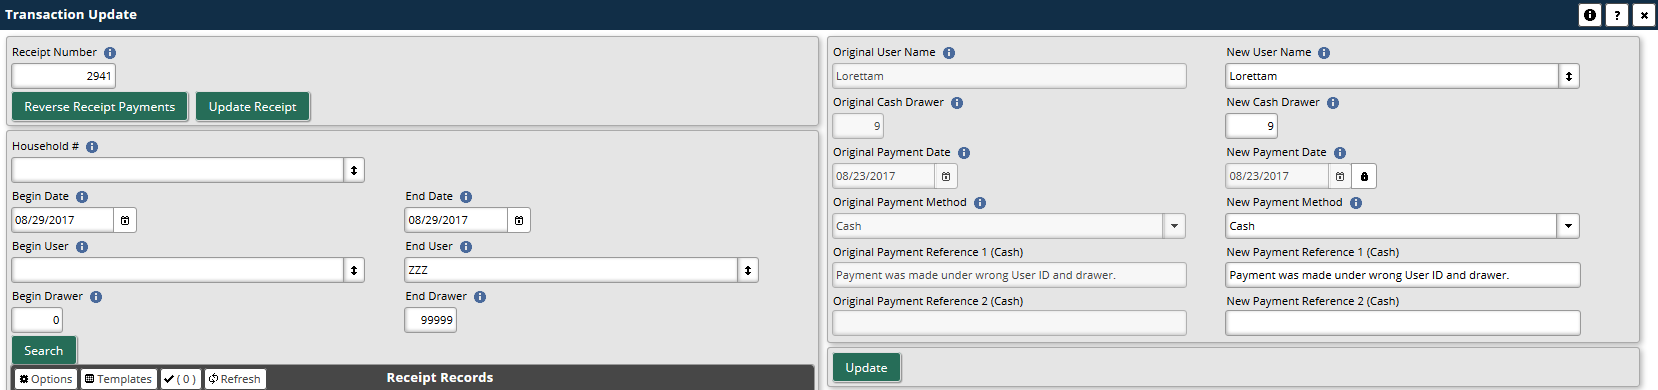
- With the Receipt Number displayed in the Receipt Number field, click Update Receipt. The right-hand panel of the screen will populate with Update parameters.

Click Image to Enlarge
- Fields on the left-hand side of the panel (Original User Name, Original Cash Drawer, Original Payment Method (if applicable), etc…) cannot be updated. These fields display the field data linked to the Transaction History for this receipt.
- Make corrections as needed in the fields on the right-hand panel. In the example above, the following fields have been updated:
- New User Name
- New Cash Drawer
- New Payment Method (if applicable)
- New Payment References 1 & 2
Notes:
- Payment Method fields appears only if the Payment Code used for the original transaction was a Check, Cash, Journal, or Miscellaneous Type.
- If you are linked to a Check profile (i.e. if you process e-checks), then this field will NOT appear for Check transactions.
- An Audit Log entry is made as a byproduct of changing the Payment Method.
- The Payment Codes are listed by their Screen Description.
- The Payment Codes listed in the New Payment Method field are all Cash, Check, Journal and/or Miscellaneous Payment Codes that appear in the Allowed Pay Codes field of your (Payment profile • • Pay Code Restrictions group.)
- The ability to update the New User Name, New Cash Drawer, and New Payment Date fields is determined by your <applicable payment field> - Allow Override Permissions (Permissions profile • Button/Misc. Permissions tab • Miscellaneous Settings group.)
In the example above, the User ID logged into RecTrac does not have permission to change the Transaction Date. This is represented by the Lock icon that is displayed.
- Click the Update button when ready. The system will process your changes and your field focus will be returned to the left-hand panel of the screen when done.
There is NO confirmation message. - To verify your changes, you can re-enter the original Receipt and click Update Receipt The changes you made now will be listed on the left-hand side of the panel in the Original fields, as displayed below.
Click Image to Enlarge
- Repeat these steps to update other receipts as needed or exit back to the main RecTrac menu.